Use & Care Guide
Page 5
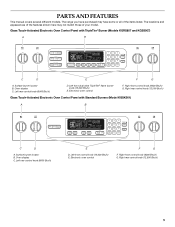
...TripleTier® flame burner knob (15,000 Btu/h) E. Oven display C. Glass Touch-Activated Electronic Oven Control Panel with Standard Burners (Model KGSK901) A B MED LOW HI ON F C CONTROL LOCKED CLEAN TIME PROBE TEMP HR MIN COOK TIME DELAY MIN HR SEC MIN START TIME STOP TIME...START TIME STOP TIME C D E F G A. Left rear control knob (6000 Btu/h) E D. Electronic oven control F G F. Left front control knob (14,000 Btu/h) E. Surface burner locator B. Right rear control knob (12,500 Btu/h) 5 The range you have purchased may not match those of the items listed.
...TripleTier® flame burner knob (15,000 Btu/h) E. Oven display C. Glass Touch-Activated Electronic Oven Control Panel with Standard Burners (Model KGSK901) A B MED LOW HI ON F C CONTROL LOCKED CLEAN TIME PROBE TEMP HR MIN COOK TIME DELAY MIN HR SEC MIN START TIME STOP TIME...START TIME STOP TIME C D E F G A. Left rear control knob (6000 Btu/h) E D. Electronic oven control F G F. Left front control knob (14,000 Btu/h) E. Surface burner locator B. Right rear control knob (12,500 Btu/h) 5 The range you have purchased may not match those of the items listed.
Use & Care Guide
Page 6
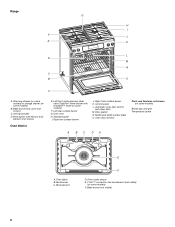
... grate I F J E K L D M N C B O A A. Door gasket N. Oven cavity sensor E. Bake burner (not visible) 6 Left rear surface burner G. Right front surface burner K. Automatic oven light switch/ self-clean latch M. Range G H I . Control panel L. Right rear surface burner J. Warming drawer (on some models) or storage drawer (on some models) B. Model and serial number plate O. Oven lights B.
... grate I F J E K L D M N C B O A A. Door gasket N. Oven cavity sensor E. Bake burner (not visible) 6 Left rear surface burner G. Right front surface burner K. Automatic oven light switch/ self-clean latch M. Range G H I . Control panel L. Right rear surface burner J. Warming drawer (on some models) or storage drawer (on some models) B. Model and serial number plate O. Oven lights B.

Use & Care Guide
Page 12
... If the START pad is preset unlocked, but setting may be used either when the range is pressed several times repeatedly, the pad may be changed to start or stop reminder tones. The Control Lock is not pressed within 5 seconds, the oven display will turn the audible signals and... To Set Timer: 1. The Dehydrate and Sabbath Mode are off . Hold down the control panel pads to avoid unintended use of your finger to change the oven temperature between each control pad command. To Lock/Unlock Control: Before locking, make sure the oven, the Timer and Timed Cooking are also set ...
... If the START pad is preset unlocked, but setting may be used either when the range is pressed several times repeatedly, the pad may be changed to start or stop reminder tones. The Control Lock is not pressed within 5 seconds, the oven display will turn the audible signals and... To Set Timer: 1. The Dehydrate and Sabbath Mode are off . Hold down the control panel pads to avoid unintended use of your finger to change the oven temperature between each control pad command. To Lock/Unlock Control: Before locking, make sure the oven, the Timer and Timed Cooking are also set ...

Use & Care Guide
Page 23
...oven counterclockwise to remove from control panel to order. Replace bulb and bulb cover by turning clockwise. 5. Oven Door For normal range use oven cleaners. Close the oven door as far as it is off . Cleaning Method: ■ Mild detergent (for both) ■ KitchenAid® Stainless Steel Cleaner ... water: Pull knobs straight away from socket. 4. Cleaning Method: ■ Glass cleaner and soft cloth or sponge: Apply glass cleaner to slide. Remove racks or they will discolor and become harder to soft cloth or sponge, not directly on some models) Make sure drawer is cool...
...oven counterclockwise to remove from control panel to order. Replace bulb and bulb cover by turning clockwise. 5. Oven Door For normal range use oven cleaners. Close the oven door as far as it is off . Cleaning Method: ■ Mild detergent (for both) ■ KitchenAid® Stainless Steel Cleaner ... water: Pull knobs straight away from socket. 4. Cleaning Method: ■ Glass cleaner and soft cloth or sponge: Apply glass cleaner to slide. Remove racks or they will discolor and become harder to soft cloth or sponge, not directly on some models) Make sure drawer is cool...
Installation Guide
Page 7
... . Install a shut-off valve. With LP gas, piping or tubing size can be grounded in insufficient gas supply. A copy of the range must be obtained from the gas specified on longer runs may result in order for use with LP gas. ■ This range is factory set for the control panel to convert the appliance from : National Fire...
... . Install a shut-off valve. With LP gas, piping or tubing size can be grounded in insufficient gas supply. A copy of the range must be obtained from the gas specified on longer runs may result in order for use with LP gas. ■ This range is factory set for the control panel to convert the appliance from : National Fire...

Installation Guide
Page 15
..., open , press the CANCEL button on the slides. See "Level Range." 5. Use a mild solution of your range. 15 Read the Use and Care Guide. ...For more information, see which step was skipped. 2. If the range is seated properly on the oven control panel and contact a qualified technician. Turn on range operation. Replace warming drawer or storage drawer. Complete Installation 1. Dispose ...repeat the 5-minute test as outlined above. ■ If the gas supply line shutoff valve is open it is cold, turn off the range and check that you purchased your tools. 3. To Replace Storage ...
..., open , press the CANCEL button on the slides. See "Level Range." 5. Use a mild solution of your range. 15 Read the Use and Care Guide. ...For more information, see which step was skipped. 2. If the range is seated properly on the oven control panel and contact a qualified technician. Turn on range operation. Replace warming drawer or storage drawer. Complete Installation 1. Dispose ...repeat the 5-minute test as outlined above. ■ If the gas supply line shutoff valve is open it is cold, turn off the range and check that you purchased your tools. 3. To Replace Storage ...


