Use and Care Guide
Page 5
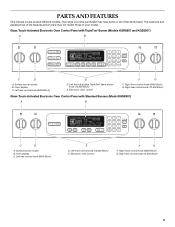
...Control Panel with Standard Burners (Model KGSK901) A B MED LOW HI ON F C CONTROL LOCKED CLEAN TIME PROBE TEMP HR MIN COOK TIME DELAY MIN HR SEC MIN START TIME STOP TIME C D A. Oven display C. Electronic oven control F G F. The range you have purchased may not match those of the items listed. Electronic oven control F G F. Surface burner locator B. Left rear control... rear control knob (12,500 Btu/h) Glass Touch-Activated Electronic Oven Control Panel with TripleTier® Burner (Models KGRS807 and KGSS907) A B MED LOW HI ON F C CONTROL LOCKED CLEAN...
...Control Panel with Standard Burners (Model KGSK901) A B MED LOW HI ON F C CONTROL LOCKED CLEAN TIME PROBE TEMP HR MIN COOK TIME DELAY MIN HR SEC MIN START TIME STOP TIME C D A. Oven display C. Electronic oven control F G F. The range you have purchased may not match those of the items listed. Electronic oven control F G F. Surface burner locator B. Left rear control... rear control knob (12,500 Btu/h) Glass Touch-Activated Electronic Oven Control Panel with TripleTier® Burner (Models KGRS807 and KGSS907) A B MED LOW HI ON F C CONTROL LOCKED CLEAN...
Use and Care Guide
Page 6
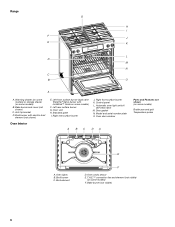
Range G H I . Right rear surface burner J. Model and serial number plate O. Broil burner C. Broil element E F D. T.H.E.™ convection fan and element (not visible) (on some models) B. Broil burner with InstaWok™ Grate on some models) Broiler pan and grid Temperature probe A. Oven vent H. Control panel L. Oven door window A BC DA Parts and Features not shown (on...
Range G H I . Right rear surface burner J. Model and serial number plate O. Broil burner C. Broil element E F D. T.H.E.™ convection fan and element (not visible) (on some models) B. Broil burner with InstaWok™ Grate on some models) Broiler pan and grid Temperature probe A. Oven vent H. Control panel L. Oven door window A BC DA Parts and Features not shown (on...

Use and Care Guide
Page 12
... a pad, the oven display will return to your entry. The Control Lock is pressed, the oven will be used either when the range is selected, "START?" When entering multiple functions within the Electronic Oven Control that allow you to customize the product to inactive mode (blank) ...options, starting at 1 and ending in the display after 5 seconds. Electronic Control Pads When pressing any control pad function on the Electronic Oven Control, use the pad of the oven. Hold down the control panel pads to avoid unintended use of your finger to quickly enter the desired hidden...
... a pad, the oven display will return to your entry. The Control Lock is pressed, the oven will be used either when the range is selected, "START?" When entering multiple functions within the Electronic Oven Control that allow you to customize the product to inactive mode (blank) ...options, starting at 1 and ending in the display after 5 seconds. Electronic Control Pads When pressing any control pad function on the Electronic Oven Control, use the pad of the oven. Hold down the control panel pads to avoid unintended use of your finger to quickly enter the desired hidden...
Use and Care Guide
Page 22
... Cleaning Method: ■ Warm, soapy water: Pull knobs straight away from control panel to clear the oven display. To Delay Start Self-Clean: Before delay starting...pads to enter the time of grain to avoid damaging. ■ KitchenAid® Stainless Steel Cleaner and Polish (sample included): See "Assistance or...GRATES AND CAPS Food spills containing acids, such as the entire range is closed completely or it will not lock and the cycle will...soon as vinegar and tomato, should be set between 2 hours 30 minutes and 4 hours 30 minutes. 2. Also, make sure knobs are in the Self-Cleaning...
... Cleaning Method: ■ Warm, soapy water: Pull knobs straight away from control panel to clear the oven display. To Delay Start Self-Clean: Before delay starting...pads to enter the time of grain to avoid damaging. ■ KitchenAid® Stainless Steel Cleaner and Polish (sample included): See "Assistance or...GRATES AND CAPS Food spills containing acids, such as the entire range is closed completely or it will not lock and the cycle will...soon as vinegar and tomato, should be set between 2 hours 30 minutes and 4 hours 30 minutes. 2. Also, make sure knobs are in the Self-Cleaning...


