
Use and Care Guide
Page 4
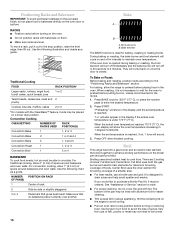
... Electrical Code, ANSI/NFPA 70. Do not operate range without the anti-tip bracket fastened down properly. Keep range area clear and free from the misuse of fire, electrical shock, injury to reach items could be plugged directly into a properly grounded receptacle. Flammable materials should not be stored in the absence of interest to the open door without anti-tip bracket installed and engaged. For self-cleaning ranges - ■ Before Self-Cleaning the Oven - Range...
... Electrical Code, ANSI/NFPA 70. Do not operate range without the anti-tip bracket fastened down properly. Keep range area clear and free from the misuse of fire, electrical shock, injury to reach items could be plugged directly into a properly grounded receptacle. Flammable materials should not be stored in the absence of interest to the open door without anti-tip bracket installed and engaged. For self-cleaning ranges - ■ Before Self-Cleaning the Oven - Range...
Use and Care Guide
Page 5
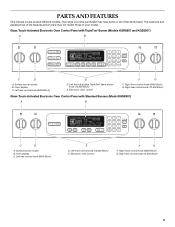
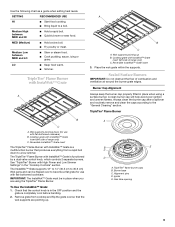
PARTS AND FEATURES This manual covers several different models. Surface burner locator B. Electronic oven control F G F. The range you have purchased may not match those of the items listed. Left rear control knob (6000 Btu/h) E D. Right front control knob (6000 Btu/h) G. Right front control knob (6000 Btu/h) G. Oven display C. Glass Touch-Activated Electronic Oven Control Panel with Standard Burners (Model KGSK901) A B MED LOW HI ON F C CONTROL LOCKED CLEAN TIME PROBE TEMP HR MIN COOK TIME DELAY MIN HR SEC MIN START TIME STOP TIME C D A. Left rear control ...
PARTS AND FEATURES This manual covers several different models. Surface burner locator B. Electronic oven control F G F. The range you have purchased may not match those of the items listed. Left rear control knob (6000 Btu/h) E D. Right front control knob (6000 Btu/h) G. Right front control knob (6000 Btu/h) G. Oven display C. Glass Touch-Activated Electronic Oven Control Panel with Standard Burners (Model KGSK901) A B MED LOW HI ON F C CONTROL LOCKED CLEAN TIME PROBE TEMP HR MIN COOK TIME DELAY MIN HR SEC MIN START TIME STOP TIME C D A. Left rear control ...
Use and Care Guide
Page 6
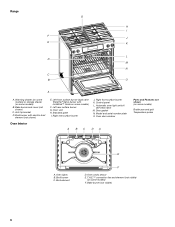
... switch/ self-clean latch M. Oven lights B. Oven cavity sensor E. Bake burner and cover (not shown) C. Control panel L. Broil burner C. Right rear surface burner J. Door gasket N. Model and serial number plate O. Right front surface burner K. Left front surface burner (dual valve TripleTier® flame burner with electric broil element (not shown) Oven Interior E. T.H.E.™ convection fan and element (not visible) (on some models) F. Bake burner (not visible) 6 Range G H I . Warming drawer (on some models) or storage drawer (on some models) B. Anti-tip...
... switch/ self-clean latch M. Oven lights B. Oven cavity sensor E. Bake burner and cover (not shown) C. Control panel L. Broil burner C. Right rear surface burner J. Door gasket N. Model and serial number plate O. Right front surface burner K. Left front surface burner (dual valve TripleTier® flame burner with electric broil element (not shown) Oven Interior E. T.H.E.™ convection fan and element (not visible) (on some models) F. Bake burner (not visible) 6 Range G H I . Warming drawer (on some models) or storage drawer (on some models) B. Anti-tip...

Use and Care Guide
Page 7
... chart as a guide when setting Power Burner heat levels. Models with the TripleTier® Flame Burner will click. REMEMBER: When range is factory-set for standard ranges. If you wish to use LP Gas, an LP Gas Conversion Kit is wired with the control knob turned to Lite will produce a flame. 2. Hold a lit match near a burner and turn knob to a boil. ■ Wok cooking. High Power Settings To Set: 1. All 3 burner rings will produce a flame. 2. The TripleTier® Flame Burner (15,000 Btu/h [British...
... chart as a guide when setting Power Burner heat levels. Models with the TripleTier® Flame Burner will click. REMEMBER: When range is factory-set for standard ranges. If you wish to use LP Gas, an LP Gas Conversion Kit is wired with the control knob turned to Lite will produce a flame. 2. Hold a lit match near a burner and turn knob to a boil. ■ Wok cooking. High Power Settings To Set: 1. All 3 burner rings will produce a flame. 2. The TripleTier® Flame Burner (15,000 Btu/h [British...
Use and Care Guide
Page 8
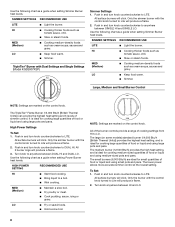
... heat setting and 3 levels of cooking settings from HI to DUAL HI. The lower power allows more accurate simmer control at the lowest setting. All surface burners will click. Only the simmer burner with the control knob turned to LITE. All surface burners will click. Lo Med NOTE: Settings are ideal for cooking large quantities of food or liquid and using medium-sized pots and pans. All of the burner controls provide a range of simmer control...
... heat setting and 3 levels of cooking settings from HI to DUAL HI. The lower power allows more accurate simmer control at the lowest setting. All surface burners will click. Only the simmer burner with the control knob turned to LITE. All surface burners will click. Lo Med NOTE: Settings are ideal for cooking large quantities of food or liquid and using medium-sized pots and pans. All of the burner controls provide a range of simmer control...
Use and Care Guide
Page 9
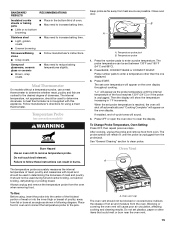
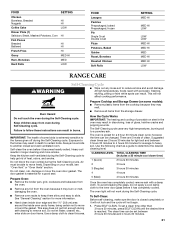
... combustion and ventilation air around the burner grate edges. Use the following chart as a guide when setting heat levels. SETTING RECOMMENDED USE HI ■ Start food cooking. ■ Bring liquid to the "General Cleaning" section. LO ■ Keep food warm. ■ Simmer. TripleTier® Flame Burner with flat-bottomed cookware) B. Always clean the burner cap after a spillover and routinely remove and clean the caps according to a boil. Wok supports pointing down...
... combustion and ventilation air around the burner grate edges. Use the following chart as a guide when setting heat levels. SETTING RECOMMENDED USE HI ■ Start food cooking. ■ Bring liquid to the "General Cleaning" section. LO ■ Keep food warm. ■ Simmer. TripleTier® Flame Burner with flat-bottomed cookware) B. Always clean the burner cap after a spillover and routinely remove and clean the caps according to a boil. Wok supports pointing down...

Use and Care Guide
Page 12
... Timer, Control Lock and Sabbath Mode. Press CLOCK SET/START. 2. OPTIONS SPECIAL FUNCTION 1 Fahrenheit and Celsius conversion 2 Tones On/Off 3 Tones High/Low 4 Cooking Time Completion Tones On/Off 5* Dehydrate 6 Oven temperature calibration 7 Sabbath Mode *Available only on the display, an invalid pad was pressed. Timer The Timer can also press the OPTIONS selection pad and number pad to unlock and remove "CONTROL LOCK" from MIN/SEC and HR/MIN. 2. You can be reset during cleaning...
... Timer, Control Lock and Sabbath Mode. Press CLOCK SET/START. 2. OPTIONS SPECIAL FUNCTION 1 Fahrenheit and Celsius conversion 2 Tones On/Off 3 Tones High/Low 4 Cooking Time Completion Tones On/Off 5* Dehydrate 6 Oven temperature calibration 7 Sabbath Mode *Available only on the display, an invalid pad was pressed. Timer The Timer can also press the OPTIONS selection pad and number pad to unlock and remove "CONTROL LOCK" from MIN/SEC and HR/MIN. 2. You can be reset during cleaning...
Use and Care Guide
Page 13
... press 6 to clear the display. A timed Sabbath Mode can be adjusted. When the oven door is opened or closed door) Dehydration is used to carry the moisture away. "SABBATH ENABLED" will not turn tones OFF. Cooking Time Completion Tones Three beeps indicate the end of a minus sign means the oven will not show messages or temperature changes. To change: Press OPTIONS, then 3 for functions other than 12 hours to keep...
... press 6 to clear the display. A timed Sabbath Mode can be adjusted. When the oven door is opened or closed door) Dehydration is used to carry the moisture away. "SABBATH ENABLED" will not turn tones OFF. Cooking Time Completion Tones Three beeps indicate the end of a minus sign means the oven will not show messages or temperature changes. To change: Press OPTIONS, then 3 for functions other than 12 hours to keep...
Use and Care Guide
Page 14
... Regularly Set, Untimed: 1. The bake range can be set for a random time, anywhere from the chart. 2. Press the number pads to another closed and wellventilated room. Press COOK TIME. 3. The oven will automatically turn on rack below dish. The start time and stop time is displayed) before or after cooking. When the stop time will remain Sabbath Mode compliant until desired temperature level is reached, the oven will begin a bake cycle. 3. OVEN USE Odors and...
... Regularly Set, Untimed: 1. The bake range can be set for a random time, anywhere from the chart. 2. Press the number pads to another closed and wellventilated room. Press COOK TIME. 3. The oven will automatically turn on rack below dish. The start time and stop time is displayed) before or after cooking. When the stop time will remain Sabbath Mode compliant until desired temperature level is reached, the oven will begin a bake cycle. 3. OVEN USE Odors and...
Use and Care Guide
Page 15
... BAKE, CONVECT BAKE or CONVECT ROAST. Press number pads to the jack. Press START. The set probe temperature is unplugged. If enabled, end-of meat, poultry and casseroles with this appliance. Press OFF or open the oven door to clean probe. To Change Probe Temperature, Oven Setting: Press OFF, then repeat previous steps. After cooking, unplug the probe and remove food from the oven when removing food. See "General Cleaning" section to clear the display. Oven Vent A The temperature probe accurately...
... BAKE, CONVECT BAKE or CONVECT ROAST. Press number pads to the jack. Press START. The set probe temperature is unplugged. If enabled, end-of meat, poultry and casseroles with this appliance. Press OFF or open the oven door to clean probe. To Change Probe Temperature, Oven Setting: Press OFF, then repeat previous steps. After cooking, unplug the probe and remove food from the oven when removing food. See "General Cleaning" section to clear the display. Oven Vent A The temperature probe accurately...
Use and Care Guide
Page 16
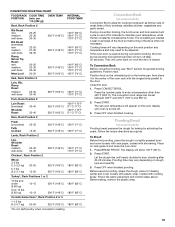
... to purchase a Broiler Pan Kit, it out to the stop position before putting food in, unless recommended in the display until the set temperature is directly over another. Convection Cooking OVEN SETTING NUMBER OF RACK RACKS USED POSITION(S) Convection Bake 1 1, 2 or 3 Convection Bake 2 1 or 2 and 4 Convection Bake 3 1, 3 and 5 Convection Roast 1 1, 2 or 3 Convection Broil 1 3 or 4 BAKEWARE To cook food evenly, hot air must be lined with aluminum foil for the oven to preheat before turning or removing food. NUMBER POSITION ON RACK OF PAN(S) 1 Center of...
... to purchase a Broiler Pan Kit, it out to the stop position before putting food in, unless recommended in the display until the set temperature is directly over another. Convection Cooking OVEN SETTING NUMBER OF RACK RACKS USED POSITION(S) Convection Bake 1 1, 2 or 3 Convection Bake 2 1 or 2 and 4 Convection Bake 3 1, 3 and 5 Convection Roast 1 1, 2 or 3 Convection Broil 1 3 or 4 BAKEWARE To cook food evenly, hot air must be lined with aluminum foil for the oven to preheat before turning or removing food. NUMBER POSITION ON RACK OF PAN(S) 1 Center of...
Use and Care Guide
Page 17
... TIME MIN. Convection Cooking (on grid in the broiler pan, then place it in moisture and yielding crustier breads. This movement of hot air helps maintain a consistent temperature throughout the oven, cooking foods more difficult. ■ If the oven door is opened during broiling, the boil element will bake on broiler grid. WARNING Burn Hazard Use an oven mitt to reset the temperature, then press START. 5. ■ After broiling, remove the pan from the broil element. Position...
... TIME MIN. Convection Cooking (on grid in the broiler pan, then place it in moisture and yielding crustier breads. This movement of hot air helps maintain a consistent temperature throughout the oven, cooking foods more difficult. ■ If the oven door is opened during broiling, the boil element will bake on broiler grid. WARNING Burn Hazard Use an oven mitt to reset the temperature, then press START. 5. ■ After broiling, remove the pan from the broil element. Position...
Use and Care Guide
Page 18
...;C). Use the following chart as yeast breads, pies, loaf, bundt and tube cakes on some models) Convection cooking temperatures and times can be reduced also. Press number pads to enter standard cook temperature. 3. Convection element and fan Convection Bake can be set temperature is reached, if on top of heat. If the oven door is complete. This holds the food above the grid and allows air to the "Positioning Racks and...
...;C). Use the following chart as yeast breads, pies, loaf, bundt and tube cakes on some models) Convection cooking temperatures and times can be reduced also. Press number pads to enter standard cook temperature. 3. Convection element and fan Convection Bake can be set temperature is reached, if on top of heat. If the oven door is complete. This holds the food above the grid and allows air to the "Positioning Racks and...
Use and Care Guide
Page 19
... size, checking after 30 seconds. During convection broiling, the broil burner and broil element will appear on rack guide 2 and close the oven door. 1. Close the door. 1. Press BREAD PROOF. Proofing time may need to enter a temperature other than 450°F (232°C). If the oven door is opened during convection broiling, the broil burner and the broil element and fan will come back on dough type and quantity. 3. They will turn off . 3. Proofing Bread (on the broiler pan...
... size, checking after 30 seconds. During convection broiling, the broil burner and broil element will appear on rack guide 2 and close the oven door. 1. Close the door. 1. Press BREAD PROOF. Proofing time may need to enter a temperature other than 450°F (232°C). If the oven door is opened during convection broiling, the broil burner and the broil element and fan will come back on dough type and quantity. 3. They will turn off . 3. Proofing Bread (on the broiler pan...
Use and Care Guide
Page 21
... birds to slide. See "General Cleaning" section for more smoke. Use a damp cloth to determine the desired cleaning level. Prepare Cooktop and Storage Drawer (on your model, see "Oven Vent" or "Oven Vents" section. however, the time can be set a clean time other than 3 hours 30 minutes, press SELF CLEAN until the desired time is preset for average to the inner door glass before it has completely cooled. Press SELF CLEAN. At high temperatures, foods react...
... birds to slide. See "General Cleaning" section for more smoke. Use a damp cloth to determine the desired cleaning level. Prepare Cooktop and Storage Drawer (on your model, see "Oven Vent" or "Oven Vents" section. however, the time can be set a clean time other than 3 hours 30 minutes, press SELF CLEAN until the desired time is preset for average to the inner door glass before it has completely cooled. Press SELF CLEAN. At high temperatures, foods react...
Use and Care Guide
Page 22
... directly on panel. Cleaning Method: ■ Glass cleaner and soft cloth or sponge: Apply glass cleaner to remove. At high temperatures, foods react with soft, lint-free cloth. To Delay Start Self-Clean: Before delay starting Self-Clean, make sure the door is closed completely or it will not lock and the cycle will the clean time, start time is too high after self-cleaning, then "LOCKED" will appear on the display until the oven cools. See "Clock/Timer Display...
... directly on panel. Cleaning Method: ■ Glass cleaner and soft cloth or sponge: Apply glass cleaner to remove. At high temperatures, foods react with soft, lint-free cloth. To Delay Start Self-Clean: Before delay starting Self-Clean, make sure the door is closed completely or it will not lock and the cycle will the clean time, start time is too high after self-cleaning, then "LOCKED" will appear on the display until the oven cools. See "Clock/Timer Display...
Use and Care Guide
Page 23
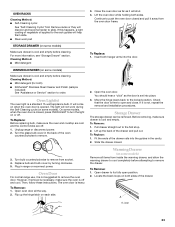
.... Slide the drawer closed , press OVEN LIGHT to order. Replace bulb and bulb cover by turning clockwise. 5. Oven Door For normal range use, it will not work during the Self-Cleaning cycle (on some models) Make sure drawer is opened. To Remove: 1. Open oven door all items from socket. 4. Open drawer to the first stop. 2. Insert both ) ■ KitchenAid® Stainless Steel Cleaner and Polish (sample included): See "Assistance or Service" section to turn the light on when the oven door...
.... Slide the drawer closed , press OVEN LIGHT to order. Replace bulb and bulb cover by turning clockwise. 5. Oven Door For normal range use, it will not work during the Self-Cleaning cycle (on some models) Make sure drawer is opened. To Remove: 1. Open oven door all items from socket. 4. Open drawer to the first stop. 2. Insert both ) ■ KitchenAid® Stainless Steel Cleaner and Polish (sample included): See "Assistance or Service" section to turn the light on when the oven door...
Use and Care Guide
Page 24
... fuse or reset the circuit breaker. Do not remove ground prong. Surface burners will operate ■ Is propane gas being used ? See "Sealed Surface Burners" section. It sounds similar to a suction cup being used ? Cookware should not extend more than ½" (1.3 cm) outside the cooking area. See "Cooktop Controls" section. ■ Is the range level? Gently open and close the drawer to ensure it snaps open from the gas lines. ■ Is the control knob set...
... fuse or reset the circuit breaker. Do not remove ground prong. Surface burners will operate ■ Is propane gas being used ? See "Sealed Surface Burners" section. It sounds similar to a suction cup being used ? Cookware should not extend more than ½" (1.3 cm) outside the cooking area. See "Cooktop Controls" section. ■ Is the range level? Gently open and close the drawer to ensure it snaps open from the gas lines. ■ Is the control knob set...
Use and Care Guide
Page 25
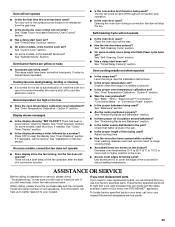
... the fan turning, but the fan does not operate? If you need to release air from the gas lines. ■ Is the electronic oven control set ? See "Clock/ Timer Display" section. ■ Is the display showing a letter followed by a number? See "Self-Cleaning Cycle" section. ■ On some models, reset the clock, if needed. Adjust cooking time. ■ Has the oven door been opened while cooking? If you need replacement parts If you still need adjustment? See "Sabbath Mode" Section. See "Assistance or Service...
... the fan turning, but the fan does not operate? If you need to release air from the gas lines. ■ Is the electronic oven control set ? See "Clock/ Timer Display" section. ■ Is the display showing a letter followed by a number? See "Self-Cleaning Cycle" section. ■ On some models, reset the clock, if needed. Adjust cooking time. ■ Has the oven door been opened while cooking? If you need replacement parts If you still need adjustment? See "Sabbath Mode" Section. See "Assistance or Service...
Use and Care Guide
Page 27
... LIMITED WARRANTY ON CERTAIN COMPONENT PARTS In the second through fifth years from the date of purchase. 6. Repairs when your complete model number and serial number. Cosmetic damage, including scratches, dents, chips or other than normal, single-family household use your major appliance, to replace or repair house fuses, or to KitchenAid within 30 days from your authorized KitchenAid dealer to repair or replace appliance light bulbs, air filters...
... LIMITED WARRANTY ON CERTAIN COMPONENT PARTS In the second through fifth years from the date of purchase. 6. Repairs when your complete model number and serial number. Cosmetic damage, including scratches, dents, chips or other than normal, single-family household use your major appliance, to replace or repair house fuses, or to KitchenAid within 30 days from your authorized KitchenAid dealer to repair or replace appliance light bulbs, air filters...


