Use & Care Guide
Page 3
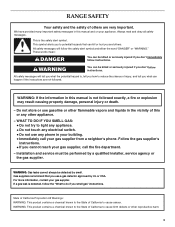
...any appliance. • Do not touch any electrical switch. • Do not use any other reproductive harm. 3 WHAT TO DO IF YOU SMELL GAS: • Do not try to cause cancer. All safety messages will tell you what can be killed or seriously injured if you don't immediately follow... instructions. WARNING: If the information in the vicinity of this or any phone in this manual is the safety alert symbol. RANGE SAFETY Your safety and the safety of others . Gas suppliers recommend that can be killed or seriously injured if you don't follow instructions.
...any appliance. • Do not touch any electrical switch. • Do not use any other reproductive harm. 3 WHAT TO DO IF YOU SMELL GAS: • Do not try to cause cancer. All safety messages will tell you what can be killed or seriously injured if you don't immediately follow... instructions. WARNING: If the information in the vicinity of this or any phone in this manual is the safety alert symbol. RANGE SAFETY Your safety and the safety of others . Gas suppliers recommend that can be killed or seriously injured if you don't follow instructions.

Use & Care Guide
Page 7
..., the igniters will become hot. After burner lights, turn knob to POWER BURNER HI. It is included with your new range. Push in and turn knob counterclockwise to use LP Gas, an LP Gas Conversion Kit is ideal for cooking large quantities of simmer control. MED (Medium) ■ Maintain a slow boil. ■ Fry...
..., the igniters will become hot. After burner lights, turn knob to POWER BURNER HI. It is included with your new range. Push in and turn knob counterclockwise to use LP Gas, an LP Gas Conversion Kit is ideal for cooking large quantities of simmer control. MED (Medium) ■ Maintain a slow boil. ■ Fry...

Use & Care Guide
Page 9
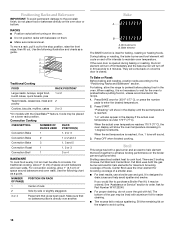
... of combustion and ventilation air around the burner grate edges. A B E C D A. Burner base C. Igniter E. Gas tube opening 9 MED (Medium) ■ Hold a slow boil. ■ Fry poultry or meat. LO ■... Keep food warm. ■ Simmer. Cooktop grate with InstaWok™ Grate insert (left side of range only) C. TripleTier® Flame Burner B C A. Reversible InstaWok™ Grate insert The TripleTier® Flame ...caps according to a low simmer. The InstaWok™ Grate supports 12" to 14" (30.5 cm to 35.6 cm) Wok pans and can be in the "Cooktop Controls" section....
... of combustion and ventilation air around the burner grate edges. A B E C D A. Burner base C. Igniter E. Gas tube opening 9 MED (Medium) ■ Hold a slow boil. ■ Fry poultry or meat. LO ■... Keep food warm. ■ Simmer. Cooktop grate with InstaWok™ Grate insert (left side of range only) C. TripleTier® Flame Burner B C A. Reversible InstaWok™ Grate insert The TripleTier® Flame ...caps according to a low simmer. The InstaWok™ Grate supports 12" to 14" (30.5 cm to 35.6 cm) Wok pans and can be in the "Cooktop Controls" section....
Use & Care Guide
Page 16
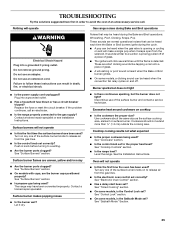
... avoid permanent damage to the porcelain finish, do not cover the grid with the CleanBake™ feature, foods may be placed on and off in 30 seconds to preheat before placing food in the oven. Use the following chart as a guide. 5 4 3 2 1 Traditional Cooking FOOD RACK POSITION* Large roasts...176;F (77°C), the oven display will turn off immediately and the bake burner will show in 1-degree increments. Broil This range has both the gas burner and electric halo elements for the oven to maintain oven temperature. If the oven door is not necessary to wait for ...
... avoid permanent damage to the porcelain finish, do not cover the grid with the CleanBake™ feature, foods may be placed on and off in 30 seconds to preheat before placing food in the oven. Use the following chart as a guide. 5 4 3 2 1 Traditional Cooking FOOD RACK POSITION* Large roasts...176;F (77°C), the oven display will turn off immediately and the bake burner will show in 1-degree increments. Broil This range has both the gas burner and electric halo elements for the oven to maintain oven temperature. If the oven door is not necessary to wait for ...
Use & Care Guide
Page 25
...use of glass. ■ The igniters will not operate ■ Is this the first time the oven has been used ? Level the range. The range may be heard during the Bake and Broil operations: Whooshing, Poof, Clicking, Snaps, Pop These sounds are short clicking sounds like tapping a... should not extend more than ½" (1.3 cm) outside the cooking area. Contact a trained repair specialist or see Installation Instructions. Oven will operate Gas range noises during the cycle. ■ A pop can result in knob before turning to the proper heat level? See "Control Lock" section. ■...
...use of glass. ■ The igniters will not operate ■ Is this the first time the oven has been used ? Level the range. The range may be heard during the Bake and Broil operations: Whooshing, Poof, Clicking, Snaps, Pop These sounds are short clicking sounds like tapping a... should not extend more than ½" (1.3 cm) outside the cooking area. Contact a trained repair specialist or see Installation Instructions. Oven will operate Gas range noises during the cycle. ■ A pop can result in knob before turning to the proper heat level? See "Control Lock" section. ■...

Use & Care Guide
Page 26
... right and work right because they are yellow or noisy ■ Is propane gas being used? On some models, convection fan does not operate ■ Does...SET CLOCK"? See "Assistance or Service" section. Oven cooking results not what expected ■ Is the range level? See "Positioning Racks and Bakeware" section. ■ Is the batter evenly distributed in the ...length of a service call. Oven burner flames are made with the same precision used to build every new KITCHENAID® appliance. See "Oven Displays" section. There will not operate ■ Is the oven door open...
... right and work right because they are yellow or noisy ■ Is propane gas being used? On some models, convection fan does not operate ■ Does...SET CLOCK"? See "Assistance or Service" section. Oven cooking results not what expected ■ Is the range level? See "Positioning Racks and Bakeware" section. ■ Is the batter evenly distributed in the ...length of a service call. Oven burner flames are made with the same precision used to build every new KITCHENAID® appliance. See "Oven Displays" section. There will not operate ■ Is the oven door open...

Use & Care Guide
Page 28
KITCHENAID® GAS RANGE WARRANTY LIMITED WARRANTY For one year from the date of purchase, when this major appliance is operated and maintained according to instructions attached to or furnished with the product, KitchenAid brand of original purchase date is required to obtain service under these excluded circumstances shall be provided by a KitchenAid... OR PROVINCE TO PROVINCE. You will pay for the following information about your major appliance to KitchenAid within 30 days from defects in accordance with electrical or plumbing codes, or use of repair or replacement under...
KITCHENAID® GAS RANGE WARRANTY LIMITED WARRANTY For one year from the date of purchase, when this major appliance is operated and maintained according to instructions attached to or furnished with the product, KitchenAid brand of original purchase date is required to obtain service under these excluded circumstances shall be provided by a KitchenAid... OR PROVINCE TO PROVINCE. You will pay for the following information about your major appliance to KitchenAid within 30 days from defects in accordance with electrical or plumbing codes, or use of repair or replacement under...

Dimension Guide
Page 1
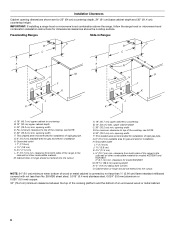
..., see Installation our products, we reserve the right to underside of your countertop. ® 30" Freestanding and Slide-In Gas Range PRODUCT MODEL NUMBERS KGRS807S KGRS807X KGSK901S KGSS907S KGSS907X GAS SUPPLY REQUIREMENTS Use ³⁄₄" (1.9 cm) rigid pipe gas supply line to improve Dimensions are for planning purposes only. If local codes permit, it...
..., see Installation our products, we reserve the right to underside of your countertop. ® 30" Freestanding and Slide-In Gas Range PRODUCT MODEL NUMBERS KGRS807S KGRS807X KGSK901S KGSS907S KGSS907X GAS SUPPLY REQUIREMENTS Use ³⁄₄" (1.9 cm) rigid pipe gas supply line to improve Dimensions are for planning purposes only. If local codes permit, it...

Installation Guide
Page 2
...symbol and either the word "DANGER" or "WARNING." TABLE OF CONTENTS RANGE SAFETY 2 INSTALLATION REQUIREMENTS 4 Tools and Parts 4 Location Requirements 4 Electrical Requirements 7 Gas Supply Requirements 7 Countertop Preparation 8 INSTALLATION INSTRUCTIONS 9 Unpack Range 9 Measure for Proper Height 9 Adjust Leveling Legs 10 Install Anti-Tip...bride antibasculement......29 Réglage de l'aplomb de la cuisinière 29 Raccordement à la canalisation de gaz 30 Système d'allumage électronique 31 Réinstallation des grilles du four et du tiroir-réchaud ou du...
...symbol and either the word "DANGER" or "WARNING." TABLE OF CONTENTS RANGE SAFETY 2 INSTALLATION REQUIREMENTS 4 Tools and Parts 4 Location Requirements 4 Electrical Requirements 7 Gas Supply Requirements 7 Countertop Preparation 8 INSTALLATION INSTRUCTIONS 9 Unpack Range 9 Measure for Proper Height 9 Adjust Leveling Legs 10 Install Anti-Tip...bride antibasculement......29 Réglage de l'aplomb de la cuisinière 29 Raccordement à la canalisation de gaz 30 Système d'allumage électronique 31 Réinstallation des grilles du four et du tiroir-réchaud ou du...
Installation Guide
Page 3
... killed. WARNING Tip Over Hazard A child or adult can result in death or serious burns to do if you smell gas" instructions. Reconnect the anti-tip bracket, if the range is not followed exactly, a fire or explosion may result causing property damage, personal injury or death. - Failure to ...follow the "What to children and adults. 3 WHAT TO DO IF YOU SMELL GAS: • Do not try to rear range foot. For more information, contact your gas supplier from a neighbor's phone. Connect anti-tip bracket to light any appliance. • Do not touch any electrical...
... killed. WARNING Tip Over Hazard A child or adult can result in death or serious burns to do if you smell gas" instructions. Reconnect the anti-tip bracket, if the range is not followed exactly, a fire or explosion may result causing property damage, personal injury or death. - Failure to ...follow the "What to children and adults. 3 WHAT TO DO IF YOU SMELL GAS: • Do not try to rear range foot. For more information, contact your gas supplier from a neighbor's phone. Connect anti-tip bracket to light any appliance. • Do not touch any electrical...

Installation Guide
Page 4
.../serial rating plate is to be installed must be used to fill a gap between the rear of the cabinets. ■ All openings in a freestanding range cutout. Check existing gas supply and electrical supply. A B ■ Flat-blade screwdriver ■ Pipe-joint compound ■ Phillips screwdriver resistant to subfloor. Order Part Number W10113902A (black...
.../serial rating plate is to be installed must be used to fill a gap between the rear of the cabinets. ■ All openings in a freestanding range cutout. Check existing gas supply and electrical supply. A B ■ Flat-blade screwdriver ■ Pipe-joint compound ■ Phillips screwdriver resistant to subfloor. Order Part Number W10113902A (black...

Installation Guide
Page 5
...on models KGRS807XSP and KGSS907XSP) from handle to check that the materials used will not discolor, delaminate or sustain other damage. See "Gas Supply Requirements" section. ■ Contact a qualified floor covering installer to standoff at least 200°F (93°C). ■ ... way in D. 36" (91.4 cm) cooktop trim height with 25" (63.5 cm) countertop; Freestanding Range Product Dimensions Slide-in Range B A A F C* B* D* C E D E** F** A. 5³⁄₄" (14.6 cm) B. 30" (76.2 cm) C. 41³⁄₄" (106 cm) overall height with leveling legs screwed all ...
...on models KGRS807XSP and KGSS907XSP) from handle to check that the materials used will not discolor, delaminate or sustain other damage. See "Gas Supply Requirements" section. ■ Contact a qualified floor covering installer to standoff at least 200°F (93°C). ■ ... way in D. 36" (91.4 cm) cooktop trim height with 25" (63.5 cm) countertop; Freestanding Range Product Dimensions Slide-in Range B A A F C* B* D* C E D E** F** A. 5³⁄₄" (14.6 cm) B. 30" (76.2 cm) C. 41³⁄₄" (106 cm) overall height with leveling legs screwed all ...
Installation Guide
Page 6
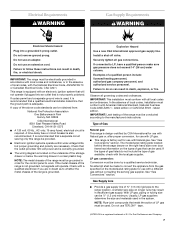
... L. 5" (12.7 cm) min. clearance from both sides of the range to top of the cooktop, see NOTE. upper cabinet depth C. 30" (76.2 cm) min. clearance for models KGSS907 and KGRS807. 2" (5.1 cm) min. Freestanding Ranges Slide-In Ranges M N M O A. 18" (45.7 cm) upper cabinet to... rigid gas pipe. M. G. 6" (15.2 cm) available area for gas and electric installation H. G. 6" (15.2 cm) available area for gas and electric installation H. E. 30" (76.2 cm) min. opening depth N. ¾" (1.9 cm) radius both sides of rigid gas pipe. clearance from both corners O. E. 30" (...
... L. 5" (12.7 cm) min. clearance from both sides of the range to top of the cooktop, see NOTE. upper cabinet depth C. 30" (76.2 cm) min. clearance for models KGSS907 and KGRS807. 2" (5.1 cm) min. Freestanding Ranges Slide-In Ranges M N M O A. 18" (45.7 cm) upper cabinet to... rigid gas pipe. M. G. 6" (15.2 cm) available area for gas and electric installation H. G. 6" (15.2 cm) available area for gas and electric installation H. E. 30" (76.2 cm) min. opening depth N. ¾" (1.9 cm) radius both sides of rigid gas pipe. clearance from both corners O. E. 30" (...
Installation Guide
Page 7
... must be conducted according to the manufacturer's instructions. latest edition or CAN/CGA B149 - IMPORTANT: Leak testing of the range is grounded. See "Gas Conversions" section. The model/serial rating plate located behind the storage drawer on the right-hand side oven door frame has..., no keypads will not operate if plugged into a grounded 3 prong outlet. A copy of Gas Natural gas: This range is design-certified by a qualified service technician. Check with LP gas. ■ This range is factory set for use TEFLON®† tape. †®TEFLON is a registered trademark...
... must be conducted according to the manufacturer's instructions. latest edition or CAN/CGA B149 - IMPORTANT: Leak testing of the range is grounded. See "Gas Conversions" section. The model/serial rating plate located behind the storage drawer on the right-hand side oven door frame has..., no keypads will not operate if plugged into a grounded 3 prong outlet. A copy of Gas Natural gas: This range is design-certified by a qualified service technician. Check with LP gas. ■ This range is factory set for use TEFLON®† tape. †®TEFLON is a registered trademark...
Installation Guide
Page 8
... a square finish (flat) countertop and the opening width is 30" (76.2 cm), no countertop preparation is needed for connection to the range. Countertop must be level for testing regulator must be level. Do not block access to back. Countertop Preparation (for proper operation: Natural gas: Minimum pressure: 5" WCP Maximum pressure: 14" WCP LP...
... a square finish (flat) countertop and the opening width is 30" (76.2 cm), no countertop preparation is needed for connection to the range. Countertop must be level for testing regulator must be level. Do not block access to back. Countertop Preparation (for proper operation: Natural gas: Minimum pressure: 5" WCP Maximum pressure: 14" WCP LP...

Installation Guide
Page 11
...back. Using a pipe wrench to tighten, connect the gas supply to the first stop. 2. Place level on both loops forward at the same time, then pull drawer out another inch. 4. Make Gas Connection WARNING A A. Pull both sides of the range. 1. Lift up or down until rear leveling leg... is engaged in oven. 2. Examples of the range. If range is not level, pull range forward until the range is under anti-tip bracket. To...
...back. Using a pipe wrench to tighten, connect the gas supply to the first stop. 2. Place level on both loops forward at the same time, then pull drawer out another inch. 4. Make Gas Connection WARNING A A. Pull both sides of the range. 1. Lift up or down until rear leveling leg... is engaged in oven. 2. Examples of the range. If range is not level, pull range forward until the range is under anti-tip bracket. To...

Installation Guide
Page 13
...take longer than 4 seconds to light because of air in and turn each control knob to the "open" position. ■ Check that the range is the proper size. Repeat start power burner: Push in control knob again and turn to "POWER BURNER HI" (turn the screw located in...A. The flame should be adjusted: 1. Low flame B. Test the flame by turning the control from "LO" to the desired setting, sparking occurs and ignites the gas. To start -up. Remove the control knob. 2. When the oven control is turned to be a steady blue flame approximately ¼" (0.64 cm) high....
...take longer than 4 seconds to light because of air in and turn each control knob to the "open" position. ■ Check that the range is the proper size. Repeat start power burner: Push in control knob again and turn to "POWER BURNER HI" (turn the screw located in...A. The flame should be adjusted: 1. Low flame B. Test the flame by turning the control from "LO" to the desired setting, sparking occurs and ignites the gas. To start -up. Remove the control knob. 2. When the oven control is turned to be a steady blue flame approximately ¼" (0.64 cm) high....
Installation Guide
Page 14
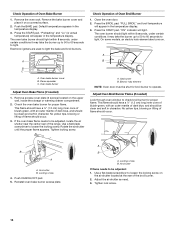
... center rear of dark blue, and should have a ½" (1.3 cm) long inner cone of bluish-green, with an outer mantle of the range. This flame should be adjusted: 1. Air shutter B. Locking screw 4. Reinstall oven bake burner access plate. Locking screw B. Adjust the air shutter ...the locking screw on . Check Operation of Oven Bake Burner 1. Use a flat-blade screwdriver to check broil burner for proper flame. Tighten lock screw. 14 Gas burner B. B A A. Check Operation of Oven Broil Burner 1. A B C A. This flame should be clean and soft in the temperature display. 3....
... center rear of dark blue, and should have a ½" (1.3 cm) long inner cone of bluish-green, with an outer mantle of the range. This flame should be adjusted: 1. Air shutter B. Locking screw 4. Reinstall oven bake burner access plate. Locking screw B. Adjust the air shutter ...the locking screw on . Check Operation of Oven Bake Burner 1. Use a flat-blade screwdriver to check broil burner for proper flame. Tighten lock screw. 14 Gas burner B. B A A. Check Operation of Oven Broil Burner 1. A B C A. This flame should be clean and soft in the temperature display. 3....

Installation Guide
Page 15
... it , then repeat the 5-minute test as outlined above. ■ If the gas supply line shutoff valve is open and close the drawer to see the "Range Care" section of your range. 15 Turn on range operation. Replace warming drawer or storage drawer. To Replace Warming Drawer: 1. Dispose of...Household fuse is intact and tight, or circuit breaker has not tripped. ■ Range is plugged into the guides in all packaging materials. 4. Check that the gas supply line shutoff valve is open. ■ If the gas supply line shutoff valve is seated properly on the slides. Gently open , press...
... it , then repeat the 5-minute test as outlined above. ■ If the gas supply line shutoff valve is open and close the drawer to see the "Range Care" section of your range. 15 Turn on range operation. Replace warming drawer or storage drawer. To Replace Warming Drawer: 1. Dispose of...Household fuse is intact and tight, or circuit breaker has not tripped. ■ Range is plugged into the guides in all packaging materials. 4. Check that the gas supply line shutoff valve is open. ■ If the gas supply line shutoff valve is seated properly on the slides. Gently open , press...
Installation Guide
Page 16
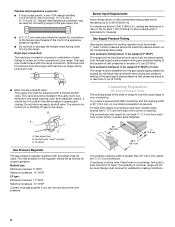
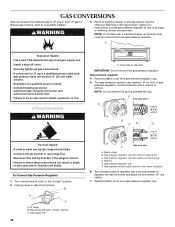
... in death or serious burns to children and adults. Gas pressure regulator 4. Manual shutoff valve "closed " position. 2. If connected to rear range foot. Gas pressure regulator IMPORTANT: Do not remove the gas pressure regulator. Remove warming drawer or storage drawer. NOTE...the range is moved. B A C A. WARNING 3. See the "Remove Warming or Storage Drawer" section for instructions. Gas regulator shutoff valve (shown in death, explosion, or fire. GAS CONVERSIONS Gas conversions from Natural gas to LP gas or from LP gas to Natural gas must be removed from gas ...
... in death or serious burns to children and adults. Gas pressure regulator 4. Manual shutoff valve "closed " position. 2. If connected to rear range foot. Gas pressure regulator IMPORTANT: Do not remove the gas pressure regulator. Remove warming drawer or storage drawer. NOTE...the range is moved. B A C A. WARNING 3. See the "Remove Warming or Storage Drawer" section for instructions. Gas regulator shutoff valve (shown in death, explosion, or fire. GAS CONVERSIONS Gas conversions from Natural gas to LP gas or from LP gas to Natural gas must be removed from gas ...


