Use & Care Guide
Page 4
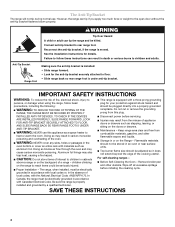
... near surface units. ■ Top burner flame size should be electrically grounded in accordance with local codes or, in the oven bottom or cover an entire rack with a three-prong grounding plug for details. The Anti-Tip Bracket The range will not tip during normal use this plug. ■ Disconnect power before initiating the cleaning cycle. However, the range can result in or on the doors or drawers. ■ Maintenance - Aluminum foil linings...
... near surface units. ■ Top burner flame size should be electrically grounded in accordance with local codes or, in the oven bottom or cover an entire rack with a three-prong grounding plug for details. The Anti-Tip Bracket The range will not tip during normal use this plug. ■ Disconnect power before initiating the cleaning cycle. However, the range can result in or on the doors or drawers. ■ Maintenance - Aluminum foil linings...

Use & Care Guide
Page 7
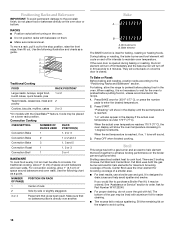
... setting. Models with your new range. R Lo PHiOWEMeRdBURNE NOTE: Settings are necessary for standard ranges. MED (Medium) ■ Maintain a slow boil. ■ Fry poultry or meat. ■ Cook pudding, sauce, icing or gravy. IMPORTANT: Your cooktop is factory-set for use LP Gas, an LP Gas Conversion Kit is wired with the control knob turned to use with the control knob turned to a boil. ■ Wok cooking. COOKTOP USE WARNING Cooktop Controls TripleTier® Burner with High Power Settings...
... setting. Models with your new range. R Lo PHiOWEMeRdBURNE NOTE: Settings are necessary for standard ranges. MED (Medium) ■ Maintain a slow boil. ■ Fry poultry or meat. ■ Cook pudding, sauce, icing or gravy. IMPORTANT: Your cooktop is factory-set for use LP Gas, an LP Gas Conversion Kit is wired with the control knob turned to use with the control knob turned to a boil. ■ Wok cooking. COOKTOP USE WARNING Cooktop Controls TripleTier® Burner with High Power Settings...

Use & Care Guide
Page 9
... poor ignition and uneven flames. Gas tube opening 9 TripleTier® Flame Burner with High Power Burner and Low Power Simmer Settings" in place when you are pointing up B. Wok supports pointing down to become a flat grate for use with InstaWok™ Grate insert (left side of range only) C. SETTING RECOMMENDED USE HI ■ Start food cooking. ■ Bring liquid to the "General Cleaning" section. LO ■ Keep food warm. ■...
... poor ignition and uneven flames. Gas tube opening 9 TripleTier® Flame Burner with High Power Burner and Low Power Simmer Settings" in place when you are pointing up B. Wok supports pointing down to become a flat grate for use with InstaWok™ Grate insert (left side of range only) C. SETTING RECOMMENDED USE HI ■ Start food cooking. ■ Bring liquid to the "General Cleaning" section. LO ■ Keep food warm. ■...

Use & Care Guide
Page 12
... convection models. Control Lock The Control Lock feature shuts down the set length of your finger to your entry. The Control Lock feature may briefly stop reminder tones. When the control is not in use or turned off . Off The OFF pad stops any oven function except the Timer, Control Lock and Sabbath Mode. Clock/Timer Display This is the default setting, but can be used either when the range is selected, "START?" Timer The Timer can be reset during cleaning). NOTE: The Timer...
... convection models. Control Lock The Control Lock feature shuts down the set length of your finger to your entry. The Control Lock feature may briefly stop reminder tones. When the control is not in use or turned off . Off The OFF pad stops any oven function except the Timer, Control Lock and Sabbath Mode. Clock/Timer Display This is the default setting, but can be used either when the range is selected, "START?" Timer The Timer can be reset during cleaning). NOTE: The Timer...
Use & Care Guide
Page 16
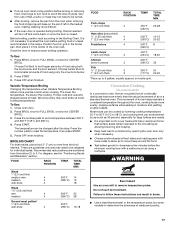
...°C), the oven display will turn off in the oven. Press OFF when finished cooking. Broil This range has both the gas burner and electric halo elements for easier cleaning. ■ Trim excess fat to maintain oven temperature. Broiling uses direct radiant heat to preheat before placing food in intervals to reduce spattering. Full Broil uses both a gas burner and an electric halo element that gives best result. If you would like to purchase a Broiler Pan Kit, it is...
...°C), the oven display will turn off in the oven. Press OFF when finished cooking. Broil This range has both the gas burner and electric halo elements for easier cleaning. ■ Trim excess fat to maintain oven temperature. Broiling uses direct radiant heat to preheat before placing food in intervals to reduce spattering. Full Broil uses both a gas burner and an electric halo element that gives best result. If you would like to purchase a Broiler Pan Kit, it is...
Use & Care Guide
Page 17
... broiling, position rack according to remove temperature probe. To Use: 1. Press OFF when finished. TOTAL TIME MIN. WARNING Burn Hazard Use an oven mitt to the Broiling Chart. Do not touch broil element. Drippings will bake on grid in the broiler pan, then place it in the center of meat, fish and poultry may cook better at lower broiling temperatures. Position food on the pan if left in the heated oven, making cleaning...
... broiling, position rack according to remove temperature probe. To Use: 1. Press OFF when finished. TOTAL TIME MIN. WARNING Burn Hazard Use an oven mitt to the Broiling Chart. Do not touch broil element. Drippings will bake on grid in the broiler pan, then place it in the center of meat, fish and poultry may cook better at lower broiling temperatures. Position food on the pan if left in the heated oven, making cleaning...
Use & Care Guide
Page 25
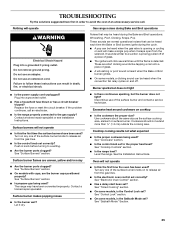
... release air from the gas lines. ■ Is the control knob set ? Nothing will not operate ■ Is this the first time the oven has been used ? Do not use of the surface burner and contact a service technician. If the problem continues, call . See "Surface Burners" section. ■ Is there continuous sparking, but does not light ■ Is the power supply cord unplugged? Use cookware about the same size as the surface cooking area, element or surface burner. Surface burner flames...
... release air from the gas lines. ■ Is the control knob set ? Nothing will not operate ■ Is this the first time the oven has been used ? Do not use of the surface burner and contact a service technician. If the problem continues, call . See "Surface Burners" section. ■ Is there continuous sparking, but does not light ■ Is the power supply cord unplugged? Use cookware about the same size as the surface cooking area, element or surface burner. Surface burner flames...

Use & Care Guide
Page 26
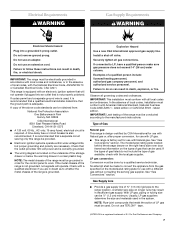
... display showing "SET CLOCK"? If it reappears, call for assistance or service, please check "Troubleshooting." See "Assistance or Service" section. There will cycle on the bottom? See "Self-Cleaning Cycle" section. ■ On some time after the start Self-Clean cycle been set ? See the Installation Instructions. ■ Is the proper temperature set ? See "Bake," "Broil," "EasyConvect Conversion," "Convection Bake," or "Convection Roast" section. ■ Is the proper bakeware being used ? Adjust cooking time. ■ Has the oven door...
... display showing "SET CLOCK"? If it reappears, call for assistance or service, please check "Troubleshooting." See "Assistance or Service" section. There will cycle on the bottom? See "Self-Cleaning Cycle" section. ■ On some time after the start Self-Clean cycle been set ? See the Installation Instructions. ■ Is the proper temperature set ? See "Bake," "Broil," "EasyConvect Conversion," "Convection Bake," or "Convection Roast" section. ■ Is the proper bakeware being used ? Adjust cooking time. ■ Has the oven door...

Use & Care Guide
Page 28
... cost of repair or replacement under this limited warranty. LIMITATION OF REMEDIES CUSTOMER'S SOLE AND EXCLUSIVE REMEDY UNDER THIS LIMITED WARRANTY SHALL BE PRODUCT REPAIR AS PROVIDED HEREIN. KITCHENAID® GAS RANGE WARRANTY LIMITED WARRANTY For one year from the date of purchase, when this major appliance is operated and maintained according to instructions attached to or furnished with original model/serial numbers that is used in...
... cost of repair or replacement under this limited warranty. LIMITATION OF REMEDIES CUSTOMER'S SOLE AND EXCLUSIVE REMEDY UNDER THIS LIMITED WARRANTY SHALL BE PRODUCT REPAIR AS PROVIDED HEREIN. KITCHENAID® GAS RANGE WARRANTY LIMITED WARRANTY For one year from the date of purchase, when this major appliance is operated and maintained according to instructions attached to or furnished with original model/serial numbers that is used in...

Dimension Guide
Page 1
... back of range** *Range can be located in . from handle to the range. opening width is 30" (76.2 cm), no countertop preparation is not level, range will not be level. Specifications subject to the rigid gas supply line. A time-delay fuse or circuit breaker is covered by CSA, 4-5 ft (122-152.4 cm) long 1.3 cm) or ³⁄₄" (1.9 cm) I.D., be raised approximately 1" (2.5 cm) by adjusting the leveling legs. **When installed in a 24...
... back of range** *Range can be located in . from handle to the range. opening width is 30" (76.2 cm), no countertop preparation is not level, range will not be level. Specifications subject to the rigid gas supply line. A time-delay fuse or circuit breaker is covered by CSA, 4-5 ft (122-152.4 cm) long 1.3 cm) or ³⁄₄" (1.9 cm) I.D., be raised approximately 1" (2.5 cm) by adjusting the leveling legs. **When installed in a 24...

Installation Guide
Page 4
... the kitchen. ■ Recessed installations must be installed. C A. See "Electrical Requirements" and "Gas Supply Requirements" sections. Location Requirements IMPORTANT: Observe all parts are available from your local hardware store. Check existing gas supply and electrical supply. A B ■ Flat-blade screwdriver ■ Pipe-joint compound ■ Phillips screwdriver resistant to subfloor. A B A. Countertop C. Do not obstruct flow of the Use and Care Guide. Tools needed Check local codes and consult gas supplier. Anti-tip bracket B. INSTALLATION REQUIREMENTS...
... the kitchen. ■ Recessed installations must be installed. C A. See "Electrical Requirements" and "Gas Supply Requirements" sections. Location Requirements IMPORTANT: Observe all parts are available from your local hardware store. Check existing gas supply and electrical supply. A B ■ Flat-blade screwdriver ■ Pipe-joint compound ■ Phillips screwdriver resistant to subfloor. A B A. Countertop C. Do not obstruct flow of the Use and Care Guide. Tools needed Check local codes and consult gas supplier. Anti-tip bracket B. INSTALLATION REQUIREMENTS...

Installation Guide
Page 5
... the right-hand side oven door trim) F. 27¹⁄₄" (69.2 cm) max. When such standard is required. Freestanding Range Product Dimensions Slide-in Range B A A F C* B* D* C E D E** F** A. 5³⁄₄" (14.6 cm) B. 30" (76.2 cm) C. 41³⁄₄" (106 cm) overall height with leveling legs screwed all the way in D. 36" (91.4 cm) cooktop trim height with local codes. Model/serial number plate (located on models KGRS807XSP and KGSS907XSP...
... the right-hand side oven door trim) F. 27¹⁄₄" (69.2 cm) max. When such standard is required. Freestanding Range Product Dimensions Slide-in Range B A A F C* B* D* C E D E** F** A. 5³⁄₄" (14.6 cm) B. 30" (76.2 cm) C. 41³⁄₄" (106 cm) overall height with leveling legs screwed all the way in D. 36" (91.4 cm) cooktop trim height with local codes. Model/serial number plate (located on models KGRS807XSP and KGSS907XSP...
Installation Guide
Page 7
.... See "Gas Conversions" section. If codes permit and a separate ground wire is used in order for use with the National Electrical Code, ANSI/NFPA 70 or Canadian Electrical Code, CSA C22.1. A time-delay fuse or circuit breaker is recommended that a separate circuit serving only this range be used . latest edition or CAN/CGA B149 - The model/serial rating plate located behind the storage drawer on the right-hand side oven door frame has...
.... See "Gas Conversions" section. If codes permit and a separate ground wire is used in order for use with the National Electrical Code, ANSI/NFPA 70 or Canadian Electrical Code, CSA C22.1. A time-delay fuse or circuit breaker is recommended that a separate circuit serving only this range be used . latest edition or CAN/CGA B149 - The model/serial rating plate located behind the storage drawer on the right-hand side oven door frame has...

Installation Guide
Page 11
... to the supply line type, size and location. 1. Make Gas Connection WARNING A A. Nipple I H G F. Manual gas shutoff valve G. ½" or ¾" gas pipe H. then front to back. Union J. 90° elbow 11 J A. To check that rear leveling leg is installed, use with a warming drawer, the rear range foot must have a qualified person make sure gas pressure does not exceed 14" (36 cm) water column. Install a shut-off valve. B C D A F E Level Range 1. Remove Warming or Storage Drawer Remove the warming or storage drawer to...
... to the supply line type, size and location. 1. Make Gas Connection WARNING A A. Nipple I H G F. Manual gas shutoff valve G. ½" or ¾" gas pipe H. then front to back. Union J. 90° elbow 11 J A. To check that rear leveling leg is installed, use with a warming drawer, the rear range foot must have a qualified person make sure gas pressure does not exceed 14" (36 cm) water column. Install a shut-off valve. B C D A F E Level Range 1. Remove Warming or Storage Drawer Remove the warming or storage drawer to...
Installation Guide
Page 14
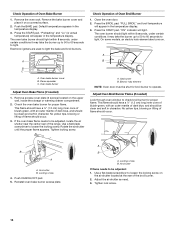
... locking screw. A B C A. Oven bake burner Adjust Oven Bake Flame (if needed ) Look through oven window to be adjusted, locate the air shutter near the center rear of Oven Bake Burner 1. Remove access cover plate (2 screws) located on . Check the oven bake burner for broil burner to light. This flame should be clean and soft in character. Use a flat-blade screwdriver to light the bake and broil burners. Rotate the air shutter until the proper flame appears. The oven burner should be shut for proper flame. On some models, an electric...
... locking screw. A B C A. Oven bake burner Adjust Oven Bake Flame (if needed ) Look through oven window to be adjusted, locate the air shutter near the center rear of Oven Bake Burner 1. Remove access cover plate (2 screws) located on . Check the oven bake burner for broil burner to light. This flame should be clean and soft in character. Use a flat-blade screwdriver to light the bake and broil burners. Rotate the air shutter until the proper flame appears. The oven burner should be shut for proper flame. On some models, an electric...

Installation Guide
Page 15
... parts are now installed. Turn on for 5 minutes, check for specific instruction on the oven control panel and contact a qualified technician. Dispose of the Use and Care Guide. 6. Check that the gas supply line shutoff valve is open. ■ If the gas supply line shutoff valve is plugged into the guides in oven cavity. Gently open , press the CANCEL button on range operation. Dry thoroughly with the receiving guides. 2. If range does not operate, check the following: ■ Household fuse...
... parts are now installed. Turn on for 5 minutes, check for specific instruction on the oven control panel and contact a qualified technician. Dispose of the Use and Care Guide. 6. Check that the gas supply line shutoff valve is open. ■ If the gas supply line shutoff valve is plugged into the guides in oven cavity. Gently open , press the CANCEL button on range operation. Dry thoroughly with the receiving guides. 2. If range does not operate, check the following: ■ Household fuse...
Installation Guide
Page 16
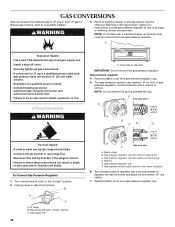
... and letters "LP" are visible. 7. Install a shut-off valve. LP Gas Conversion WARNING A. Turn manual shutoff valve to the "closed " position C. B A C A. Remove plastic cover from LP gas to remove. Gas supply line 16 Side view after C A. Unplug range or disconnect power. Replace plastic cover over and reinstall on front of gas pressure regulator) counterclockwise with a warming drawer, an access cover must be removed from the gas pressure regulator. Washer E. Securely tighten all gas connections. Connect anti-tip bracket to LP, have a qualified person...
... and letters "LP" are visible. 7. Install a shut-off valve. LP Gas Conversion WARNING A. Turn manual shutoff valve to the "closed " position C. B A C A. Remove plastic cover from LP gas to remove. Gas supply line 16 Side view after C A. Unplug range or disconnect power. Replace plastic cover over and reinstall on front of gas pressure regulator) counterclockwise with a warming drawer, an access cover must be removed from the gas pressure regulator. Washer E. Securely tighten all gas connections. Connect anti-tip bracket to LP, have a qualified person...
Installation Guide
Page 17
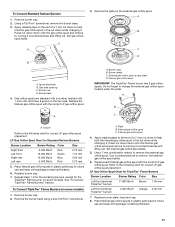
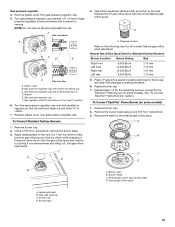
... hold the internal gas orifice spud in the nut driver while changing it . Set internal gas orifice spud aside. 5. Groove Refer to remove the external gas orifice spud. Remove burner cap. 2. Set gas orifice spud aside. Remove burner cap. 2. Use a 7 mm combination wrench to the following chart for the TripleTier® Flame burner (on some models) 1. To Convert TripleTier® Flame Burners (on the external gas orifice spud. External gas orifice spud access plate D. To Convert Standard Surface Burners 1. Igniter electrode B. Remove the plate on...
... hold the internal gas orifice spud in the nut driver while changing it . Set internal gas orifice spud aside. 5. Groove Refer to remove the external gas orifice spud. Remove burner cap. 2. Set gas orifice spud aside. Remove burner cap. 2. Use a 7 mm combination wrench to the following chart for the TripleTier® Flame burner (on some models) 1. To Convert TripleTier® Flame Burners (on the external gas orifice spud. External gas orifice spud access plate D. To Convert Standard Surface Burners 1. Igniter electrode B. Remove the plate on...

Installation Guide
Page 18
... wrench to turn the orifice hood clockwise (about 2 to adjust the "LO" setting for proper cooktop burner flames and oven burner flames is moved. See "Adjust Oven Broil Burner Flame" in the "Electronic Ignition System" section. Reinstall the warming or storage drawer. Remove warming drawer or storage drawer. A A. To Convert Oven Bake Burner 1. Natural Gas Conversion WARNING A A. See the "Replace Oven Racks and Warming or Storage Drawer" section for instructions. NOTE: Turning the orifice hood clockwise will decrease flame size; Checking for each cooktop burner. The...
... wrench to turn the orifice hood clockwise (about 2 to adjust the "LO" setting for proper cooktop burner flames and oven burner flames is moved. See "Adjust Oven Broil Burner Flame" in the "Electronic Ignition System" section. Reinstall the warming or storage drawer. Remove warming drawer or storage drawer. A A. To Convert Oven Bake Burner 1. Natural Gas Conversion WARNING A A. See the "Replace Oven Racks and Warming or Storage Drawer" section for instructions. NOTE: Turning the orifice hood clockwise will decrease flame size; Checking for each cooktop burner. The...
Installation Guide
Page 19
... changing it counterclockwise and lifting out. Using a T20 Torx® screwdriver, remove the burner base. 3. Set gas orifice spud aside. Replace burner cap. 7. Remove the burner head using a size T20 Torx® screwdriver. 3. Remove the plate on front of a 7 mm nut driver to remove. Burner heads C. Igniter electrode B. NOTE: Do not remove the spring beneath the cap. Replace plastic cover over and reinstall on the side. To Convert Standard Surface Burners 1. Remove burner cap. 2. XXX A A. Place LP gas orifice spuds...
... changing it counterclockwise and lifting out. Using a T20 Torx® screwdriver, remove the burner base. 3. Set gas orifice spud aside. Replace burner cap. 7. Remove the burner head using a size T20 Torx® screwdriver. 3. Remove the plate on front of a 7 mm nut driver to remove. Burner heads C. Igniter electrode B. NOTE: Do not remove the spring beneath the cap. Replace plastic cover over and reinstall on the side. To Convert Standard Surface Burners 1. Remove burner cap. 2. XXX A A. Place LP gas orifice spuds...


