
Use and Care Guide
Page 1
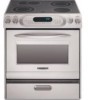
o ELECTRIC RANGE PRO LINE™ SERIES AND ARCHITECT® SERIES Use & Care Guide For questions about features, operation/performance, parts, accessories or service, call: 1-800-422-1230 In Canada, call for assistance 1-800-461-5681, for installation and service, call: 1-800-807-6777 or visit our website at... www.kitchenaid.com or www.KitchenAid.ca Table of Contents...2 Models KERA807 KESI901 KESA907 KESV908 YKESA907 YKERA807 YKESV908 9757451
o ELECTRIC RANGE PRO LINE™ SERIES AND ARCHITECT® SERIES Use & Care Guide For questions about features, operation/performance, parts, accessories or service, call: 1-800-422-1230 In Canada, call for assistance 1-800-461-5681, for installation and service, call: 1-800-807-6777 or visit our website at... www.kitchenaid.com or www.KitchenAid.ca Table of Contents...2 Models KERA807 KESI901 KESA907 KESV908 YKESA907 YKERA807 YKESV908 9757451
Use and Care Guide
Page 4
...DEVICES ARE INSTALLED PROPERLY, SLIDE RANGE FORWARD, LOOK FOR ANTI-TIP BRACKET SECURELY ATTACHED TO FLOOR, AND SLIDE RANGE BACK SO REAR RANGE FOOT IS UNDER ANTI-TIP BRACKET. s Never Use the Range for range-top service without breaking due to the sudden change in a risk of electric shock, or fire. ... of the heating element to a hot surface. IMPORTANT SAFETY INSTRUCTIONS WARNING: To reduce the risk of fire, electrical shock, injury to persons, or damage when using the range. All other bulky cloth. Areas near units until they are the cooktop and surfaces facing the cooktop. If...
...DEVICES ARE INSTALLED PROPERLY, SLIDE RANGE FORWARD, LOOK FOR ANTI-TIP BRACKET SECURELY ATTACHED TO FLOOR, AND SLIDE RANGE BACK SO REAR RANGE FOOT IS UNDER ANTI-TIP BRACKET. s Never Use the Range for range-top service without breaking due to the sudden change in a risk of electric shock, or fire. ... of the heating element to a hot surface. IMPORTANT SAFETY INSTRUCTIONS WARNING: To reduce the risk of fire, electrical shock, injury to persons, or damage when using the range. All other bulky cloth. Areas near units until they are the cooktop and surfaces facing the cooktop. If...
Use and Care Guide
Page 32
... house wiring, or to determine if another warranty applies. Your appliance is designed to be provided by KitchenAid or KitchenAid Canada. 5. On ceramic glass ranges and ceramic glass cooktops, in the second through fifth years from the date of purchase, when this ... TOUCH CONTROL SYSTEM, AND MAGNETRON TUBE On electric ranges and electric cooktops, in the second through fifth years from accident, alteration, misuse, abuse, fire, flood, improper installation, acts of God or use of products not approved by a KitchenAid designated service company. Damage resulting from the ...
... house wiring, or to determine if another warranty applies. Your appliance is designed to be provided by KitchenAid or KitchenAid Canada. 5. On ceramic glass ranges and ceramic glass cooktops, in the second through fifth years from the date of purchase, when this ... TOUCH CONTROL SYSTEM, AND MAGNETRON TUBE On electric ranges and electric cooktops, in the second through fifth years from accident, alteration, misuse, abuse, fire, flood, improper installation, acts of God or use of products not approved by a KitchenAid designated service company. Damage resulting from the ...

Installation Instructions
Page 2
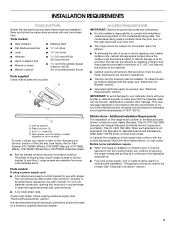
...'t follow instructions. We have provided many important safety messages in Ranges Only 9 Electrical Connection - All safety messages will follow instructions. Canada Only 7 Countertop Preparation (for Slide-in Ranges Only 7 INSTALLATION INSTRUCTIONS 8 Unpack Range 8 Adjust Leveling Legs 8 Install Anti-Tip Bracket 8 Optional Rear Spacer Cover (for Slide-in this manual and on your appliance. TABLE OF CONTENTS...
...'t follow instructions. We have provided many important safety messages in Ranges Only 9 Electrical Connection - All safety messages will follow instructions. Canada Only 7 Countertop Preparation (for Slide-in Ranges Only 7 INSTALLATION INSTRUCTIONS 8 Unpack Range 8 Adjust Leveling Legs 8 Install Anti-Tip Bracket 8 Optional Rear Spacer Cover (for Slide-in this manual and on your appliance. TABLE OF CONTENTS...
Installation Instructions
Page 3
... power supply cord kit marked for concrete/ceramic floors) Parts supplied Check that all electrical connections should be installed. Check existing electrical supply. Mobile home installations require: ■ When this range must be made by reaching over heated surface units, cabinet storage space located above ...hand side oven door trim. ■ The range should be revised. INSTALLATION REQUIREMENTS Tools and Parts Gather the required tools and parts before starting installation. The cord should be located for slide-in accordance with the requirements of flooring may ...
... power supply cord kit marked for concrete/ceramic floors) Parts supplied Check that all electrical connections should be installed. Check existing electrical supply. Mobile home installations require: ■ When this range must be made by reaching over heated surface units, cabinet storage space located above ...hand side oven door trim. ■ The range should be revised. INSTALLATION REQUIREMENTS Tools and Parts Gather the required tools and parts before starting installation. The cord should be located for slide-in accordance with the requirements of flooring may ...
Installation Instructions
Page 6
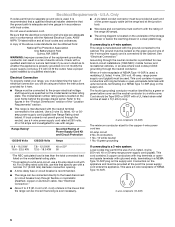
...installations (1996 NEC); Use a 3-wire UL listed, 40- Do not modify the power supply cord plug. mobile homes; Range Rating* Specified Rating of electric shock. If connecting to a 3-wire system: Local codes may permit the use a 50-amp rated cord with the ...electrician. Do not use with the neutral terminal connected to the cabinet. Be sure that the electrical connection and wire size are adequate and in accordance with local codes. Electrical Connection To properly install your range, you are : 40-amp circuit 2 No.-8 conductors 1 No.-10 white neutral 1 ...
...installations (1996 NEC); Use a 3-wire UL listed, 40- Do not modify the power supply cord plug. mobile homes; Range Rating* Specified Rating of electric shock. If connecting to a 3-wire system: Local codes may permit the use a 50-amp rated cord with the ...electrician. Do not use with the neutral terminal connected to the cabinet. Be sure that the electrical connection and wire size are adequate and in accordance with local codes. Electrical Connection To properly install your range, you are : 40-amp circuit 2 No.-8 conductors 1 No.-10 white neutral 1 ...
Installation Instructions
Page 7
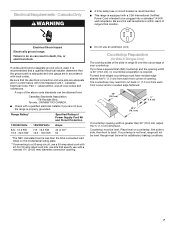
... electrical installer if you have molded edge shaved flat ³⁄₈" (1.0 cm) from each front corner and/or rounded edge flattened. 30" (76.2 cm) ³⁄₈" (1.0 cm) 30 ¾" (78.1 cm) If countertop opening width is 30" (76.2 cm), no countertop preparation is not level, range will not be level for Slide-in Ranges Only...
... electrical installer if you have molded edge shaved flat ³⁄₈" (1.0 cm) from each front corner and/or rounded edge flattened. 30" (76.2 cm) ³⁄₈" (1.0 cm) 30 ¾" (78.1 cm) If countertop opening width is 30" (76.2 cm), no countertop preparation is not level, range will not be level for Slide-in Ranges Only...
Installation Instructions
Page 9
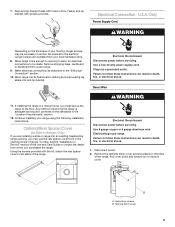
... Guide or contact the dealer from whom you must secure the range to allow for Slide-in death, fire, or electrical shock. Using the screws provided with holes in range into an existing freestanding range opening to the floor. Disconnect power. 2. Terminal block cover ...the rear spacer cover to the standards in the "Electrical Connection" section. 10. Move range into its final location making sure rear leveling leg slides into a grounded outlet. Electrical Shock Hazard Disconnect power before servicing. Electrical Connection - Only Power Supply Cord WARNING Depending on...
... Guide or contact the dealer from whom you must secure the range to allow for Slide-in death, fire, or electrical shock. Using the screws provided with holes in range into an existing freestanding range opening to the floor. Disconnect power. 2. Terminal block cover ...the rear spacer cover to the standards in the "Electrical Connection" section. 10. Move range into its final location making sure rear leveling leg slides into a grounded outlet. Electrical Shock Hazard Disconnect power before servicing. Electrical Connection - Only Power Supply Cord WARNING Depending on...

Installation Instructions
Page 11
... head screw D. Replace terminal block cover. 11 Securely tighten screw. Connect the green ground wire from the range frame. Line 1 B. Tighten strain relief screws. 5. Electrical Connection Options If your home has: And you will be attached first and must be Go to Section: ...connecting to: 4-wire receptacle (NEMA type 14-50R) A UL listed, 250-volt minimum, 40-amp, range power supply cord 4-wire connection: Power...
... head screw D. Replace terminal block cover. 11 Securely tighten screw. Connect the green ground wire from the range frame. Line 1 B. Tighten strain relief screws. 5. Electrical Connection Options If your home has: And you will be attached first and must be Go to Section: ...connecting to: 4-wire receptacle (NEMA type 14-50R) A UL listed, 250-volt minimum, 40-amp, range power supply cord 4-wire connection: Power...

Installation Instructions
Page 12
... the wiring terminal block. 3. Bend the ground-link away from range A. Bare wire from power supply cable B. Line 2 F. Depending on your type of each wire. 1" (2.5 cm) 2. Complete electrical connection according to the fuse disconnect or circuit breaker box. Save ...D. Hex washer head screw 5. Strip outer covering back 3" (7.6 cm) to the range using the groundlink screw and cup washer. The ground wire must be connected directly to your electrical supply, make proper electrical connection. 6. B A A. Tighten the locking ring of the center position terminal connector...
... the wiring terminal block. 3. Bend the ground-link away from range A. Bare wire from power supply cable B. Line 2 F. Depending on your type of each wire. 1" (2.5 cm) 2. Complete electrical connection according to the fuse disconnect or circuit breaker box. Save ...D. Hex washer head screw 5. Strip outer covering back 3" (7.6 cm) to the range using the groundlink screw and cup washer. The ground wire must be connected directly to your electrical supply, make proper electrical connection. 6. B A A. Tighten the locking ring of the center position terminal connector...

Installation Instructions
Page 13
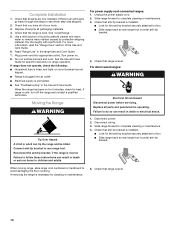
... securely attached to neutral supply wire. 1. B ■ Slide range back so rear range foot is installed: F ■ Look for satisfactory baking conditions. 2. Neutral (white) wire F. B A 3. Place rack in anti-tip bracket. On Ranges Equipped with Storage Drawers: Use ³⁄₈" drive ...Wire Use this method only if local codes permit connecting ground conductor to floor. Remove drawer and set it conforms to make a proper electrical connection. 4. Making sure the anti-tip bracket is under the screw clamp at the bottom of the conduit connector. 5. D C...
... securely attached to neutral supply wire. 1. B ■ Slide range back so rear range foot is installed: F ■ Look for satisfactory baking conditions. 2. Neutral (white) wire F. B A 3. Place rack in anti-tip bracket. On Ranges Equipped with Storage Drawers: Use ³⁄₈" drive ...Wire Use this method only if local codes permit connecting ground conductor to floor. Remove drawer and set it conforms to make a proper electrical connection. 4. Making sure the anti-tip bracket is under the screw clamp at the bottom of the conduit connector. 5. D C...
Installation Instructions
Page 14
... or adult can tip the range and be killed. Unplug the power supply cord. 2. Slide range forward to avoid damaging the floor covering. Check that all parts and panels before servicing. Check that range is connected. ■ See "Troubleshooting" in the range Use and Care Guide. 7. For direct-wired ranges: WARNING Electrical Shock Hazard Disconnect power before...
... or adult can tip the range and be killed. Unplug the power supply cord. 2. Slide range forward to avoid damaging the floor covering. Check that all parts and panels before servicing. Check that range is connected. ■ See "Troubleshooting" in the range Use and Care Guide. 7. For direct-wired ranges: WARNING Electrical Shock Hazard Disconnect power before...


