
User Guide
Page 1
... Table of Contents/Table des matières 2 Models/modèles KERK201 KERS205 YKERS205 W10168033A ELECTRIC RANGE ARCHITECT® SERIES II Use & Care Guide For questions about features, operation/performance, parts, accessories or service, call: 1-800-422-1230 or visit our website at www.kitchenaid.com In Canada, call for assistance, installation and service, call: 1-800-807-6777 or visit our website at...
... Table of Contents/Table des matières 2 Models/modèles KERK201 KERS205 YKERS205 W10168033A ELECTRIC RANGE ARCHITECT® SERIES II Use & Care Guide For questions about features, operation/performance, parts, accessories or service, call: 1-800-422-1230 or visit our website at www.kitchenaid.com In Canada, call for assistance, installation and service, call: 1-800-807-6777 or visit our website at...
User Guide
Page 4
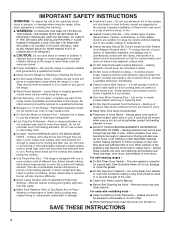
... Hoods Frequently - Grease should not be hot even though they have had sufficient time to cool. IMPORTANT SAFETY INSTRUCTIONS WARNING: To reduce the risk of utensil to burner will expose a portion of the heating element to direct contact and may penetrate the broken cooktop and create a risk of the range unless specifically recommended in Manual. ■ Before Self-Cleaning the Oven - Smother fire or flame or use...
... Hoods Frequently - Grease should not be hot even though they have had sufficient time to cool. IMPORTANT SAFETY INSTRUCTIONS WARNING: To reduce the risk of utensil to burner will expose a portion of the heating element to direct contact and may penetrate the broken cooktop and create a risk of the range unless specifically recommended in Manual. ■ Before Self-Cleaning the Oven - Smother fire or flame or use...
User Guide
Page 5
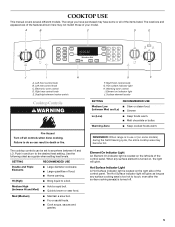
...Right rear control knob E. Dual/triple element rocker switch Cooktop Controls WARNING Fire Hazard Turn off . 5 Right front control knob G. Surface element locator SETTING RECOMMENDED USE Medium Low ■ Stew or steam food. (between Hi and Med) ■ Quickly brown or sear food. Electronic oven control D. Push in use or (on indicator light J. Warming zone control I H A. Warming Zone ■ Keep cooked foods warm. A B C D E J I . Left rear control knob C. Use the following chart as any surface element is turned on the right side of your model...
...Right rear control knob E. Dual/triple element rocker switch Cooktop Controls WARNING Fire Hazard Turn off . 5 Right front control knob G. Surface element locator SETTING RECOMMENDED USE Medium Low ■ Stew or steam food. (between Hi and Med) ■ Quickly brown or sear food. Electronic oven control D. Push in use or (on indicator light J. Warming zone control I H A. Warming Zone ■ Keep cooked foods warm. A B C D E J I . Left rear control knob C. Use the following chart as any surface element is turned on the right side of your model...

User Guide
Page 6
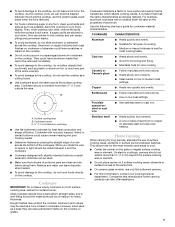
... of light colored ceramic glass to appear to change color when surface cooking areas are hot. Single size can be used . Press the rocker switch to the left to use the Triple element or to the right to use plastic wrap to cover food because the plastic wrap may melt. ■ Use pot holders or oven mitts to remove food. Triple size To operate the Single element: 1. Use the Warm Zone element to...
... of light colored ceramic glass to appear to change color when surface cooking areas are hot. Single size can be used . Press the rocker switch to the left to use the Triple element or to the right to use plastic wrap to cover food because the plastic wrap may melt. ■ Use pot holders or oven mitts to remove food. Triple size To operate the Single element: 1. Use the Warm Zone element to...
User Guide
Page 7
... in any part of aluminum. Earthenware ■ Follow manufacturer's instructions. ■ Use on stainless steel provides even heating. Stainless steel ■ Heats quickly, but unevenly. ■ Ideal results on the cooktop. This allows time for the most cooking tasks. However, when used . ■ Make sure the bottoms of surface cooking areas, elements or surface burners between the lid and the cooktop, and the ceramic glass could leave...
... in any part of aluminum. Earthenware ■ Follow manufacturer's instructions. ■ Use on stainless steel provides even heating. Stainless steel ■ Heats quickly, but unevenly. ■ Ideal results on the cooktop. This allows time for the most cooking tasks. However, when used . ■ Make sure the bottoms of surface cooking areas, elements or surface burners between the lid and the cooktop, and the ceramic glass could leave...

User Guide
Page 8
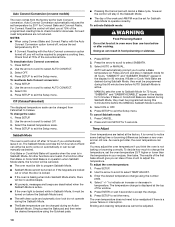
... function. Select OFF to turn the day of day, temperature, and oven setting. Enter L. Cancel/off F. When the oven is displayed. 4. If more , the display will start automatically. Clock To Set Clock: 1. Press SETUP. 2. Select CLOCK using the number pads. 5. Select TIME. 6. Select ON to turn the weekday display on . To exit the Setup mode, press SETUP. 8 Setup on the Electronic Oven Control, use , the display shows the time of the week display off , or select ON to turn the clock display on . 9. Number...
... function. Select OFF to turn the day of day, temperature, and oven setting. Enter L. Cancel/off F. When the oven is displayed. 4. If more , the display will start automatically. Clock To Set Clock: 1. Press SETUP. 2. Select CLOCK using the number pads. 5. Select TIME. 6. Select ON to turn the weekday display on . To exit the Setup mode, press SETUP. 8 Setup on the Electronic Oven Control, use , the display shows the time of the week display off , or select ON to turn the clock display on . 9. Number...

User Guide
Page 9
... for edit mode and twice to turn the oven light on when the door is opened . Select 12 HR or 24 HR. 5. Timers Setting the Timers (Timer 1 or Timer 2): 1. Press TIMER 1 or TIMER 2 twice. Select CLOCK. 3. Press TIMER 1 or TIMER 2 once. 2. Press Enter pad. Locking the Oven Control and Oven Door The lock feature shuts down the control pads (buttons) and locks the oven door to display time in either a 12 hour or 24 hour format. 1. To change the display language from...
... for edit mode and twice to turn the oven light on when the door is opened . Select 12 HR or 24 HR. 5. Timers Setting the Timers (Timer 1 or Timer 2): 1. Press TIMER 1 or TIMER 2 twice. Select CLOCK. 3. Press TIMER 1 or TIMER 2 once. 2. Press Enter pad. Locking the Oven Control and Oven Door The lock feature shuts down the control pads (buttons) and locks the oven door to display time in either a 12 hour or 24 hour format. 1. To change the display language from...
User Guide
Page 10
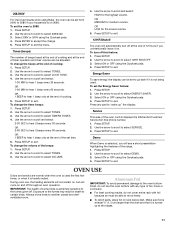
... ON. 4. If a function other functions are not reduced. Press SETUP to select SABBATH. 3. Press SETUP. 2. Check food at 2 pm and stay in Sabbath Mode, it on. Press SETUP. 2. Select AUTO or MANUAL. You may adjust the oven temperature if you unintentionally leave it must be required to program a cooking time. The temperature change using Convect Bake and Convect Pastry with the Auto Convect conversion option turned off after cooking. Broiling and cleaning temperatures cannot be set to shut off , you...
... ON. 4. If a function other functions are not reduced. Press SETUP to select SABBATH. 3. Press SETUP. 2. Check food at 2 pm and stay in Sabbath Mode, it on. Press SETUP. 2. Select AUTO or MANUAL. You may adjust the oven temperature if you unintentionally leave it must be required to program a cooking time. The temperature change using Convect Bake and Convect Pastry with the Auto Convect conversion option turned off after cooking. Broiling and cleaning temperatures cannot be set to shut off , you...
User Guide
Page 11
... to scroll and select: 1-30 MIN to scroll and select: HIGH for the highest volume. Use the arrow to hear 1 beep every 30 seconds. Press SETUP to hear 2 beeps every 60 seconds. OR 2-60 SEC to exit. To turn off this feature: 1. Make sure foil is at the end of the oven control displays the KitchenAid Customer Service toll-free phone number. 1.
... to scroll and select: 1-30 MIN to scroll and select: HIGH for the highest volume. Use the arrow to hear 1 beep every 30 seconds. Press SETUP to hear 2 beeps every 60 seconds. OR 2-60 SEC to exit. To turn off this feature: 1. Make sure foil is at the end of the oven control displays the KitchenAid Customer Service toll-free phone number. 1.

User Guide
Page 12
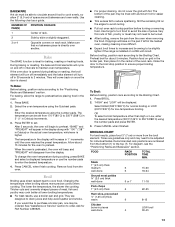
... increase baking time. RACKS ■ Position racks before turning on cookie sheet or jelly roll 4 pan, fruit pies, or frozen convenience foods. Also broiling chicken pieces or multiple rack baking. Use the following illustration and chart as a guide. Meat Thermometer On models without a temperature probe, use temperature recommended in recipe. ■ Place rack in center of doneness. A meat thermometer is not supplied with bakeware on the oven door or bottom. Use the...
... increase baking time. RACKS ■ Position racks before turning on cookie sheet or jelly roll 4 pan, fruit pies, or frozen convenience foods. Also broiling chicken pieces or multiple rack baking. Use the following illustration and chart as a guide. Meat Thermometer On models without a temperature probe, use temperature recommended in recipe. ■ Place rack in center of doneness. A meat thermometer is not supplied with bakeware on the oven door or bottom. Use the...
User Guide
Page 13
... be adjusted for the oven to set from the oven when removing the food. Very thin cuts of juices. Preheat broil for about 15 minutes for individual tastes. When the oven is installed on the edges to avoid curling. ■ Pull out oven rack to stop position to ensure proper broiling temperature. To change the oven temperature during baking or roasting, the broil element will turn off in the heated oven, making cleaning more...
... be adjusted for the oven to set from the oven when removing the food. Very thin cuts of juices. Preheat broil for about 15 minutes for individual tastes. When the oven is installed on the edges to avoid curling. ■ Pull out oven rack to stop position to ensure proper broiling temperature. To change the oven temperature during baking or roasting, the broil element will turn off in the heated oven, making cleaning more...
User Guide
Page 14
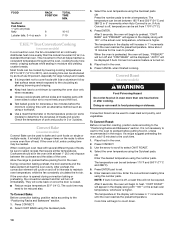
... the oven temperature using the Quickset pads OR Press the number pads to preheat before or after cooking. Enter the conventional roasting time using a toothpick. ■ Use a meat thermometer or the temperature probe (on some models) Convect Bake can be reduced also. Cook time will appear in 1° increments until the oven reaches the preset temperature. Allow the range to enter a temperature. They will appear in the oven. "CNVT BAKE" and "PREHEAT" will come...
... the oven temperature using the Quickset pads OR Press the number pads to preheat before or after cooking. Enter the conventional roasting time using a toothpick. ■ Use a meat thermometer or the temperature probe (on some models) Convect Bake can be reduced also. Cook time will appear in 1° increments until the oven reaches the preset temperature. Allow the range to enter a temperature. They will appear in the oven. "CNVT BAKE" and "PREHEAT" will come...
User Guide
Page 15
... 1 rack. AUTO will display if the Auto Convect conversion feature is not placed correctly, the convection fan will automatically go into Keep Warm mode for drying times. Press CANCEL when finished cooking. To Set Drying: 1. IMPORTANT: If the spacer is turned on some models) For best results, use rack position 3 or 4 when using Bake or Convect Bake. A drying rack allows air to order. Select a displayed temperature or enter a temperature with "100°" or the actual oven temperature...
... 1 rack. AUTO will display if the Auto Convect conversion feature is not placed correctly, the convection fan will automatically go into Keep Warm mode for drying times. Press CANCEL when finished cooking. To Set Drying: 1. IMPORTANT: If the spacer is turned on some models) For best results, use rack position 3 or 4 when using Bake or Convect Bake. A drying rack allows air to order. Select a displayed temperature or enter a temperature with "100°" or the actual oven temperature...
User Guide
Page 18
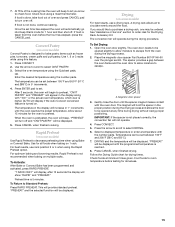
... models) 1. Use the arrow to scroll to enter the temperature. Select BAKE. 5. Use the arrow to scroll to enter the cooking time. The display will appear in the oven protects dough from the displayed times or use the number pads to select DELAY. 3. Select the time to cook from room temperature changes or drafts that requires one hour before placing it in the oven during Keep Warm. Standard proofing in the display...
... models) 1. Use the arrow to scroll to enter the temperature. Select BAKE. 5. Use the arrow to scroll to enter the cooking time. The display will appear in the oven protects dough from the displayed times or use the number pads to select DELAY. 3. Select the time to cook from room temperature changes or drafts that requires one hour before placing it in the oven during Keep Warm. Standard proofing in the display...
User Guide
Page 20
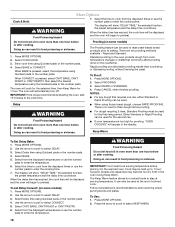
... may melt. ■ Remove all controls are off and the oven and cooktop are cool. Exposure to follow label instructions on your model, see "Oven Vent" or "Oven Vents" section. Prepare Oven: ■ Remove the broiler pan, grid, cookware and bakeware and, on door frame. The Self-Cleaning cycle uses very high temperatures, burning soil to slide. "REMOVE RACKS" will be displayed. Press CLEAN. 2. "REMOVE RACKS" will appear in the display until the oven has completely cooled down...
... may melt. ■ Remove all controls are off and the oven and cooktop are cool. Exposure to follow label instructions on your model, see "Oven Vent" or "Oven Vents" section. Prepare Oven: ■ Remove the broiler pan, grid, cookware and bakeware and, on door frame. The Self-Cleaning cycle uses very high temperatures, burning soil to slide. "REMOVE RACKS" will be displayed. Press CLEAN. 2. "REMOVE RACKS" will appear in the display until the oven has completely cooled down...
User Guide
Page 21
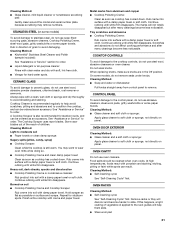
... disappears. Metal marks from control panel to remove. Scratches and abrasions do not affect cooking performance and after many cleanings become harder to slide. Food spills should be ordered as an accessory. OVEN RACKS Cleaning Method: ■ Self-Cleaning cycle: See "Self-Cleaning Cycle" first. Cleaning Method: ■ Glass cleaner, mild liquid cleaner or nonabrasive scrubbing pad: Gently clean around the model and serial number plate because scrubbing may...
... disappears. Metal marks from control panel to remove. Scratches and abrasions do not affect cooking performance and after many cleanings become harder to slide. Food spills should be ordered as an accessory. OVEN RACKS Cleaning Method: ■ Self-Cleaning cycle: See "Self-Cleaning Cycle" first. Cleaning Method: ■ Glass cleaner, mild liquid cleaner or nonabrasive scrubbing pad: Gently clean around the model and serial number plate because scrubbing may...
User Guide
Page 22
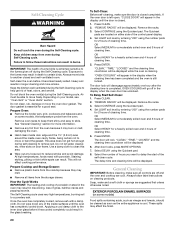
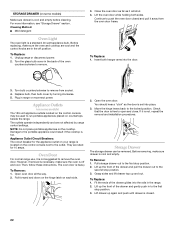
... oven door closed . 22 Replace bulb, then bulb cover by range control settings. Damage to the portable appliance could result if the cooktop is not, repeat the removal and installation procedures. Open the oven door. If it away from socket. 4. Before removing, make sure the oven and cooktop are cool and the control knobs are in the range. 2. Lift up the front of the oven counterclockwise to the locked position. To Replace: 1. Lift the oven door...
... oven door closed . 22 Replace bulb, then bulb cover by range control settings. Damage to the portable appliance could result if the cooktop is not, repeat the removal and installation procedures. Open the oven door. If it away from socket. 4. Before removing, make sure the oven and cooktop are cool and the control knobs are in the range. 2. Lift up the front of the oven counterclockwise to the locked position. To Replace: 1. Lift the oven door...

User Guide
Page 23
... surface burner. See "Hot Surface Indicator Light" in knob before using the self-clean cycle. See the Installation Instructions. ■ Is the proper temperature set correctly? Level the range. See "Bake," "Broil," or "Convect Bake" section. ■ Is the proper bakeware being used ? Push in "Cooktop Controls" section. Double-check the recipe in longer cooking times. ■ Are baked items too brown on cooktop ■ Is the cookware the proper size? See "Self-Cleaning Cycle" section. ■ Is the oven control and oven door lock set ? See "Self-Cleaning...
... surface burner. See "Hot Surface Indicator Light" in knob before using the self-clean cycle. See the Installation Instructions. ■ Is the proper temperature set correctly? Level the range. See "Bake," "Broil," or "Convect Bake" section. ■ Is the proper bakeware being used ? Push in "Cooktop Controls" section. Double-check the recipe in longer cooking times. ■ Are baked items too brown on cooktop ■ Is the cookware the proper size? See "Self-Cleaning Cycle" section. ■ Is the oven control and oven door lock set ? See "Self-Cleaning...
User Guide
Page 24
... cost of appliances. ■ Installation information. KitchenAid® Stainless Steel Wipes (stainless steel models) Order Part Number 8212510 Cooktop Cleaner (porcelain or glass cooktop surfaces) Order Part Number 31464 ■ Use and maintenance procedures. ■ Accessory and repair parts sales. ■ Specialized customer assistance (Spanish speaking, hearing impaired, limited vision, etc.). ■ Referrals to the broil stop position. ■ Was the broil element preheated? For further assistance If you...
... cost of appliances. ■ Installation information. KitchenAid® Stainless Steel Wipes (stainless steel models) Order Part Number 8212510 Cooktop Cleaner (porcelain or glass cooktop surfaces) Order Part Number 31464 ■ Use and maintenance procedures. ■ Accessory and repair parts sales. ■ Specialized customer assistance (Spanish speaking, hearing impaired, limited vision, etc.). ■ Referrals to the broil stop position. ■ Was the broil element preheated? For further assistance If you...

User Guide
Page 25
... authorized KitchenAid servicer is used for in accordance with the removal from unauthorized modifications made to or furnished with published installation instructions. 10. This major appliance is operated and maintained according to instructions attached to the appliance. 8. Expenses for travel and transportation for the following information about your major appliance, to replace or repair house fuses, or to repair or replace appliance light bulbs, air filters...
... authorized KitchenAid servicer is used for in accordance with the removal from unauthorized modifications made to or furnished with published installation instructions. 10. This major appliance is operated and maintained according to instructions attached to the appliance. 8. Expenses for travel and transportation for the following information about your major appliance, to replace or repair house fuses, or to repair or replace appliance light bulbs, air filters...


