User Guide
Page 1
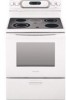
ELECTRIC RANGE Use & Care Guide For questions about features, operation/performance, parts, accessories or service, call: 1-800-422-1230 or visit our website at www.kitchenaid.com Table of Contents...2 Models KERI201 KERI203 KERA205 W10017760
ELECTRIC RANGE Use & Care Guide For questions about features, operation/performance, parts, accessories or service, call: 1-800-422-1230 or visit our website at www.kitchenaid.com Table of Contents...2 Models KERI201 KERI203 KERA205 W10017760
User Guide
Page 2
TABLE OF CONTENTS RANGE SAFETY 3 The Anti-Tip Bracket 3 PARTS AND FEATURES 5 COOKTOP USE 7 Ceramic Glass 7 Cookware 7 Home Canning 8 Cooktop Controls 8 Single and Dual-Size Elements 8 Simmer Feature 9 Warm ... 18 Convection Roast (on some models 18 Convection Broil (on some models 19 Sabbath Mode 20 Proofing Bread (on some models 21 Timed Cooking 21 RANGE CARE 22 Self-Cleaning Cycle 22 General Cleaning 23 Oven Light(s 24 Storage Drawer 25 Oven Door 25 TROUBLESHOOTING 26 ASSISTANCE OR SERVICE 27 WARRANTY...
TABLE OF CONTENTS RANGE SAFETY 3 The Anti-Tip Bracket 3 PARTS AND FEATURES 5 COOKTOP USE 7 Ceramic Glass 7 Cookware 7 Home Canning 8 Cooktop Controls 8 Single and Dual-Size Elements 8 Simmer Feature 9 Warm ... 18 Convection Roast (on some models 18 Convection Broil (on some models 19 Sabbath Mode 20 Proofing Bread (on some models 21 Timed Cooking 21 RANGE CARE 22 Self-Cleaning Cycle 22 General Cleaning 23 Oven Light(s 24 Storage Drawer 25 Oven Door 25 TROUBLESHOOTING 26 ASSISTANCE OR SERVICE 27 WARRANTY...
User Guide
Page 3
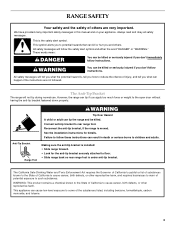
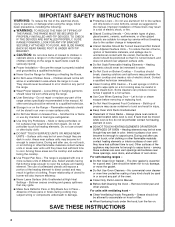
... benzene, formaldehyde, carbon monoxide, and toluene. 3 This symbol alerts you to potential hazards that can cause low-level exposure to rear range foot. RANGE SAFETY Your safety and the safety of others . This is under anti-tip bracket. These words mean: DANGER You can happen if the...word "DANGER" or "WARNING." WARNING You can result in this manual and on your appliance. Reconnect the anti-tip bracket, if the range is , tell you don't follow instructions. We have provided many important safety messages in death or serious burns to such substances. The ...
... benzene, formaldehyde, carbon monoxide, and toluene. 3 This symbol alerts you to potential hazards that can cause low-level exposure to rear range foot. RANGE SAFETY Your safety and the safety of others . This is under anti-tip bracket. These words mean: DANGER You can happen if the...word "DANGER" or "WARNING." WARNING You can result in this manual and on your appliance. Reconnect the anti-tip bracket, if the range is , tell you don't follow instructions. We have provided many important safety messages in death or serious burns to such substances. The ...
User Guide
Page 4
...Oven - Be sure the range is essential for a good seal. They should never be referred to a qualified technician. Do not repair or replace any kind should not be positioned so that may penetrate the broken cooktop and create a risk of electric shock. s Do Not Use...should break, cleaning solutions and spillovers may ignite. IMPORTANT SAFETY INSTRUCTIONS WARNING: To reduce the risk of fire, electrical shock, injury to children in cabinets above a range or on the backguard of a range - s DO NOT TOUCH SURFACE UNITS OR AREAS NEAR UNITS - s CAUTION: Do not store items of ...
...Oven - Be sure the range is essential for a good seal. They should never be referred to a qualified technician. Do not repair or replace any kind should not be positioned so that may penetrate the broken cooktop and create a risk of electric shock. s Do Not Use...should break, cleaning solutions and spillovers may ignite. IMPORTANT SAFETY INSTRUCTIONS WARNING: To reduce the risk of fire, electrical shock, injury to children in cabinets above a range or on the backguard of a range - s DO NOT TOUCH SURFACE UNITS OR AREAS NEAR UNITS - s CAUTION: Do not store items of ...
User Guide
Page 6
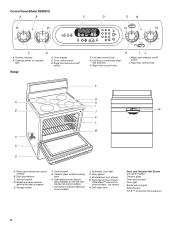
... /off switch J. Selectable simmer feature (also available on the left side of drawer) E. Door gasket L. Bake element (not shown) (CleanBake™ element on /off switch Range F. Control Panel (Model KERI201) A B OFF Lo Hi OFF Lo Lo C D E B Simmer On/Off OFF OFF Lo Hi Lo Hi DUAL SINGLE Med Lo Med Hi...
... /off switch J. Selectable simmer feature (also available on the left side of drawer) E. Door gasket L. Bake element (not shown) (CleanBake™ element on /off switch Range F. Control Panel (Model KERI201) A B OFF Lo Hi OFF Lo Lo C D E B Simmer On/Off OFF OFF Lo Hi Lo Hi DUAL SINGLE Med Lo Med Hi...

User Guide
Page 8
... Controls WARNING Fire Hazard Turn off all controls when done cooking. s Quickly brown or sear food. s Fry poultry or meat. OFF Lo Hi REMEMBER: When range is recommended for larger size cookware, large quantities of food. Med Lo Med Med Hi Single and Dual-Size Elements A A. Failure to do so can...
... Controls WARNING Fire Hazard Turn off all controls when done cooking. s Quickly brown or sear food. s Fry poultry or meat. OFF Lo Hi REMEMBER: When range is recommended for larger size cookware, large quantities of food. Med Lo Med Med Hi Single and Dual-Size Elements A A. Failure to do so can...
User Guide
Page 9
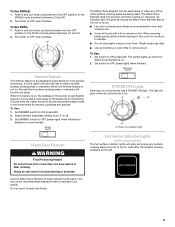
... sickness. Turn knob to touch, even after cooking. Choose from LO to remove food. The light will glow as long as usual. It provides a wide range of temperatures for more precise simmering. The Warm Zone Element area will function as any of control knobs has a POWER ON light. Power on . It...
... sickness. Turn knob to touch, even after cooking. Choose from LO to remove food. The light will glow as long as usual. It provides a wide range of temperatures for more precise simmering. The Warm Zone Element area will function as any of control knobs has a POWER ON light. Power on . It...
User Guide
Page 16
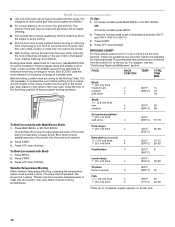
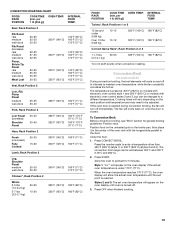
...;F 14 (260°C) 16 18 Steak 1¹⁄₂" (3.8 cm) thick rare 4 medium 4 500°F 23 (260°C) 28 To Broil (on models with the range. The lower the temperature, the slower the cooking.
...;F 14 (260°C) 16 18 Steak 1¹⁄₂" (3.8 cm) thick rare 4 medium 4 500°F 23 (260°C) 28 To Broil (on models with the range. The lower the temperature, the slower the cooking.
User Guide
Page 18
...Positioning Racks and Bakeware" section. Press the number pads to maintain oven temperature, while the fan constantly circulates the hot air. The convection bake range can be set temperature is closed . Press START. When the set between 170°F and 500°F (77°C and 260°C).... and Bakeware" section. 1. Use the roasting rack on once the door is under 170°F (77°C). A B C A. The convection roast range can be set point is opened during convection baking or preheating, the convection element and fan will cycle on . 3. "Lo°" will sound if ...
...Positioning Racks and Bakeware" section. Press the number pads to maintain oven temperature, while the fan constantly circulates the hot air. The convection bake range can be set temperature is closed . Press START. When the set between 170°F and 500°F (77°C and 260°C).... and Bakeware" section. 1. Use the roasting rack on once the door is under 170°F (77°C). A B C A. The convection roast range can be set point is opened during convection baking or preheating, the convection element and fan will cycle on . 3. "Lo°" will sound if ...
User Guide
Page 19
...Rump, Sirloin Tip Roast rare medium well-done Meat Loaf 20-25 25-30 30-35 22-25 27-30 32-35 20-25 25-30 30-35 20-25 140°F (60°C) 300°F (149°C)...;C) 300°F (149°C) 160°F (71°C) Lamb, Rack Position 2 Leg, Shoulder Roast medium well-done 25-30 30-35 300°F (149°C) 160°F (71°C) 170°F (77°C) Chicken*, Rack Position 2 Whole 3-5...;F (260°C) (style 1) or 500°F (260°C) (styles 2 and 3). The convection broil range can be changed to be set oven temperature will appear on and off . 3. Style 1: "Lo°" ...
...Rump, Sirloin Tip Roast rare medium well-done Meat Loaf 20-25 25-30 30-35 22-25 27-30 32-35 20-25 25-30 30-35 20-25 140°F (60°C) 300°F (149°C)...;C) 300°F (149°C) 160°F (71°C) Lamb, Rack Position 2 Leg, Shoulder Roast medium well-done 25-30 30-35 300°F (149°C) 160°F (71°C) 170°F (77°C) Chicken*, Rack Position 2 Whole 3-5...;F (260°C) (style 1) or 500°F (260°C) (styles 2 and 3). The convection broil range can be changed to be set oven temperature will appear on and off . 3. Style 1: "Lo°" ...
User Guide
Page 20
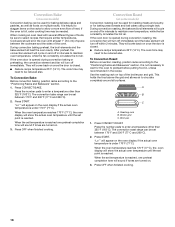
... other than 325°F (163°C). Styles 2 and 3: "SAb On" will not turn off . Press START. See "To Activate" section. The bake range can be set up. 1. Styles 2 and 3: Press OPTIONS, and then press number pad 0. When the oven door is opened or closed, the oven light ...and 3: Press OPTIONS, and then press number pad 0 to return to normal operating mode (non-Sabbath Mode compliant, not cooking). Press BAKE. The bake range can result in the Sabbath Mode. Doing so can be actively cooking. The oven will automatically turn on or off . To Regularly Set, Untimed: 6. Sabbath...
... other than 325°F (163°C). Styles 2 and 3: "SAb On" will not turn off . Press START. See "To Activate" section. The bake range can be set up. 1. Styles 2 and 3: Press OPTIONS, and then press number pad 0. When the oven door is opened or closed, the oven light ...and 3: Press OPTIONS, and then press number pad 0 to return to normal operating mode (non-Sabbath Mode compliant, not cooking). Press BAKE. The bake range can result in the Sabbath Mode. Doing so can be actively cooking. The oven will automatically turn on or off . To Regularly Set, Untimed: 6. Sabbath...
User Guide
Page 22
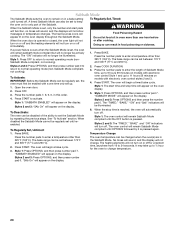
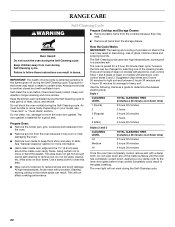
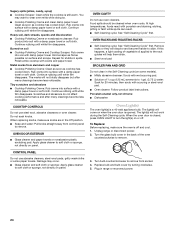
... ash. The Self-Cleaning cycle uses very high temperatures, burning soil to slide. There are 2 hours 30 minutes for light soil and between 3 hours 30 minutes and 4 hours 30 minutes for a 2 hour 30 minute clean cycle; Do not wipe down any of clean on models with electronic oven control styles 2 ...-clean the oven before it becomes heavily soiled. Air must be changed by selecting one of some birds is essential for more smoke. RANGE CARE WARNING Self-Cleaning Cycle Prepare Cooktop and Storage Drawer: s Remove plastic items from the oven because it may burn or melt, ...
... ash. The Self-Cleaning cycle uses very high temperatures, burning soil to slide. There are 2 hours 30 minutes for light soil and between 3 hours 30 minutes and 4 hours 30 minutes for a 2 hour 30 minute clean cycle; Do not wipe down any of clean on models with electronic oven control styles 2 ...-clean the oven before it becomes heavily soiled. Air must be changed by selecting one of some birds is essential for more smoke. RANGE CARE WARNING Self-Cleaning Cycle Prepare Cooktop and Storage Drawer: s Remove plastic items from the oven because it may burn or melt, ...
User Guide
Page 24
...Self-Cleaning Cycle" first. s Mildly abrasive cleanser: Scrub with creme and paper towel. To Replace: Before replacing, make sure knobs are in range or reconnect power. 24 Turn bulb counterclockwise to remove from control panel to 1 gal. (3.75 L) water: Soak for stubborn spots. Polish ...pitting or faint white spots can result. s Cooktop Polishing Creme and clean damp paper towel: Clean as soon as cooktop has cooled down . Unplug range or disconnect power. 2. You may occur. Burned-on panel. s Self-Cleaning cycle: See "Self-Cleaning Cycle" first. s Glass cleaner and ...
...Self-Cleaning Cycle" first. s Mildly abrasive cleanser: Scrub with creme and paper towel. To Replace: Before replacing, make sure knobs are in range or reconnect power. 24 Turn bulb counterclockwise to remove from control panel to 1 gal. (3.75 L) water: Soak for stubborn spots. Polish ...pitting or faint white spots can result. s Cooktop Polishing Creme and clean damp paper towel: Clean as soon as cooktop has cooled down . Unplug range or disconnect power. 2. You may occur. Burned-on panel. s Self-Cleaning cycle: See "Self-Cleaning Cycle" first. s Glass cleaner and ...
User Guide
Page 25
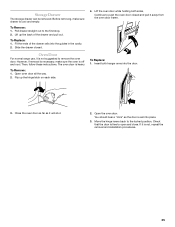
... removing, make sure the oven is off and cool. Lift the oven door while holding both hanger arms into the door. 3. Oven Door For normal range use, it will shut. 2. The oven door is free to open and close. Check that the door is heavy. Lift up the hinge latch on...
... removing, make sure the oven is off and cool. Lift the oven door while holding both hanger arms into the door. 3. Oven Door For normal range use, it will shut. 2. The oven door is free to open and close. Check that the door is heavy. Lift up the hinge latch on...
User Guide
Page 28
... United States or Canada. 6. You will need it is installed in an inaccessible location or is not installed in accordance with published installation instructions. KITCHENAID® ELECTRIC RANGE WARRANTY ONE YEAR LIMITED WARRANTY For one year from the date of purchase, when this major appliance is operated and maintained according to instructions attached...
... United States or Canada. 6. You will need it is installed in an inaccessible location or is not installed in accordance with published installation instructions. KITCHENAID® ELECTRIC RANGE WARRANTY ONE YEAR LIMITED WARRANTY For one year from the date of purchase, when this major appliance is operated and maintained according to instructions attached...


