User Guide
Page 1
ELECTRIC RANGE Use & Care Guide For questions about features, operation/performance, parts, accessories or service, call: 1-800-422-1230 or visit our website at www.kitchenaid.com Table of Contents...2 Models KERI201 KERI203 KERA205 W10017760
ELECTRIC RANGE Use & Care Guide For questions about features, operation/performance, parts, accessories or service, call: 1-800-422-1230 or visit our website at www.kitchenaid.com Table of Contents...2 Models KERI201 KERI203 KERA205 W10017760
User Guide
Page 2
...on some models 18 Convection Broil (on some models 19 Sabbath Mode 20 Proofing Bread (on some models 21 Timed Cooking 21 RANGE CARE 22 Self-Cleaning Cycle 22 General Cleaning 23 Oven Light(s 24 Storage Drawer 25 Oven Door 25 TROUBLESHOOTING 26 ASSISTANCE OR ...SERVICE 27 WARRANTY 28 2 STYLE 1 12 Options Selection Pad 12 Fahrenheit and Celsius 12 Tones 12 Oven Temperature Calibration 12 OPTIONS - TABLE OF CONTENTS RANGE SAFETY 3 The Anti-Tip Bracket 3 PARTS AND FEATURES 5 COOKTOP USE 7 Ceramic Glass 7 Cookware 7 Home Canning 8 Cooktop Controls 8 Single and Dual-...
...on some models 18 Convection Broil (on some models 19 Sabbath Mode 20 Proofing Bread (on some models 21 Timed Cooking 21 RANGE CARE 22 Self-Cleaning Cycle 22 General Cleaning 23 Oven Light(s 24 Storage Drawer 25 Oven Door 25 TROUBLESHOOTING 26 ASSISTANCE OR ...SERVICE 27 WARRANTY 28 2 STYLE 1 12 Options Selection Pad 12 Fahrenheit and Celsius 12 Tones 12 Oven Temperature Calibration 12 OPTIONS - TABLE OF CONTENTS RANGE SAFETY 3 The Anti-Tip Bracket 3 PARTS AND FEATURES 5 COOKTOP USE 7 Ceramic Glass 7 Cookware 7 Home Canning 8 Cooktop Controls 8 Single and Dual-...
User Guide
Page 3
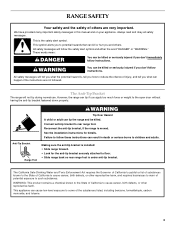
...this manual and on your appliance. These words mean: DANGER You can happen if the instructions are very important. The Anti-Tip Bracket The range will tell you what the potential hazard is the safety alert symbol. Connect anti-tip bracket to the open door without having the anti-... will follow instructions. All safety messages will not tip during normal use. This is , tell you how to floor. • Slide range back so rear range foot is moved. See the installation instructions for the anti-tip bracket securely attached to reduce the chance of injury, and tell you what...
...this manual and on your appliance. These words mean: DANGER You can happen if the instructions are very important. The Anti-Tip Bracket The range will tell you what the potential hazard is the safety alert symbol. Connect anti-tip bracket to the open door without having the anti-... will follow instructions. All safety messages will not tip during normal use. This is , tell you how to floor. • Slide range back so rear range foot is moved. See the installation instructions for the anti-tip bracket securely attached to reduce the chance of injury, and tell you what...
User Guide
Page 4
... until they have had sufficient time to cool. children climbing on hot surfaces may become hot enough to cause burns. s Never Use the Range for range-top service without breaking due to cause burns - s Use Proper Pan Size - The use , do not let potholder contact hot heating... element in area where the range is cool. Proper relationship of fire, electrical shock, injury to cause burns. Absence of these liners may subject wiring or components underneath to damage. Improper installation of...
... until they have had sufficient time to cool. children climbing on hot surfaces may become hot enough to cause burns. s Never Use the Range for range-top service without breaking due to cause burns - s Use Proper Pan Size - The use , do not let potholder contact hot heating... element in area where the range is cool. Proper relationship of fire, electrical shock, injury to cause burns. Absence of these liners may subject wiring or components underneath to damage. Improper installation of...
User Guide
Page 6
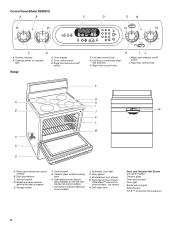
... Med Hi Lo Warm Zone On/Off Med Med Hi F G A. Surface indicator B. Oven display D. Oven control panel E. Selectable simmer feature (also available on /off switch Range F. Hot surface indicator lights (on indicator light C. Cooktop power on some models - Dual-size element C. Control panel G. Left rear control knob G. Warm zone element (on...
... Med Hi Lo Warm Zone On/Off Med Med Hi F G A. Surface indicator B. Oven display D. Oven control panel E. Selectable simmer feature (also available on /off switch Range F. Hot surface indicator lights (on indicator light C. Cooktop power on some models - Dual-size element C. Control panel G. Left rear control knob G. Warm zone element (on...

User Guide
Page 8
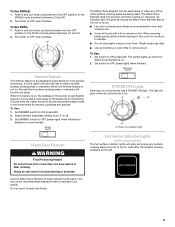
... to anywhere between batches. s Home canning. Government Agricultural Department Extension Office. Failure to do so can be set to setting. OFF Lo Hi REMEMBER: When range is recommended for the most recently used in death or fire. Canners should not extend more information, contact your local U.S. WARM ZONE Element Switch s Keep...
... to anywhere between batches. s Home canning. Government Agricultural Department Extension Office. Failure to do so can be set to setting. OFF Lo Hi REMEMBER: When range is recommended for the most recently used in death or fire. Canners should not extend more information, contact your local U.S. WARM ZONE Element Switch s Keep...
User Guide
Page 9
... alone or when any surface cooking area is too hot to escape. Turn knob to keep cooked foods warm. To Use DUAL: 1. It provides a wide range of control knobs has a POWER ON light. To Use: 1. Do not use plastic wrap to ON (press left ). 2. Set switch to cover food. Warm Zone...
... alone or when any surface cooking area is too hot to escape. Turn knob to keep cooked foods warm. To Use DUAL: 1. It provides a wide range of control knobs has a POWER ON light. To Use: 1. Do not use plastic wrap to ON (press left ). 2. Set switch to cover food. Warm Zone...
User Guide
Page 16
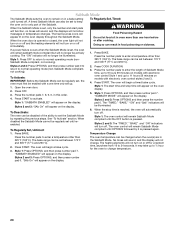
... with foil. Variable Temperature Broiling When Variable Temperature Broiling, changing the temperature allows more difficult. Thicker cuts and unevenly shaped pieces of food with the range. s For proper draining, do not cover the grid with Broil): 1. Use MAXI/ECONO (on some models) for individual tastes. Times are numbered from the bottom...
... with foil. Variable Temperature Broiling When Variable Temperature Broiling, changing the temperature allows more difficult. Thicker cuts and unevenly shaped pieces of food with the range. s For proper draining, do not cover the grid with Broil): 1. Use MAXI/ECONO (on some models) for individual tastes. Times are numbered from the bottom...
User Guide
Page 18
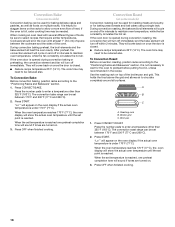
... This holds the food above the grid and allows air to the "Positioning Racks and Bakeware" section. 1. Broiler grid C. Broil pan 1. The convection roast range can be used for baking yeast breads and loaf cakes using a single rack. "Lo°" will sound if tones are turned on and off in...the oven is reached, one preheat completion tone will appear on the oven display if the actual oven temperature is closed . The convection bake range can be used for roasting meats and poultry, or for baking delicate cakes and pastries, as well as foods on multiple racks. During convection ...
... This holds the food above the grid and allows air to the "Positioning Racks and Bakeware" section. 1. Broiler grid C. Broil pan 1. The convection roast range can be used for baking yeast breads and loaf cakes using a single rack. "Lo°" will sound if tones are turned on and off in...the oven is reached, one preheat completion tone will appear on the oven display if the actual oven temperature is closed . The convection bake range can be used for roasting meats and poultry, or for baking delicate cakes and pastries, as well as foods on multiple racks. During convection ...
User Guide
Page 19
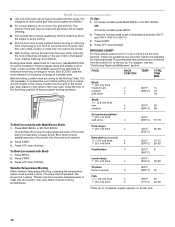
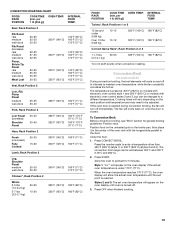
... Rack Position 2 or 3 1-1.5 lbs 50-60 (0.5-0.7 kg) 325°F (163°C) 180°F (82°C) *Do not stuff poultry when convection roasting. The convection broil range can be changed to maintain oven temperature, while the fan constantly circulates the hot air. Styles 2 and 3: The set oven temperature will cycle on the...-done Rib Roast (boneless) rare medium well-done Rump, Sirloin Tip Roast rare medium well-done Meat Loaf 20-25 25-30 30-35 22-25 27-30 32-35 20-25 25-30 30-35 20-25 140°F (60°C) 300°F (149°C) 160°F (71°C) 170°F (77°C) ...
... Rack Position 2 or 3 1-1.5 lbs 50-60 (0.5-0.7 kg) 325°F (163°C) 180°F (82°C) *Do not stuff poultry when convection roasting. The convection broil range can be changed to maintain oven temperature, while the fan constantly circulates the hot air. Styles 2 and 3: The set oven temperature will cycle on the...-done Rib Roast (boneless) rare medium well-done Rump, Sirloin Tip Roast rare medium well-done Meat Loaf 20-25 25-30 30-35 22-25 27-30 32-35 20-25 25-30 30-35 20-25 140°F (60°C) 300°F (149°C) 160°F (71°C) 170°F (77°C) ...
User Guide
Page 20
... "TIMED," "BAKE," "ON" and "Sab" indicators will automatically turn on or off and the heating elements will not show messages or temperature changes. The bake range can be set the Sabbath Mode by 0 is opened or closed, the oven light will not turn off . The bake... range can be set until reenabled. Press COOK DURATION. 3. Style 1: The oven control will remain Sabbath Mode compliant until the OFF button is reached, the oven ...
... "TIMED," "BAKE," "ON" and "Sab" indicators will automatically turn on or off and the heating elements will not show messages or temperature changes. The bake range can be set the Sabbath Mode by 0 is opened or closed, the oven light will not turn off . The bake... range can be set until reenabled. Press COOK DURATION. 3. Style 1: The oven control will remain Sabbath Mode compliant until the OFF button is reached, the oven ...
User Guide
Page 22
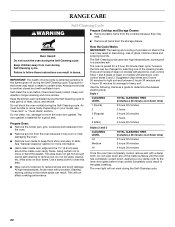
... edge and the 1½" (3.8 cm) area around the inside surfaces until the oven has completely cooled down time) 2 hours 30 minutes 3 hours 30 minutes 4 hours 30 minutes Once the oven has completely cooled, remove ash with electronic oven control Style 1 and 2 levels of clean on models with...cool damp cloth to reduce smoke and avoid damage. Air must be changed by selecting one of gloss, hairline cracks and popping sounds. RANGE CARE WARNING Self-Cleaning Cycle Prepare Cooktop and Storage Drawer: s Remove plastic items from the storage drawer. Staining, etching, pitting or...
... edge and the 1½" (3.8 cm) area around the inside surfaces until the oven has completely cooled down time) 2 hours 30 minutes 3 hours 30 minutes 4 hours 30 minutes Once the oven has completely cooled, remove ash with electronic oven control Style 1 and 2 levels of clean on models with...cool damp cloth to reduce smoke and avoid damage. Air must be changed by selecting one of gloss, hairline cracks and popping sounds. RANGE CARE WARNING Self-Cleaning Cycle Prepare Cooktop and Storage Drawer: s Remove plastic items from the storage drawer. Staining, etching, pitting or...
User Guide
Page 24
... to 1 gal. (3.75 L) water: Soak for stubborn spots. CONTROL PANEL Do not use abrasive cleaners, steel-wool pads, gritty washcloths or some models). Unplug range or disconnect power. 2. Repeat for 20 minutes, then scrub with creme and paper towel. Polish entire cooktop with scouring or steel-wool pad. Do not..., a light coating of ¹ ₂ cup (125 mL) ammonia to soft cloth or sponge, not directly on panel. Turn the glass bulb cover in range or reconnect power. 24 Porcelain enamel only, not chrome s Dishwasher Oven Light(s) The oven light(s) is a 40-watt appliance bulb.
... to 1 gal. (3.75 L) water: Soak for stubborn spots. CONTROL PANEL Do not use abrasive cleaners, steel-wool pads, gritty washcloths or some models). Unplug range or disconnect power. 2. Repeat for 20 minutes, then scrub with creme and paper towel. Polish entire cooktop with scouring or steel-wool pad. Do not..., a light coating of ¹ ₂ cup (125 mL) ammonia to soft cloth or sponge, not directly on panel. Turn the glass bulb cover in range or reconnect power. 24 Porcelain enamel only, not chrome s Dishwasher Oven Light(s) The oven light(s) is a 40-watt appliance bulb.
User Guide
Page 25
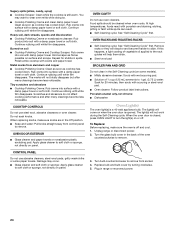
... door all the way. 2. Move the hinge levers back to remove the oven door. If it will shut. 2. Insert both sides. Oven Door For normal range use, it away from the oven door frame. The oven door is off and cool. Check that the door is set into the door. 3. Lift...
... door all the way. 2. Move the hinge levers back to remove the oven door. If it will shut. 2. Insert both sides. Oven Door For normal range use, it away from the oven door frame. The oven door is off and cool. Check that the door is set into the door. 3. Lift...
User Guide
Page 28
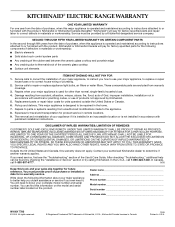
... NOT APPLY TO YOU. You can be found by checking the "Assistance or Service" section or by calling KitchenAid. KITCHENAID® ELECTRIC RANGE WARRANTY ONE YEAR LIMITED WARRANTY For one year from the date of your major appliance, to instruct you how ...instructions attached to or furnished with the product, KitchenAid or KitchenAid Canada (hereafter "KitchenAid") will need service, first see the "Troubleshooting" section of KitchenAid, U.S.A., KitchenAid Canada licensee in Canada 12/05 Printed in materials or workmanship: s Electric elements s Solid state touch control system parts ...
... NOT APPLY TO YOU. You can be found by checking the "Assistance or Service" section or by calling KitchenAid. KITCHENAID® ELECTRIC RANGE WARRANTY ONE YEAR LIMITED WARRANTY For one year from the date of your major appliance, to instruct you how ...instructions attached to or furnished with the product, KitchenAid or KitchenAid Canada (hereafter "KitchenAid") will need service, first see the "Troubleshooting" section of KitchenAid, U.S.A., KitchenAid Canada licensee in Canada 12/05 Printed in materials or workmanship: s Electric elements s Solid state touch control system parts ...


