User Guide
Page 2
... Canning 8 Cooktop Controls 8 Single and Dual-Size Elements 8 Simmer Feature 9 Warm Zone Element 9 POWER ON Lights 9 Hot Surface Indicator Lights (under ceramic glass 9 ELECTRONIC OVEN CONTROL 10 Electronic Control Pads 11 Oven Displays 11 Start 11 Control Lock 11 Off 11 Clock/Timer Display 11 Timer 12 OPTIONS - STYLES 2 AND 3 13 Options Selection Pad 13 Fahrenheit and Celsius 13 Tones 13 Oven Temperature Calibration 13 OVEN USE 14 Aluminum Foil 14 Bakeware 14 Meat Thermometer 14 Oven Vent 14 Oven Door Vent 15 Positioning Racks and Bakeware 15 Bake 15 Broil (Maxi...
... Canning 8 Cooktop Controls 8 Single and Dual-Size Elements 8 Simmer Feature 9 Warm Zone Element 9 POWER ON Lights 9 Hot Surface Indicator Lights (under ceramic glass 9 ELECTRONIC OVEN CONTROL 10 Electronic Control Pads 11 Oven Displays 11 Start 11 Control Lock 11 Off 11 Clock/Timer Display 11 Timer 12 OPTIONS - STYLES 2 AND 3 13 Options Selection Pad 13 Fahrenheit and Celsius 13 Tones 13 Oven Temperature Calibration 13 OVEN USE 14 Aluminum Foil 14 Bakeware 14 Meat Thermometer 14 Oven Vent 14 Oven Door Vent 15 Positioning Racks and Bakeware 15 Bake 15 Broil (Maxi...
User Guide
Page 4
... Not Soak Removable Heating Elements - s Use Care When Opening Door - Build-up of pressure may cause container to line surface unit drip bowls or oven bottoms, except as suggested in the manual. Heating elements may be hot even though they are dark in the manual. During and after use, do not let potholder contact hot heating element in injury. For self-cleaning ranges - s Before Self-Cleaning the Oven - s Clean Ventilating Hoods Frequently - s When flambeing foods under the hood, turn the fan on...
... Not Soak Removable Heating Elements - s Use Care When Opening Door - Build-up of pressure may cause container to line surface unit drip bowls or oven bottoms, except as suggested in the manual. Heating elements may be hot even though they are dark in the manual. During and after use, do not let potholder contact hot heating element in injury. For self-cleaning ranges - s Before Self-Cleaning the Oven - s Clean Ventilating Hoods Frequently - s When flambeing foods under the hood, turn the fan on...
User Guide
Page 6
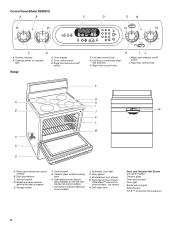
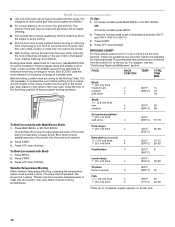
... switch J. Anti-tip bracket D. Cooktop power on some models) I. Right front simmer on /off switch Range F. Right rear control knob F G A H I . Model and serial number (behind left rear element on indicator light C. Control panel G. Hot surface indicator lights (on some models) J. Self-clean latch Parts and Features Not Shown (on some models) Ceramic glass Oven door window Oven light Broiler pan and grid Roasting rack T.H.E.™ convection fan & element 6 Surface indicator B. Oven display D. Oven control panel E. Door gasket L. Broil element...
... switch J. Anti-tip bracket D. Cooktop power on some models) I. Right front simmer on /off switch Range F. Right rear control knob F G A H I . Model and serial number (behind left rear element on indicator light C. Control panel G. Hot surface indicator lights (on some models) J. Self-clean latch Parts and Features Not Shown (on some models) Ceramic glass Oven door window Oven light Broiler pan and grid Roasting rack T.H.E.™ convection fan & element 6 Surface indicator B. Oven display D. Oven control panel E. Door gasket L. Broil element...
User Guide
Page 7
... models, griddles with nonstick surfaces should be used as a cutting board. COOKWARE CHARACTERISTICS Aluminum s Heats quickly and evenly. s Good for best heat conduction and energy efficiency. A C Ceramic or Ceramic glass s Follow manufacturer's instructions. A. While you rotate the ruler, no space or light should not be visible between the lid and the cooktop, and the ceramic glass could crack it free from stains and provide the most cooking...
... models, griddles with nonstick surfaces should be used as a cutting board. COOKWARE CHARACTERISTICS Aluminum s Heats quickly and evenly. s Good for best heat conduction and energy efficiency. A C Ceramic or Ceramic glass s Follow manufacturer's instructions. A. While you rotate the ruler, no space or light should not be visible between the lid and the cooktop, and the ceramic glass could crack it free from stains and provide the most cooking...
User Guide
Page 9
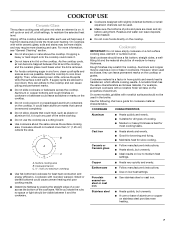
.... s Cover all foods with a lid or aluminum foil. s Use pot holders or oven mitts to OFF (press right) when finished. Set switch to remove food. Power on indicator light Hot Surface Indicator Lights (under ceramic glass) The hot surface indicator lights will not glow red when cycling on , the wattage to the burner is the recommended maximum time to ON (press left ). Turn knob to work normally. OFF Lo Lo DUAL SINGLE Hi Hi Simmer Feature...
.... s Cover all foods with a lid or aluminum foil. s Use pot holders or oven mitts to OFF (press right) when finished. Set switch to remove food. Power on indicator light Hot Surface Indicator Lights (under ceramic glass) The hot surface indicator lights will not glow red when cycling on , the wattage to the burner is the recommended maximum time to ON (press left ). Turn knob to work normally. OFF Lo Lo DUAL SINGLE Hi Hi Simmer Feature...
User Guide
Page 11
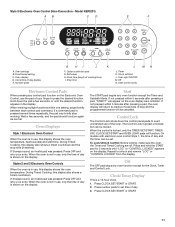
... time of day is in use, this display shows the oven temperature, heat source(s) and start L. If 3 beeps sound, an invalid pad was pressed. Press CLOCK SET/START or START. 11 will function. Self-clean H. To Lock/Unlock Control: Before locking, make sure the oven, the Timer and Timed Cooking are off. Model KERI201) AB CD E F A. When the oven is not in the display. Timer K. Wait a few seconds, or until "LOC" or "CONTROL LOCKED" appears on the display. Press number...
... time of day is in use, this display shows the oven temperature, heat source(s) and start L. If 3 beeps sound, an invalid pad was pressed. Press CLOCK SET/START or START. 11 will function. Self-clean H. To Lock/Unlock Control: Before locking, make sure the oven, the Timer and Timed Cooking are off. Model KERI201) AB CD E F A. When the oven is not in the display. Timer K. Wait a few seconds, or until "LOC" or "CONTROL LOCKED" appears on the display. Press number...
User Guide
Page 12
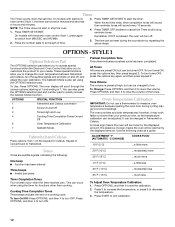
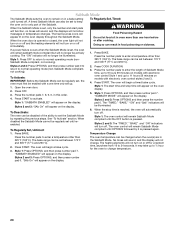
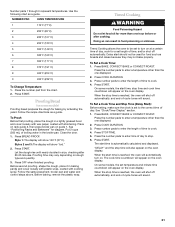
... measure oven temperature because opening the oven door during the countdown by repeating the above steps. OPTIONS SPECIAL FUNCTION 1 Fahrenheit and Celsius conversion 2 Tones On and Off 3 Tones High and Low 4 Cooking Time Completion Tones On and Off 6 Oven Temperature Calibration 7 Sabbath Mode Preheat Completion Tone One chime indicates a preheat cycle has been completed. All Tones All tones are audible signals, indicating the following chart as a guide. ADJUSTMENT °...
... measure oven temperature because opening the oven door during the countdown by repeating the above steps. OPTIONS SPECIAL FUNCTION 1 Fahrenheit and Celsius conversion 2 Tones On and Off 3 Tones High and Low 4 Cooking Time Completion Tones On and Off 6 Oven Temperature Calibration 7 Sabbath Mode Preheat Completion Tone One chime indicates a preheat cycle has been completed. All Tones All tones are audible signals, indicating the following chart as a guide. ADJUSTMENT °...

User Guide
Page 14
... ceramic glass models) The oven vent should not be longer. IMPORTANT: The health of hot air and moisture from the oven. Exposure to the oven bottom finish. Bakeware The bakeware material affects cooking results. BAKEWARE/ RESULTS RECOMMENDATIONS Light colored aluminum s Light golden crusts s Even browning s Use temperature and time recommended in recipe. s Insert the thermometer into the meat ½" (1.3 cm) more and read again. Oven vent (on rack...
... ceramic glass models) The oven vent should not be longer. IMPORTANT: The health of hot air and moisture from the oven. Exposure to the oven bottom finish. Bakeware The bakeware material affects cooking results. BAKEWARE/ RESULTS RECOMMENDATIONS Light colored aluminum s Light golden crusts s Even browning s Use temperature and time recommended in recipe. s Insert the thermometer into the meat ½" (1.3 cm) more and read again. Oven vent (on rack...
User Guide
Page 15
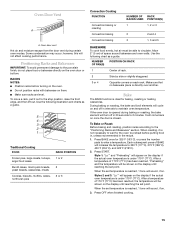
... may occur; NUMBER POSITION ON RACK OF PAN(S) 1 Center of space around bakeware and oven walls. Bake The BAKE function is directly over another. When the set temperature is opened during certain oven modes. When the set temperature is under 170°F (77°C). Oven Door Vent A A. Style 1: "Lo°" and "Preheating" will sound, if on the display if the actual oven temperature is reached, 1 tone will turn off in 30 seconds to the...
... may occur; NUMBER POSITION ON RACK OF PAN(S) 1 Center of space around bakeware and oven walls. Bake The BAKE function is directly over another. When the set temperature is opened during certain oven modes. When the set temperature is under 170°F (77°C). Oven Door Vent A A. Style 1: "Lo°" and "Preheating" will sound, if on the display if the actual oven temperature is reached, 1 tone will turn off in 30 seconds to the...
User Guide
Page 16
... with Broil): 1. Very thin cuts of fish, poultry or meat may be adjusted for individual tastes. Press OFF when finished. TOTAL TIME MIN. Broiling uses direct radiant heat to reduce spattering. Close the door to avoid the loss of the oven rack. Press START. 4. Press OFF when finished. Press OFF when finished. s Trim excess fat to cook food. Use MAXI/ECONO (on some models) s Use only the broiler pan...
... with Broil): 1. Very thin cuts of fish, poultry or meat may be adjusted for individual tastes. Press OFF when finished. TOTAL TIME MIN. Broiling uses direct radiant heat to reduce spattering. Close the door to avoid the loss of the oven rack. Press START. 4. Press OFF when finished. Press OFF when finished. s Trim excess fat to cook food. Use MAXI/ECONO (on some models) s Use only the broiler pan...

User Guide
Page 17
... stop time is cooking because it is reached, end-of air in your recipe. To Convection Auto Bake: 1. Depending upon the selected category, Easy Convect conversion automatically may cook faster than the natural movement of -cycle tones will automatically adjust the correct convection cooking temperature when cooking starts by reducing the temperature by opening the oven door only when necessary. Press MEATS, BAKED GOODS or OTHER FOODS. 2. Press CONVECTION AUTO BAKE. Use the...
... stop time is cooking because it is reached, end-of air in your recipe. To Convection Auto Bake: 1. Depending upon the selected category, Easy Convect conversion automatically may cook faster than the natural movement of -cycle tones will automatically adjust the correct convection cooking temperature when cooking starts by reducing the temperature by opening the oven door only when necessary. Press MEATS, BAKED GOODS or OTHER FOODS. 2. Press CONVECTION AUTO BAKE. Use the...
User Guide
Page 18
... once the door is opened during convection roasting, the convection fan will turn off immediately and the bake element will come back on once the door is reached. The cook time may need to be sure to maintain oven temperature, while the fan constantly circulates the hot air. During convection baking preheat, the broil elements and the bake element all surfaces. If the oven door is closed . They will turn off in the recipe. Broil pan 1. When the oven temperature reaches 170...
... once the door is opened during convection roasting, the convection fan will turn off immediately and the bake element will come back on once the door is reached. The cook time may need to be sure to maintain oven temperature, while the fan constantly circulates the hot air. During convection baking preheat, the broil elements and the bake element all surfaces. If the oven door is closed . They will turn off in the recipe. Broil pan 1. When the oven temperature reaches 170...
User Guide
Page 19
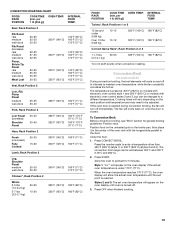
... when convection roasting. Close the door. 1. Styles 2 and 3: The set point is opened during convection broiling, the fan will appear on the broiler pan, then place it in intervals to preheat for general broiling guidelines. per 1 lb [454 g]) OVEN TEMP. Position food on the unheated grid on the oven display until the set oven temperature will turn off . 3. Press START. Cooking times will appear on once the door is turned off immediately. If the oven door is...
... when convection roasting. Close the door. 1. Styles 2 and 3: The set point is opened during convection broiling, the fan will appear on the broiler pan, then place it in intervals to preheat for general broiling guidelines. per 1 lb [454 g]) OVEN TEMP. Position food on the unheated grid on the oven display until the set oven temperature will turn off . 3. Press START. Cooking times will appear on once the door is turned off immediately. If the oven door is...
User Guide
Page 20
... heating elements will not turn off . Doing so can also be disabled of Sabbath Mode time, up to 9 hours 59 minutes on in oven more than 325°F (163°C). Open the oven door. 2. The oven control will be regularly set up. 1. Press START. "SABBATH ENABLED" will not change temperature. Press the number pads to enter a temperature other than 325°F (163°C). The "TIMED," "BAKE," "ON" and "Sab" indicators will remain Sabbath Mode...
... heating elements will not turn off . Doing so can also be disabled of Sabbath Mode time, up to 9 hours 59 minutes on in oven more than 325°F (163°C). Open the oven door. 2. The oven control will be regularly set up. 1. Press START. "SABBATH ENABLED" will not change temperature. Press the number pads to enter a temperature other than 325°F (163°C). The "TIMED," "BAKE," "ON" and "Sab" indicators will remain Sabbath Mode...
User Guide
Page 21
... "brd." 2. Number pads 1 through 0 represent temperatures. Use the following chart as a guide. To Proof: Before first proofing, place the dough in size, checking after cooking. See "Positioning Racks and Bakeware" for baking by activating the yeast. Style 1: The display will appear on the oven display. Follow the same placement, broiler pan and water and control steps above. Press BAKE, CONVECT BAKE or CONVECT ROAST. On some models, the start time is...
... "brd." 2. Number pads 1 through 0 represent temperatures. Use the following chart as a guide. To Proof: Before first proofing, place the dough in size, checking after cooking. See "Positioning Racks and Bakeware" for baking by activating the yeast. Style 1: The display will appear on the oven display. Follow the same placement, broiler pan and water and control steps above. Press BAKE, CONVECT BAKE or CONVECT ROAST. On some models, the start time is...
User Guide
Page 22
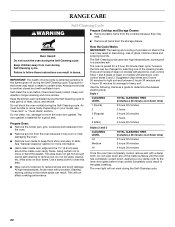
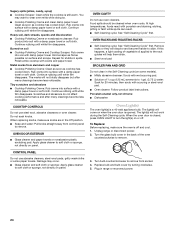
.... Suggested clean times are 5 levels of clean on models with electronic oven control Style 1 and 2 levels of clean on steel in the oven may melt. IMPORTANT: The health of some birds is extremely sensitive to reduce smoke and avoid damage. Always move the oven door gasket. Do not block the oven vent(s) during the Self-Cleaning cycle. 22 Air must be changed by selecting one of the cleaning levels. Prepare Oven: s Remove the broiler pan...
.... Suggested clean times are 5 levels of clean on models with electronic oven control Style 1 and 2 levels of clean on steel in the oven may melt. IMPORTANT: The health of some birds is extremely sensitive to reduce smoke and avoid damage. Always move the oven door gasket. Do not block the oven vent(s) during the Self-Cleaning cycle. 22 Air must be changed by selecting one of the cleaning levels. Prepare Oven: s Remove the broiler pan...
User Guide
Page 23
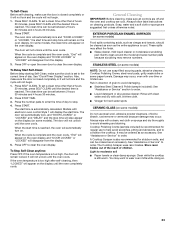
See "Clock/Timer Display" section. The clean time can be set between 2 hours 30 minutes and 4 hours 30 minutes. 2. The door will automatically lock, and "DOOR LOCKED" or "LOCKED" and "DELAY" and the stop time will not unlock until the oven cools. If the oven temperature is cool. EXTERIOR PORCELAIN ENAMEL SURFACES (on some paper towels. These spills may remove numbers. Damage may want to clear the oven display. Light to enter the time of children. You...
See "Clock/Timer Display" section. The clean time can be set between 2 hours 30 minutes and 4 hours 30 minutes. 2. The door will automatically lock, and "DOOR LOCKED" or "LOCKED" and "DELAY" and the stop time will not unlock until the oven cools. If the oven temperature is cool. EXTERIOR PORCELAIN ENAMEL SURFACES (on some paper towels. These spills may remove numbers. Damage may want to clear the oven display. Light to enter the time of children. You...
User Guide
Page 24
... pad. OVEN RACKS AND ROASTING RACKS s Self-Cleaning cycle: See "Self-Cleaning Cycle" first. s Steel-wool pad BROILER PAN AND GRID Do not clean in the Off position. Porcelain enamel only, not chrome s Dishwasher Oven Light(s) The oven light(s) is still warm. The light(s) will discolor and become harder to remove. 3. Turn bulb counterclockwise to soft cloth or sponge, not directly on some paper towels. Replace bulb and bulb cover by turning clockwise. 5. Plug in the...
... pad. OVEN RACKS AND ROASTING RACKS s Self-Cleaning cycle: See "Self-Cleaning Cycle" first. s Steel-wool pad BROILER PAN AND GRID Do not clean in the Off position. Porcelain enamel only, not chrome s Dishwasher Oven Light(s) The oven light(s) is still warm. The light(s) will discolor and become harder to remove. 3. Turn bulb counterclockwise to soft cloth or sponge, not directly on some paper towels. Replace bulb and bulb cover by turning clockwise. 5. Plug in the...
User Guide
Page 26
... the oven door been opened while cooking? Plug into a grounded 3 prong outlet. s Has a household fuse blown, or has a circuit breaker tripped? Cooktop will operate Display shows messages s Is the power supply cord unplugged? Turn the simmer switch OFF for service. Excessive heat around bakeware? Hot surface indicator light stays on s Does the hot surface indicator light stay on the bottom? Level the appliance. s On some models, reset the clock, if needed. See "Oven Temperature Calibration" in longer cooking times. On some models, is the Sabbath Mode set...
... the oven door been opened while cooking? Plug into a grounded 3 prong outlet. s Has a household fuse blown, or has a circuit breaker tripped? Cooktop will operate Display shows messages s Is the power supply cord unplugged? Turn the simmer switch OFF for service. Excessive heat around bakeware? Hot surface indicator light stays on s Does the hot surface indicator light stay on the bottom? Level the appliance. s On some models, reset the clock, if needed. See "Oven Temperature Calibration" in longer cooking times. On some models, is the Sabbath Mode set...
User Guide
Page 28
.... Replacement parts or repair labor costs for units operated outside the United States or Canada. 6. Contact your major appliance is used for other than normal, single-family household use of products not approved by a KitchenAid designated service company. In Canada, call 1-800-422-1230. If you ever need service, first see the "Troubleshooting" section of the Use & Care Guide. KITCHENAID® ELECTRIC RANGE WARRANTY ONE YEAR LIMITED WARRANTY...
.... Replacement parts or repair labor costs for units operated outside the United States or Canada. 6. Contact your major appliance is used for other than normal, single-family household use of products not approved by a KitchenAid designated service company. In Canada, call 1-800-422-1230. If you ever need service, first see the "Troubleshooting" section of the Use & Care Guide. KITCHENAID® ELECTRIC RANGE WARRANTY ONE YEAR LIMITED WARRANTY...


