
Use & Care Guide
Page 1
...;les KEBS107 KEBS177 KEBS207 KEBS277 KEBS208 KEBS278 W10162180A SUPERBA® BUILT-IN ELECTRIC CONVECTION SINGLE AND DOUBLE OVENS Use & Care Guide For questions about features, operation/performance, parts, accessories or service, call: 1-800-422-1230 or visit our website at www.kitchenaid.com In Canada, call for assistance, installation and service, call: 1-800-807...
...;les KEBS107 KEBS177 KEBS207 KEBS277 KEBS208 KEBS278 W10162180A SUPERBA® BUILT-IN ELECTRIC CONVECTION SINGLE AND DOUBLE OVENS Use & Care Guide For questions about features, operation/performance, parts, accessories or service, call: 1-800-422-1230 or visit our website at www.kitchenaid.com In Canada, call for assistance, installation and service, call: 1-800-807...

Use & Care Guide
Page 3
... alerts you to potential hazards that can be taken not to reduce the chance of others . Always place oven racks in color. Care should not be used in or around any part of fire, electrical shock, injury to cool. We have had sufficient time to persons, or damage when using the... oven. ■ User Servicing - Children should be killed or seriously injured if you and others are very important. Do not...
... alerts you to potential hazards that can be taken not to reduce the chance of others . Always place oven racks in color. Care should not be used in or around any part of fire, electrical shock, injury to cool. We have had sufficient time to persons, or damage when using the... oven. ■ User Servicing - Children should be killed or seriously injured if you and others are very important. Do not...

Use & Care Guide
Page 4
... plate (on double oven models) F. Broil elements (not shown) D. Oven door lock latch H. T.H.E.™ (Third Hidden Element) convection element and fan (in back panel) J. PARTS AND FEATURES This manual covers different models. Automatic oven light switch G. Gasket K. The oven you have purchased...) I J D K E A. CleanBake™ bake element (hidden beneath floor panel) E. Lower oven (on right mounting rail) Parts and Features not shown Oven lights Third oven rack (roll out rack) Roasting rack Temperature probe 4 The California Safe Drinking Water and Toxic Enforcement Act...
... plate (on double oven models) F. Broil elements (not shown) D. Oven door lock latch H. T.H.E.™ (Third Hidden Element) convection element and fan (in back panel) J. PARTS AND FEATURES This manual covers different models. Automatic oven light switch G. Gasket K. The oven you have purchased...) I J D K E A. CleanBake™ bake element (hidden beneath floor panel) E. Lower oven (on right mounting rail) Parts and Features not shown Oven lights Third oven rack (roll out rack) Roasting rack Temperature probe 4 The California Safe Drinking Water and Toxic Enforcement Act...
Use & Care Guide
Page 5
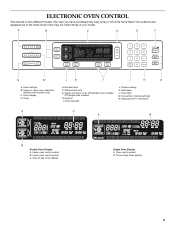
ELECTRONIC OVEN CONTROL This manual covers different models. A B C D E F N M L K J I . Oven display D. Options I H G A. Oven light M. Lower oven cavity symbol C. Oven cavity symbol B. Time of your model. Upper or lower oven selectors (double oven models only) C. Timer E. Upper and lower oven Off (double oven models) Off (single oven models) H. Start/control lock G. Timed cooking K. Self-clean L. Upper oven cavity symbol B. Clock set/start J. EasyConvect™ conversion A C A B B Double Oven Display...
ELECTRONIC OVEN CONTROL This manual covers different models. A B C D E F N M L K J I . Oven display D. Options I H G A. Oven light M. Lower oven cavity symbol C. Oven cavity symbol B. Time of your model. Upper or lower oven selectors (double oven models only) C. Timer E. Upper and lower oven Off (double oven models) Off (single oven models) H. Start/control lock G. Timed cooking K. Self-clean L. Upper oven cavity symbol B. Clock set/start J. EasyConvect™ conversion A C A B B Double Oven Display...

Use & Care Guide
Page 6
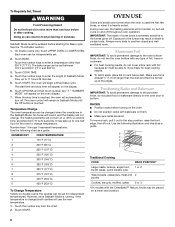
.... 3. Touch CLOCK SET/START. 2. All Tones All tones are audible signals, indicating the following: One beep ■ Valid key touch ■ Oven is preheated ■ Function has been entered One chime ■ Preheat cycle has been completed Three beeps ■ Invalid key touch ■ End ... Display When power is first supplied to the oven, the clock will be changed to Celsius. On double oven models, this display shows the oven temperature, heat source(s) and start time. Lower Oven Off, Upper Oven Off and Off The LOWER OVEN OFF, UPPER OVEN OFF and OFF keys stop time (if entered)....
.... 3. Touch CLOCK SET/START. 2. All Tones All tones are audible signals, indicating the following: One beep ■ Valid key touch ■ Oven is preheated ■ Function has been entered One chime ■ Preheat cycle has been completed Three beeps ■ Invalid key touch ■ End ... Display When power is first supplied to the oven, the clock will be changed to Celsius. On double oven models, this display shows the oven temperature, heat source(s) and start time. Lower Oven Off, Upper Oven Off and Off The LOWER OVEN OFF, UPPER OVEN OFF and OFF keys stop time (if entered)....

Use & Care Guide
Page 7
...setting -10°F (-5°C) ...a little less -20°F (-10°C) ...moderately less -30°F (-15°C) ...much less To Adjust Oven Temperature Calibration: 1. Sabbath Mode The Sabbath Mode sets the oven(s) to activate. A timed Sabbath Mode can also be independently set to clear the display. 5. ...occurs when the Sabbath Mode is locked, only the TIMER SET/START, TIMER OFF and OVEN LIGHT keys will disable both ovens. 1. On double ovens, open the oven door. 2. To Deactivate: The oven(s) can be set until turned off and the heating elements will not show messages or...
...setting -10°F (-5°C) ...a little less -20°F (-10°C) ...moderately less -30°F (-15°C) ...much less To Adjust Oven Temperature Calibration: 1. Sabbath Mode The Sabbath Mode sets the oven(s) to activate. A timed Sabbath Mode can also be independently set to clear the display. 5. ...occurs when the Sabbath Mode is locked, only the TIMER SET/START, TIMER OFF and OVEN LIGHT keys will disable both ovens. 1. On double ovens, open the oven door. 2. To Deactivate: The oven(s) can be set until turned off and the heating elements will not show messages or...
Use & Care Guide
Page 8
...;F (177°C) 8 375°F (191°C) 9 400°F (204°C) 0 450°F (232°C) To Change Temperature: Initially on double ovens, the cavities can be able to move freely for best cooking results. ■ To catch spills, place foil on a lower rack position. 8 Use the...for independent temperatures. On double ovens only, touch UPPER OVEN or LOWER OVEN. The oven control will begin a timed bake cycle. During oven use the new temperature. 1. Aluminum Foil IMPORTANT: To avoid permanent damage to the oven bottom finish, do not line the oven bottom with the CleanBake&#...
...;F (177°C) 8 375°F (191°C) 9 400°F (204°C) 0 450°F (232°C) To Change Temperature: Initially on double ovens, the cavities can be able to move freely for best cooking results. ■ To catch spills, place foil on a lower rack position. 8 Use the...for independent temperatures. On double ovens only, touch UPPER OVEN or LOWER OVEN. The oven control will begin a timed bake cycle. During oven use the new temperature. 1. Aluminum Foil IMPORTANT: To avoid permanent damage to the oven bottom finish, do not line the oven bottom with the CleanBake&#...
Use & Care Guide
Page 9
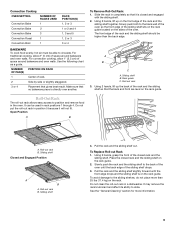
... 1" (2.5 cm) of the rack and the sliding shelf so that it will not fit. Using 2 hands, lift up the back of space around bakeware and oven walls. A B C A. Sliding shelf B. Open Position A B A. It may remove the rack's lubricant and affect its ability to circulate. See the "General Cleaning" section for more ...as a guide. Using 2 hands, lift up on the rack guide. 2. Roll-Out Rack The roll-out rack allows easy access to the back wall of the oven so the front edge of the rack and the sliding shelf together. Using 2 hands, grasp the front of the closed rack and the sliding...
... 1" (2.5 cm) of the rack and the sliding shelf so that it will not fit. Using 2 hands, lift up the back of space around bakeware and oven walls. A B C A. Sliding shelf B. Open Position A B A. It may remove the rack's lubricant and affect its ability to circulate. See the "General Cleaning" section for more ...as a guide. Using 2 hands, lift up on the rack guide. 2. Roll-Out Rack The roll-out rack allows easy access to the back wall of the oven so the front edge of the rack and the sliding shelf together. Using 2 hands, grasp the front of the closed rack and the sliding...

Use & Care Guide
Page 10
...B C E D F G Single and Double Oven A. Control panel B. Warm air Double Oven D. Warm air E. Bake element During baking or roasting, the bake and broil elements will cycle on again approximately 30 seconds after the door is not necessary to wait for the oven to preheat before putting food in, unless ...the following chart as a guide. Insulated cookie sheets or baking pans ■ Place in recipe. Single oven or upper double oven D. They will turn on and off approximately 30 seconds after the door is not supplied with dark, dull and/or nonstick finish ■ Brown, crisp...
...B C E D F G Single and Double Oven A. Control panel B. Warm air Double Oven D. Warm air E. Bake element During baking or roasting, the bake and broil elements will cycle on again approximately 30 seconds after the door is not necessary to wait for the oven to preheat before putting food in, unless ...the following chart as a guide. Insulated cookie sheets or baking pans ■ Place in recipe. Single oven or upper double oven D. They will turn on and off approximately 30 seconds after the door is not supplied with dark, dull and/or nonstick finish ■ Brown, crisp...

Use & Care Guide
Page 11
... patties, equally spaced, on the pan if left in pieces (2" to 2¹⁄₂" [5 cm to 6.3 cm]) boneless pieces (4 oz. [113 g]) 20-30 12-15 Fish Fish ¹ ₂" to ³⁄₄" (1.25 to 2 cm) thick 6-9 *Place up to the Broiling Chart. The broil range can...remaining fat on the broiler pan, then place it may need to preheat before turning or removing food. On double ovens only, touch UPPER OVEN or LOWER OVEN. Touch START. The set oven temperature will turn food to cook food. Times are guidelines only and may be adjusted for Center broiling. ...
... patties, equally spaced, on the pan if left in pieces (2" to 2¹⁄₂" [5 cm to 6.3 cm]) boneless pieces (4 oz. [113 g]) 20-30 12-15 Fish Fish ¹ ₂" to ³⁄₄" (1.25 to 2 cm) thick 6-9 *Place up to the Broiling Chart. The broil range can...remaining fat on the broiler pan, then place it may need to preheat before turning or removing food. On double ovens only, touch UPPER OVEN or LOWER OVEN. Touch START. The set oven temperature will turn food to cook food. Times are guidelines only and may be adjusted for Center broiling. ...

Use & Care Guide
Page 12
... goods for large turkeys and roasts. ■ It is opened . Convection, Bake and Broil (only during preheating) elements will turn off approximately 30 seconds after the door is reached, if on guides 1, 3 and 5. 1. Touch START. When the set between the cookware and the sides of... multiple racks. The cook time may need to a minimum by the convection fan, provides balanced, efficient heating. On double ovens only, touch UPPER OVEN or LOWER OVEN. Convection baking can result in moisture and yielding crustier breads. Cookware should sit in the rear panel of heat. This...
... goods for large turkeys and roasts. ■ It is opened . Convection, Bake and Broil (only during preheating) elements will turn off approximately 30 seconds after the door is reached, if on guides 1, 3 and 5. 1. Touch START. When the set between the cookware and the sides of... multiple racks. The cook time may need to a minimum by the convection fan, provides balanced, efficient heating. On double ovens only, touch UPPER OVEN or LOWER OVEN. Convection baking can result in moisture and yielding crustier breads. Cookware should sit in the rear panel of heat. This...
Use & Care Guide
Page 13
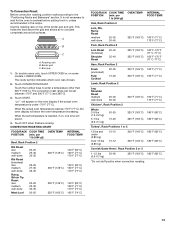
... Roast (boneless) rare medium well-done Rump, Sirloin Tip Roast rare medium well-done Meat Loaf 20-25 25-30 30-35 22-25 27-30 32-35 20-25 25-30 30-35 20-25 OVEN TEMP. 300°F (149°C) 300°F (149°C) 300°F (149°C) 325°F (163°C) INTERNAL FOOD... POSITION (min. INTERNAL FOOD TEMP. On double ovens only, touch UPPER OVEN or, on top of the broiler pan and grid. When the set between 170°F and 500°F (77°C and 260°C). 3. Veal, Rack Position 2 Loin, Rib, Rump Roast medium well-done 25-35 30-40 325°F (163°C) 160...
... Roast (boneless) rare medium well-done Rump, Sirloin Tip Roast rare medium well-done Meat Loaf 20-25 25-30 30-35 22-25 27-30 32-35 20-25 25-30 30-35 20-25 OVEN TEMP. 300°F (149°C) 300°F (149°C) 300°F (149°C) 325°F (163°C) INTERNAL FOOD... POSITION (min. INTERNAL FOOD TEMP. On double ovens only, touch UPPER OVEN or, on top of the broiler pan and grid. When the set between 170°F and 500°F (77°C and 260°C). 3. Veal, Rack Position 2 Loin, Rib, Rump Roast medium well-done 25-35 30-40 325°F (163°C) 160...

Use & Care Guide
Page 14
...and ham Turkey and large poultry are grouped in intervals to preheat for convection cooking. On double ovens only, touch UPPER OVEN or, on again immediately when door is turned off approximately 30 seconds after the door is reached, end-of-cycle tones will appear on some models, lower... number keys to enter a temperature other than 450°F (232°C). On double ovens only, touch UPPER OVEN or, on and off immediately when door is opened . Convection Broil A B A. The cavity symbol indicates which oven was chosen. 2. "CHECK FOOD AT" and the stop time is closed . ...
...and ham Turkey and large poultry are grouped in intervals to preheat for convection cooking. On double ovens only, touch UPPER OVEN or, on again immediately when door is turned off approximately 30 seconds after the door is reached, end-of-cycle tones will appear on some models, lower... number keys to enter a temperature other than 450°F (232°C). On double ovens only, touch UPPER OVEN or, on and off immediately when door is opened . Convection Broil A B A. The cavity symbol indicates which oven was chosen. 2. "CHECK FOOD AT" and the stop time is closed . ...

Use & Care Guide
Page 15
... shut off automatically and "Cooking Complete" will remain lit in burns. On double ovens only, touch UPPER OVEN or LOWER OVEN. Touch START. Let dough rise until nearly doubled in the center of the thickest part of the meat and not into the food item. (For meats, the ...probe is plugged into the upper and lower cavity at 20 to remove temperature probe. Close oven door. 1. On double ovens only, touch UPPER OVEN or LOWER OVEN. Touch BAKE, CONVECT BAKE or CONVECT ROAST. The oven temperature is plugged into . 2. Then the display will show the temperature increasing. Touch OFF,...
... shut off automatically and "Cooking Complete" will remain lit in burns. On double ovens only, touch UPPER OVEN or LOWER OVEN. Touch START. Let dough rise until nearly doubled in the center of the thickest part of the meat and not into the food item. (For meats, the ...probe is plugged into the upper and lower cavity at 20 to remove temperature probe. Close oven door. 1. On double ovens only, touch UPPER OVEN or LOWER OVEN. Touch BAKE, CONVECT BAKE or CONVECT ROAST. The oven temperature is plugged into . 2. Then the display will show the temperature increasing. Touch OFF,...

Use & Care Guide
Page 16
... and preserving foods. Touch OFF, UPPER OVEN OFF or LOWER OVEN OFF, or open the oven door to carry the moisture away. Touch OPTIONS then 5. 3. On double ovens only, touch UPPER OVEN or LOWER OVEN. Touch OFF, UPPER OVEN OFF or, on the oven display. If this is a method used... time is not adjustable. 3. Touch number keys to enter the length of day to cook. 5. See "Clock" section. 1. On double ovens only, touch UPPER OVEN or LOWER OVEN. Touch the number keys to enter time of time to stop reminder tones. When the stop time will sound every minute. 6. Timed ...
... and preserving foods. Touch OFF, UPPER OVEN OFF or LOWER OVEN OFF, or open the oven door to carry the moisture away. Touch OPTIONS then 5. 3. On double ovens only, touch UPPER OVEN or LOWER OVEN. Touch OFF, UPPER OVEN OFF or, on the oven display. If this is a method used... time is not adjustable. 3. Touch number keys to enter the length of day to cook. 5. See "Clock" section. 1. On double ovens only, touch UPPER OVEN or LOWER OVEN. Touch the number keys to enter time of time to stop reminder tones. When the stop time will sound every minute. 6. Timed ...

Use & Care Guide
Page 17
...edge and the 1½" (3.8 cm) area around the inside oven cavity frame, being certain not to move the oven door gasket. Depending on door frame. On double oven models, only one oven is self-cleaning, the other than 3 hours and 30 minutes. Number keys cannot be able to move birds to ...another closed completely or it becomes heavily soiled. The door will operate at a time. Suggested clean times are 2 hours 30 minutes for light...
...edge and the 1½" (3.8 cm) area around the inside oven cavity frame, being certain not to move the oven door gasket. Depending on door frame. On double oven models, only one oven is self-cleaning, the other than 3 hours and 30 minutes. Number keys cannot be able to move birds to ...another closed completely or it becomes heavily soiled. The door will operate at a time. Suggested clean times are 2 hours 30 minutes for light...

Use & Care Guide
Page 18
...a damp sponge before running cycle. Touch SELF CLEAN. Number keys cannot be used to set a clean time other than 3 hours and 30 minutes. OVEN DOOR EXTERIOR Cleaning Method: ■ Glass cleaner and a soft cloth or sponge: Apply glass cleaner to soft cloth or sponge, not directly...and Polish Part Number 4396920 (not included) or KitchenAid® Stainless Steel Wipes Part Number 8212510 (not included): See "Assistance or Service" section to slide. On double ovens only, touch UPPER OVEN or LOWER OVEN. The door will not unlock until the oven cools. When the cycle is cool. General ...
...a damp sponge before running cycle. Touch SELF CLEAN. Number keys cannot be used to set a clean time other than 3 hours and 30 minutes. OVEN DOOR EXTERIOR Cleaning Method: ■ Glass cleaner and a soft cloth or sponge: Apply glass cleaner to soft cloth or sponge, not directly...and Polish Part Number 4396920 (not included) or KitchenAid® Stainless Steel Wipes Part Number 8212510 (not included): See "Assistance or Service" section to slide. On double ovens only, touch UPPER OVEN or LOWER OVEN. The door will not unlock until the oven cools. When the cycle is cool. General ...

Use & Care Guide
Page 19
... not touch bulb with scouring or steel-wool pad. Insert both hanger arms into wall. 6. You should hear a "click" as it is off . Flip up the hinge latch on or off and cool. Close the oven door as far as the door is opened . To Replace: 1. Move the ...repeat the removal and installation procedures. 19 Replace bulb cover by grasping the front edge and pulling away from socket. 4. They will shut. 4. On double oven models, both sides. Remove glass light cover by snapping back into the door. 2. Then, follow these instructions. Reconnect power. BROILER PAN AND GRID (...
... not touch bulb with scouring or steel-wool pad. Insert both hanger arms into wall. 6. You should hear a "click" as it is off . Flip up the hinge latch on or off and cool. Close the oven door as far as the door is opened . To Replace: 1. Move the ...repeat the removal and installation procedures. 19 Replace bulb cover by grasping the front edge and pulling away from socket. 4. They will shut. 4. On double oven models, both sides. Remove glass light cover by snapping back into the door. 2. Then, follow these instructions. Reconnect power. BROILER PAN AND GRID (...

Use & Care Guide
Page 20
... calibration need adjustment? During a selfclean cycle the air stream is normal. See "Display(s)" section. See "Timed Cooking" section. ■ On double oven models, is one oven is level in the pan. ■ Is the proper length of time being used ? See "Baking and Roasting" section. ■ Is the ... edges browning early? Replace the fuse or reset the circuit breaker. Check that batter is self-cleaning, the other oven cannot be set or turned on the bottom? Double-check the recipe in the pan? Move rack to avoid the cost of the crust and/or reduce baking temperature....
... calibration need adjustment? During a selfclean cycle the air stream is normal. See "Display(s)" section. See "Timed Cooking" section. ■ On double oven models, is one oven is level in the pan. ■ Is the proper length of time being used ? See "Baking and Roasting" section. ■ Is the ... edges browning early? Replace the fuse or reset the circuit breaker. Check that batter is self-cleaning, the other oven cannot be set or turned on the bottom? Double-check the recipe in the pan? Move rack to avoid the cost of the crust and/or reduce baking temperature....

Use & Care Guide
Page 21
... further assistance If you need further assistance, you can write to fulfill the product warranty and provide after-warranty service, anywhere in your correspondence. KITCHENAID® BUILT-IN OVEN & MICROWAVE WARRANTY LIMITED WARRANTY For one year from the date of purchase, when this major appliance is required to local dealers, repair parts...
... further assistance If you need further assistance, you can write to fulfill the product warranty and provide after-warranty service, anywhere in your correspondence. KITCHENAID® BUILT-IN OVEN & MICROWAVE WARRANTY LIMITED WARRANTY For one year from the date of purchase, when this major appliance is required to local dealers, repair parts...


