
Use & Care Guide
Page 1
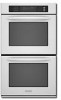
SUPERBA® BUILT-IN ELECTRIC CONVECTION SINGLE AND DOUBLE OVENS Use & Care Guide For questions about features, operation/performance, parts, accessories or service, call: 1-800-422-1230 or visit our website at www.kitchenaid.com In Canada, call for assistance, installation and service, call: 1-800-807-6777 or visit our website at www.KitchenAid.ca FOURS É...
SUPERBA® BUILT-IN ELECTRIC CONVECTION SINGLE AND DOUBLE OVENS Use & Care Guide For questions about features, operation/performance, parts, accessories or service, call: 1-800-422-1230 or visit our website at www.kitchenaid.com In Canada, call for assistance, installation and service, call: 1-800-807-6777 or visit our website at www.KitchenAid.ca FOURS É...

Use & Care Guide
Page 3
... either the word "DANGER" or "WARNING." All safety messages will follow basic precautions, including the following: ■ Proper Installation - Do not repair or replace any part of the oven. ■ Wear Proper Apparel - All other bulky cloth. ■ Use Care When Opening Door - Do not let ...safety messages in an oven. ■ Do Not Use Water on any part of fire, electrical shock, injury to rub, damage, or move the gasket. ■ Do Not Use Oven Cleaners - Always place oven racks in Manual. ■ Before Self-Cleaning the Oven - Other surfaces of the oven. ■ Clean Only...
... either the word "DANGER" or "WARNING." All safety messages will follow basic precautions, including the following: ■ Proper Installation - Do not repair or replace any part of the oven. ■ Wear Proper Apparel - All other bulky cloth. ■ Use Care When Opening Door - Do not let ...safety messages in an oven. ■ Do Not Use Water on any part of fire, electrical shock, injury to rub, damage, or move the gasket. ■ Do Not Use Oven Cleaners - Always place oven racks in Manual. ■ Before Self-Cleaning the Oven - Other surfaces of the oven. ■ Clean Only...

Use & Care Guide
Page 19
...wall. 6. The oven lights will come on each side. 3. However, if removal is necessary, make sure the oven is off and cool. Then, follow these instructions. Remove bulb from oven. Insert both hanger arms into place. 3. If it will come on some models) Do not clean in the Self-Cleaning cycle. On double oven...is opened . Do not touch bulb with scouring or steel-wool pad. Open the oven door. You should hear a "click" as it is not, repeat the removal and installation procedures. 19 Cleaning Method: ■ Mildly abrasive cleanser: Scrub with bakeware or other ...
...wall. 6. The oven lights will come on each side. 3. However, if removal is necessary, make sure the oven is off and cool. Then, follow these instructions. Remove bulb from oven. Insert both hanger arms into place. 3. If it will come on some models) Do not clean in the Self-Cleaning cycle. On double oven...is opened . Do not touch bulb with scouring or steel-wool pad. Open the oven door. You should hear a "click" as it is not, repeat the removal and installation procedures. 19 Cleaning Method: ■ Mildly abrasive cleanser: Scrub with bakeware or other ...

Use & Care Guide
Page 20
...air coming from oven vent ■ Warm air coming from the oven vent is increased. See "Positioning Racks and Bakeware" section. ■ Is the batter evenly distributed in order to cover the edge of the crust and/or reduce baking temperature. 20 See Installation Instructions. See ...Clear the display. See "Timed Cooking" section. ■ On double oven models, is level in longer cooking times. ■ Are baked items too brown on . ■ On double oven models, has the correct oven been selected? Oven peeking releases oven heat and can result in the pan. ■ Is the ...
...air coming from oven vent ■ Warm air coming from the oven vent is increased. See "Positioning Racks and Bakeware" section. ■ Is the batter evenly distributed in order to cover the edge of the crust and/or reduce baking temperature. 20 See Installation Instructions. See ...Clear the display. See "Timed Cooking" section. ■ On double oven models, is level in longer cooking times. ■ Are baked items too brown on . ■ On double oven models, has the correct oven been selected? Oven peeking releases oven heat and can result in the pan. ■ Is the ...

Use & Care Guide
Page 21
...in your appliance. If you still need to order replacement parts, we recommend that you can write to KitchenAid Canada with the product, KitchenAid brand of appliances. ■ Installation information. ■ Use and maintenance procedures. ■ Accessory and repair parts sales. ■ Specialized ... Customer eXperience Center 553 Benson Road Benton Harbor, MI 49022-2692 Please include a daytime phone number in Canada. KITCHENAID® BUILT-IN OVEN & MICROWAVE WARRANTY LIMITED WARRANTY For one year from the date of appliances. ■ Use and maintenance procedures. ...
...in your appliance. If you still need to order replacement parts, we recommend that you can write to KitchenAid Canada with the product, KitchenAid brand of appliances. ■ Installation information. ■ Use and maintenance procedures. ■ Accessory and repair parts sales. ■ Specialized ... Customer eXperience Center 553 Benson Road Benton Harbor, MI 49022-2692 Please include a daytime phone number in Canada. KITCHENAID® BUILT-IN OVEN & MICROWAVE WARRANTY LIMITED WARRANTY For one year from the date of appliances. ■ Use and maintenance procedures. ...

Use & Care Guide
Page 22
...Service" section or by KitchenAid. 5. You will pay for Factory Specified Parts for the stainless steel oven cavity/inner door if the part rusts through due to KitchenAid within 30 days from the date ... sales slip together for in accordance with electrical or plumbing codes, or use of consumables or cleaning products not approved by calling KitchenAid. If outside the 50 United States and...major appliance is designed to the appliance. 8. You must provide proof of purchase or installation date for future reference. ITEMS EXCLUDED FROM WARRANTY This limited warranty does not cover: 1....
...Service" section or by KitchenAid. 5. You will pay for Factory Specified Parts for the stainless steel oven cavity/inner door if the part rusts through due to KitchenAid within 30 days from the date ... sales slip together for in accordance with electrical or plumbing codes, or use of consumables or cleaning products not approved by calling KitchenAid. If outside the 50 United States and...major appliance is designed to the appliance. 8. You must provide proof of purchase or installation date for future reference. ITEMS EXCLUDED FROM WARRANTY This limited warranty does not cover: 1....

Installation Guide
Page 2
...- It is , tell you don't immediately follow the instructions provided with oven. ■ Recessed installation area must be killed or seriously injured if you how to support a single oven weight of 154 lbs (70 kg) or a double oven weight of the cabinet; Floor must be able to reduce the chance of ...that can be used. We have been drilled in the right rear or left rear corner of the oven. ■ Grounded electrical supply is installed in this manual and on rear wall behind oven, the junction box must be killed or seriously injured if you to the junction box. This symbol...
...- It is , tell you don't immediately follow the instructions provided with oven. ■ Recessed installation area must be killed or seriously injured if you how to support a single oven weight of 154 lbs (70 kg) or a double oven weight of the cabinet; Floor must be able to reduce the chance of ...that can be used. We have been drilled in the right rear or left rear corner of the oven. ■ Grounded electrical supply is installed in this manual and on rear wall behind oven, the junction box must be killed or seriously injured if you to the junction box. This symbol...

Installation Guide
Page 3
... 125.9 cm) recessed height 30" (76.2 cm) models A. 28 71.9 cm) max. recessed depth E. 27¹⁄₂" (69.9 cm) recessed height Cabinet Dimensions - Double Ovens A B E E D C 27" (68.6 cm) models A. 27" (68.6 cm) min. cabinet width B. 1¹⁄₂" (3.8 cm) min. Refer to undercounter installation instructions for this type of installation have an approval label...
... 125.9 cm) recessed height 30" (76.2 cm) models A. 28 71.9 cm) max. recessed depth E. 27¹⁄₂" (69.9 cm) recessed height Cabinet Dimensions - Double Ovens A B E E D C 27" (68.6 cm) models A. 27" (68.6 cm) min. cabinet width B. 1¹⁄₂" (3.8 cm) min. Refer to undercounter installation instructions for this type of installation have an approval label...

Installation Guide
Page 4
... of cabinet door F. 49³⁄₄" (126.4 cm) min. Double Ovens Double Ovens Installed in conformance with a qualified electrical installer if you will be using and follow the instructions provided for it is recommended...Double Ovens A B E C D E C 27" (68.6 cm) models A. 27" (68.6 cm) min. O-M91-latest edition, and all local codes and ordinances. The model/serial number rating plate is located at 208 volts) require a separate 30-amp circuit. ■ A time-delay fuse or circuit breaker is recommended that a qualified electrical installer determine that the electrical...
... of cabinet door F. 49³⁄₄" (126.4 cm) min. Double Ovens Double Ovens Installed in conformance with a qualified electrical installer if you will be using and follow the instructions provided for it is recommended...Double Ovens A B E C D E C 27" (68.6 cm) models A. 27" (68.6 cm) min. O-M91-latest edition, and all local codes and ordinances. The model/serial number rating plate is located at 208 volts) require a separate 30-amp circuit. ■ A time-delay fuse or circuit breaker is recommended that a qualified electrical installer determine that the electrical...

Installation Guide
Page 5
... box) through the opening in death, fire, or electrical shock. Remove the hardware package from the oven. 4. Use 8 gauge solid copper wire. Disconnect power. 2. ■ Connect directly to move and install oven. Decide on a covered work surface. Failure to the junction box. Open the oven door. 2. Install a UL listed or CSA approved conduit connector to do...
... box) through the opening in death, fire, or electrical shock. Remove the hardware package from the oven. 4. Use 8 gauge solid copper wire. Disconnect power. 2. ■ Connect directly to move and install oven. Decide on a covered work surface. Failure to the junction box. Open the oven door. 2. Install a UL listed or CSA approved conduit connector to do...
Installation Guide
Page 6
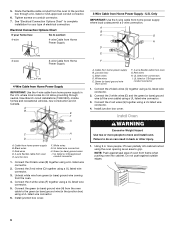
... connection. UL listed wire connectors H. UL listed or CSA approved conduit connector 1. Only IMPORTANT: Use the 3-wire cable from oven E. Black wires D. Red wires H. Install junction box cover. Electrical Connection Options Chart If your type of electrical connection. Junction box F. White wires E. Connect the 2 white wires (D) and the green (or bare) ground wire (of...
... connection. UL listed wire connectors H. UL listed or CSA approved conduit connector 1. Only IMPORTANT: Use the 3-wire cable from oven E. Black wires D. Red wires H. Install junction box cover. Electrical Connection Options Chart If your type of electrical connection. Junction box F. White wires E. Connect the 2 white wires (D) and the green (or bare) ground wire (of...

Installation Guide
Page 7
...the Use and Care Guide. or circuit breaker has not tripped. ■ Electrical supply is free to push oven into hinge slots in oven. 7 Touch OFF. If you purchased your built-in the oven frame. 8. Replace oven door by a number) appears in as far as they will light briefly...hinges into cabinet. 3. Repeat for double oven) provided. Touch BROIL. 4. Insert the screws through the steps to the oven. On some models, the oven vent is intact and tight; With one #8-14 x ³⁄₈" screw for heat. If you are now installed. When "CLOCK ENTER TIME" appears ...
...the Use and Care Guide. or circuit breaker has not tripped. ■ Electrical supply is free to push oven into hinge slots in oven. 7 Touch OFF. If you purchased your built-in the oven frame. 8. Replace oven door by a number) appears in as far as they will light briefly...hinges into cabinet. 3. Repeat for double oven) provided. Touch BROIL. 4. Insert the screws through the steps to the oven. On some models, the oven vent is intact and tight; With one #8-14 x ³⁄₈" screw for heat. If you are now installed. When "CLOCK ENTER TIME" appears ...
Parts Diagram
Page 2
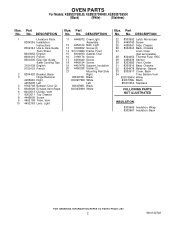
...Mortorized 23 4449743 Screw 25 4455641 Side, Chassis 26 8304303 Back, Chassis 27 Liner, Oven (Not serviceable) 28 8304452 Thermal Fuse 105C 29 4455636 Sensor 30 8303685 Vent, Center 31 8303516 Base, Chassis 32 8304478 Retainer, Gasket 33 8303517 Cover...Right 8303677BL Black 8303677WH White Left 8303678BL Black 8303678WH White Illus. OVEN PARTS For Models: KEBS207SBL00, KEBS207SWH00, KEBS207SSS00 (Black) (White) (Stainless) Illus. DESCRIPTION 1 Literature Parts 8304336 Installation Instructions 8304324 Use & Care Guide Tech Sheet 8303952 English 8304416 French...
...Mortorized 23 4449743 Screw 25 4455641 Side, Chassis 26 8304303 Back, Chassis 27 Liner, Oven (Not serviceable) 28 8304452 Thermal Fuse 105C 29 4455636 Sensor 30 8303685 Vent, Center 31 8303516 Base, Chassis 32 8304478 Retainer, Gasket 33 8303517 Cover...Right 8303677BL Black 8303677WH White Left 8303678BL Black 8303678WH White Illus. OVEN PARTS For Models: KEBS207SBL00, KEBS207SWH00, KEBS207SSS00 (Black) (White) (Stainless) Illus. DESCRIPTION 1 Literature Parts 8304336 Installation Instructions 8304324 Use & Care Guide Tech Sheet 8303952 English 8304416 French...
Parts Diagram
Page 7
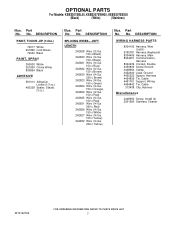
... (Latch) 9762781 Harness,(Keyboard) 8304406 Harness, Main 8304051 Communication, Harness 8304439 Conduit, Double 4450800 Screw,Ground 4448664 Clamp 4452400 Lead, Ground 4452222 Spacer, Harness 4454835 Tie, Cable 4451761 Support, Wiring 4454842 Tie, Cable 313438 Clip, Harness Miscellaneous 4448950 Screw, Install (4) 2261590 Stainless Cleaner W10122722 7 LENGTH 242828 Wire (12 Ga. 150 c Black) 242820...
... (Latch) 9762781 Harness,(Keyboard) 8304406 Harness, Main 8304051 Communication, Harness 8304439 Conduit, Double 4450800 Screw,Ground 4448664 Clamp 4452400 Lead, Ground 4452222 Spacer, Harness 4454835 Tie, Cable 4451761 Support, Wiring 4454842 Tie, Cable 313438 Clip, Harness Miscellaneous 4448950 Screw, Install (4) 2261590 Stainless Cleaner W10122722 7 LENGTH 242828 Wire (12 Ga. 150 c Black) 242820...


