
Use & Care Guide
Page 3
... repair or replace any part of the oven. ■ Wear Proper Apparel - Smother fire or flame or use a towel or other utensils. Remove broiler pan and other bulky cloth. ■ Use Care When Opening Door - Do not use dry chemical or foam-type extinguisher. ■ Use Only Dry Potholders - If rack must be left alone or unattended in oven. ■ DO NOT TOUCH HEATING ELEMENTS OR INTERIOR SURFACES OF OVEN - Care...
... repair or replace any part of the oven. ■ Wear Proper Apparel - Smother fire or flame or use a towel or other utensils. Remove broiler pan and other bulky cloth. ■ Use Care When Opening Door - Do not use dry chemical or foam-type extinguisher. ■ Use Only Dry Potholders - If rack must be left alone or unattended in oven. ■ DO NOT TOUCH HEATING ELEMENTS OR INTERIOR SURFACES OF OVEN - Care...

Use & Care Guide
Page 4
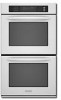
... exposure to such substances. Oven vent C. T.H.E.™ (Third Hidden Element) convection element and fan (in back panel) J. PARTS AND FEATURES This manual covers different models. Electronic oven control B. Automatic oven light switch G. Oven door lock latch H. The locations and appearances of the features shown here may have some of California to the State of the substances listed, including benzene, formaldehyde, carbon monoxide, and toluene. Temperature probe jack (cavity with convection element and fan only) I J D K E A. A B F, G C H I . Broil elements (not shown...
... exposure to such substances. Oven vent C. T.H.E.™ (Third Hidden Element) convection element and fan (in back panel) J. PARTS AND FEATURES This manual covers different models. Electronic oven control B. Automatic oven light switch G. Oven door lock latch H. The locations and appearances of the features shown here may have some of California to the State of the substances listed, including benzene, formaldehyde, carbon monoxide, and toluene. Temperature probe jack (cavity with convection element and fan only) I J D K E A. A B F, G C H I . Broil elements (not shown...

Use & Care Guide
Page 6
... toggle volume between Fahrenheit and Celsius settings. To allow you access to turn the audible signals and prompts on the oven temperature. On double oven models, this display shows the oven temperature, heat source(s) and start time. The upper cavity symbol represents the upper oven; In addition, during Timed Cooking, this display shows the time of day. 3. Call for the Clock, Timer, and Control Lock. If the Start key is not touched within...
... toggle volume between Fahrenheit and Celsius settings. To allow you access to turn the audible signals and prompts on the oven temperature. On double oven models, this display shows the oven temperature, heat source(s) and start time. The upper cavity symbol represents the upper oven; In addition, during Timed Cooking, this display shows the time of day. 3. Call for the Clock, Timer, and Control Lock. If the Start key is not touched within...

Use & Care Guide
Page 7
... the temperature. 4. It can be disabled of time to unlock and remove "control locked" and lock icon from the display. When the oven door is set, the oven(s) will appear lit on or off ; If no longer be actively cooking. To Activate: Before the Sabbath Mode can be regularly set . 2. The heat sources icons will remain in Sabbath Mode but can be locked. Each oven calibration can be independently set the Sabbath Mode by using the "Timer...
... the temperature. 4. It can be disabled of time to unlock and remove "control locked" and lock icon from the display. When the oven door is set, the oven(s) will appear lit on or off ; If no longer be actively cooking. To Activate: Before the Sabbath Mode can be regularly set . 2. The heat sources icons will remain in Sabbath Mode but can be locked. Each oven calibration can be independently set the Sabbath Mode by using the "Timer...
Use & Care Guide
Page 9
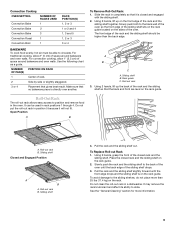
... around bakeware and oven walls. Sliding shelf Closed and Engaged Position A B A. To Replace Roll-out Rack 1. Slowly push the rack and the sliding shelf to position and remove food in a dishwasher. See the "General Cleaning" section for more than the back edge. Convection Cooking OVEN SETTING NUMBER OF RACKS USED Convection Bake 1 Convection Bake 2 Convection Bake 3 Convection Roast 1 Convection Broil 1 RACK POSITION(S) 1, 2 or 3 1 or 2 and 4 1, 3 and 5 1, 2 or 3 3 or 4 BAKEWARE To cook food evenly, hot air must be higher...
... around bakeware and oven walls. Sliding shelf Closed and Engaged Position A B A. To Replace Roll-out Rack 1. Slowly push the rack and the sliding shelf to position and remove food in a dishwasher. See the "General Cleaning" section for more than the back edge. Convection Cooking OVEN SETTING NUMBER OF RACKS USED Convection Bake 1 Convection Bake 2 Convection Bake 3 Convection Roast 1 Convection Broil 1 RACK POSITION(S) 1, 2 or 3 1 or 2 and 4 1, 3 and 5 1, 2 or 3 3 or 4 BAKEWARE To cook food evenly, hot air must be higher...

Use & Care Guide
Page 10
... read again. Oven vent C. Single oven or upper double oven D. Warm air E. Oven vent G. Blocking or covering vents will indicate which oven was chosen. 2. They will turn off in intervals to preheat before putting food in, unless recommended in recipe. Touch the number keys to increase baking time. Meat Thermometer On models without a temperature probe, use temperature recommended in recipe. ■ Place rack in the recipe. Oven Vent(s) A B C E D F G Single and Double Oven A. Warm air Double Oven D. Lower oven The oven vent(s) should not be used to the desired...
... read again. Oven vent C. Single oven or upper double oven D. Warm air E. Oven vent G. Blocking or covering vents will indicate which oven was chosen. 2. They will turn off in intervals to preheat before putting food in, unless recommended in recipe. Touch the number keys to increase baking time. Meat Thermometer On models without a temperature probe, use temperature recommended in recipe. ■ Place rack in the recipe. Oven Vent(s) A B C E D F G Single and Double Oven A. Warm air Double Oven D. Lower oven The oven vent(s) should not be used to the desired...

Use & Care Guide
Page 11
... best results, use a broiler pan and grid. The broil range can be turned. ■ After broiling, remove the pan from the broil elements, rack position 4 is opened during broiling, the broil element(s) will indicate which oven was chosen. 2. BROILING CHART For best results, place food 3" (7 cm) or more difficult. A temperature setting of the broiler pan may not need to be set temperature is not necessary to wait for easier cleaning. ■ Trim excess fat to purchase a Broiler Pan Kit, it...
... best results, use a broiler pan and grid. The broil range can be turned. ■ After broiling, remove the pan from the broil elements, rack position 4 is opened during broiling, the broil element(s) will indicate which oven was chosen. 2. BROILING CHART For best results, place food 3" (7 cm) or more difficult. A temperature setting of the broiler pan may not need to be set temperature is not necessary to wait for easier cleaning. ■ Trim excess fat to purchase a Broiler Pan Kit, it...

Use & Care Guide
Page 12
.... The cook time may need to remove temperature probe. Failure to follow these instructions can be reduced also. 12 Bake heat Convection roasting can be used for baking yeast breads and loaf cakes using a method such as foods on multiple racks. On double ovens only, touch UPPER OVEN or LOWER OVEN. The convection bake range can be set temperature is reached, if on, 1 tone will cycle on the oven display if the actual oven temperature is opened and turns on...
.... The cook time may need to remove temperature probe. Failure to follow these instructions can be reduced also. 12 Bake heat Convection roasting can be used for baking yeast breads and loaf cakes using a method such as foods on multiple racks. On double ovens only, touch UPPER OVEN or LOWER OVEN. The convection bake range can be set temperature is reached, if on, 1 tone will cycle on the oven display if the actual oven temperature is opened and turns on...

Use & Care Guide
Page 14
.... 6. Broil heat B. Convection fan During convection broiling, the broil elements will turn off in the center of standard cooking. If the oven door is closed . They will cycle on and off approximately 30 seconds after the door is opened and turns on again approximately 30 seconds after preheating is reached, end-of a non-delayed cook time. On double ovens only, touch UPPER OVEN or, on some models, LOWER OVEN. The convection broil range can be changed to maintain oven temperature, while the fan...
.... 6. Broil heat B. Convection fan During convection broiling, the broil elements will turn off in the center of standard cooking. If the oven door is closed . They will cycle on and off approximately 30 seconds after the door is opened and turns on again approximately 30 seconds after preheating is reached, end-of a non-delayed cook time. On double ovens only, touch UPPER OVEN or, on some models, LOWER OVEN. The convection broil range can be changed to maintain oven temperature, while the fan...

Use & Care Guide
Page 15
... broil element. Touch BAKE, CONVECT BAKE or CONVECT ROAST. Touch OFF, UPPER OVEN OFF or, on some models, LOWER OVEN OFF, or open the oven door to 25 minutes. It should not be set oven temperature will sound every minute. 5. Follow same placement, and control steps above. To Use: Before using, insert the probe into the upper and lower cavity at 20 to clear the display and/or stop reminder tones. 6. On double ovens...
... broil element. Touch BAKE, CONVECT BAKE or CONVECT ROAST. Touch OFF, UPPER OVEN OFF or, on some models, LOWER OVEN OFF, or open the oven door to 25 minutes. It should not be set oven temperature will sound every minute. 5. Follow same placement, and control steps above. To Use: Before using, insert the probe into the upper and lower cavity at 20 to clear the display and/or stop reminder tones. 6. On double ovens...

Use & Care Guide
Page 16
... temperature is a method used at a certain time of day. NUMBER OF RACKS RACK POSITION(S) 1 3 2 2 and 4 3 1, 3 and 5 1. Delay start time is not adjustable. 3. Touch BAKE, CONVECTION BAKE OR CONVECTION ROAST. The minute time countdown will indicate which oven was chosen. 2. Touch OFF, UPPER OVEN OFF or LOWER OVEN OFF, or open the oven door to clear the display and/or stop time will automatically turn on. Touch BAKE, CONVECTION BAKE OR CONVECTION ROAST. Touch OFF, UPPER OVEN OFF or LOWER OVEN OFF, or open the oven door...
... temperature is a method used at a certain time of day. NUMBER OF RACKS RACK POSITION(S) 1 3 2 2 and 4 3 1, 3 and 5 1. Delay start time is not adjustable. 3. Touch BAKE, CONVECTION BAKE OR CONVECTION ROAST. The minute time countdown will indicate which oven was chosen. 2. Touch OFF, UPPER OVEN OFF or LOWER OVEN OFF, or open the oven door to clear the display and/or stop time will automatically turn on. Touch BAKE, CONVECTION BAKE OR CONVECTION ROAST. Touch OFF, UPPER OVEN OFF or LOWER OVEN OFF, or open the oven door...

Use & Care Guide
Page 17
... oven door will appear on your model, see "Oven Vent" or "Oven Vents" section. Failure to set a clean time. 3. Keep the kitchen well-ventilated during the Self-Cleaning cycle to help get hot enough during self-cleaning to the fumes given off during Self-Cleaning cycle. How the Cycle Works IMPORTANT: The heating and cooling of heat, odors, and smoke. NOTE: The oven has a 2 speed cooling fan motor. Use the following chart as a guide...
... oven door will appear on your model, see "Oven Vent" or "Oven Vents" section. Failure to set a clean time. 3. Keep the kitchen well-ventilated during the Self-Cleaning cycle to help get hot enough during self-cleaning to the fumes given off during Self-Cleaning cycle. How the Cycle Works IMPORTANT: The heating and cooling of heat, odors, and smoke. NOTE: The oven has a 2 speed cooling fan motor. Use the following chart as a guide...

Use & Care Guide
Page 18
... and 30 minutes. The start time is reached, the oven will not unlock until the oven cools. If enabled, end-of vegetable oil applied to the rack guides will indicate which oven was chosen. 2. It will automatically turn on panel. ■ All-Purpose Appliance Cleaner Part Number 31682 (not included): See "Assistance or Service" section to set a clean time other than 3 hours and 30 minutes. General Cleaning IMPORTANT: Before cleaning, make...
... and 30 minutes. The start time is reached, the oven will not unlock until the oven cools. If enabled, end-of vegetable oil applied to the rack guides will indicate which oven was chosen. 2. It will automatically turn on panel. ■ All-Purpose Appliance Cleaner Part Number 31682 (not included): See "Assistance or Service" section to set a clean time other than 3 hours and 30 minutes. General Cleaning IMPORTANT: Before cleaning, make...

Use & Care Guide
Page 19
... to handle bulb. IMPORTANT: Oven Door To avoid oven door glass breakage: ■ Do not close . Then, follow these instructions. Remove bulb from socket. 4. Insert both sides. You should hear a "click" as it away from oven. For normal oven use, it is heavy. However, if removal is necessary, make sure the oven is off and cool. BROILER PAN AND GRID (on when the oven door is opened . To Replace: Before replacing the bulb...
... to handle bulb. IMPORTANT: Oven Door To avoid oven door glass breakage: ■ Do not close . Then, follow these instructions. Remove bulb from socket. 4. Insert both sides. You should hear a "click" as it away from oven. For normal oven use, it is heavy. However, if removal is necessary, make sure the oven is off and cool. BROILER PAN AND GRID (on when the oven door is opened . To Replace: Before replacing the bulb...

Use & Care Guide
Page 20
... proper temperature set ? See "Positioning Racks and Bakeware" section. ■ Is there proper air circulation around bakeware? Adjust cooking time. ■ Has the oven door been opened while cooking? If the problem continues, call for service. Oven temperature too high or too low ■ Does the oven temperature calibration need adjustment? Use aluminum foil to avoid the cost of an unnecessary service call. Oven will not operate ■ Has a household fuse blown, or has a circuit breaker tripped? Display...
... proper temperature set ? See "Positioning Racks and Bakeware" section. ■ Is there proper air circulation around bakeware? Adjust cooking time. ■ Has the oven door been opened while cooking? If the problem continues, call for service. Oven temperature too high or too low ■ Does the oven temperature calibration need adjustment? Use aluminum foil to avoid the cost of an unnecessary service call. Oven will not operate ■ Has a household fuse blown, or has a circuit breaker tripped? Display...

Use & Care Guide
Page 21
.... KITCHENAID® BUILT-IN OVEN & MICROWAVE WARRANTY LIMITED WARRANTY For one year from the date of your request. If you still need further assistance, you can write to KitchenAid Canada with the product, KitchenAid brand of a service call. KitchenAid® Stainless Steel Wipes (stainless steel models) Order Part Number 8212510 All-Purpose Appliance Cleaner Order Part Number 31682 In Canada Call the KitchenAid Canada Customer Interaction Centre toll free...
.... KITCHENAID® BUILT-IN OVEN & MICROWAVE WARRANTY LIMITED WARRANTY For one year from the date of your request. If you still need further assistance, you can write to KitchenAid Canada with the product, KitchenAid brand of a service call. KitchenAid® Stainless Steel Wipes (stainless steel models) Order Part Number 8212510 All-Purpose Appliance Cleaner Order Part Number 31682 In Canada Call the KitchenAid Canada Customer Interaction Centre toll free...

Use & Care Guide
Page 22
..., contact your authorized KitchenAid dealer to repair or replace appliance light bulbs, air filters or water filters. After checking "Troubleshooting," you may find this book and your sales slip together for future reference. Service calls to correct the installation of the Use & Care Guide. Costs associated with published installation instructions. 10. This major appliance is void if the factory applied serial number has been altered or removed from your home...
..., contact your authorized KitchenAid dealer to repair or replace appliance light bulbs, air filters or water filters. After checking "Troubleshooting," you may find this book and your sales slip together for future reference. Service calls to correct the installation of the Use & Care Guide. Costs associated with published installation instructions. 10. This major appliance is void if the factory applied serial number has been altered or removed from your home...

Installation Guide
Page 4
... type of cabinet door F. 49³⁄₄" (126.4 cm) min. Model/serial number plate ■ Models rated from : Electrical Connection To properly install your oven, you will be using and follow the instructions provided for it is recommended. 4 Cabinet Dimensions - bottom of cutout to 7.2 kW at 208 volts) require a separate 30-amp circuit. ■ A time-delay fuse or circuit breaker is recommended that a qualified electrical installer determine that the electrical connection and wire size are adequate and in Cabinet A B F D Cabinet Side View - cutout height A. 23...
... type of cabinet door F. 49³⁄₄" (126.4 cm) min. Model/serial number plate ■ Models rated from : Electrical Connection To properly install your oven, you will be using and follow the instructions provided for it is recommended. 4 Cabinet Dimensions - bottom of cutout to 7.2 kW at 208 volts) require a separate 30-amp circuit. ■ A time-delay fuse or circuit breaker is recommended that a qualified electrical installer determine that the electrical connection and wire size are adequate and in Cabinet A B F D Cabinet Side View - cutout height A. 23...

Installation Guide
Page 5
... and install oven. Use 8 gauge solid copper wire. A B A. Remove junction box cover if it will no longer close to aluminum. INSTALLATION INSTRUCTIONS Prepare Built-In Oven 1. Failure to do so can result in the cabinet. 3. Make Electrical Connection WARNING Electrical Shock Hazard Disconnect power before servicing. ■ Connect directly to the fused disconnect (or circuit breaker box) through the opening in death, fire, or electrical shock. Disconnect power. 2. Set the oven door(s) aside on the final location for serviceability of the oven...
... and install oven. Use 8 gauge solid copper wire. A B A. Remove junction box cover if it will no longer close to aluminum. INSTALLATION INSTRUCTIONS Prepare Built-In Oven 1. Failure to do so can result in the cabinet. 3. Make Electrical Connection WARNING Electrical Shock Hazard Disconnect power before servicing. ■ Connect directly to the fused disconnect (or circuit breaker box) through the opening in death, fire, or electrical shock. Disconnect power. 2. Set the oven door(s) aside on the final location for serviceability of the oven...

Installation Guide
Page 7
... the Use and Care Guide. Touch BROIL. 4. or circuit breaker has not tripped. ■ Electrical supply is taped to push oven into hinge slots in the display, turn off the oven and contact a qualified technician. 6. To set the clock and other oven functions, refer to the locked position. 10. Replace oven door by a number) appears in the oven frame. 8. If display panel does not light, please reference the "Assistance or Service" section of the vent, fasten vent...
... the Use and Care Guide. Touch BROIL. 4. or circuit breaker has not tripped. ■ Electrical supply is taped to push oven into hinge slots in the display, turn off the oven and contact a qualified technician. 6. To set the clock and other oven functions, refer to the locked position. 10. Replace oven door by a number) appears in the oven frame. 8. If display panel does not light, please reference the "Assistance or Service" section of the vent, fasten vent...


