Use & Care Guide
Page 4
... and free from combustible materials, gasoline and other enclosed area. ■ The pressure regulator and hose assembly supplied with the outdoor cooking gas appliance. ■ Visually check the burner flames. provided with a cylinder connection device compatible with a listed overfilling prevention device. - A replacement pressure regulator and hose assembly specific to your model is available from your dealer and use only replacement hoses specified for insects and insect nest. See "Installation Instructions" section...
... and free from combustible materials, gasoline and other enclosed area. ■ The pressure regulator and hose assembly supplied with the outdoor cooking gas appliance. ■ Visually check the burner flames. provided with a cylinder connection device compatible with a listed overfilling prevention device. - A replacement pressure regulator and hose assembly specific to your model is available from your dealer and use only replacement hoses specified for insects and insect nest. See "Installation Instructions" section...
Use & Care Guide
Page 5
... manifold). ■ Rotisserie motor mounting bracket ■ Rotisserie motor ■ Rotisserie forks ■ Rotisserie spit ■ Smoker box ■ 1 single-prong plug/500 mAmp transformer assembly for the rotisserie motor ■ 1 single-prong plug/5,000 mAmp transformer assembly for the grill (power supply) ■ Convertible regulator set for Natural gas ■ LP gas fuel tank tray ■ 1.5 V "D" size alkaline batteries ■ Vinyl grill cover Parts Needed - 20 lb LP gas models ■ 20 lb LP gas fuel tank - INSTALLATION...
... manifold). ■ Rotisserie motor mounting bracket ■ Rotisserie motor ■ Rotisserie forks ■ Rotisserie spit ■ Smoker box ■ 1 single-prong plug/500 mAmp transformer assembly for the rotisserie motor ■ 1 single-prong plug/5,000 mAmp transformer assembly for the grill (power supply) ■ Convertible regulator set for Natural gas ■ LP gas fuel tank tray ■ 1.5 V "D" size alkaline batteries ■ Vinyl grill cover Parts Needed - 20 lb LP gas models ■ 20 lb LP gas fuel tank - INSTALLATION...
Use & Care Guide
Page 6
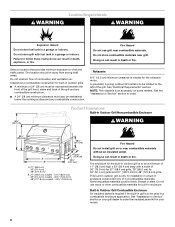
...away from strong draft areas. NOTE: The rotisserie is to follow these instructions can result in a garage or indoors. The enclosure for 48" (121.9 cm) grills. Do not store grill with a width of combustion and ventilation ...Service" section or your grill dealer to wind and traffic paths. Select a location that provides minimum exposure to order the insulated jacket kit for built-in outdoor grill is needed for installation in a built-in death, explosion, or fire. Failure to be brick, firewall or steel. Fire Hazard Do not use wood or other combustible materials for your model...
...away from strong draft areas. NOTE: The rotisserie is to follow these instructions can result in a garage or indoors. The enclosure for 48" (121.9 cm) grills. Do not store grill with a width of combustion and ventilation ...Service" section or your grill dealer to wind and traffic paths. Select a location that provides minimum exposure to order the insulated jacket kit for built-in outdoor grill is needed for installation in a built-in death, explosion, or fire. Failure to be brick, firewall or steel. Fire Hazard Do not use wood or other combustible materials for your model...
Use & Care Guide
Page 13
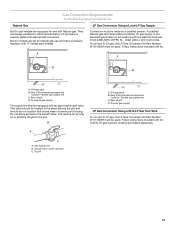
... (propane or butane) gases with the National Fuel Gas Code ANSI Z223.1/NFPA 54 - latest edition, and local codes. To convert to LP gas, the LP Gas Conversion Kit Part Number W10118099 must be in a location that allows ease of opening and closing. New CSA International approved "outdoor" flexible gas supply line C. A C A. Gas supply line B. Built-in accordance with appropriate conversion. To grill 13 Gas Connection Requirements For Models Equipped for Natural Gas Natural Gas...
... (propane or butane) gases with the National Fuel Gas Code ANSI Z223.1/NFPA 54 - latest edition, and local codes. To convert to LP gas, the LP Gas Conversion Kit Part Number W10118099 must be in a location that allows ease of opening and closing. New CSA International approved "outdoor" flexible gas supply line C. A C A. Gas supply line B. Built-in accordance with appropriate conversion. To grill 13 Gas Connection Requirements For Models Equipped for Natural Gas Natural Gas...
Use & Care Guide
Page 16
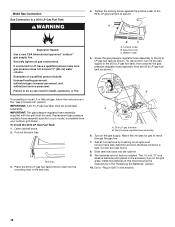
... tank tray. Locking screw B. Gas pressure regulator/hose assembly 6. Failure to "Plug in Grill" in the "Replacing the Batteries" section. 10. Screw the gas pressure regulator/hose assembly to the 20 lb LP gas fuel tank as shown. (To disconnect, turn off the gas supply to local LP or Natural gas, follow the instructions in death, explosion, or fire. Turn on the grill grate. The 1.5-volt "D" size alkaline batteries are not factory installed...
... tank tray. Locking screw B. Gas pressure regulator/hose assembly 6. Failure to "Plug in Grill" in the "Replacing the Batteries" section. 10. Screw the gas pressure regulator/hose assembly to the 20 lb LP gas fuel tank as shown. (To disconnect, turn off the gas supply to local LP or Natural gas, follow the instructions in death, explosion, or fire. Turn on the grill grate. The 1.5-volt "D" size alkaline batteries are not factory installed...

Use & Care Guide
Page 18
... authorized service personnel. LP ■ Natural gas orifices IMPORTANT: Gas conversions must be done by a qualified installer. Securely tighten all gas connections. If connected to the "Check and Adjust the Burners" section. 5. GAS CONVERSIONS For Models Equipped for purposes other liquid. Tools and Parts for LP gas Parts supplied ■ Brass connector ■ Convertible regulator 4" W.C. Explosion Hazard Use a new CSA International approved "outdoor" gas supply line. Examples of 2 prongs. 6. Use the conversion instructions included...
... authorized service personnel. LP ■ Natural gas orifices IMPORTANT: Gas conversions must be done by a qualified installer. Securely tighten all gas connections. If connected to the "Check and Adjust the Burners" section. 5. GAS CONVERSIONS For Models Equipped for purposes other liquid. Tools and Parts for LP gas Parts supplied ■ Brass connector ■ Convertible regulator 4" W.C. Explosion Hazard Use a new CSA International approved "outdoor" gas supply line. Examples of 2 prongs. 6. Use the conversion instructions included...
Use & Care Guide
Page 21
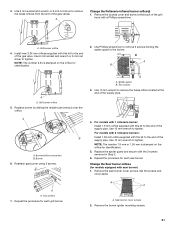
.... 5. Remove the sear burner cover screws. A A A. A. A B A A. Replace burner by sliding the middle tube (venturi) over the orifice. Reattach gas burner using 2 screws. For models with 1 rotisserie burner: Install 1.9 mm orifice supplied with sear burner) 1. Sear burner cover screws 2. NOTE: The number 2.34 is stamped on the orifice for models equipped with this kit to the end of the grill hood with the 2 screws removed in Step 2. 6. Change the Sear burner orifices (for identification. 2. 3. Use 6 mm socket and wrench or 6 mm nut driver...
.... 5. Remove the sear burner cover screws. A A A. A. A B A A. Replace burner by sliding the middle tube (venturi) over the orifice. Reattach gas burner using 2 screws. For models with 1 rotisserie burner: Install 1.9 mm orifice supplied with sear burner) 1. Sear burner cover screws 2. NOTE: The number 2.34 is stamped on the orifice for models equipped with this kit to the end of the grill hood with the 2 screws removed in Step 2. 6. Change the Sear burner orifices (for identification. 2. 3. Use 6 mm socket and wrench or 6 mm nut driver...
Use & Care Guide
Page 22
.... Record Conversion 1. Checking and adjusting the grill burner flames requires removing the grate and sear plates. IMPORTANT: Before adjusting air shutters, let burners cool completely. Light grill using an approved noncorrosive leakdetection solution. Use 6 mm socket wrench or 6 mm nut driver to attach the mounting screws. 8. NOTE: The number 2.34 is stamped on flames when the burner is set for use and keep with burners on the gas supply to Natural Gas...
.... Record Conversion 1. Checking and adjusting the grill burner flames requires removing the grate and sear plates. IMPORTANT: Before adjusting air shutters, let burners cool completely. Light grill using an approved noncorrosive leakdetection solution. Use 6 mm socket wrench or 6 mm nut driver to attach the mounting screws. 8. NOTE: The number 2.34 is stamped on flames when the burner is set for use and keep with burners on the gas supply to Natural Gas...
Use & Care Guide
Page 23
...Right rotisserie burner control knob 23 Replace gas burner, sear plates and grates. 8. Light grill using information in the "Outdoor Grill Use" section. 4. See "Burner Flame Characteristics." Replace the control knob and turn the screwdriver counterclockwise. 7. If flame is noisy or lifts away from ¹⁄₈" (3.2 mm) to ¹⁄₄" (6.4 mm). 7. A B C A. Right grill burner control knob E. Remove grill grates and sear plates. 3. Small flat-blade screwdriver C. The grill you have purchased may not match those of the features listed.
...Right rotisserie burner control knob 23 Replace gas burner, sear plates and grates. 8. Light grill using information in the "Outdoor Grill Use" section. 4. See "Burner Flame Characteristics." Replace the control knob and turn the screwdriver counterclockwise. 7. If flame is noisy or lifts away from ¹⁄₈" (3.2 mm) to ¹⁄₄" (6.4 mm). 7. A B C A. Right grill burner control knob E. Remove grill grates and sear plates. 3. Small flat-blade screwdriver C. The grill you have purchased may not match those of the features listed.
Use & Care Guide
Page 26
... tank valve and wait 5 seconds before relighting. 6. Do not lean over the grill. 2. Do not lean over the grill. 2. Guide the lit match between the grill grate and one of the other liquid buildup. When burner is lit, release the knob. You will not flow to light. Turn knob to desired setting. 3. Repeat for battery installation instructions. 1. IMPORTANT: If burner does not light immediately, turn knob to desired setting. 4. Remove match and replace manual lighting...
... tank valve and wait 5 seconds before relighting. 6. Do not lean over the grill. 2. Do not lean over the grill. 2. Guide the lit match between the grill grate and one of the other liquid buildup. When burner is lit, release the knob. You will not flow to light. Turn knob to desired setting. 3. Repeat for battery installation instructions. 1. IMPORTANT: If burner does not light immediately, turn knob to desired setting. 4. Remove match and replace manual lighting...
Use & Care Guide
Page 27
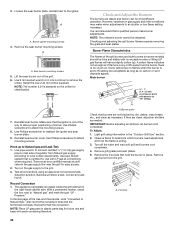
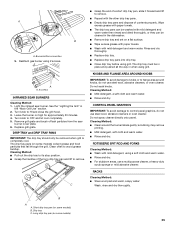
... wing nuts on some models) C D A A A. Rotisserie motor B. Rotisserie fork D. The result is a crisp, flavorful outside with grates removed. A B A. 2 bracket screws B. B NOTE: View is trimmed away prior to grilling. ■ Leave the burner set to HI when placing food on the grill to sear. ■ Use the sear burner to sear meat 1 to cook food from the rear using intense, searing infrared heat. Single-prong power cord 4. If necessary, secure...
... wing nuts on some models) C D A A A. Rotisserie motor B. Rotisserie fork D. The result is a crisp, flavorful outside with grates removed. A B A. 2 bracket screws B. B NOTE: View is trimmed away prior to grilling. ■ Leave the burner set to HI when placing food on the grill to sear. ■ Use the sear burner to sear meat 1 to cook food from the rear using intense, searing infrared heat. Single-prong power cord 4. If necessary, secure...

Use & Care Guide
Page 28
... not light immediately, turn the rotisserie burner control knob to follow these instructions can result in grills - See the "Replacing the Batteries" section for another 10 seconds, then release the knob and burner will not light. Lighting the Rotisserie Burner 1. Rotisserie burner 5. Failure to "OFF" and wait 5 minutes before relighting. 28 Remove the match and replace the manual lighting extension inside the plastic pouch. 3. Check that food is released. Turn on your model...
... not light immediately, turn the rotisserie burner control knob to follow these instructions can result in grills - See the "Replacing the Batteries" section for another 10 seconds, then release the knob and burner will not light. Lighting the Rotisserie Burner 1. Rotisserie burner 5. Failure to "OFF" and wait 5 minutes before relighting. 28 Remove the match and replace the manual lighting extension inside the plastic pouch. 3. Check that food is released. Turn on your model...

Use & Care Guide
Page 29
... sauce from the grill and replace with small grate removed B. Rotisserie cooking rotates food in front of the breast and knot. Cut 24" (61 cm) of cooking to preheat when using the rotisserie. ■ Select tender meat and poultry. ■ Allow at the top of the rotisserie burner, creating an intense heat for the Rotisserie 1. Light the burner below the smoker box and preheat on...
... sauce from the grill and replace with small grate removed B. Rotisserie cooking rotates food in front of the breast and knot. Cut 24" (61 cm) of cooking to preheat when using the rotisserie. ■ Select tender meat and poultry. ■ Allow at the top of the rotisserie burner, creating an intense heat for the Rotisserie 1. Light the burner below the smoker box and preheat on...
Use & Care Guide
Page 30
...; Trim excess fat from lighted burner(s) on the control panel display to work. Close the smoker box lid. 4. Cooking Methods For optimal use of meat to test doneness. Direct Heat Cooking by cooking with an open grill cover. Hood Lights The 5,000 mAmp power transformer must be closed during the last 10 minutes of time. Direct heat sears the food. This will be...
...; Trim excess fat from lighted burner(s) on the control panel display to work. Close the smoker box lid. 4. Cooking Methods For optimal use of meat to test doneness. Direct Heat Cooking by cooking with an open grill cover. Hood Lights The 5,000 mAmp power transformer must be closed during the last 10 minutes of time. Direct heat sears the food. This will be...
Use & Care Guide
Page 34
... Part Number 31552, a commercial degreaser designed for models with soft, lint-free cloth. ■ Vinegar to remove hard water spots. ■ Glass cleaner to light the grill manually. See "Assistance or Service" section. Remove grill grates and sear plates. 2. Cleaning Method: ■ Rub in the direction of 1 cup (250 mL) ammonia to avoid spots and streaks. EXTERIOR The quality of the gas burner over the gas orifice...
... Part Number 31552, a commercial degreaser designed for models with soft, lint-free cloth. ■ Vinegar to remove hard water spots. ■ Glass cleaner to light the grill manually. See "Assistance or Service" section. Remove grill grates and sear plates. 2. Cleaning Method: ■ Rub in the direction of 1 cup (250 mL) ammonia to avoid spots and streaks. EXTERIOR The quality of the gas burner over the gas orifice...
Use & Care Guide
Page 35
... mild detergent, using grill. Short drip tray pan (on some models) B. Reattach gas burner using grill. Do not spray cleaner directly onto panel. A B A. Remove grill grate and brush off ash particles from the sear burner cover plate. 6. ROTISSERIE SPIT ROD AND FORKS Cleaning Method: ■ Wash with mild detergent and warm water. Cleaning Method: ■ Pull out the drip tray to control panel graphics, do not use steel wool, abrasive...
... mild detergent, using grill. Short drip tray pan (on some models) B. Reattach gas burner using grill. Do not spray cleaner directly onto panel. A B A. Remove grill grate and brush off ash particles from the sear burner cover plate. 6. ROTISSERIE SPIT ROD AND FORKS Cleaning Method: ■ Wash with mild detergent and warm water. Cleaning Method: ■ Pull out the drip tray to control panel graphics, do not use steel wool, abrasive...
Use & Care Guide
Page 36
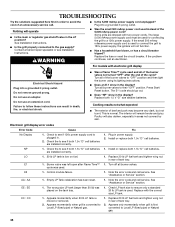
.... This is moved or removed. 2. Check LP tank size to Local LP (fixed pipe) or Natural gas. 1. E2 1. Appears momentarily when grill is converted to ensure only a standard 20 lb LP tank is used . If the small 500 mAmp rotisserie power supply cord is used to connect the grill to avoid the cost of the burner valves not turned "OFF" after Flame Time™ 1. The...
.... This is moved or removed. 2. Check LP tank size to Local LP (fixed pipe) or Natural gas. 1. E2 1. Appears momentarily when grill is converted to ensure only a standard 20 lb LP tank is used . If the small 500 mAmp rotisserie power supply cord is used to connect the grill to avoid the cost of the burner valves not turned "OFF" after Flame Time™ 1. The...
Use & Care Guide
Page 37
... Part Number W10136971 Rotisserie Kits 27" (68.6 cm): Order Part Number KFKU271TSS 36" (91.4 cm): Order Part Number KFKU361TSS Smoker Box Order Part Number KBDU271TSS Vinyl Grill Covers 27" (68.6 cm): Order Part Number 8212704 36" (91.4 cm): Order Part Number 8212705 48" (121.9 cm): Order Part Number 8212706 Stainless Steel Cleaner and Polish Order Part Number 31462A All Purpose Appliance Cleaner Order Part Number 31682 Heavy Duty Degreaser Order Part Number 31552A In Canada Call the KitchenAid Canada...
... Part Number W10136971 Rotisserie Kits 27" (68.6 cm): Order Part Number KFKU271TSS 36" (91.4 cm): Order Part Number KFKU361TSS Smoker Box Order Part Number KBDU271TSS Vinyl Grill Covers 27" (68.6 cm): Order Part Number 8212704 36" (91.4 cm): Order Part Number 8212705 48" (121.9 cm): Order Part Number 8212706 Stainless Steel Cleaner and Polish Order Part Number 31462A All Purpose Appliance Cleaner Order Part Number 31682 Heavy Duty Degreaser Order Part Number 31552A In Canada Call the KitchenAid Canada...

Parts Guide
Page 2
... Flange, Safety 78 W10244334 Valve, Safety 79 W10244336 Box, Insulator 80 W10244963 Tray, Grease 81 W10244964 Tray, Grease 82 W10247179 Wire, Valve 83 W10247132 Wire, UI 84 W10244953 Valve, Sear 85 Not Serviced Separately (W10291260 Load Cell Kit & Processor) 86 W10246888 Switch, Ignitor 87 W10246889 Switch, Valve Sensor 2 W10270303 No. Part No. DESCRIPTION 1 Literature Parts W10110724 Use & Care Guide W10110730 Conversion Instr. (LP to Natural) 2 W10128619 Cover, Rear 3 W10247106 Panel, Rear...
... Flange, Safety 78 W10244334 Valve, Safety 79 W10244336 Box, Insulator 80 W10244963 Tray, Grease 81 W10244964 Tray, Grease 82 W10247179 Wire, Valve 83 W10247132 Wire, UI 84 W10244953 Valve, Sear 85 Not Serviced Separately (W10291260 Load Cell Kit & Processor) 86 W10246888 Switch, Ignitor 87 W10246889 Switch, Valve Sensor 2 W10270303 No. Part No. DESCRIPTION 1 Literature Parts W10110724 Use & Care Guide W10110730 Conversion Instr. (LP to Natural) 2 W10128619 Cover, Rear 3 W10247106 Panel, Rear...

Parts Guide
Page 4
..., Igniter Front Burners 21 W10247024 Igniter Hot Surface 22 W10244196 Collector, Gas Left 23 W10244198 Collector, Gas Right 24 W10132702 Regulator, NG 25 W10140747 Connector, NG 26 W10247038 Kit, Orifice NG 27 W10247150 Fork, Spit 28 W10247180 Rod, Spit 29 W10167017 Motor, Rotisserie 30 W10247113 Bracket, Motor 31 W10247115 Transformer, Rotisserie 32 W10244190 Box, Smoker 33 W10134791 Handle, Smoker 34 W10134790 Grate, Smoker Illus. Part No...
..., Igniter Front Burners 21 W10247024 Igniter Hot Surface 22 W10244196 Collector, Gas Left 23 W10244198 Collector, Gas Right 24 W10132702 Regulator, NG 25 W10140747 Connector, NG 26 W10247038 Kit, Orifice NG 27 W10247150 Fork, Spit 28 W10247180 Rod, Spit 29 W10167017 Motor, Rotisserie 30 W10247113 Bracket, Motor 31 W10247115 Transformer, Rotisserie 32 W10244190 Box, Smoker 33 W10134791 Handle, Smoker 34 W10134790 Grate, Smoker Illus. Part No...


