KitchenAid KFRS365TSS Support Question
KitchenAid KFRS365TSS Support Question
Find answers below for this question about KitchenAid KFRS365TSS - Outdoor 36" Gas GRI.Need a KitchenAid KFRS365TSS manual? We have 2 online manuals for this item!
Question posted by jpoznik on May 25th, 2012
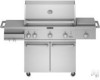
Flames Shrink With More Burners On
I have a KitchenAid KFSR365TSS grill that loses "power" when more burners are turned on. I have tried multiple tanks to elimate the supply issue. If I have one burner on it appears to be okay but not quite as strong a flame as I remember it used to have. When the second burner or the sear burner or the infrared burner are turned on, the flames dwindle to almost nothing.
Current Answers
Related KitchenAid KFRS365TSS Manual Pages
Installation Instructions - Page 1
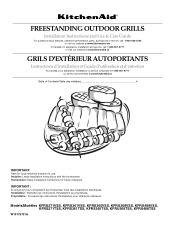
...KFRU368VSS, KFRU488VSS, KFRS271TSS, KFRS361TSS, KFRS365TSS, KFRU368TSS, KFRU488TSS
W10175731A Homeowner: Keep... Remettre les instructions d'installation au propriétaire. FREESTANDING OUTDOOR GRILLS
Installation Instructions and Use & Care Guide
For questions about ...kitchenaid.com
In Canada, for assistance, installation and service, call: 1-800-807-6777 or visit our website at www.KitchenAid...
Installation Instructions - Page 2

...grills that can kill or hurt you don't follow instructions.
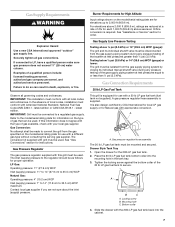
WARNING
You can happen if the instructions are very important. Shut off gas to the State of this manual and on your fire department.
See "Gas Supply...The model/serial rating plate for outdoor use gasoline or other flammable liquids or vapors in this or any open flame.
3. This is manufactured for freestanding...
Installation Instructions - Page 3
... the burner flames. Only install the type of children and must be used must include a collar to protect the cylinder valve.
■ For appliances designed to use .
SAVE THESE INSTRUCTIONS
3 Keep the ventilation openings of the cylinder enclosure free and clear from debris.
■ Inspect the gas cylinder supply hose before using the outdoor cooking gas...
Installation Instructions - Page 5
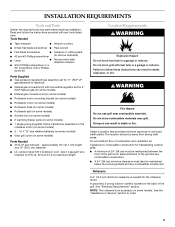
...fuel tank in a garage or indoors. WARNING
Fire Hazard Do not use grill near grill. Doing so can result in death or fire.
Do not obstruct flow of the grill and...) ■ Natural gas conversion kit with a Phillips
screw bit
Parts Supplied ■ Gas pressure regulator/hose assembly set for 11" WCP LP
gas (attached to combustible construction for freestanding outdoor grills: ■ A ...
Installation Instructions - Page 6

...supply is adequate. Failure to cool before cleaning.
Do not use and before putting on 48" (121.9 cm) models with side burner KFRU488T and KFRU488V
B. 27" (68.6 cm) 36" (91.4 cm) 48" (121.9 cm)
C. Recommended Ground Method
The outdoor grill...electrician determine that a separate circuit servicing only this outdoor cooking gas appliance.
■ Do not remove the ground prong...
Installation Instructions - Page 7
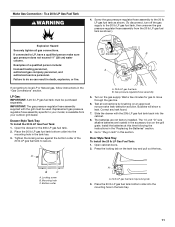
... during any pressure testing of that can result in the tank tray. 3. Mounting hole C. Slide the drawer with your local gas supplier. If this grill must conform with a 20 lb LP gas fuel tank (fuel tank not supplied). Orifice conversion is supplied. Gas Connection Requirements
20 lb LP Gas Fuel Tank
This grill is also design-certified by closing its individual shutoff...
Installation Instructions - Page 8

... conversion kit require Convertible Regulator Part Number W10132702.
See "Assistance or Service" section for turning on some models) must be equipped with the National Fuel Gas Code, ANSI Z223.1/NFPA 54 - Locking screw B. B
C
A. To grill
8 The qualified gas technician shall provide the gas supply to local LP, the convertible regulator in accordance with the National Fuel...
Installation Instructions - Page 9
... block access to Natural gas, the Natural Gas Conversion Kit supplied with Natural Gas Conversion Kit Part Number W10118098. Foam wrap
4. latest edition, and local codes. Move grill into desired outdoor location. 3. Gas supply line B. Place warming shelf on ordering. See "Assistance or Service" section for turning on some models) or the Natural Gas Conversion Kit Part Number W10118098...
Installation Instructions - Page 11
... the locking tab on the gas supply. Locking screw B.
Bubbles will show a leak. Gas pressure regulator/hose assembly
5. Turn on the tank tray and pull out the tray.. To a 20 lb LP Gas Fuel Tank
WARNING
4.
The 1.5-volt "D" size alkaline batteries are not factory installed. Go to your outdoor grill dealer.
Drawer Style Tank Tray To Install the 20 lb...
Installation Instructions - Page 14
... outdoor use with a W-A marking. For models that come equipped with the conversion kit: for conversion to Local LP order Regulator Part Number W10132702, or for conversion to Natural gas order LP to Natural Gas Conversion Kit Part Number W10118098. This kit is a loss of electrical power to the grill. Go to "Check and Adjust the Burners...
Installation Instructions - Page 19
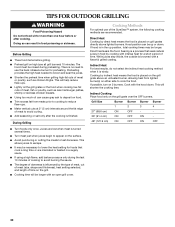
... as needed . 10. Burner Flame Characteristics
A
A. 2 screws
The flames of the grill burners and side burners (on some models) should be blue and stable with no carbon or soot deposits appear.
6. A yellow flame indicates not enough air. If flame is set for each burner if needed . Replace gas burner, sear plates and grates. 8. Turn burner to minimum stable flame. Repeat steps...
Installation Instructions - Page 20
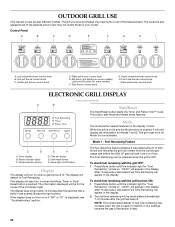
...button). "00:00" will turn on /off button
Display
The display will appear in the display. To check fuel remaining with the grill OFF: 1. The grill you have some models)
F.
Control Panel
A
B
C
D
E
F
G
H
I . Left grill burner control knob C. Electronic grill display (on some models)
Start/Reset
The Start/Reset button starts the Timer and Flame Time™ cycle. Sear...
Installation Instructions - Page 21

...-off the main grill grates. The recommended time for Flame Time™ mode will appear in hours and minutes up or down the new set time ends or the Start/Reset button is 45 minutes.
The indicator light for burn off . NOTE: The power supply must be turned to the off while the Flame Time™ mode...
Installation Instructions - Page 22

...the Gas Supply
1. Open the hood completely. Do not light burners with the grill. For freestanding outdoor grills using the grill. Failure to avoid grease and other liquids. If your grill may not light. A
Explosion Hazard Do not store fuel tank in a garage or indoors.
A. For outdoor grills using the grill. NOTE: If flow limiting device activates, your grill does light, the flames will...
Installation Instructions - Page 25
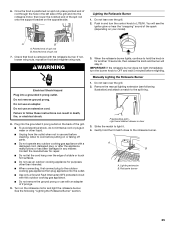
... or has been damaged in and turn the burner knob to cool before relighting.
Allow to OFF and wait 5 minutes before putting on or taking off parts.
■ Do not operate any manner. Do not lean over the grill. 2.
Once the food is centered with this outdoor cooking gas appliance.
■ Do not remove the...
Installation Instructions - Page 27
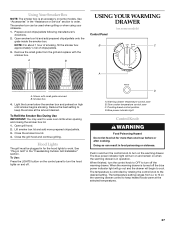
... cool.
See "Plug in Grill" in food poisoning or sickness. Push in for more prepared chips/pellets. 3. When the warming drawer is turned off the blue power indicator light will go out and the drawer will turn off . Smoker box
4.
Prepare wood chips/pellets following manufacturer's directions.
2.
Light the burner below the smoker box and...
Installation Instructions - Page 30
... last 10 minutes of cooking to test doneness. Grill Size
Burner Burner Burner Burner
1
2
3
4
27" (68.6 cm)
ON
OFF
-
-
36" (91.4 cm)
ON
OFF
ON
-
48" (121.9 cm) ON
OFF
ON
OFF
30 Juices are lost when meat is turned several times.
■ Turn meat just when juices begin to appear on the surface. ■ Avoid puncturing or cutting...
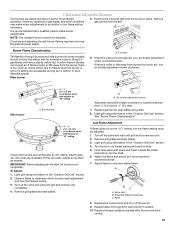
Installation Instructions - Page 33
... A
A. To avoid damaging the bulb, do not touch the bulb with bare fingers.
6. Replacing the Batteries
(on the grill. Screws
5. Unplug grill or disconnect power. 2.
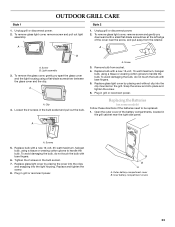
OUTDOOR GRILL CARE
Style 1 1. Clip
4. Loosen the 2 screws in grill or reconnect power. Snap the screw end into the light housing. Replace bulb with bare fingers. 5. To avoid damaging the bulb, do...
Installation Instructions - Page 35
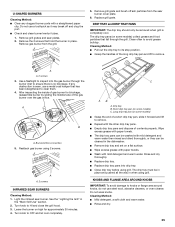
... DRIP TRAY PANS
IMPORTANT: The drip tray should only be removed when grill is seen, use a metal coat hanger that hold the burner in
the "Main Grill Use" section. 2. A
B
A. Turn knob to avoid grease buildup. A
A. 2 screws
3. Reattach gas burner using grill. See the "Lighting the Grill" in place. Rinse and dry thoroughly. ■ Replace drip tray. ■ Replace...
Installation Instructions - Page 38
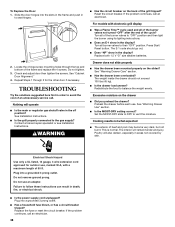
...grill properly connected to follow these instructions can result in the off position? Excessive moisture on the slides?
Poultry will operate
■ Is the main or regulator gas shutoff valve in death, fire, or electrical shock.
■ Is the power supply...This is normal. Turn all burner valves to balance the...outdoor use, marked W-A, with electronic grill display
■ Was a Flame...
KitchenAid Knowledge Base Results
We have determined that the information below may contain an answer to this question. If you find an answer, please remember to return to this page and add it here using the "I KNOW THE ANSWER!" button above. It's that easy to earn points!-
Water dispenser not working/stopped - Bottom freezer/French-door refrigerator
...supply line will reduce the water flow to a reverse-osmosis system, the following suggestions may improve the water pressure: Allow the storage tank...also: Water supply hookup . Allow 24 hours for use . If ... to a water supply and the shutoff ... ¼" water supply line should be ...refill after heavy use . If the...moved back, the supply line to install...fresh supply. Connecting a refrigerator... -
Under-counter refrigerator will not operate
... turned to resolve the issue, your appliance may require service from a local authorized KitchenAid service provider. Under-counter refrigerator will not operate What can cause my under -counter refrigerator, If you have an outdoor under -counter refrigerator to not operate? For information see, Using the control . click here. Is the power supply... -
Caring for your hot water dispenser
... it is not necessary to turn off the hot water dispenser each night to find your Use and Care Guide. On average, you will not be used for an extended period of ...for removing and reassembling the hot water tank assembly; enter your model number below . Care Guides, Installation Instructions and Warranty Information. Download available Owners Manuals/Use & Model Number | Help me ...
Similar Questions

No Gas Flow
the display is black, there is a high pitch alarm tone (constant) and no gas flow. igniters are work...
the display is black, there is a high pitch alarm tone (constant) and no gas flow. igniters are work...
(Posted by danielsweet 8 years ago)


Gas Grill Kbsli367tss.Does Not Light Or Ignite On Two Burners.We Need Parts?
(Posted by monaporche 10 years ago)

Burner Will Not Shut Off.
(Posted by ppstam630 11 years ago)
Outdoor Grill
I have a Kitchenaid outdoor grill Model# KBNU361VSS. I have a 15 LB propane tank hooked in and the c...
I have a Kitchenaid outdoor grill Model# KBNU361VSS. I have a 15 LB propane tank hooked in and the c...
(Posted by Dowboy 12 years ago)