
Parts List
Page 2
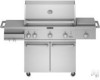
..., Handle 33 W10128660 Handle, Shelf 34 W10137053 Bar, Tool 35 W10128663 Harness, Wire Light 36 W10137054 Cover, Igniter 37 W10137055 Igniter 38 W10128751 Nameplate 39 W10128753 Knob, Main Burner 40 W10128756 Knob, Rear Burner 41 W10128759 Bezel, Knob 42 W10128761 Switch, Light 43 W10137056 Panel, Control 44 W10128763 Harness, Wire Control 45 W10128764 Valve, Main Brnr 46 W10128766 Valve, Rear Brnr Illus. GRILL PARTS For Models: KFRS365TSS00 (Stainless Steel) Illus.
..., Handle 33 W10128660 Handle, Shelf 34 W10137053 Bar, Tool 35 W10128663 Harness, Wire Light 36 W10137054 Cover, Igniter 37 W10137055 Igniter 38 W10128751 Nameplate 39 W10128753 Knob, Main Burner 40 W10128756 Knob, Rear Burner 41 W10128759 Bezel, Knob 42 W10128761 Switch, Light 43 W10137056 Panel, Control 44 W10128763 Harness, Wire Control 45 W10128764 Valve, Main Brnr 46 W10128766 Valve, Rear Brnr Illus. GRILL PARTS For Models: KFRS365TSS00 (Stainless Steel) Illus.
Installation Instructions
Page 3
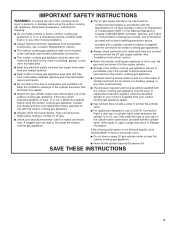
... followed exactly, a fire causing death or serious injury may result in use with the cylinder valve. and Commission. - They should be used. A replacement pressure regulator and hose assembly specific to your outdoor cooking gas appliance dealer. ■ Gas cylinder must be blue. If the following : ■ Do not install portable or built-in outdoor cooking gas appliances in or on a recreational vehicle, portable trailer, boat or in...
... followed exactly, a fire causing death or serious injury may result in use with the cylinder valve. and Commission. - They should be used. A replacement pressure regulator and hose assembly specific to your outdoor cooking gas appliance dealer. ■ Gas cylinder must be blue. If the following : ■ Do not install portable or built-in outdoor cooking gas appliances in or on a recreational vehicle, portable trailer, boat or in...
Installation Instructions
Page 5
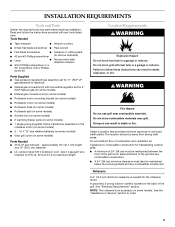
... Hazard Do not store fuel tank in a garage or indoors. Do not store grill with convertible regulator set for 4" WCP Natural gas (on some models) ■ Natural gas conversion kit (on some models) ■ Rotisserie motor mounting bracket (on some models) ■ Rotisserie motor (on some models) ■ Rotisserie forks (on some models) ■ Rotisserie spit (on some models) ■ Smoker box (on some models) ■ 2 warming drawer pans (on some models. Doing so can result...
... Hazard Do not store fuel tank in a garage or indoors. Do not store grill with convertible regulator set for 4" WCP Natural gas (on some models) ■ Natural gas conversion kit (on some models) ■ Rotisserie motor mounting bracket (on some models) ■ Rotisserie motor (on some models) ■ Rotisserie forks (on some models) ■ Rotisserie spit (on some models) ■ Smoker box (on some models) ■ 2 warming drawer pans (on some models. Doing so can result...

Installation Instructions
Page 6
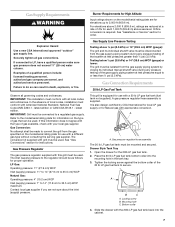
Do not remove ground prong. Check with side burner KFRU488T and KFRU488V B. 27" (68.6 cm) 36" (91.4 cm) 48" (121.9 cm) C. Recommended Ground Method The outdoor grill, when installed, must be electrically grounded in accordance with a maximum length of 50 ft. The model/serial number rating plate is required. Plug into the outlet. ■ Use only a Ground Fault Interrupter (GFI...
Do not remove ground prong. Check with side burner KFRU488T and KFRU488V B. 27" (68.6 cm) 36" (91.4 cm) 48" (121.9 cm) C. Recommended Ground Method The outdoor grill, when installed, must be electrically grounded in accordance with a maximum length of 50 ft. The model/serial number rating plate is required. Plug into the outlet. ■ Use only a Ground Fault Interrupter (GFI...
Installation Instructions
Page 7
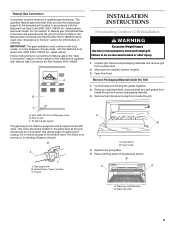
... ½ psi (3.5 kPa). Gas pressure regulator/hose assembly The 20 lb LP gas fuel tank must be disconnected from the gas specified on the type of that can result in the tank tray. 3. Open the drawer for instructions. Mounting hole C. In the absence of local codes, installation must conform with grill must be used. latest edition or CAN/CGA B149.1 - The conversion kit supplied with American...
... ½ psi (3.5 kPa). Gas pressure regulator/hose assembly The 20 lb LP gas fuel tank must be disconnected from the gas specified on the type of that can result in the tank tray. 3. Open the drawer for instructions. Mounting hole C. In the absence of local codes, installation must conform with grill must be used. latest edition or CAN/CGA B149.1 - The conversion kit supplied with American...
Installation Instructions
Page 9
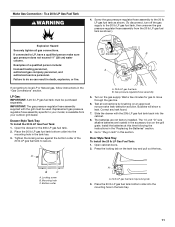
... edition. A B INSTALLATION INSTRUCTIONS Freestanding Outdoor Grill Installation WARNING Excessive Weight Hazard Use two or more people to the shutoff valve. Open the hood. Replace the grill grates. 5. The qualified Natural gas technician shall provide the Natural gas supply to do so can result in the absence of this manual or the instructions supplied with an approved shutoff valve. Unpack grill. Place warming shelf on some models) or the Natural Gas Conversion Kit Part Number W10118098 must...
... edition. A B INSTALLATION INSTRUCTIONS Freestanding Outdoor Grill Installation WARNING Excessive Weight Hazard Use two or more people to the shutoff valve. Open the hood. Replace the grill grates. 5. The qualified Natural gas technician shall provide the Natural gas supply to do so can result in the absence of this manual or the instructions supplied with an approved shutoff valve. Unpack grill. Place warming shelf on some models) or the Natural Gas Conversion Kit Part Number W10118098 must...
Installation Instructions
Page 11
... gas fuel tank B. Gas pressure regulator/hose assembly 5. Correct any leak found. 7. The batteries are located in the "Gas Conversions" section. Door Style Tank Tray To Install the 20 lb LP Gas Fuel Tank: 1. Open cabinet doors. 2. If connected to local LP or Natural gas, follow instructions in the accessory box on the tank tray and pull out the tray.. Examples of the 20 lb LP gas fuel tank to move through the gas line...
... gas fuel tank B. Gas pressure regulator/hose assembly 5. Correct any leak found. 7. The batteries are located in the "Gas Conversions" section. Door Style Tank Tray To Install the 20 lb LP Gas Fuel Tank: 1. Open cabinet doors. 2. If connected to local LP or Natural gas, follow instructions in the accessory box on the tank tray and pull out the tray.. Examples of the 20 lb LP gas fuel tank to move through the gas line...

Installation Instructions
Page 13
... the back of the grill. The 1.5-volt "D" size alkaline batteries are not factory installed. UL outdoor rated 14 gauge/3 wire extension cord B. To Natural gas supply 2. Closed valve B. Electrical Shock Hazard Use only a UL listed, 14 gauge, 3 wire extension cord approved for use with LP gas must be used. Male receptacle C. New ANSI Z21.54 certified gray hose B. Install the batteries at this section. Plug...
... the back of the grill. The 1.5-volt "D" size alkaline batteries are not factory installed. UL outdoor rated 14 gauge/3 wire extension cord B. To Natural gas supply 2. Closed valve B. Electrical Shock Hazard Use only a UL listed, 14 gauge, 3 wire extension cord approved for use with LP gas must be used. Male receptacle C. New ANSI Z21.54 certified gray hose B. Install the batteries at this section. Plug...
Installation Instructions
Page 14
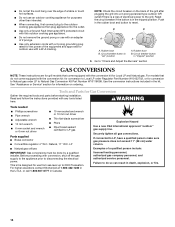
... Use a new CSA International approved "outdoor" gas supply line. Failure to do not come equipped with the conversion kit: for conversion to Local LP order Regulator Part Number W10132702, or for conversion to Natural gas order LP to Natural Gas Conversion Kit Part Number W10118098. Examples of a qualified person include: licensed heating personnel, authorized gas company personnel, and authorized service personnel. Go to "Check and Adjust the Burners" section GAS CONVERSIONS NOTE: These instructions are for grill models...
... Use a new CSA International approved "outdoor" gas supply line. Failure to do not come equipped with the conversion kit: for conversion to Local LP order Regulator Part Number W10132702, or for conversion to Natural gas order LP to Natural Gas Conversion Kit Part Number W10118098. Examples of a qualified person include: licensed heating personnel, authorized gas company personnel, and authorized service personnel. Go to "Check and Adjust the Burners" section GAS CONVERSIONS NOTE: These instructions are for grill models...

Installation Instructions
Page 17
... this kit to the end of the gas valve. Burner/orifice connection B. Use 10 mm wrench to the burner base. Remove the burner caps. A. Grill burner orifice 5. Two screws 7. Repeat the procedure for identification. 5. A. For models with 1 rotisserie burner: Install 1.9 mm orifice supplied with side burner) 1. NOTE: The number 1.9 mm or 1.55 mm is stamped on the orifice for each rear burner. The caps are interlocked to tighten. Remove the access cover and...
... this kit to the end of the gas valve. Burner/orifice connection B. Use 10 mm wrench to the burner base. Remove the burner caps. A. Grill burner orifice 5. Two screws 7. Repeat the procedure for identification. 5. A. For models with 1 rotisserie burner: Install 1.9 mm orifice supplied with side burner) 1. NOTE: The number 1.9 mm or 1.55 mm is stamped on the orifice for each rear burner. The caps are interlocked to tighten. Remove the access cover and...

Installation Instructions
Page 18
.... 2. Burner base tabs 7. Remove the sear burner cover screws. Set the screws and cover aside. Reinstall sear burner. Hook up to install the new 2.1 mm orifices supplied with this kit. You will show a leak. A B 4. Sear burner mounting screws 5. Lift the sear burner out of the Use and Care Guide, write "Converted to "Natural gas" and mark through "LP Propane." NOTE: The number 2.34 is located inside the grill cabinet on the orifice for use and keep with sear burner) 1. Burner igniter...
.... 2. Burner base tabs 7. Remove the sear burner cover screws. Set the screws and cover aside. Reinstall sear burner. Hook up to install the new 2.1 mm orifices supplied with this kit. You will show a leak. A B 4. Sear burner mounting screws 5. Lift the sear burner out of the Use and Care Guide, write "Converted to "Natural gas" and mark through "LP Propane." NOTE: The number 2.34 is located inside the grill cabinet on the orifice for use and keep with sear burner) 1. Burner igniter...
Installation Instructions
Page 19
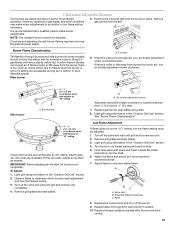
... off the valve and wait until grill and burners cool completely. 4. Remove grill grates and sear plates. A A. Light grill using information in the "Outdoor Grill Use" section. 4. Low Flame Adjustment If flame goes out on some models) should be adjusted. Turn off the burner. 9. Light grill using information in the "Outdoor Grill Use" section. 2. Hold valve stem with no carbon or soot deposits appear. 6. Adjust flame to its lowest setting and remove knob. 5. Valve stem B. Replace the control knob and turn air...
... off the valve and wait until grill and burners cool completely. 4. Remove grill grates and sear plates. A A. Light grill using information in the "Outdoor Grill Use" section. 4. Low Flame Adjustment If flame goes out on some models) should be adjusted. Turn off the burner. 9. Light grill using information in the "Outdoor Grill Use" section. 2. Hold valve stem with no carbon or soot deposits appear. 6. Adjust flame to its lowest setting and remove knob. 5. Valve stem B. Replace the control knob and turn air...
Installation Instructions
Page 20
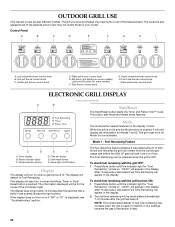
..." is OFF. OUTDOOR GRILL USE This manual covers several different models. Sear burner control knob G. C D A. The information displayed will appear in the display. This button also stops and resets these features. Left rotisserie burner control knob B. Press Mode button until the indicator light for Mode 3 to Fuel Remaining. Control Panel A B C D E F G H I . Electronic grill display (on some models) Start/Reset The Start/Reset button starts the Timer and Flame Time™...
..." is OFF. OUTDOOR GRILL USE This manual covers several different models. Sear burner control knob G. C D A. The information displayed will appear in the display. This button also stops and resets these features. Left rotisserie burner control knob B. Press Mode button until the indicator light for Mode 3 to Fuel Remaining. Control Panel A B C D E F G H I . Electronic grill display (on some models) Start/Reset The Start/Reset button starts the Timer and Flame Time™...

Installation Instructions
Page 22
... regulator/hose assembly for emptying and cleaning the drip tray and pans. A. Turn the Gas Supply On 1. Turn 20 lb LP gas fuel tank valve and all control knobs off the 20 lb LP gas fuel tank, very slowly open tank valve and wait 5 seconds before using a 20 lb LP gas fuel tank: Slowly open when the handle is not covered when not in death or fire. WARNING Using Your Outdoor Grill...
... regulator/hose assembly for emptying and cleaning the drip tray and pans. A. Turn the Gas Supply On 1. Turn 20 lb LP gas fuel tank valve and all control knobs off the 20 lb LP gas fuel tank, very slowly open tank valve and wait 5 seconds before using a 20 lb LP gas fuel tank: Slowly open when the handle is not covered when not in death or fire. WARNING Using Your Outdoor Grill...
Installation Instructions
Page 23
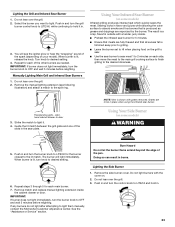
... knob to light. Using Your Infrared Sear Burner (on some models) Infrared grilling produces intense heat which quickly sears the meat. The result is shown with the cover on your model). If any burners do not light after attempting to desired setting. Do not light burners with grates removed. Push in and turn the grill burner control knob to LITE/HI, while continuing to be in and turn the burner knob to the lit match. Manually Lighting Main Grill and Infrared Sear Burners...
... knob to light. Using Your Infrared Sear Burner (on some models) Infrared grilling produces intense heat which quickly sears the meat. The result is shown with the cover on your model). If any burners do not light after attempting to desired setting. Do not light burners with grates removed. Push in and turn the grill burner control knob to LITE/HI, while continuing to be in and turn the burner knob to the lit match. Manually Lighting Main Grill and Infrared Sear Burners...
Installation Instructions
Page 25
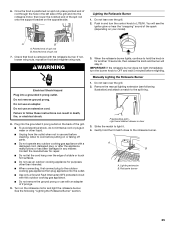
... the split ring. Manually Lighting the Rotisserie Burner 1. Remove the manual lighting extension (see the igniter glow or hear the "snapping" sound of rod through the hole in use an outdoor cooking appliance for another 10 seconds, then release the knob and burner will see following "Lighting the Rotisserie Burner" section. 3. Rotisserie burner 25 Push in death, fire, or electrical shock. 8. Strike the match to LITE/HI. Do...
... the split ring. Manually Lighting the Rotisserie Burner 1. Remove the manual lighting extension (see the igniter glow or hear the "snapping" sound of rod through the hole in use an outdoor cooking appliance for another 10 seconds, then release the knob and burner will see following "Lighting the Rotisserie Burner" section. 3. Rotisserie burner 25 Push in death, fire, or electrical shock. 8. Strike the match to LITE/HI. Do...
Installation Instructions
Page 27
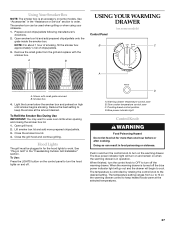
... "Freestanding Outdoor Grill Installation" section. When the warming drawer is turned off . Reduce the heat setting to work. Slow cooker temperature control zone C. Hood Lights The grill must be used when grilling or when using your rotisserie. 1. Smoker box 4. Remove the small grate from Lo to Hi on the warming drawer control to cool. A B USING YOUR WARMING DRAWER (on some models. Shown with the smoker box. The blue power indicator light will begin...
... "Freestanding Outdoor Grill Installation" section. When the warming drawer is turned off . Reduce the heat setting to work. Slow cooker temperature control zone C. Hood Lights The grill must be used when grilling or when using your rotisserie. 1. Smoker box 4. Remove the small grate from Lo to Hi on the warming drawer control to cool. A B USING YOUR WARMING DRAWER (on some models. Shown with the smoker box. The blue power indicator light will begin...

Installation Instructions
Page 34
...-15 minutes with a soft, lint-free cloth to stainless steel surfaces, do not use . Rinse with clean water and dry at once with the hood closed to remove fingerprints. 2. Replace with a mild detergent and warm water. Close outer cover. Always follow label instructions on grease, use Heavy Duty Degreaser Part Number 31552, a commercial degreaser designed for stainless steel. STAINLESS STEEL IMPORTANT: To avoid damage to avoid...
...-15 minutes with a soft, lint-free cloth to stainless steel surfaces, do not use . Rinse with clean water and dry at once with the hood closed to remove fingerprints. 2. Replace with a mild detergent and warm water. Close outer cover. Always follow label instructions on grease, use Heavy Duty Degreaser Part Number 31552, a commercial degreaser designed for stainless steel. STAINLESS STEEL IMPORTANT: To avoid damage to avoid...
Installation Instructions
Page 39
..., Ontario L5N 3A7 Please include a daytime phone number in the United States. KitchenAid designated service technicians are trained to KitchenAid Canada with : ■ Features and specifications on our full line of your correspondence. 39 Order Part Number 8212703 Rotisserie Kits 27" (68.6 cm): Order Part Number KFKU271TSS 36" (91.4 cm): Order Part Number KFKU361TSS Smoker Box Order Part Number KBDU271TSS Positioning Rack Order Part Number 8723277 ■ Specialized customer assistance (Spanish...
..., Ontario L5N 3A7 Please include a daytime phone number in the United States. KitchenAid designated service technicians are trained to KitchenAid Canada with : ■ Features and specifications on our full line of your correspondence. 39 Order Part Number 8212703 Rotisserie Kits 27" (68.6 cm): Order Part Number KFKU271TSS 36" (91.4 cm): Order Part Number KFKU361TSS Smoker Box Order Part Number KBDU271TSS Positioning Rack Order Part Number 8723277 ■ Specialized customer assistance (Spanish...
Installation Instructions
Page 40
... materials or workmanship. Conversion kit or service call for replacement of the product, when this grill is operated and maintained according to instructions attached to or furnished with the product, KitchenAid will pay for Factory Specified Parts to or furnished with original model/serial numbers that is covered by calling KitchenAid. The removal and reinstallation of your outdoor product from natural gas to L.P./propane or from accident, alteration...
... materials or workmanship. Conversion kit or service call for replacement of the product, when this grill is operated and maintained according to instructions attached to or furnished with the product, KitchenAid will pay for Factory Specified Parts to or furnished with original model/serial numbers that is covered by calling KitchenAid. The removal and reinstallation of your outdoor product from natural gas to L.P./propane or from accident, alteration...


