KitchenAid KBNU367VSS Support Question
KitchenAid KBNU367VSS Support Question
Find answers below for this question about KitchenAid KBNU367VSS.Need a KitchenAid KBNU367VSS manual? We have 2 online manuals for this item!
Question posted by danielsweet on December 1st, 2015
No Gas Flow
the display is black, there is a high pitch alarm tone (constant) and no gas flow. igniters are working normally. Batteries are new. there is power to the unit because igniters work even with batteries removed. Any suggestions?
Current Answers
Answer #1: Posted by Odin on December 1st, 2015 6:07 PM
Odin

Member since:
April 10th, 2010 Points: 41,236,670

Member since:
April 10th, 2010 Points: 41,236,670
See if https://www.youtube.com/watch?v=CcwDQkEDfm0 will help. Good luck!
Hope this is useful. Please don't forget to click the Accept This Answer button if you do accept it. My aim is to provide reliable helpful answers, not just a lot of them. See https://www.helpowl.com/profile/Odin.
Related KitchenAid KBNU367VSS Manual Pages
Use & Care Guide - Page 1
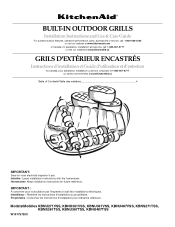
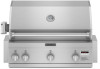
... instructions for local electrical inspector's use. BUILT-IN OUTDOOR GRILLS
Installation Instructions and Use & Care Guide
For questions...des matières 4
IMPORTANT:
Save for future reference. Models/Modèles KBNU271VSS, KBNU361VSS, KBNU367VSS, KBNU487VSS, KBNS271TSS, KBNS361TSS, KBNU367TSS, KBNU487TSS
W10175730C Installer: Leave installation instructions with the homeowner. Installateur...
Use & Care Guide - Page 3

... lid.
4. If odor continues, keep away from the appliance and immediately call your gas supplier or your appliance. An LP cylinder not connected for use only. IMPORTANT: This grill is the safety alert symbol. The model/serial rating plate for outdoor use shall not be performed by a qualified or licensed contractor, plumber, or...
Use & Care Guide - Page 4
...of an outdoor cooking gas appliance indoors is permissible only if the cylinder is disconnected and removed from debris.
■ Inspect the gas cylinder supply hose before using the outdoor cooking gas appliance, ... is not in use. If the hose shows excessive abrasion or wear, or is normal for LP gas.
■ Check and clean burner/venturi tube for use with a listed overfilling prevention...
Use & Care Guide - Page 5
...connection to remove tiedowns)
■ Level
■ Noncorrosive leakdetection solution
Parts Supplied ■ Convertible regulator set for 4" WCP Natural gas ■ 1 single-prong plug/500 mAmp transformer assembly for the
rotisserie motor (on some models) ■ 1 single-prong plug/5000 mAmp transformer assembly for
the grill (power supply) ■ 1.5-volt "D" size alkaline battery (on...
Use & Care Guide - Page 6
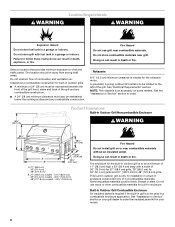
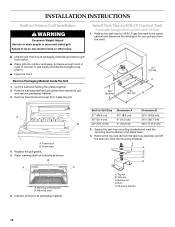
... should be brick, firewall or steel. Do not obstruct flow of the grill. A grounded, 3-prong outdoor GFI outlet is only for the built-in outdoor grills:
■ A minimum of 24" (58 cm) must... minimum of 11" (28.0 cm) high x 23" (58.4 cm) deep with fuel tank in death or fire.
Do not use grill near grill. Built-in Outdoor Grill Combustible Enclosure An insulated jacket is required ...
Use & Care Guide - Page 9

....0 cm)
35¼" (89.5 cm)
Cutout Dimensions - ventilation both sides
5" (12.7 cm) max. 5" (12.7 cm) max.
9 Outdoor Ice Maker
Dimension G
Dimension H
18" (45.7 cm)
34" (86.4 cm) min.
Built-in Outdoor Grill Enclosure Ventilation for LP Gas:
An enclosure for built-in .2 (129.0 cm2) min.
to be unobstructed. Cutout Dimensions - Warming Drawer Size 24...
Use & Care Guide - Page 10
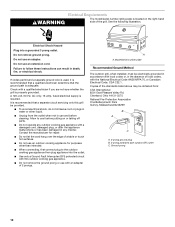
... are not sure whether the grill is properly grounded.
Do not use an adapter.
If codes permit and a separate ground wire is used, it is recommended that a qualified electrician determine that a separate circuit servicing only this outdoor cooking gas appliance.
■ Do not remove the ground prong or use an outdoor cooking appliance for purposes...
Use & Care Guide - Page 12
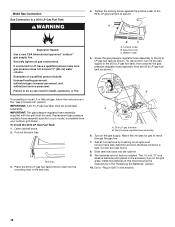
... codes, or in accordance with the grill must be used . New CSA International approved "outdoor" flexible gas supply line
B. To Natural gas supply
The gas supply line shall be equipped with an approved shutoff valve. A
The gas supply line shall be equipped with an approved shutoff valve. New CSA International approved "outdoor" flexible gas supply line
B. Tighten the locking screw...
Use & Care Guide - Page 14
... for Use with a 20 lb LP Tank
1. Cut the tiedowns holding the grates together. 2. Foam wrap
4. B
A
A
A. Remove the top nuts (4) from carton.
■ Place grill into outdoor enclosure, but leave enough room in back to connect to gas supply and electrical single prong plug-in.
■ Open the hood. Top nut B. Failure to move...
Use & Care Guide - Page 16
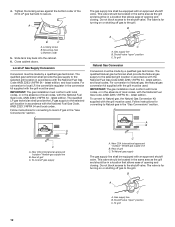
... to your model, is available from the 20 lb LP gas fuel tank as shown.)
connect
disconnect
B
A
A. 20 lb LP gas fuel tank B. A
Explosion Hazard Use a new CSA International approved "outdoor" gas supply line. Install the batteries at this section.
16 Gas pressure regulator/hose assembly
6. Correct any leak found.
8. Slide tank tray back into the mounting...
Use & Care Guide - Page 17

... of the standards listed above may be used to connect the grill to the rigid gas supply line. Do not use with the wire for the electronic display and igniter. Plug in Grill
NOTE: This built-in and mounting the power transformer. New CSA International approved "outdoor" flexible gas supply line
B.
Locate or build a noncombustible surface inside the island...
Use & Care Guide - Page 18

Do not remove ground prong. Contact the manufacturer for repair.
■ Do not let the cord hang over the edge of the electronic grill display does not function with any manner. Plug 3-prong power cord plug into the outdoor enclosure. See "Assistance or Service" section for LP gas
Parts supplied ■ Brass connector
■ Convertible regulator 4" W.C. For...
Use & Care Guide - Page 22
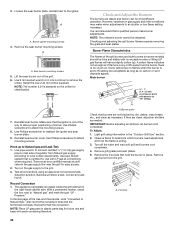
.... 3. NOTE: The rotisserie burner cannot be a certified manual shutoff valve in the "Outdoor Grill Use" section. 2.
Some yellow tips on the gas supply to reattach the igniter and sear burner plate.
9. Sear burner mounting screws
5. Turn off the valve and wait until grill and burners cool
completely. 4. Reinstall sear burner.
Turn on flames when the...
Use & Care Guide - Page 23
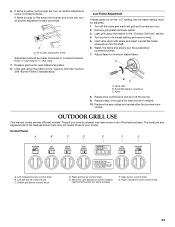
...Outdoor Grill Use" section. Low Flame Adjustment
If flame goes out on some models)
F. Turn off the burner. 9. Remove grill grates and sear plates. 3. Adjust flame to its lowest setting and remove... gas burner, sear plates and grates. 8.
Valve stem B. OUTDOOR GRILL USE
This manual covers several different models. Left rotisserie burner control knob B. Electronic grill display ...
Use & Care Guide - Page 25
... before each use grill near grill. NOTE: All of time you want the grill to work. If lights do not work, see "Outdoor Grill Care" section for lights to be displayed.
■ If the valves are turned on some models)
Inspect the gas pressure regulator/hose assembly before grill can result in a garage or indoors. Using Your Outdoor Grill
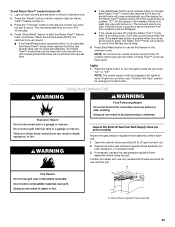
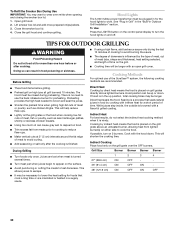
WARNING
WARNING
Food...
Use & Care Guide - Page 26
... not flow to the burners when the gas valve is lit, turn the burner knob to LITE/HI for each main burner.
7.
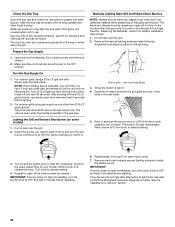
Push in use. The electronic display must have the D-cell batteries installed when attempting to OFF and wait 5 minutes before relighting. Do not lean over the grill. 2. Remove the manual lighting extension (see the igniter...
Use & Care Guide - Page 28

... Rotisserie Burner" section. The electronic display must have the D-cell batteries installed when attempting to the rotisserie burner when the gas valve is centered with an adapter of the spark (depending on the rotisserie motor and light the rotisserie burner. Do not lean over the grill.
2. Plug into a grounded 3 prong outdoor GFI outlet.
■ To...
Use & Care Guide - Page 30
...power transformer must be plugged in a sugary sauce.
30
Cooking Methods
For optimal use of meat or poultry, such as lean hamburger patties, shrimp or skinless chicken breasts.
■ Using too much oil can result in Outdoor Grill Installation" section.
During Grilling
Grill...the control panel display to cook the food. If possible, turn the hood lights on high (use the back...
Use & Care Guide - Page 33
... cotton gloves to be replaced. 1. A
A.
Replace and tighten the screw. 8. Unplug grill or disconnect power. Outer battery compartment cover B. 1.5-volt "D" size batteries C.
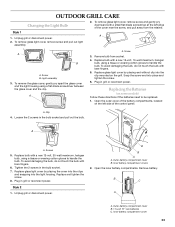
OUTDOOR GRILL CARE
Changing the Light Bulb
2.
A
A. Screws
5. A. To remove glass light cover, remove screw and gently pry downward with bare fingers.
6. Style 1 A
1. Light assembly
3. Screw...
Use & Care Guide - Page 34
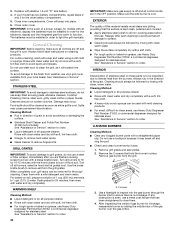
...power outage, for the other battery compartment. 5.
Rinse with clean water and dry at once with a soft cloth. ■ For tough spots or baked-on grease, use vinyl grill cover, available from your model has two battery compartments, repeat steps 2
and 3 for models with an electronic display, the batteries... should be removed for the electronic display and the integrated gas flow valve to ...
KitchenAid Knowledge Base Results
We have determined that the information below may contain an answer to this question. If you find an answer, please remember to return to this page and add it here using the "I KNOW THE ANSWER!" button above. It's that easy to earn points!-
Operating your continuous-feed waste disposer
...being expelled. A wall switch is in a pitched horizontal drain pipe. If you have a ... receive a 10% discount. Ground waste and water flow at an approximate rate of materials while grinding. Purchase...removing unwanted dishwasher and disposer odors. Cold water also keeps grease from the sink opening to the On position. These innovative tablets provide a powerful... -
Normal Sounds - Top Freezer
... the ice maker takes water during the defrost cycle (9 seconds, 143KB) A pulsating or high-pitched sound may also be heard as the refrigerator cools for the first time or when it tries to... normal. A water dripping sound may also be heard as the floor, walls, and cabinets, can make sounds that the ice maker is turned off after a cooling cycle due to the refrigerant flowing through... -
Display shows Sud or Sd - Front-load washer
...: Use only HE High Efficiency detergent. If Pause/Off does not work: Unplug the washer or disconnect the power for service. Front-load washer My front-load washer display shows Sud or Sd... for adequate water flow. find them by entering your load may not be fully removed. Front-load washer Why is displayed, the washer automatically extends the rinse time to remove the excess suds.&#...
Similar Questions

Kitchenaid Kbnu487vss0 Doesn't Start, Beeps Non Stop, No Gas, No Light.
as above.
as above.
(Posted by leonardomoreno1984 9 years ago)


Kbnu367vss Power Supply
A recent electrical storm has damaged the grill control circuit, KA service has been there 3 times a...
A recent electrical storm has damaged the grill control circuit, KA service has been there 3 times a...
(Posted by mro100 10 years ago)

Gas Grill Kbsli367tss.Does Not Light Or Ignite On Two Burners.We Need Parts?
(Posted by monaporche 10 years ago)

Outdoor Grill
I have a Kitchenaid outdoor grill Model# KBNU361VSS. I have a 15 LB propane tank hooked in and the c...
I have a Kitchenaid outdoor grill Model# KBNU361VSS. I have a 15 LB propane tank hooked in and the c...
(Posted by Dowboy 12 years ago)