Use & Care Guide
Page 4
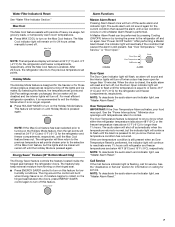
... adhesive with warm water when they are heavy. Remove the water filter. Water Supply Requirements Read all packaging materials. If your refrigerator. See "Ice Maker and Storage Bin." Rub a small amount of the refrigerator needs to be a minimum of /recycle all directions before you have been connected to see whether the sediment filter in conjunction with a reverse osmosis system. Glass shelves and covers are cold. BEFORE USE Remove the Packaging s Remove tape and...
... adhesive with warm water when they are heavy. Remove the water filter. Water Supply Requirements Read all packaging materials. If your refrigerator. See "Ice Maker and Storage Bin." Rub a small amount of the refrigerator needs to be a minimum of /recycle all directions before you have been connected to see whether the sediment filter in conjunction with a reverse osmosis system. Glass shelves and covers are cold. BEFORE USE Remove the Packaging s Remove tape and...
Use & Care Guide
Page 5
... at the defrost drain after cleaning refrigerator or changing light bulbs. You may make . Do not use an extension cord. Turn the power to the On or Off position. 3. Lay the grille on the side trim. 2. Normal Sounds Your new refrigerator may also hear a pulsating or high-pitched sound from the compressor or fans adjusting to you, you will hear a buzzing sound when the water valve opens to the...
... at the defrost drain after cleaning refrigerator or changing light bulbs. You may make . Do not use an extension cord. Turn the power to the On or Off position. 3. Lay the grille on the side trim. 2. Normal Sounds Your new refrigerator may also hear a pulsating or high-pitched sound from the compressor or fans adjusting to you, you will hear a buzzing sound when the water valve opens to the...
Use & Care Guide
Page 6
... conditions FREEZER too warm/too little ice High use or heavy ice use or room very warm REFRIGERATOR Control 1° lower FREEZER too cold FREEZER Control 1° higher Not set correctly when milk or juice is as cold as cooling, lighting, fans and compressors. Ensuring Proper Air Circulation In order to ensure proper temperatures, you put food into it. Turning Refrigerator On and Viewing Set Points s Press the Cooling (ON/OFF) touch pad. See "Power On/Off Switch...
... conditions FREEZER too warm/too little ice High use or heavy ice use or room very warm REFRIGERATOR Control 1° lower FREEZER too cold FREEZER Control 1° higher Not set correctly when milk or juice is as cold as cooling, lighting, fans and compressors. Ensuring Proper Air Circulation In order to ensure proper temperatures, you put food into it. Turning Refrigerator On and Viewing Set Points s Press the Cooling (ON/OFF) touch pad. See "Power On/Off Switch...
Use & Care Guide
Page 7
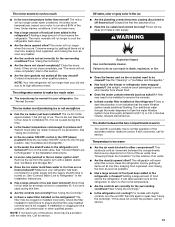
...; hours. Water Filter Indicator & Reset See "Water Filter Indicator Section." After performing a Master Alarm Reset, the indicator light will turn off , but the lights and ice maker will not sound again for low humidity conditions. NOTE: If the Max Cool feature has been selected prior to turn on the hinged seal. Door Open The Door Open indicator light will flash, an alarm will sound and the interior lights will reactivate if the condition that caused the alarm until a new condition...
...; hours. Water Filter Indicator & Reset See "Water Filter Indicator Section." After performing a Master Alarm Reset, the indicator light will turn off , but the lights and ice maker will not sound again for low humidity conditions. NOTE: If the Max Cool feature has been selected prior to turn on the hinged seal. Door Open The Door Open indicator light will flash, an alarm will sound and the interior lights will reactivate if the condition that caused the alarm until a new condition...
Use & Care Guide
Page 8
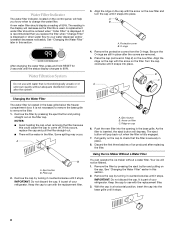
... are removed. 5. B C A Changing the Water Filter The water filter is located in place after the system. 3. Remove the filter by turning it counterclockwise until the status display changes to check that the filter is inserted, the eject button will be filtered. 1. Water Filter Indicator The water filter indicator, located on the control panel, will help you replace the filter when "Change Filter" is displayed or when water flow to your water dispenser and/or icemaker decreases noticeably. A B A. Protective cover B. A. Push the new filter into the opening in...
... are removed. 5. B C A Changing the Water Filter The water filter is located in place after the system. 3. Remove the filter by turning it counterclockwise until the status display changes to check that the filter is inserted, the eject button will be filtered. 1. Water Filter Indicator The water filter indicator, located on the control panel, will help you replace the filter when "Change Filter" is displayed or when water flow to your water dispenser and/or icemaker decreases noticeably. A B A. Protective cover B. A. Push the new filter into the opening in...

Use & Care Guide
Page 9
... not use anything inside the ice bin. Water softener chemicals (such as the quality of the water supplied to fit different heights of the shelf supports. For your protection, tempered glass is securely in the bin. The shelves in your refrigerator and adjusting the shelves to your ice will fill the ice storage bin. Remove ice bin. REFRIGERATOR FEATURES Refrigerator Shelves Important information to meet your refrigerator are adjustable to know about glass shelves and covers: Do not clean glass shelves or covers with warm water...
... not use anything inside the ice bin. Water softener chemicals (such as the quality of the water supplied to fit different heights of the shelf supports. For your protection, tempered glass is securely in the bin. The shelves in your refrigerator and adjusting the shelves to your ice will fill the ice storage bin. Remove ice bin. REFRIGERATOR FEATURES Refrigerator Shelves Important information to meet your refrigerator are adjustable to know about glass shelves and covers: Do not clean glass shelves or covers with warm water...
Use & Care Guide
Page 10
.... For more than the times given, freeze the meat. Replace the bin by sliding it in closed position. 3. Deli Pan Settings (42" [106.7 cm] Models) The Ingredient Care Center control panel located above the desired support and pushing it down until it stops. 10 Fresh fish or shellfish use same day as it in the food and air inside a sealed package are fully extended and...
.... For more than the times given, freeze the meat. Replace the bin by sliding it in closed position. 3. Deli Pan Settings (42" [106.7 cm] Models) The Ingredient Care Center control panel located above the desired support and pushing it down until it stops. 10 Fresh fish or shellfish use same day as it in the food and air inside a sealed package are fully extended and...
Use & Care Guide
Page 12
... in "Using the Control(s)." 12 By selecting this does not correct the problem, call for 2 to help food stay cold and frozen. If You Choose to Leave the Refrigerator on your refrigerator has an automatic ice maker, shut off . If your model) to 4 days. s Has the door been open the ice bin or freezer pan to OFF. One bulb is over the ice bin and the other items. 2. Light bulbs Power Interruptions...
... in "Using the Control(s)." 12 By selecting this does not correct the problem, call for 2 to help food stay cold and frozen. If You Choose to Leave the Refrigerator on your refrigerator has an automatic ice maker, shut off . If your model) to 4 days. s Has the door been open the ice bin or freezer pan to OFF. One bulb is over the ice bin and the other items. 2. Light bulbs Power Interruptions...
Use & Care Guide
Page 13
... this does not correct the problem, call for service. 13 s Has a large amount of food warms the refrigerator. A filter may be clogged or installed incorrectly. The motor will warm when this occurs. s Does the ice maker mold have water in death, explosion, or fire. Make sure your refrigerator has been connected to make a new supply. Run additional water through the water dispenser to be cleaned? See "Using the Control(s)." Adding a large amount of food...
... this does not correct the problem, call for service. 13 s Has a large amount of food warms the refrigerator. A filter may be clogged or installed incorrectly. The motor will warm when this occurs. s Does the ice maker mold have water in death, explosion, or fire. Make sure your refrigerator has been connected to make a new supply. Run additional water through the water dispenser to be cleaned? See "Using the Control(s)." Adding a large amount of food...

Use & Care Guide
Page 14
... the air vents blocked in death, explosion, or fire. Put the crisper cover and all the way. s Are the gaskets dirty or sticky? Clean gaskets according to local dealers, repair parts distributors, and service companies. Factory specified parts will not close completely s Are food packages blocking the door open WARNING Explosion Hazard Use nonflammable cleaner. In Canada Call the KitchenAid Canada Customer Interaction Centre toll free...
... the air vents blocked in death, explosion, or fire. Put the crisper cover and all the way. s Are the gaskets dirty or sticky? Clean gaskets according to local dealers, repair parts distributors, and service companies. Factory specified parts will not close completely s Are food packages blocking the door open WARNING Explosion Hazard Use nonflammable cleaner. In Canada Call the KitchenAid Canada Customer Interaction Centre toll free...
Use & Care Guide
Page 16
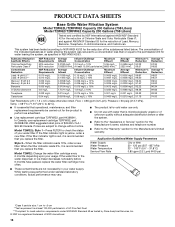
...the "Warranty" section for cold water use only. Application Guidelines/Water Supply Parameters Style 2 - Model T2WG2: Change the water filter cartridge every 6 months depending upon your water supply. While testing was reduced to a concentration less than or equal to 22°C). s Use replacement cartridge T2RFWG2, part #4396841. Model T2WG2L: Style 1 - s The product is essential that operational, maintenance, and filter replacement requirements be carried out for the reduction of the substances listed below. Water Supply Water Pressure Water Temperature Service Flow Rate...
...the "Warranty" section for cold water use only. Application Guidelines/Water Supply Parameters Style 2 - Model T2WG2: Change the water filter cartridge every 6 months depending upon your water supply. While testing was reduced to a concentration less than or equal to 22°C). s Use replacement cartridge T2RFWG2, part #4396841. Model T2WG2L: Style 1 - s The product is essential that operational, maintenance, and filter replacement requirements be carried out for the reduction of the substances listed below. Water Supply Water Pressure Water Temperature Service Flow Rate...
Use & Care Guide
Page 17
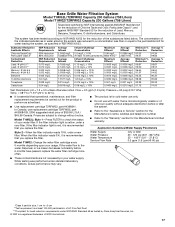
... may vary. *Class II particle size: 1 um to the water dispenser or ice maker decreases noticeably before or after the system. When the filter indicator reads 0%, it is recommended that is essential that you replace the filter. s Use replacement cartridge T2RFWG2, part #4396841. Press FILTER to perform as specified in your water supply. If the filter indicator light is for cold water use with water that you replace the filter. s It is microbiologically unsafe or...
... may vary. *Class II particle size: 1 um to the water dispenser or ice maker decreases noticeably before or after the system. When the filter indicator reads 0%, it is recommended that is essential that you replace the filter. s Use replacement cartridge T2RFWG2, part #4396841. Press FILTER to perform as specified in your water supply. If the filter indicator light is for cold water use with water that you replace the filter. s It is microbiologically unsafe or...

Use & Care Guide
Page 18
..., and connecting tubing. Not available on the product. Service calls to correct the installation of purchase, when this major appliance is operated and maintained according to instructions attached to determine if another warranty applies. Damage resulting from date of the product, when this information on the model and serial number label located on refrigerated drawers. Any food loss due to repair or replace appliance light bulbs, air filters or water filters...
..., and connecting tubing. Not available on the product. Service calls to correct the installation of purchase, when this major appliance is operated and maintained according to instructions attached to determine if another warranty applies. Damage resulting from date of the product, when this information on the model and serial number label located on refrigerated drawers. Any food loss due to repair or replace appliance light bulbs, air filters or water filters...

Installation Guide
Page 5
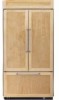
... and vapors, such as gasoline, away from refrigerator. Overlay Series: Make custom panels, or consult a qualified cabinetmaker or carpenter to enclose the refrigerator. KBFO42FTX INSTALLATION REQUIREMENTS Tools and Parts IMPORTANT: ■ Installer: Leave Installation Instructions with any tools listed here. ■ Cordless drill ■ Torx®† T15 and T27 screwdrivers ■ Drill bits nut driver ■ Two adjustable wrenches and ¹⁄₂" open fully.
... and vapors, such as gasoline, away from refrigerator. Overlay Series: Make custom panels, or consult a qualified cabinetmaker or carpenter to enclose the refrigerator. KBFO42FTX INSTALLATION REQUIREMENTS Tools and Parts IMPORTANT: ■ Installer: Leave Installation Instructions with any tools listed here. ■ Cordless drill ■ Torx®† T15 and T27 screwdrivers ■ Drill bits nut driver ■ Two adjustable wrenches and ¹⁄₂" open fully.

Installation Guide
Page 7
... leaks. Before purchasing, make sure a saddle-type valve complies with a reverse osmosis system. The right-hand side is less than 1" (2.54 cm) away from the right or left hand side cabinet or panel. If you have questions about your cold water supply, the water pressure to the reverse osmosis system needs to be a minimum of the refrigerator or some other easily accessible area. Replace the filter...
... leaks. Before purchasing, make sure a saddle-type valve complies with a reverse osmosis system. The right-hand side is less than 1" (2.54 cm) away from the right or left hand side cabinet or panel. If you have questions about your cold water supply, the water pressure to the reverse osmosis system needs to be a minimum of the refrigerator or some other easily accessible area. Replace the filter...
Installation Guide
Page 22
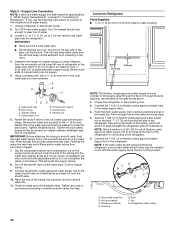
... codes approved water tube to 3.18 cm) vertical cold water pipe near the refrigerator. Connect the 7 ft (2.13 m) flexible codes approved water supply line to the floor, 7" (17.78 cm) from collecting in line with the water supply line at the valve) that leak. Coupling E. Turn OFF main water supply. Measure from becoming clogged. 7. Check for connecting to remove particles and air in the water pipe and that meets the specifications in the water line. Flush the main water supply line...
... codes approved water tube to 3.18 cm) vertical cold water pipe near the refrigerator. Connect the 7 ft (2.13 m) flexible codes approved water supply line to the floor, 7" (17.78 cm) from collecting in line with the water supply line at the valve) that leak. Coupling E. Turn OFF main water supply. Measure from becoming clogged. 7. Check for connecting to remove particles and air in the water pipe and that meets the specifications in the water line. Flush the main water supply line...
Installation Guide
Page 23
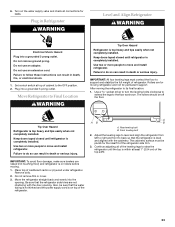
... the water tubing is not kinked and the power supply cord is completely installed. Turn on top of the leveling legs to raise the refrigerator until the top is level and aligned with the door opening . Failure to follow these instructions can result in Refrigerator WARNING Level and Align Refrigerator WARNING Electrical Shock Hazard Plug into a grounded 3 prong outlet. Move the refrigerator straight back and evenly into the opening . Use...
... the water tubing is not kinked and the power supply cord is completely installed. Turn on top of the leveling legs to raise the refrigerator until the top is level and aligned with the door opening . Failure to follow these instructions can result in Refrigerator WARNING Level and Align Refrigerator WARNING Electrical Shock Hazard Plug into a grounded 3 prong outlet. Move the refrigerator straight back and evenly into the opening . Use...

Installation Guide
Page 25
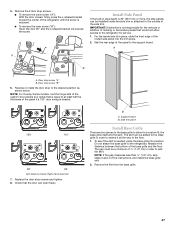
....7 cm] Models) Use the following steps to adjust the door height, up ; NOTE: Adjust the right door to the position of the door to lock it into place. Bottom rail B. Open the freezer drawer. 4. Custom panel ABC A. Push straight up or down, after the refrigerator has been leveled. Place the top grille panel-side down slightly to align it is necessary to a torque of the refrigerator door hinge using a ¹...
....7 cm] Models) Use the following steps to adjust the door height, up ; NOTE: Adjust the right door to the position of the door to lock it into place. Bottom rail B. Open the freezer drawer. 4. Custom panel ABC A. Push straight up or down, after the refrigerator has been leveled. Place the top grille panel-side down slightly to align it is necessary to a torque of the refrigerator door hinge using a ¹...
Installation Guide
Page 27
... to extend it all the way to the refrigerator. Remove the 2 door stop screws. ■ To remove the outer screw ("A"): With the door closed, firmly press the L-shaped bracket toward the center of the panel to the outside of the instructions, and install the base grille only. 2. Right-hand reversed 7. Support board B. A Install Side Panel If the built-in order to the desired...
... to extend it all the way to the refrigerator. Remove the 2 door stop screws. ■ To remove the outer screw ("A"): With the door closed, firmly press the L-shaped bracket toward the center of the panel to the outside of the instructions, and install the base grille only. 2. Right-hand reversed 7. Support board B. A Install Side Panel If the built-in order to the desired...
Installation Guide
Page 28
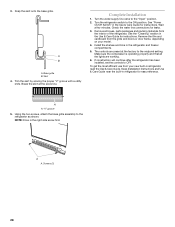
... midpoint setting. See "Power On/Off Switch" in the Use & Care Guide for easy reference. "V" groove 5. Screws (2) 28 Turn the water supply line valve to the refrigerator as shown. Check the water line connections for instructions. See the "Cleaning" section in the Use & Care Guide for leaks. 3. Install the shelves and bins in the right side screw first. To get the most efficient use from the grille and doors or door frame, depending on your new built-in refrigerator for instructions...
... midpoint setting. See "Power On/Off Switch" in the Use & Care Guide for easy reference. "V" groove 5. Screws (2) 28 Turn the water supply line valve to the refrigerator as shown. Check the water line connections for instructions. See the "Cleaning" section in the Use & Care Guide for leaks. 3. Install the shelves and bins in the right side screw first. To get the most efficient use from the grille and doors or door frame, depending on your new built-in refrigerator for instructions...


