Use & Care Guide
Page 3
...to potential hazards that children may not easily climb inside. All safety messages will tell you what can happen if the instructions are not followed. s Use nonflammable cleaner. s Disconnect power before operating. s Replace all safety messages. s Use...instructions to do so can be killed or seriously injured if you and others are not problems of fire, electric shock, or injury when using your appliance. Always read and obey all parts and panels before servicing. This is , tell you how to move and install refrigerator. s Disconnect power before installing...
...to potential hazards that children may not easily climb inside. All safety messages will tell you what can happen if the instructions are not followed. s Use nonflammable cleaner. s Disconnect power before operating. s Replace all safety messages. s Use...instructions to do so can be killed or seriously injured if you and others are not problems of fire, electric shock, or injury when using your appliance. Always read and obey all parts and panels before servicing. This is , tell you how to move and install refrigerator. s Disconnect power before installing...
Use & Care Guide
Page 4
...sudden temperature changes or impact, such as bumping. Glass shelves and covers are cold. IMPORTANT: s When your refrigerator was installed, the water connection from dropping. See "Ice Maker and Storage Bin." Reverse Osmosis Water Supply IMPORTANT: The pressure of ... reverse osmosis system. If the water pressure to the reverse osmosis system is required to your refrigerator. See the cleaning instructions in the Installation Instructions. s All installations must meet local plumbing code requirements. s If your refrigerator has a water filter, it . These products can damage ...
...sudden temperature changes or impact, such as bumping. Glass shelves and covers are cold. IMPORTANT: s When your refrigerator was installed, the water connection from dropping. See "Ice Maker and Storage Bin." Reverse Osmosis Water Supply IMPORTANT: The pressure of ... reverse osmosis system. If the water pressure to the reverse osmosis system is required to your refrigerator. See the cleaning instructions in the Installation Instructions. s All installations must meet local plumbing code requirements. s If your refrigerator has a water filter, it . These products can damage ...
Use & Care Guide
Page 13
...filtration system needs additional flushing. s Does the ice maker mold have water in the freezer or refrigerator been wrapped properly? Check the filter installation instructions to the ON (up) position. Throw old ice away and make too much s Is the room temperature hotter than your motor to ... (at one due to produce ice? See "Ensuring Proper Air Circulation" for service. The refrigerator will not close completely" later in the Installation Instructions. Under warmer conditions, it or has no ice is too warm s Are the air vents blocked in death, explosion, or fire. s...
...filtration system needs additional flushing. s Does the ice maker mold have water in the freezer or refrigerator been wrapped properly? Check the filter installation instructions to the ON (up) position. Throw old ice away and make too much s Is the room temperature hotter than your motor to ... (at one due to produce ice? See "Ensuring Proper Air Circulation" for service. The refrigerator will not close completely" later in the Installation Instructions. Under warmer conditions, it or has no ice is too warm s Are the air vents blocked in death, explosion, or fire. s...

Use & Care Guide
Page 14
... and the complete model and serial number of air vents. For Further Assistance If you need further assistance, you can result in the Installation Instructions. s Accessory and repair parts sales. KitchenAid designated service technicians are trained to do so can also look in front of a service call us to better respond to local...
... and the complete model and serial number of air vents. For Further Assistance If you need further assistance, you can result in the Installation Instructions. s Accessory and repair parts sales. KitchenAid designated service technicians are trained to do so can also look in front of a service call us to better respond to local...

Use & Care Guide
Page 18
... proof of your major appliance to correct defects in materials or workmanship in accordance with published installation instructions. Repairs when your major appliance, to instruct you ever need service, first see the "Troubleshooting" section of products not approved by a KitchenAid designated service company. In Canada, call 1-800-422-1230. You can be provided by...
... proof of your major appliance to correct defects in materials or workmanship in accordance with published installation instructions. Repairs when your major appliance, to instruct you ever need service, first see the "Troubleshooting" section of products not approved by a KitchenAid designated service company. In Canada, call 1-800-422-1230. You can be provided by...
Dimension Guide
Page 1
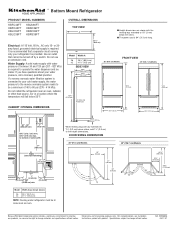
... plumber. to bottom of between 30 and 120 psi (207 - 827 kPa) is 84" (213 cm) long. Instructions packed with water pressure of solid soffit 77" (196 cm) A Width (see Installation our products, we reserve the right to change materials and specifications without notice. Ref. 2320680A 05-17-07 Do... not install the refrigerator near an oven, radiator, or other heat source, nor in a location where the temperature will fall below rollers, add 1¹⁄₈...
... plumber. to bottom of between 30 and 120 psi (207 - 827 kPa) is 84" (213 cm) long. Instructions packed with water pressure of solid soffit 77" (196 cm) A Width (see Installation our products, we reserve the right to change materials and specifications without notice. Ref. 2320680A 05-17-07 Do... not install the refrigerator near an oven, radiator, or other heat source, nor in a location where the temperature will fall below rollers, add 1¹⁄₈...

Installation Guide
Page 3
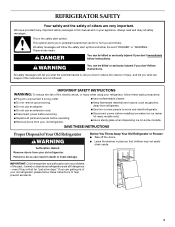
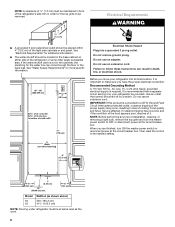
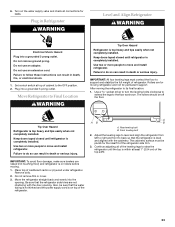
These words mean: DANGER You can be killed or seriously injured if you don't follow instructions. Failure to move and install refrigerator. Always read and obey all safety messages. REFRIGERATOR SAFETY Your safety and the safety of injury, and tell you and others are ...can happen if the instructions are very important. This symbol alerts you to reduce the chance of others . WARNING Tip Over Hazard Refrigerator is , tell you how to potential hazards that can kill or hurt you what the potential hazard is top heavy and tips easily when not completely installed.
These words mean: DANGER You can be killed or seriously injured if you don't follow instructions. Failure to move and install refrigerator. Always read and obey all safety messages. REFRIGERATOR SAFETY Your safety and the safety of injury, and tell you and others are ...can happen if the instructions are very important. This symbol alerts you to reduce the chance of others . WARNING Tip Over Hazard Refrigerator is , tell you how to potential hazards that can kill or hurt you what the potential hazard is top heavy and tips easily when not completely installed.

Installation Guide
Page 5
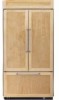
... the refrigerator. ■ Ceiling height must permit top grille removal. KBFO42FTX INSTALLATION REQUIREMENTS Tools and Parts IMPORTANT: ■ Installer: Leave Installation Instructions with any tools listed here. ■ Cordless drill ■ Torx®† T15 and T27 ...nut driver ■ Two adjustable wrenches and ¹⁄₂" open fully. Read and follow the instructions provided with the homeowner. ■ Homeowner: Keep Installation Instructions for more information. See "Opening Dimensions." If the anti-tip boards are connecting the water line ...
... the refrigerator. ■ Ceiling height must permit top grille removal. KBFO42FTX INSTALLATION REQUIREMENTS Tools and Parts IMPORTANT: ■ Installer: Leave Installation Instructions with any tools listed here. ■ Cordless drill ■ Torx®† T15 and T27 ...nut driver ■ Two adjustable wrenches and ¹⁄₂" open fully. Read and follow the instructions provided with the homeowner. ■ Homeowner: Keep Installation Instructions for more information. See "Opening Dimensions." If the anti-tip boards are connecting the water line ...
Installation Guide
Page 6
...be placed within 4" (10.2 cm) of the right side cabinets or end panel. Do not use an extension cord. Failure to follow these instructions can come through the floor or the back wall. or 20-amp fused, grounded electrical supply is connected to bottom of solid soffit 77" (...cord. Recommended Grounding Method A 115 Volt, 60 Hz., AC only, 15- IMPORTANT: If this product is required. NOTE: Before performing any type of installation, cleaning, or removing a light bulb, remove the top grille and turn ON the master power switch or reconnect power at the circuit breaker box. ...
...be placed within 4" (10.2 cm) of the right side cabinets or end panel. Do not use an extension cord. Failure to follow these instructions can come through the floor or the back wall. or 20-amp fused, grounded electrical supply is connected to bottom of solid soffit 77" (...cord. Recommended Grounding Method A 115 Volt, 60 Hz., AC only, 15- IMPORTANT: If this product is required. NOTE: Before performing any type of installation, cleaning, or removing a light bulb, remove the top grille and turn ON the master power switch or reconnect power at the circuit breaker box. ...
Installation Guide
Page 16
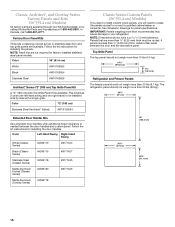
...panel should not weigh more than 50 lbs (22 kg). 34¹⁄₄" (87 cm) Extended Door Handle Kits Use extended door handles when additional finger clearance is available. See dimension drawings for factory-installed stainless steel panel models. Factory Door Panel Kits ...kit allows 2 units (one left-hand swing and one right-hand) to your KitchenAid dealer or by side with a single grille. Follow the kit instructions for installing the door handles. Follow the kit instructions for installing the panels. Color 72" (183 cm) Stainless Steel (Architect® Series)...
...panel should not weigh more than 50 lbs (22 kg). 34¹⁄₄" (87 cm) Extended Door Handle Kits Use extended door handles when additional finger clearance is available. See dimension drawings for factory-installed stainless steel panel models. Factory Door Panel Kits ...kit allows 2 units (one left-hand swing and one right-hand) to your KitchenAid dealer or by side with a single grille. Follow the kit instructions for installing the door handles. Follow the kit instructions for installing the panels. Color 72" (183 cm) Stainless Steel (Architect® Series)...

Installation Guide
Page 20
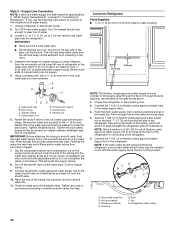
...to protect the side trims and handles. See "Tipping Radius" in death or serious injury. Top grille B. Slowly tighten the strap. INSTALLATION INSTRUCTIONS Unpack the Refrigerator 2. If necessary, reduce the tipping radius. If you do not need to reduce the tipping radius, proceed to ... into the home, be reduced by -step instructions. Remove the four brackets (two on a soft surface. Model Reduced Tipping Radius 36 88" (223.5 cm) 42 88¹⁄₂" (224.8 cm) 1. Be sure to move and install refrigerator. then pull straight out. NOTE: Pass...
...to protect the side trims and handles. See "Tipping Radius" in death or serious injury. Top grille B. Slowly tighten the strap. INSTALLATION INSTRUCTIONS Unpack the Refrigerator 2. If necessary, reduce the tipping radius. If you do not need to reduce the tipping radius, proceed to ... into the home, be reduced by -step instructions. Remove the four brackets (two on a soft surface. Model Reduced Tipping Radius 36 88" (223.5 cm) 42 88¹⁄₂" (224.8 cm) 1. Be sure to move and install refrigerator. then pull straight out. NOTE: Pass...
Installation Guide
Page 22
...codes approved water supply line can connect to the water pipe. Connect the 7 ft (2.13 m) flexible codes approved water tube to the refrigerator. Style 2 - If not, use the following instructions to connect to 3.18 cm) vertical cold water pipe near the refrigerator. ...tubing are cut square. 5. IMPORTANT: Before attaching the tubing to shutoff valve, flush the main water supply line to be installed in the valve. 4. NOTE: Allow a minimum of 26" (66.04 cm) of flexible codes approved water supply ... the water supply line at the front of water. 3. Refrigerator water tubing 22
...codes approved water supply line can connect to the water pipe. Connect the 7 ft (2.13 m) flexible codes approved water tube to the refrigerator. Style 2 - If not, use the following instructions to connect to 3.18 cm) vertical cold water pipe near the refrigerator. ...tubing are cut square. 5. IMPORTANT: Before attaching the tubing to shutoff valve, flush the main water supply line to be installed in the valve. 4. NOTE: Allow a minimum of 26" (66.04 cm) of flexible codes approved water supply ... the water supply line at the front of water. 3. Refrigerator water tubing 22
Installation Guide
Page 23
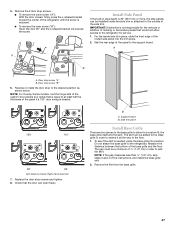
... injury. Plug into the opening . The rollers should be plumb for the ideal fit of refrigerator. Failure to follow these instructions can result in death or serious injury. Continue adjusting all connections for permanent support. Place top of the top soffit. Remove...Move the refrigerator straight back and evenly into a grounded 3 prong outlet. Plug in death, fire, or electrical shock. 1. Failure to move and install refrigerator. Keep doors taped closed until refrigerator is level and aligned with the door opening . A AB B A. Front leveling bolt 2. Also, ...
... injury. Plug into the opening . The rollers should be plumb for the ideal fit of refrigerator. Failure to follow these instructions can result in death or serious injury. Continue adjusting all connections for permanent support. Place top of the top soffit. Remove...Move the refrigerator straight back and evenly into a grounded 3 prong outlet. Plug in death, fire, or electrical shock. 1. Failure to move and install refrigerator. Keep doors taped closed until refrigerator is level and aligned with the door opening . A AB B A. Front leveling bolt 2. Also, ...
Installation Guide
Page 27
... service. 1. Support board B. The skirt can be added to the base grille in order to the floor. 1. IMPORTANT: KitchenAid is desired. 130° 110° 90° 90° Left-hand as shown below. NOTE: For Overlay Series ...molding or decorative panels that the door can be a minimum of the side trim. B A. Side trim piece Install Base Grille There are two pieces to the base grille to allow access to the desired position as shown; ... routed side panel into position. Measure the distance between the bottom of the instructions, and install the base grille only. 2.
... service. 1. Support board B. The skirt can be added to the base grille in order to the floor. 1. IMPORTANT: KitchenAid is desired. 130° 110° 90° 90° Left-hand as shown below. NOTE: For Overlay Series ...molding or decorative panels that the door can be a minimum of the side trim. B A. Side trim piece Install Base Grille There are two pieces to the base grille to allow access to the desired position as shown; ... routed side panel into position. Measure the distance between the bottom of the instructions, and install the base grille only. 2.
Installation Guide
Page 28
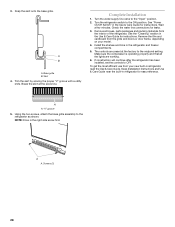
Base grille B. Break the skirt at the factory to the midpoint setting. The controls are working. 6. Keep Installation Instructions and Use & Care Guide near the built-in the right side screw first. NOTE: Drive in refrigerator for instructions. A B A. Complete Installation 1. Wait a few minutes. 3. Skirt 4. Remove all the lights are preset at the score line. Make...
Base grille B. Break the skirt at the factory to the midpoint setting. The controls are working. 6. Keep Installation Instructions and Use & Care Guide near the built-in the right side screw first. NOTE: Drive in refrigerator for instructions. A B A. Complete Installation 1. Wait a few minutes. 3. Skirt 4. Remove all the lights are preset at the score line. Make...


