Use & Care Guide
Page 3
... in place so that can result in death or brain damage. s Do not remove ground prong. s Do not use an extension cord. s Disconnect power before installing ice maker (on some models). s Remove doors from your appliance. s Disconnect power before servicing. even if they will follow these instructions to move and...
... in place so that can result in death or brain damage. s Do not remove ground prong. s Do not use an extension cord. s Disconnect power before installing ice maker (on some models). s Remove doors from your appliance. s Disconnect power before servicing. even if they will follow these instructions to move and...
Use & Care Guide
Page 4
...see "Troubleshooting" or call a licensed, qualified plumber. For your refrigerator. Glass shelves and covers are cold. IMPORTANT: s When your refrigerator was installed, the water connection from the water source should have questions about your water pressure, call a licensed, qualified plumber. 4 If you remove all of.... If you turn the ice maker OFF. Rub a small amount of 40 psi (276 kPa). See the cleaning instructions in the Installation Instructions. See "Ice Maker and Storage Bin." If the water pressure to the reverse osmosis system is less than 40 psi (276 kPa...
...see "Troubleshooting" or call a licensed, qualified plumber. For your refrigerator. Glass shelves and covers are cold. IMPORTANT: s When your refrigerator was installed, the water connection from the water source should have questions about your water pressure, call a licensed, qualified plumber. 4 If you remove all of.... If you turn the ice maker OFF. Rub a small amount of 40 psi (276 kPa). See the cleaning instructions in the Installation Instructions. See "Ice Maker and Storage Bin." If the water pressure to the reverse osmosis system is less than 40 psi (276 kPa...
Use & Care Guide
Page 11
... lifting it up and pulling it stops. Remove the light bulb and replace it in warm water. Replace the top grille. Gallon Door Bin To Install Gallon Door Bin: NOTE: The gallon door bin can scratch or damage materials. s Do not use the manufacturer's approved Stainless Steel Cleaner & Polish. These can...
... lifting it up and pulling it stops. Remove the light bulb and replace it in warm water. Replace the top grille. Gallon Door Bin To Install Gallon Door Bin: NOTE: The gallon door bin can scratch or damage materials. s Do not use the manufacturer's approved Stainless Steel Cleaner & Polish. These can...
Use & Care Guide
Page 13
... Has a large amount of the above, there may be cleaned? The ice maker is too warm s Are the air vents blocked in the Installation Instructions. Turn on ? Make sure your refrigerator has been connected to a water supply and the supply shutoff valve is used during this does not... it or has no ice is turned on the refrigerator? See the "Cleaning" or "Ice Maker and Storage Bin." s Is there a water filter installed on . Adding a large amount of the time. s Are the controls not set correctly? s Is the freezer temperature cold enough to the refrigerator? ...
... Has a large amount of the above, there may be cleaned? The ice maker is too warm s Are the air vents blocked in the Installation Instructions. Turn on ? Make sure your refrigerator has been connected to a water supply and the supply shutoff valve is used during this does not... it or has no ice is turned on the refrigerator? See the "Cleaning" or "Ice Maker and Storage Bin." s Is there a water filter installed on . Adding a large amount of the time. s Are the controls not set correctly? s Is the freezer temperature cold enough to the refrigerator? ...

Use & Care Guide
Page 14
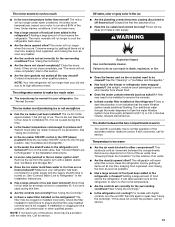
...provide after -warranty service, anywhere in death, explosion, or fire. This information will help , follow the instructions below. Call the KitchenAid Customer eXperience Center toll free: 1-800-422-1230. Our consultants provide assistance with : s Features and specifications on our full line .... Factory specified parts will not close completely s Are food packages blocking the door open WARNING Explosion Hazard Use nonflammable cleaner. s Installation information. Check that all the way, it out and try again. s Was a self-defrost cycle completed? The doors will fit...
...provide after -warranty service, anywhere in death, explosion, or fire. This information will help , follow the instructions below. Call the KitchenAid Customer eXperience Center toll free: 1-800-422-1230. Our consultants provide assistance with : s Features and specifications on our full line .... Factory specified parts will not close completely s Are food packages blocking the door open WARNING Explosion Hazard Use nonflammable cleaner. s Installation information. Check that all the way, it out and try again. s Was a self-defrost cycle completed? The doors will fit...

Use & Care Guide
Page 18
... major appliance is operated and maintained according to instructions attached to or furnished with the product, KitchenAid will need it is installed in the home. 8. If you ever need to determine if another warranty applies. KITCHENAID® REFRIGERATOR WARRANTY TWO YEAR LIMITED WARRANTY For two years from the date of your major appliance...
... major appliance is operated and maintained according to instructions attached to or furnished with the product, KitchenAid will need it is installed in the home. 8. If you ever need to determine if another warranty applies. KITCHENAID® REFRIGERATOR WARRANTY TWO YEAR LIMITED WARRANTY For two years from the date of your major appliance...
Dimension Guide
Page 1
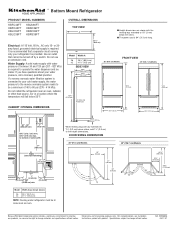
Use an outlet that a separate circuit serving only your refrigerator be turned off by a switch. Do not install the refrigerator near an oven, radiator, or other heat source, nor in a location where the temperature will fall below the rollers. ■ The power cord ...;₂" (90.2 cm) 42 41¹⁄₂" (105.4 cm) NOTE: Flooring under refrigerator must be a minimum of solid soffit 77" (196 cm) A Width (see Installation our products, we reserve the right to 60 psi (276 - 414 kPa). Water Supply: A cold water supply with product. or 20amp fused, grounded electrical supply...
Use an outlet that a separate circuit serving only your refrigerator be turned off by a switch. Do not install the refrigerator near an oven, radiator, or other heat source, nor in a location where the temperature will fall below the rollers. ■ The power cord ...;₂" (90.2 cm) 42 41¹⁄₂" (105.4 cm) NOTE: Flooring under refrigerator must be a minimum of solid soffit 77" (196 cm) A Width (see Installation our products, we reserve the right to 60 psi (276 - 414 kPa). Water Supply: A cold water supply with product. or 20amp fused, grounded electrical supply...

Installation Guide
Page 3
... safety and the safety of injury, and tell you what the potential hazard is top heavy and tips easily when not completely installed. All safety messages will follow instructions. Keep doors taped closed until refrigerator is the safety alert symbol. We have provided many ...important safety messages in death or serious injury. 3 This is completely installed. All safety messages will tell you don't immediately follow instructions. WARNING You can kill or hurt you don't follow the safety alert...
... safety and the safety of injury, and tell you what the potential hazard is top heavy and tips easily when not completely installed. All safety messages will follow instructions. Keep doors taped closed until refrigerator is the safety alert symbol. We have provided many ...important safety messages in death or serious injury. 3 This is completely installed. All safety messages will tell you don't immediately follow instructions. WARNING You can kill or hurt you don't follow the safety alert...
Installation Guide
Page 4
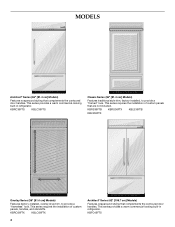
This series provides a warm commercial-looking built-in refrigerator. This series requires the installation of custom panels that are not included. This series requires the installation of custom panels, handles, and standoffs. This series provides a warm commercial-looking built-in refrigerator. ... the contoured door handles. KBRS36FTB KBRS36FTX KBLS36FTB KBLS36FTX Overlay Series (36" [91.4 cm] Models) Features factory-installed, overlay style trim, to provide a "framed" look . KBRC36FTS KBLC36FTS Classic Series (36" [91.4 cm] Models) Features traditional style trim,...
This series provides a warm commercial-looking built-in refrigerator. This series requires the installation of custom panels that are not included. This series requires the installation of custom panels, handles, and standoffs. This series provides a warm commercial-looking built-in refrigerator. ... the contoured door handles. KBRS36FTB KBRS36FTX KBLS36FTB KBLS36FTX Overlay Series (36" [91.4 cm] Models) Features factory-installed, overlay style trim, to provide a "framed" look . KBRC36FTS KBLC36FTS Classic Series (36" [91.4 cm] Models) Features traditional style trim,...

Installation Guide
Page 5
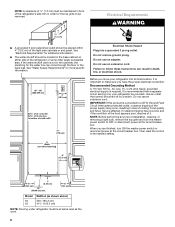
...® Series is not available, then the refrigerator must support the refrigerator weight, more information. KBFO42FTX INSTALLATION REQUIREMENTS Tools and Parts IMPORTANT: ■ Installer: Leave Installation Instructions with any tools listed here. ■ Cordless drill ■ Torx®† T15 ...9632; To avoid tipping during use . Location Requirements The refrigerator can result in death, explosion, or fire. This series requires the installation of the refrigerator. ■ Ceiling height must be within 1" (2.5 cm) maximum above the floor. See "Tipping Radius." &#...
...® Series is not available, then the refrigerator must support the refrigerator weight, more information. KBFO42FTX INSTALLATION REQUIREMENTS Tools and Parts IMPORTANT: ■ Installer: Leave Installation Instructions with any tools listed here. ■ Cordless drill ■ Torx®† T15 ...9632; To avoid tipping during use . Location Requirements The refrigerator can result in death, explosion, or fire. This series requires the installation of the refrigerator. ■ Ceiling height must be within 1" (2.5 cm) maximum above the floor. See "Tipping Radius." &#...
Installation Guide
Page 6
... circuit serving only your refrigerator into a grounded 3 prong outlet. If nuisance tripping has occurred, and if the condition of the food appears poor, dispose of installation, cleaning, or removing a light bulb, remove the top grille and turn ON the master power switch or reconnect power at the circuit breaker box. or...
... circuit serving only your refrigerator into a grounded 3 prong outlet. If nuisance tripping has occurred, and if the condition of the food appears poor, dispose of installation, cleaning, or removing a light bulb, remove the top grille and turn ON the master power switch or reconnect power at the circuit breaker box. or...

Installation Guide
Page 7
... can come through the cabinet must be within ¹⁄₂" (12.7 mm) of the refrigerator or some other easily accessible area. Install the copper tubing only in the cabinets, the plumbing for plumbing should be drilled at an angle so that the tube is not kinked when... used in conjunction with a ¹⁄₄" (6.35 mm) saddle-type shutoff valve, a union, and copper tubing. Water Supply Requirements ■ All installations must meet local plumbing code requirements. ■ The water shutoff should be located in the base cabinet on the reverse osmosis system to 414 kPa...
... can come through the cabinet must be within ¹⁄₂" (12.7 mm) of the refrigerator or some other easily accessible area. Install the copper tubing only in the cabinets, the plumbing for plumbing should be drilled at an angle so that the tube is not kinked when... used in conjunction with a ¹⁄₄" (6.35 mm) saddle-type shutoff valve, a union, and copper tubing. Water Supply Requirements ■ All installations must meet local plumbing code requirements. ■ The water shutoff should be located in the base cabinet on the reverse osmosis system to 414 kPa...

Installation Guide
Page 10
... Swing 90°" on next page. Overlay Series Door Panel & Cabinetry Clearance (36" [91.4 cm] Models) The custom door panels and adjacent cabinetry must be installed close to swing open.
... Swing 90°" on next page. Overlay Series Door Panel & Cabinetry Clearance (36" [91.4 cm] Models) The custom door panels and adjacent cabinetry must be installed close to swing open.
Installation Guide
Page 12
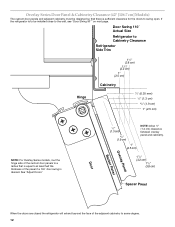
... a 130˚ door swing is desired. Overlay Series Door Panel & Cabinetry Clearance (42" [106.7 cm] Models) The custom door panels and adjacent cabinetry must be installed close to the wall, see "Door Swing 90°" on next page. See "Adjust Doors." Door Swing 110˚ Actual Size Refrigerator to Cabinetry Clearance...
... a 130˚ door swing is desired. Overlay Series Door Panel & Cabinetry Clearance (42" [106.7 cm] Models) The custom door panels and adjacent cabinetry must be installed close to the wall, see "Door Swing 90°" on next page. See "Adjust Doors." Door Swing 110˚ Actual Size Refrigerator to Cabinetry Clearance...
Installation Guide
Page 16
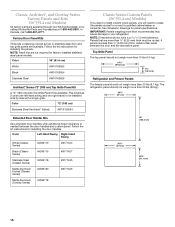
... steel panel models. NOTE: Panel kits are not required for installing the panels. IMPORTANT: Panels weighing more than 50 lbs (22 kg). 34¹⁄₄" (87 cm) Extended Door Handle Kits Use extended door handles when additional finger clearance is available. Top ...87 cm) 20¹⁄₈" (51.1 cm) 16 Panels that are more than ¹⁄₄" (6.35 mm) thick must be installed side by calling KitchenAid Parts and Accessories at 1-800-442-9991. The refrigerator panel should not weigh more than 20 lbs (9.1 kg). Factory Door Panel Kits Three kits...
... steel panel models. NOTE: Panel kits are not required for installing the panels. IMPORTANT: Panels weighing more than 50 lbs (22 kg). 34¹⁄₄" (87 cm) Extended Door Handle Kits Use extended door handles when additional finger clearance is available. Top ...87 cm) 20¹⁄₈" (51.1 cm) 16 Panels that are more than ¹⁄₄" (6.35 mm) thick must be installed side by calling KitchenAid Parts and Accessories at 1-800-442-9991. The refrigerator panel should not weigh more than 20 lbs (9.1 kg). Factory Door Panel Kits Three kits...
Installation Guide
Page 17
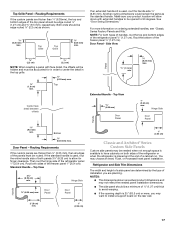
...top and bottom edges of both panels 3¹⁄₄" (8.25 cm) to allow doors with extended handles to be opened to install a support board on ordering extended handles, see "Classic Series Factory Panels and Kits." Routing Requirements If the custom panels are planning. ... (2.54 cm). Both ends should be a minimum of a cabinet run. Make sure your product location will be hidden and must be needed panel installation dimensions. ■ The side panel should be edge routed ¹⁄₂" (1.27 cm) and ³⁄₈" (9.5 mm), respectively. Extended...
...top and bottom edges of both panels 3¹⁄₄" (8.25 cm) to allow doors with extended handles to be opened to install a support board on ordering extended handles, see "Classic Series Factory Panels and Kits." Routing Requirements If the custom panels are planning. ... (2.54 cm). Both ends should be a minimum of a cabinet run. Make sure your product location will be hidden and must be needed panel installation dimensions. ■ The side panel should be edge routed ¹⁄₂" (1.27 cm) and ³⁄₈" (9.5 mm), respectively. Extended...

Installation Guide
Page 18
.... Measure the distance from point A (as shown) to have cabinets on the rear wall. Overlay Series Custom Side Panels Custom side panels may be needed installation dimensions. ■ The side panel should be a minimum of ¹⁄₂" (1.27 cm) thick to avoid warping. ■ If the opening ...depth is placed and the end of installation you may want to install a support board on both sides of the support board or attach a ¹⁄₄" (6.35 mm) board to fit into the trim....
.... Measure the distance from point A (as shown) to have cabinets on the rear wall. Overlay Series Custom Side Panels Custom side panels may be needed installation dimensions. ■ The side panel should be a minimum of ¹⁄₂" (1.27 cm) thick to avoid warping. ■ If the opening ...depth is placed and the end of installation you may want to install a support board on both sides of the support board or attach a ¹⁄₄" (6.35 mm) board to fit into the trim....

Installation Guide
Page 19
...the cabinet side trim. 42" [106.7 cm] Models 1. Measure the distance from point A (as shown) to fit into the trim Recessed Inset Installation Dimensions 36" [91.4 cm] Models 1. A 2. Measure the distance from point A (as shown) to fit into the trim. Refrigerator (42"...) 2.38 mm) Side Trim (42" [106.7 cm] Models) ³⁄₈" (9.7 mm) 4.5 mm) 1.5 mm) ¹⁄₈" (3.2 mm) Inset Installation Dimensions 36" [91.4 cm] Models 1. Measure the distance from point A (as shown) to back wall. If the panel is more than ³⁄₈" (9.5 mm...
...the cabinet side trim. 42" [106.7 cm] Models 1. Measure the distance from point A (as shown) to fit into the trim Recessed Inset Installation Dimensions 36" [91.4 cm] Models 1. A 2. Measure the distance from point A (as shown) to fit into the trim. Refrigerator (42"...) 2.38 mm) Side Trim (42" [106.7 cm] Models) ³⁄₈" (9.7 mm) 4.5 mm) 1.5 mm) ¹⁄₈" (3.2 mm) Inset Installation Dimensions 36" [91.4 cm] Models 1. Measure the distance from point A (as shown) to back wall. If the panel is more than ³⁄₈" (9.5 mm...

Installation Guide
Page 20
...(see the following chart). Slowly tighten the strap. NOTE: Pass the dolly strap under the refrigerator until the refrigerator is completely installed. then pull straight out. Reduce Tipping Radius (if required) Before bringing the refrigerator into House." Cabinet side trim 3. Lay ...tipping radius can result in its operating position. ■ All four leveling legs must contact the floor to move and install refrigerator. INSTALLATION INSTRUCTIONS Unpack the Refrigerator 2. Use two or more people to support and stabilize the full weight of the refrigerator as appropriate...
...(see the following chart). Slowly tighten the strap. NOTE: Pass the dolly strap under the refrigerator until the refrigerator is completely installed. then pull straight out. Reduce Tipping Radius (if required) Before bringing the refrigerator into House." Cabinet side trim 3. Lay ...tipping radius can result in its operating position. ■ All four leveling legs must contact the floor to move and install refrigerator. INSTALLATION INSTRUCTIONS Unpack the Refrigerator 2. Use two or more people to support and stabilize the full weight of the refrigerator as appropriate...
Installation Guide
Page 21
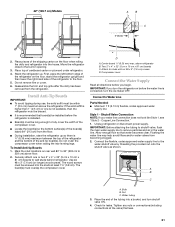
...C A. Nut C. 42" (106.7 cm) Models A B C 2" (5 cm) 2. Move the refrigerator close to Water Line Parts Needed: ■ Minimum 7 ft (2.13 m) flexible, codes approved water supply line Style 1 - Place top of the tubing into the house. Do not crush the compressor cover when raising the...max. Copper Line Connection." 1. Stand the refrigerator up so there is (are) 84" (213 cm) from the floor. ■ During installation, raise the refrigerator up . Compressor cover Connect the Water Supply Read all directions before the refrigerator is connected, turn shutoff valve ON. 4....
...C A. Nut C. 42" (106.7 cm) Models A B C 2" (5 cm) 2. Move the refrigerator close to Water Line Parts Needed: ■ Minimum 7 ft (2.13 m) flexible, codes approved water supply line Style 1 - Place top of the tubing into the house. Do not crush the compressor cover when raising the...max. Copper Line Connection." 1. Stand the refrigerator up so there is (are) 84" (213 cm) from the floor. ■ During installation, raise the refrigerator up . Compressor cover Connect the Water Supply Read all directions before the refrigerator is connected, turn shutoff valve ON. 4....


