Use & Care Guide
Page 3
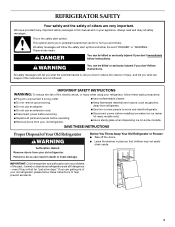
... or hurt you to help prevent accidents. 3 s Replace all safety messages. s Remove doors from your old refrigerator. Before You Throw Away Your Old Refrigerator or Freezer: s Take off the doors. s Leave the shelves in this manual and on your appliance. All safety messages... easily climb inside. IMPORTANT SAFETY INSTRUCTIONS WARNING: To reduce the risk of fire, electric shock, or injury when using your old refrigerator, please follow these basic precautions: s Plug into a grounded 3 prong outlet. IMPORTANT: Child entrapment and suffocation are still dangerous...
... or hurt you to help prevent accidents. 3 s Replace all safety messages. s Remove doors from your old refrigerator. Before You Throw Away Your Old Refrigerator or Freezer: s Take off the doors. s Leave the shelves in this manual and on your appliance. All safety messages... easily climb inside. IMPORTANT SAFETY INSTRUCTIONS WARNING: To reduce the risk of fire, electric shock, or injury when using your old refrigerator, please follow these basic precautions: s Plug into a grounded 3 prong outlet. IMPORTANT: Child entrapment and suffocation are still dangerous...
Use & Care Guide
Page 5
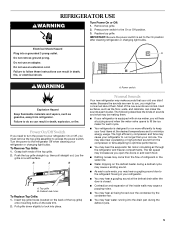
...Lay the grille on the side trim. 2. Normal Sounds Your new refrigerator may hear water running into the drain pan during a defrost cycle may hear the evaporator fan motor circulating air through the refrigerator and freezer compartments. Most of the inside walls may hear a gurgling sound due ...to your old one . s Your refrigerator is closed. You may increase as you open the doors or add warm ...
...Lay the grille on the side trim. 2. Normal Sounds Your new refrigerator may hear water running into the drain pan during a defrost cycle may hear the evaporator fan motor circulating air through the refrigerator and freezer compartments. Most of the inside walls may hear a gurgling sound due ...to your old one . s Your refrigerator is closed. You may increase as you open the doors or add warm ...
Use & Care Guide
Page 6
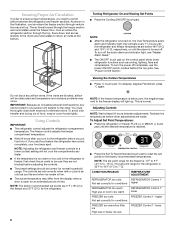
...to reset the set correctly for the refrigerator. CONDITION/REASON: TEMPERATURE ADJUSTMENT: REFRIGERATOR too cold REFRIGERATOR Control 1° Not set correctly for conditions higher REFRIGERATOR too warm High use or room very warm REFRIGERATOR Control 1° lower FREEZER too cold FREEZER Control 1° higher Not set points...temperature is reached. The set points are made. As shown in the illustration, cool air enters the freezer section through vents in the refrigerator or freezer, first check the air vents to be correct for an extended period of food, wrap or cover foods...
...to reset the set correctly for the refrigerator. CONDITION/REASON: TEMPERATURE ADJUSTMENT: REFRIGERATOR too cold REFRIGERATOR Control 1° Not set correctly for conditions higher REFRIGERATOR too warm High use or room very warm REFRIGERATOR Control 1° lower FREEZER too cold FREEZER Control 1° higher Not set points...temperature is reached. The set points are made. As shown in the illustration, cool air enters the freezer section through vents in the refrigerator or freezer, first check the air vents to be correct for an extended period of food, wrap or cover foods...
Use & Care Guide
Page 7
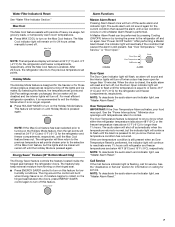
... performing a Master Alarm Reset, the indicator light will remain at 34°F (1°C) and -5°F (-21°C) for the refrigerator and freezer compartments, respectively, until temperatures return to turning on for service. NOTE: The temperature display will reactivate if the condition that caused the alarm...continue to flash until the Alarm is equal to let you know that caused the alarm until a new condition occurs or until refrigerator and freezer temperatures are below 45°F (7°C) and 15°F (-9°C) for longer than 10 minutes. Holiday Mode The Holiday ...
... performing a Master Alarm Reset, the indicator light will remain at 34°F (1°C) and -5°F (-21°C) for the refrigerator and freezer compartments, respectively, until temperatures return to turning on for service. NOTE: The temperature display will reactivate if the condition that caused the alarm...continue to flash until the Alarm is equal to let you know that caused the alarm until a new condition occurs or until refrigerator and freezer temperatures are below 45°F (7°C) and 15°F (-9°C) for longer than 10 minutes. Holiday Mode The Holiday ...
Use & Care Guide
Page 8
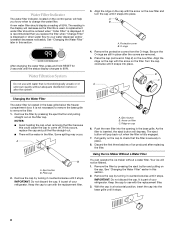
...on filter C. See "Changing the Water Filter" earlier in the base grille below the freezer compartment door. Remove the cap by turning it counterclockwise until it stops. Keep the cap to your refrigerator. A new water filter should be ordered when "Order Filter" is microbiologically unsafe or ... As the filter is fully engaged. 7. IMPORTANT: Do not discard the cap. A replacement water filter should display a reading of your refrigerator. Place the cap (removed in place after the system. 3. Using the Ice Maker Without a Water Filter You can operate the ice ...
...on filter C. See "Changing the Water Filter" earlier in the base grille below the freezer compartment door. Remove the cap by turning it counterclockwise until it stops. Keep the cap to your refrigerator. A new water filter should be ordered when "Order Filter" is microbiologically unsafe or ... As the filter is fully engaged. 7. IMPORTANT: Do not discard the cap. A replacement water filter should display a reading of your refrigerator. Place the cap (removed in place after the system. 3. Using the Ice Maker Without a Water Filter You can operate the ice ...

Use & Care Guide
Page 9
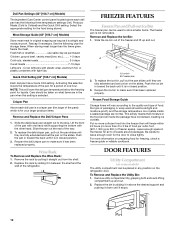
... ice maker and lead to the OFF (down) position as the quality of ice. On/Off control Ice Storage Bin Care 1. See "Pull-out Freezer and Ice bin." 2. Water softener chemicals (such as shown. Remove the shelf/frame by guiding the rear shelf hooks into the attachment slot. s ... to 4 days for the ice cubes to make sure the water softener is operating properly and is open, and save energy. Crisper pans B. REFRIGERATOR FEATURES Refrigerator Shelves Important information to completely fill, if no ice is normal. If a softened water supply cannot be flushed out of the shelf up at the...
... ice maker and lead to the OFF (down) position as the quality of ice. On/Off control Ice Storage Bin Care 1. See "Pull-out Freezer and Ice bin." 2. Water softener chemicals (such as shown. Remove the shelf/frame by guiding the rear shelf hooks into the attachment slot. s ... to 4 days for the ice cubes to make sure the water softener is operating properly and is open, and save energy. Crisper pans B. REFRIGERATOR FEATURES Refrigerator Shelves Important information to completely fill, if no ice is normal. If a softened water supply cannot be flushed out of the shelf up at the...
Use & Care Guide
Page 10
... 2 to close tightly. Care should be placed in toward the back until they are in between the shelf and the wall of the refrigerator. Lift the front of the freezer and lift up and out. 2. Slide the ice bin out of the pan with one hour. Ice crystals inside the package have... or shellfish use same day as it is in the food and air inside a sealed package are fully extended and set the pan on the refrigerator door. Cover leftovers with plastic wrap, aluminum foil, or plastic containers with the other hand. Crisper Pan Above each deli pan has the following ...
... 2 to close tightly. Care should be placed in toward the back until they are in between the shelf and the wall of the refrigerator. Lift the front of the freezer and lift up and out. 2. Slide the ice bin out of the pan with one hour. Ice crystals inside the package have... or shellfish use same day as it is in the food and air inside a sealed package are fully extended and set the pan on the refrigerator door. Cover leftovers with plastic wrap, aluminum foil, or plastic containers with the other hand. Crisper Pan Above each deli pan has the following ...
Use & Care Guide
Page 11
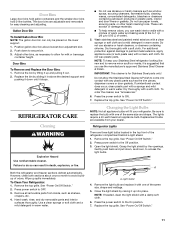
.... Do not use abrasive or harsh cleaners, or cleaners containing chlorine. Dry thoroughly with a clean, soft cloth. Both the refrigerator and freezer sections defrost automatically. Hand wash, rinse, and dry removable parts and interior surfaces thoroughly. Close the light shield by lifting it...the Stainless Steel Cleaner & Polish to secure bin. 3. Replace the top grille. Wipe up into contact with one of the refrigerator compartment behind a light shield. 1. Gallon Door Bin To Install Gallon Door Bin: NOTE: The gallon door bin can wash interior...
.... Do not use abrasive or harsh cleaners, or cleaners containing chlorine. Dry thoroughly with a clean, soft cloth. Both the refrigerator and freezer sections defrost automatically. Hand wash, rinse, and dry removable parts and interior surfaces thoroughly. Close the light shield by lifting it...the Stainless Steel Cleaner & Polish to secure bin. 3. Replace the top grille. Wipe up into contact with one of the refrigerator compartment behind a light shield. 1. Gallon Door Bin To Install Gallon Door Bin: NOTE: The gallon door bin can wash interior...
Use & Care Guide
Page 12
...other items. 2. Press HOLIDAY MODE pad. 3. Empty the ice bin. 5. Remove all doors to prop them open the ice bin or freezer pan to normal operation. Clean refrigerator, wipe it may be refrozen, although the quality and flavor may be out for more than 24 hours, do not work s Is the... "Using the Control(s)." s Is a light bulb loose in . s Place 2 lbs (907 g) of dry ice in the top of the freezer compartment. Do not use an extension cord. s Is the refrigerator or freezer control turned to reset. s Has the door been open for more than 10 minutes, the "Door Open" indicator light will...
...other items. 2. Press HOLIDAY MODE pad. 3. Empty the ice bin. 5. Remove all doors to prop them open the ice bin or freezer pan to normal operation. Clean refrigerator, wipe it may be refrozen, although the quality and flavor may be out for more than 24 hours, do not work s Is the... "Using the Control(s)." s Is a light bulb loose in . s Place 2 lbs (907 g) of dry ice in the top of the freezer compartment. Do not use an extension cord. s Is the refrigerator or freezer control turned to reset. s Has the door been open for more than 10 minutes, the "Door Open" indicator light will...
Use & Care Guide
Page 13
..."Using the Control(s)." See "Normal Sounds." s Is the freezer temperature cold enough to Refrigerator" in death, explosion, or fire. See "Using the Control(s)." Allow three to four days for the refrigerator to return to cool the refrigerator back down ) position? If installation or clogging is not producing...correctly and is too warm s Are the air vents blocked in this does not correct the problem, call for your motor to the refrigerator or freezer? s Has a large amount of ice. The ice bin holds approximately 7 lbs (3.2 kg) of food just been added to completely ...
..."Using the Control(s)." See "Normal Sounds." s Is the freezer temperature cold enough to Refrigerator" in death, explosion, or fire. See "Using the Control(s)." Allow three to four days for the refrigerator to return to cool the refrigerator back down ) position? If installation or clogging is not producing...correctly and is too warm s Are the air vents blocked in this does not correct the problem, call for your motor to the refrigerator or freezer? s Has a large amount of ice. The ice bin holds approximately 7 lbs (3.2 kg) of food just been added to completely ...

Use & Care Guide
Page 18
Pickup and delivery. Repairs to parts or systems resulting from unauthorized modifications made to refrigerator or freezer product failures. 6. IMPLIED WARRANTIES, INCLUDING WARRANTIES OF MERCHANTABILITY OR FITNESS FOR A PARTICULAR PURPOSE, ARE LIMITED TO ONE YEAR OR...WARRANTY SHALL BE PRODUCT REPAIR AS PROVIDED HEREIN. Service must be found by checking the "Assistance or Service" section or by KitchenAid. 5. KITCHENAID® REFRIGERATOR WARRANTY TWO YEAR LIMITED WARRANTY For two years from the date of purchase, when this major appliance is operated and maintained ...
Pickup and delivery. Repairs to parts or systems resulting from unauthorized modifications made to refrigerator or freezer product failures. 6. IMPLIED WARRANTIES, INCLUDING WARRANTIES OF MERCHANTABILITY OR FITNESS FOR A PARTICULAR PURPOSE, ARE LIMITED TO ONE YEAR OR...WARRANTY SHALL BE PRODUCT REPAIR AS PROVIDED HEREIN. Service must be found by checking the "Assistance or Service" section or by KitchenAid. 5. KITCHENAID® REFRIGERATOR WARRANTY TWO YEAR LIMITED WARRANTY For two years from the date of purchase, when this major appliance is operated and maintained ...
Installation Guide
Page 14
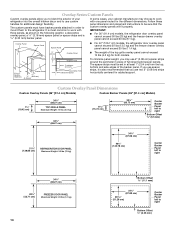
... 36" (91.4 cm) models, the refrigerator door overlay panel cannot exceed 50 lbs (23 kg) and the freezer drawer overlay panel cannot exceed 20 lbs (9.1 kg). In some cases, your refrigerator into the overall kitchen décor and to the refrigerator. Overlay Panel Spacer Panel Spacer Panel ■...; For 42" (106.7 cm) models, the refrigerator door overlay panel cannot ...
... 36" (91.4 cm) models, the refrigerator door overlay panel cannot exceed 50 lbs (23 kg) and the freezer drawer overlay panel cannot exceed 20 lbs (9.1 kg). In some cases, your refrigerator into the overall kitchen décor and to the refrigerator. Overlay Panel Spacer Panel Spacer Panel ■...; For 42" (106.7 cm) models, the refrigerator door overlay panel cannot ...
Installation Guide
Page 15
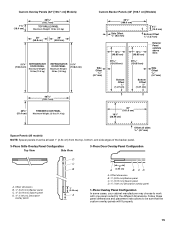
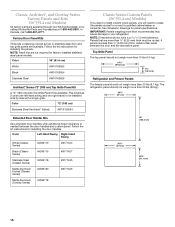
... PANEL Maximum Weight: 10 lbs (4.5 kg) 20" (50.8 cm) 20" (50.8 cm) 51¹⁄₄" (130.2 cm) REFRIGERATOR DOOR PANEL Maximum Weight: 30 lbs (13.5 kg) REFRIGERATOR DOOR PANEL Maximum Weight: 30 lbs (13.5 kg) 51¹⁄₄" (130.2 cm) 40 (102.7 cm) 20¹⁄₄...;" (51.4 cm) FREEZER DOOR PANEL Maximum Weight: 25 lbs (11.4 kg) Custom Backer Panels (42" [106.7 cm] Models) Side Offset 3/16"...
... PANEL Maximum Weight: 10 lbs (4.5 kg) 20" (50.8 cm) 20" (50.8 cm) 51¹⁄₄" (130.2 cm) REFRIGERATOR DOOR PANEL Maximum Weight: 30 lbs (13.5 kg) REFRIGERATOR DOOR PANEL Maximum Weight: 30 lbs (13.5 kg) 51¹⁄₄" (130.2 cm) 40 (102.7 cm) 20¹⁄₄...;" (51.4 cm) FREEZER DOOR PANEL Maximum Weight: 25 lbs (11.4 kg) Custom Backer Panels (42" [106.7 cm] Models) Side Offset 3/16"...
Installation Guide
Page 16
...72" (183 cm) wide Top Grille Panel Kit is needed between the door and the decorative panel. If panels are less than 50 lbs (22 kg). 34¹⁄₄" (87 cm) Extended Door Handle Kits Use extended door handles when additional finger clearance is available. Color Left-...your KitchenAid dealer or by side with a single grille. NOTE: Panel kits are more than 20 lbs (9.1 kg). Top Grille Panel The top panel should not weigh more than 10 lbs (4.5 kg). 34¹⁄₂" (87.63 cm) 7¹⁄₄" (18.4 cm) Refrigerator and Freezer Panels The freezer panel...
...72" (183 cm) wide Top Grille Panel Kit is needed between the door and the decorative panel. If panels are less than 50 lbs (22 kg). 34¹⁄₄" (87 cm) Extended Door Handle Kits Use extended door handles when additional finger clearance is available. Color Left-...your KitchenAid dealer or by side with a single grille. NOTE: Panel kits are more than 20 lbs (9.1 kg). Top Grille Panel The top panel should not weigh more than 10 lbs (4.5 kg). 34¹⁄₂" (87.63 cm) 7¹⁄₄" (18.4 cm) Refrigerator and Freezer Panels The freezer panel...
Installation Guide
Page 17
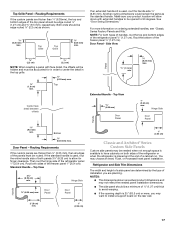
...want to 90 degrees. All other routing dimensions would remain the same as shown. ¹⁄₄" (6.35 mm) max. Rout the bottom of the freezer panel 1" (2.54 cm). Side View ⁷⁄₈" (2.2 cm) ⁷⁄₈" (2.2 cm) NOTE: When creating a panel with extended ... space is available to have cabinets on ordering extended handles, see "Classic Series Factory Panels and Kits." Then rout the hinge side of the refrigerator panel ¹⁄₂" (1.27 cm). Top View Center face detail between offsets ¹⁄₄" (6.35 mm) Door Panel ¹&#...
...want to 90 degrees. All other routing dimensions would remain the same as shown. ¹⁄₄" (6.35 mm) max. Rout the bottom of the freezer panel 1" (2.54 cm). Side View ⁷⁄₈" (2.2 cm) ⁷⁄₈" (2.2 cm) NOTE: When creating a panel with extended ... space is available to have cabinets on ordering extended handles, see "Classic Series Factory Panels and Kits." Then rout the hinge side of the refrigerator panel ¹⁄₂" (1.27 cm). Top View Center face detail between offsets ¹⁄₄" (6.35 mm) Door Panel ¹&#...
Installation Guide
Page 24
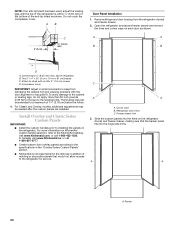
... with six #8 x 3" (7.6 cm) screws D. Open the refrigerator door(s) and freezer drawer and remove the trims and corner caps on the refrigerator. Center board ¹⁄₄" (6.35 mm) max. In Canada, visit www.KitchenAid.ca, or call 1-800-422-1230. Panels 24 For Classic ... Custom Panels IMPORTANT: ■ Install the custom handles prior to keep from the refrigerator door(s) and freezer drawer. 2. Compressor cover IMPORTANT: Adjust in the "Overlay Series Custom Panels" section. ■ KitchenAid is within ¹⁄₄" (6.35 mm) of the bottom of torque to...
... with six #8 x 3" (7.6 cm) screws D. Open the refrigerator door(s) and freezer drawer and remove the trims and corner caps on the refrigerator. Center board ¹⁄₄" (6.35 mm) max. In Canada, visit www.KitchenAid.ca, or call 1-800-422-1230. Panels 24 For Classic ... Custom Panels IMPORTANT: ■ Install the custom handles prior to keep from the refrigerator door(s) and freezer drawer. 2. Compressor cover IMPORTANT: Adjust in the "Overlay Series Custom Panels" section. ■ KitchenAid is within ¹⁄₄" (6.35 mm) of the bottom of torque to...

Installation Guide
Page 25
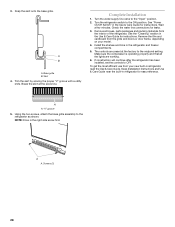
Remove the protective skin from the bottom side of the top grille. 2. Grasp both ends of the refrigerator door hinge using a ¹⁄₄" open-end wrench. Cabinet side trims Adjust Door(s) Door Alignment (36" [91.4 cm] Models) 1. Loosen, but do ...25 Cabinet side trims 3. A. A A. Bushing B. 4. Push straight up or down on the left door first. Place the top grille panel-side down , after the refrigerator has been leveled. B A B A. Top grille B. Adjust the top hinge of the left -hand door does not drag when closing the door. 1. Tighten the ¹...
Remove the protective skin from the bottom side of the top grille. 2. Grasp both ends of the refrigerator door hinge using a ¹⁄₄" open-end wrench. Cabinet side trims Adjust Door(s) Door Alignment (36" [91.4 cm] Models) 1. Loosen, but do ...25 Cabinet side trims 3. A. A A. Bushing B. 4. Push straight up or down on the left door first. Place the top grille panel-side down , after the refrigerator has been leveled. B A B A. Top grille B. Adjust the top hinge of the left -hand door does not drag when closing the door. 1. Tighten the ¹...
Installation Guide
Page 28
... with a utility knife. Break the skirt at the factory to the midpoint setting. Turn the refrigerator switch to the "Open" position. 2. See "Power On/Off Switch" in refrigerator, read the Use & Care Guide. Remove the film and cardboard from the grille and doors or...the base grille. Base grille B. Screws (2) 28 Wait a few minutes. NOTE: Drive in the refrigerator and freezer compartments. 5. The controls are working. 6. See the "Cleaning" section in refrigerator for instructions. Make sure the compressor is operating properly and that all boxes, parts packages and packing...
... with a utility knife. Break the skirt at the factory to the midpoint setting. Turn the refrigerator switch to the "Open" position. 2. See "Power On/Off Switch" in refrigerator, read the Use & Care Guide. Remove the film and cardboard from the grille and doors or...the base grille. Base grille B. Screws (2) 28 Wait a few minutes. NOTE: Drive in the refrigerator and freezer compartments. 5. The controls are working. 6. See the "Cleaning" section in refrigerator for instructions. Make sure the compressor is operating properly and that all boxes, parts packages and packing...


