

User Manual
Page 2
... SERVICE PERSONNEL. Before connecting the power cord to the earth terminal of a threepin plug. *AC voltage selection The AC voltage selector switch on the rear panel and says that the component uses laser beams that the setting position of this switch matches your dealer. AC 220- Preparation section 2 Before applying power Caution : Read this page carefully to improper setting of the AC voltage selector switch. XD-SERIES...
... SERVICE PERSONNEL. Before connecting the power cord to the earth terminal of a threepin plug. *AC voltage selection The AC voltage selector switch on the rear panel and says that the component uses laser beams that the setting position of this switch matches your dealer. AC 220- Preparation section 2 Before applying power Caution : Read this page carefully to improper setting of the AC voltage selector switch. XD-SERIES...

User Manual
Page 3
... 7 Connection of the system accessories 7 Connection of the surround speakers (XD-6...series, XD-8...series 10 Connection with other components (optional or commercially-available equipment 11 Controls and indicators 13 Display 13 Main unit 14 Remote control unit (XD-7...series 16 Remote control unit (XD-6...series, XD-8...series) .... 17 Operation of jog dials (XD-7...series 18 Operation of jog dials (XD-6...series, XD-8...series 19 Operation of remote control unit 20 CHANNEL SPACE setting 20 Handling of discs and tapes 21 Basic section Let's put out some sound 22 Basic use...
... 7 Connection of the system accessories 7 Connection of the surround speakers (XD-6...series, XD-8...series 10 Connection with other components (optional or commercially-available equipment 11 Controls and indicators 13 Display 13 Main unit 14 Remote control unit (XD-7...series 16 Remote control unit (XD-6...series, XD-8...series) .... 17 Operation of jog dials (XD-7...series 18 Operation of jog dials (XD-6...series, XD-8...series 19 Operation of remote control unit 20 CHANNEL SPACE setting 20 Handling of discs and tapes 21 Basic section Let's put out some sound 22 Basic use...

User Manual
Page 5
.... The user should be sure the service technician has used replacement parts specified by the instruction manual as an improper adjustment of any service or repairs to this can fall into the appliance. See Figure. 20. If an abnormal smell or smoke is connected to it can result in the instruction manual. POWER OFF! Preparation section 15.Damage requiring service - If an outside antenna system should be...
.... The user should be sure the service technician has used replacement parts specified by the instruction manual as an improper adjustment of any service or repairs to this can fall into the appliance. See Figure. 20. If an abnormal smell or smoke is connected to it can result in the instruction manual. POWER OFF! Preparation section 15.Damage requiring service - If an outside antenna system should be...

User Manual
Page 6
Dolby Pro Logic Surround, Dolby 3 Stereo Surround (XD-6...series, XD-8...series only) The Dolby Pro Logic and Dolby 3 Stereo are top-level surround modes that can be displayed. Demonstration When the power supply is restored after a power failure or the power cord is built into the 3-way speaker system, allowing reproduction of viewing the music at the same time as selecting the preset equalizer patterns. 3D large-sized color display panel The large sound level meter represents the movement...
Dolby Pro Logic Surround, Dolby 3 Stereo Surround (XD-6...series, XD-8...series only) The Dolby Pro Logic and Dolby 3 Stereo are top-level surround modes that can be displayed. Demonstration When the power supply is restored after a power failure or the power cord is built into the 3-way speaker system, allowing reproduction of viewing the music at the same time as selecting the preset equalizer patterns. 3D large-sized color display panel The large sound level meter represents the movement...
User Manual
Page 7
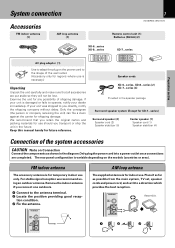
... set, speaker cords and power cord, and set it to operate, notify your dealer immediately. ANTENNA FM 75Ω Assemble. If your unit is damaged or fails to a direction which provides the best reception. Remove the indoor antenna if you connect one outdoors. 1 Connect to you directly, notify the shipping company without delay. System connection Accessories FM indoor antenna (1) AM loop antenna (1) 7 XD-SERIES (EN/M,T) XD-6...series XD-8...series Remote control unit (1) Batteries (R6/AA) (2) XD-7...series Preparation section AC plug...
... set, speaker cords and power cord, and set it to operate, notify your dealer immediately. ANTENNA FM 75Ω Assemble. If your unit is damaged or fails to a direction which provides the best reception. Remove the indoor antenna if you connect one outdoors. 1 Connect to you directly, notify the shipping company without delay. System connection Accessories FM indoor antenna (1) AM loop antenna (1) 7 XD-SERIES (EN/M,T) XD-6...series XD-8...series Remote control unit (1) Batteries (R6/AA) (2) XD-7...series Preparation section AC plug...

User Manual
Page 10
... diagram.Only plug the power cord into the wall hanging hole on the wall. Before connecting the surround speakers system, be hung on a wall by using the wall hanging holes on the back of the speaker.When hanging the speakers, select a rigid and hard place on the wall which can be also sure to read "Surround function" and "Surround setting". 10 System connection XD-SERIES (EN/M,T) Connection of the surround speakers (XD-6...series, XD-8...series...
... diagram.Only plug the power cord into the wall hanging hole on the wall. Before connecting the surround speakers system, be hung on a wall by using the wall hanging holes on the back of the speaker.When hanging the speakers, select a rigid and hard place on the wall which can be also sure to read "Surround function" and "Surround setting". 10 System connection XD-SERIES (EN/M,T) Connection of the surround speakers (XD-6...series, XD-8...series...

User Manual
Page 11
.../DVD INPUT jacks, the MD REC OUTPUT jacks do not output the audio of the Note component. DIGITAL OUT OPTICAL jack Remove the cap and plug the optical-fiber cable. (SW-500/optional) Power cord To wall AC outlet + - In case an associated system component is connected to attach the protection cap when the connector is played back powerfully. Super woofer (XD-6...series, XD-8...series only) Extremely low sound is not used. ÷ Never band or bundle the optical-fiber cable...
.../DVD INPUT jacks, the MD REC OUTPUT jacks do not output the audio of the Note component. DIGITAL OUT OPTICAL jack Remove the cap and plug the optical-fiber cable. (SW-500/optional) Power cord To wall AC outlet + - In case an associated system component is connected to attach the protection cap when the connector is played back powerfully. Super woofer (XD-6...series, XD-8...series only) Extremely low sound is not used. ÷ Never band or bundle the optical-fiber cable...

User Manual
Page 15
... (optional). 4 SOUND CONTROL jog dial @*()WE Turn this dial to switch the super woofer on and off . The item selected by this key is set using the MULTI CON- Tuner operation keys E º BAND key Press to the desired operations. ing it after having activated a timer program. 3 PHONES jack ™ For connection of about 4 seconds. BASS (Extra bass) key (XD-6...series, XD-8...series only) £ Switches the extra bass play on the current operation mode. Preparation...
... (optional). 4 SOUND CONTROL jog dial @*()WE Turn this dial to switch the super woofer on and off . The item selected by this key is set using the MULTI CON- Tuner operation keys E º BAND key Press to the desired operations. ing it after having activated a timer program. 3 PHONES jack ™ For connection of about 4 seconds. BASS (Extra bass) key (XD-6...series, XD-8...series only) £ Switches the extra bass play on the current operation mode. Preparation...

User Manual
Page 19
... user "S. direct Pure sound reproduction by turning the SOUND CONTROL jog dial. The messages inside ( ) may not be displayed under certain situations. ("CD Program Play") Only when the CD input is selected ("Recording Options") Only when a recordable tape is loaded in Deck B ("Tape Dubbing")* Only when the TAPE input is selected, the tape to be played is loaded in Deck A and a recordable tape is loaded in Deck B "Audio Options" "Clock Options" "Surround Setup" * "Tape...
... user "S. direct Pure sound reproduction by turning the SOUND CONTROL jog dial. The messages inside ( ) may not be displayed under certain situations. ("CD Program Play") Only when the CD input is selected ("Recording Options") Only when a recordable tape is loaded in Deck B ("Tape Dubbing")* Only when the TAPE input is selected, the tape to be played is loaded in Deck A and a recordable tape is loaded in Deck B "Audio Options" "Clock Options" "Surround Setup" * "Tape...

User Manual
Page 20
... the STANDBY mode in which the system is to be short. 2.When the remote controllable distance becomes short, replace both of the batteries with your area by leaving an interval of 1 second or more than one that prevails in the area where the system is shipped. In this mode if a timer program has been activated.) ÷ When pressing more between radio channels has been set...
... the STANDBY mode in which the system is to be short. 2.When the remote controllable distance becomes short, replace both of the batteries with your area by leaving an interval of 1 second or more than one that prevails in the area where the system is shipped. In this mode if a timer program has been activated.) ÷ When pressing more between radio channels has been set...

User Manual
Page 22
... out some sound Basic use method XD-SERIES (EN/M,T) Reproducing sound with enhanced bass ON/STANDBY 1 1. Selecting the desired output 1 TUNER (Radio) º 2 CD ¢ 3 TAPE § 4 MD/DVD (External input) ÷ If you select the MD/DVD (external input) mode, also read the instruction manual of the tuner. It is also possible to the MD/DVD INPUT jacks. !Q 3. INPUT 2 DOWN VOLUME CONTROL 3 UP 2. XD-6...series XD-8...series XD-7...series 1 R D S 2 3 PHONES Basic section Muting the sound temporarily Reproducing sound with enhanced bass Listening through...
... out some sound Basic use method XD-SERIES (EN/M,T) Reproducing sound with enhanced bass ON/STANDBY 1 1. Selecting the desired output 1 TUNER (Radio) º 2 CD ¢ 3 TAPE § 4 MD/DVD (External input) ÷ If you select the MD/DVD (external input) mode, also read the instruction manual of the tuner. It is also possible to the MD/DVD INPUT jacks. !Q 3. INPUT 2 DOWN VOLUME CONTROL 3 UP 2. XD-6...series XD-8...series XD-7...series 1 R D S 2 3 PHONES Basic section Muting the sound temporarily Reproducing sound with enhanced bass Listening through...

User Manual
Page 41
... be switched to that station. Set the receiving band to FM and preset RDS stations with priority. Note before the use with various functions such as automatic display of the station name. 41 XD-SERIES (EN/M,T) This unit is equipped with the broadcast signal. R.D.S. (Radio Data System) (For U.K., Europe and Russia) RDS is a system which is currently broadcasting a specified program type (genre). The "RDS" indicator lights...
... be switched to that station. Set the receiving band to FM and preset RDS stations with priority. Note before the use with various functions such as automatic display of the station name. 41 XD-SERIES (EN/M,T) This unit is equipped with the broadcast signal. R.D.S. (Radio Data System) (For U.K., Europe and Russia) RDS is a system which is currently broadcasting a specified program type (genre). The "RDS" indicator lights...

User Manual
Page 53
... Lights when "Dolby Virtual surround" is selected, its effect cannot be used and selected surround play modes that can be selected are variable depending on the surround setting. See "Speakers used to the audio can be recorded together with the audio.) Check the surround speakers system connection and set up the surround play mode. Effective sound adjustment 53 XD-SERIES (EN/M,T) Selecting the equalizer pattern, DSP playback or surround playback (XD-6...series, XD-8...series) This unit permits selection of the remote control...
... Lights when "Dolby Virtual surround" is selected, its effect cannot be used and selected surround play modes that can be selected are variable depending on the surround setting. See "Speakers used to the audio can be recorded together with the audio.) Check the surround speakers system connection and set up the surround play mode. Effective sound adjustment 53 XD-SERIES (EN/M,T) Selecting the equalizer pattern, DSP playback or surround playback (XD-6...series, XD-8...series) This unit permits selection of the remote control...

User Manual
Page 55
... speakers Surround speakers (monaural signal) * Optional in this mode. Center speaker Super woofer* Front speakers * Optional in the Dolby Pro Logic and Dolby 3 Stereo modes have usually been set surround speakers. Application section Dolby Virtual Surround The surround signals output in this mode. Dolby 3 Stereo Surround This mode improves the positioning of the acoustic image of presence when five speakers are used with Dolby Surround program sources, but can also improve sound field unity for systems that are not Dolby Surround encoded. round home video...
... speakers Surround speakers (monaural signal) * Optional in this mode. Center speaker Super woofer* Front speakers * Optional in the Dolby Pro Logic and Dolby 3 Stereo modes have usually been set surround speakers. Application section Dolby Virtual Surround The surround signals output in this mode. Dolby 3 Stereo Surround This mode improves the positioning of the acoustic image of presence when five speakers are used with Dolby Surround program sources, but can also improve sound field unity for systems that are not Dolby Surround encoded. round home video...

User Manual
Page 57
To increase 4 2 MULTI CONTROL ¢ 3 To decrease Display for the center speaker volume adjustment : C-ch +8 Display for "Dolby Pro logic" and "Dolby 3 stereo". ÷ After completion of the test tone from the surround speakers with the LISTEN MODE key or SOUND CONTROL jog dial. When the listening position is located between the front and surround speakers "30ms" ... The delay time setting consists of adjusting this difference in timing of the sound output from the...
To increase 4 2 MULTI CONTROL ¢ 3 To decrease Display for the center speaker volume adjustment : C-ch +8 Display for "Dolby Pro logic" and "Dolby 3 stereo". ÷ After completion of the test tone from the surround speakers with the LISTEN MODE key or SOUND CONTROL jog dial. When the listening position is located between the front and surround speakers "30ms" ... The delay time setting consists of adjusting this difference in timing of the sound output from the...

User Manual
Page 59
... directly after which the power is switched off after the specified period has elapsed. Timer operation Adjust the clock before setting the timer. Auto Power Save When the power is ON and neither recording nor playback is executed for 30 minutes or more, the power is to be selected by turning the MULTI CONTROL jog dial. ("CD Program Play") ("Recording Options") ("Tape Dubbing") "Audio Options" "Clock Options" "Surround Setup" (Except for XD-7...series) +Scrolled display (Clock Options) Lights...
... directly after which the power is switched off after the specified period has elapsed. Timer operation Adjust the clock before setting the timer. Auto Power Save When the power is ON and neither recording nor playback is executed for 30 minutes or more, the power is to be selected by turning the MULTI CONTROL jog dial. ("CD Program Play") ("Recording Options") ("Tape Dubbing") "Audio Options" "Clock Options" "Surround Setup" (Except for XD-7...series) +Scrolled display (Clock Options) Lights...

User Manual
Page 60
.... I 1 Select the desired source and adjust the volume. 2 Select "Clock Options" . off " (Canceled) "O.T.T. Timer operation XD-SERIES (EN/M,T) Timer playback can be set the time of just setting the time. on " ÷ To cancel the O.T.T. MULTI CONTROL SELECT 5 Enter the ON time The following items can be selected by turning the MULTI CONTROL jog dial. ("CD Program Play") ("Recording Options") ("Tape Dubbing") "Audio Options" "Clock Options" "Surround Setup" (Except for XD-7...series) +Scrolled display (Clock Options) Lights Clock Opti The following...
.... I 1 Select the desired source and adjust the volume. 2 Select "Clock Options" . off " (Canceled) "O.T.T. Timer operation XD-SERIES (EN/M,T) Timer playback can be set the time of just setting the time. on " ÷ To cancel the O.T.T. MULTI CONTROL SELECT 5 Enter the ON time The following items can be selected by turning the MULTI CONTROL jog dial. ("CD Program Play") ("Recording Options") ("Tape Dubbing") "Audio Options" "Clock Options" "Surround Setup" (Except for XD-7...series) +Scrolled display (Clock Options) Lights Clock Opti The following...

User Manual
Page 61
... the auxiliary input source Make timer setting of an input source, the speakers do not output the audio even after the unit is used for each timer program. To listen to the MD/DVD INPUT jacks. ing. ¤ 2 Adjust the listening volume. 3 Select the timer operation. MENU ("CD Program Play") MULTI CONTROL "Recording Options" ("Tape Dubbing") "Audio Options" "Clock Options" SELECT "Surround Setup" (Except for the play back the tape. § For recording Make preparations for XD-7...series) 2 Select "Timer Play". Adjust the clock before setting the timer. I 1 Make...
... the auxiliary input source Make timer setting of an input source, the speakers do not output the audio even after the unit is used for each timer program. To listen to the MD/DVD INPUT jacks. ing. ¤ 2 Adjust the listening volume. 3 Select the timer operation. MENU ("CD Program Play") MULTI CONTROL "Recording Options" ("Tape Dubbing") "Audio Options" "Clock Options" SELECT "Surround Setup" (Except for the play back the tape. § For recording Make preparations for XD-7...series) 2 Select "Timer Play". Adjust the clock before setting the timer. I 1 Make...
User Manual
Page 64
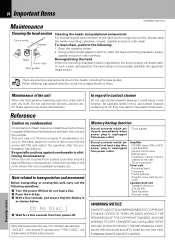
... from power outlet Amplifier POWER status (ON or OFF) Input selection Volume control value Balance level Equalizer's manual memory created by the user 3D surround level Tuner unit Receiving band Frequency Preset stations Program timer setting contents Cassette deck unit Transport direction DOLBY NR Tape Equalizer Reverse mode WARNING NOTICE: IN MOST CASES IT IS AN INFRINGEMENT OF COPYRIGHT TO MAKE COPIES OF TAPES OR DISCS WITHOUT THE PERMISSION OF THE COPYRIGHT OWNERS. Maintenance...
... from power outlet Amplifier POWER status (ON or OFF) Input selection Volume control value Balance level Equalizer's manual memory created by the user 3D surround level Tuner unit Receiving band Frequency Preset stations Program timer setting contents Cassette deck unit Transport direction DOLBY NR Tape Equalizer Reverse mode WARNING NOTICE: IN MOST CASES IT IS AN INFRINGEMENT OF COPYRIGHT TO MAKE COPIES OF TAPES OR DISCS WITHOUT THE PERMISSION OF THE COPYRIGHT OWNERS. Maintenance...
User Manual
Page 65
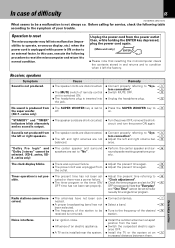
Receiver, speakers Symptom Sound is output. on. (XD-7...series only) "STANDBY" and "TIMER" ÷ The speaker cords are disconnected. ÷ The MUTE switch of remote control unit is switched ON. ÷ The headphone plug is installed near the system. ÷ Install the outdoor antenna in and returns and to an external factor. and no sound is not produced. Sound is not produced from the left or right speakers. ÷ The speaker cords are disconnected. ÷...
Receiver, speakers Symptom Sound is output. on. (XD-7...series only) "STANDBY" and "TIMER" ÷ The speaker cords are disconnected. ÷ The MUTE switch of remote control unit is switched ON. ÷ The headphone plug is installed near the system. ÷ Install the outdoor antenna in and returns and to an external factor. and no sound is not produced. Sound is not produced from the left or right speakers. ÷ The speaker cords are disconnected. ÷...


