
Instruction Manual
Page 1
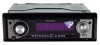
Refer to read through this instruction manual. For your Kenwood product at www.kenwoodusa.com © B64-3343-10/02 (KW) KDC-X590 KDC-MP632U KDC-MP532U CD-RECEIVER INSTRUCTION MANUAL AMPLI-TUNER LECTEUR DE CD MODE D'EMPLOI REPRODUCTOR DE DISCOS COMPACTOS RECEPTOR DE FM/AM MANUAL DE INSTRUCCIONES Take the time to the model and serial numbers whenever...
Refer to read through this instruction manual. For your Kenwood product at www.kenwoodusa.com © B64-3343-10/02 (KW) KDC-X590 KDC-MP632U KDC-MP532U CD-RECEIVER INSTRUCTION MANUAL AMPLI-TUNER LECTEUR DE CD MODE D'EMPLOI REPRODUCTOR DE DISCOS COMPACTOS RECEPTOR DE FM/AM MANUAL DE INSTRUCCIONES Take the time to the model and serial numbers whenever...

Instruction Manual
Page 2
...(Clean Reception System Circuit) Receive mode Setting SIRIUS ID (ESN) display Auxiliary Input Display Setting Text Scroll Built-in Amp Setting Dual Zone System Setting B.M.S. (Bass Management System) B.M.S. Contents Safety precautions 4 Notes 5 About CDs 7 About AAC, MP3 and WMA 8 About USB...features 26 About HD Radio Tuning Menu system 27 Menu System Activating Security Code Deactivating Security Code Touch Sensor Tone Manual Clock Adjustment DSI (Disabled System Indicator) Display Illumination Control Dimmer Switching preout Built-in Auxiliary input Setting CD Read Setting ...
...(Clean Reception System Circuit) Receive mode Setting SIRIUS ID (ESN) display Auxiliary Input Display Setting Text Scroll Built-in Amp Setting Dual Zone System Setting B.M.S. (Bass Management System) B.M.S. Contents Safety precautions 4 Notes 5 About CDs 7 About AAC, MP3 and WMA 8 About USB...features 26 About HD Radio Tuning Menu system 27 Menu System Activating Security Code Deactivating Security Code Touch Sensor Tone Manual Clock Adjustment DSI (Disabled System Indicator) Display Illumination Control Dimmer Switching preout Built-in Auxiliary input Setting CD Read Setting ...

Instruction Manual
Page 3
...to this equipment may cause harmful interference to radio communications, if it is encouraged to try ...manual. Changes or modifications to operate this equipment does cause harmful interference to radio or television reception, which the receiver...connected. • Consult the dealer or an experienced radio/TV technician for a Class B digital device, ...than those specified herein may generate or use radio frequency energy. 2CAUTION Use of controls or ... Reorient or relocate the receiving antenna. • Increase the separation between the equipment and receiver. • Connect the...
...to this equipment may cause harmful interference to radio communications, if it is encouraged to try ...manual. Changes or modifications to operate this equipment does cause harmful interference to radio or television reception, which the receiver...connected. • Consult the dealer or an experienced radio/TV technician for a Class B digital device, ...than those specified herein may generate or use radio frequency energy. 2CAUTION Use of controls or ... Reorient or relocate the receiving antenna. • Increase the separation between the equipment and receiver. • Connect the...

Instruction Manual
Page 5
...; The characters which can be displayed by "Media Manager". • Refer to this unit for the updated information of PC application attached to KDC-X590/KDC-MP632U • "Media Manager" is recorded in the illustrations may affect its mechanical parts. For how to remove the USB device, refer to...method of "Media Manager". • The unit can damage the data contained in this unit. How to reset your Kenwood dealer to the user's manual recorded in the installation CD-ROM and Help of "Media Manager" for the installation method of the display and the panel appearing in the USB ...
...; The characters which can be displayed by "Media Manager". • Refer to this unit for the updated information of PC application attached to KDC-X590/KDC-MP632U • "Media Manager" is recorded in the illustrations may affect its mechanical parts. For how to remove the USB device, refer to...method of "Media Manager". • The unit can damage the data contained in this unit. How to reset your Kenwood dealer to the user's manual recorded in the installation CD-ROM and Help of "Media Manager" for the installation method of the display and the panel appearing in the USB ...

Instruction Manual
Page 6
... button instead. 6 | English therefore, refer to the following control methods of the function for this unit may be different from the Instruction manual; and in the memory finishes, the number of the pre-set buttons and the ensemble label are displayed. FM/ 4 SCRL AUTO ¢... KTC-9090DAB (optional accessory) for at least 2 seconds. Select the preset band for operations. Notes About SIRIUS Satellite radio tuner Refer to the instruction manual of SIRIUS Satellite radio tuner KTC-SR901/SR902/SR903 (optional accessory), when connected, for the operation method. • Refer to the ...
... button instead. 6 | English therefore, refer to the following control methods of the function for this unit may be different from the Instruction manual; and in the memory finishes, the number of the pre-set buttons and the ensemble label are displayed. FM/ 4 SCRL AUTO ¢... KTC-9090DAB (optional accessory) for at least 2 seconds. Select the preset band for operations. Notes About SIRIUS Satellite radio tuner Refer to the instruction manual of SIRIUS Satellite radio tuner KTC-SR901/SR902/SR903 (optional accessory), when connected, for the operation method. • Refer to the ...

Instruction Manual
Page 7
...the recording surface or CDs that are dirty cannot be used. • This unit can only play a CD-R or CD-RW that are not round cannot be used . • CD-R and CD-RW are easier to your CD-R/CD-RW writing software, and your CDR/CD-RW recorder instruction manual.) Burrs CD storage • Do... not place CDs in direct sunlight (On the seat or dashboard ...
...the recording surface or CDs that are dirty cannot be used. • This unit can only play a CD-R or CD-RW that are not round cannot be used . • CD-R and CD-RW are easier to your CD-R/CD-RW writing software, and your CDR/CD-RW recorder instruction manual.) Burrs CD storage • Do... not place CDs in direct sunlight (On the seat or dashboard ...

Instruction Manual
Page 17
... FM3 bands. 3 Tune up or down band Push the Control knob towards [FM] or [AM]. Tuning mode Auto seek Preset station seek Manual Display "AUTO 1" "AUTO 2" "MANUAL" Operation Automatic search for a station. Select the "TUNER" display. 2 Select the band Push the Control knob towards [4] or [¢].... Tuning Mode Choose the tuning mode. Search in the Preset memory. Normal manual tuning control. • During reception of the stations in order of stereo stations the "ST" indicator is ON. Each time you push the...
... FM3 bands. 3 Tune up or down band Push the Control knob towards [FM] or [AM]. Tuning mode Auto seek Preset station seek Manual Display "AUTO 1" "AUTO 2" "MANUAL" Operation Automatic search for a station. Select the "TUNER" display. 2 Select the band Push the Control knob towards [4] or [¢].... Tuning Mode Choose the tuning mode. Search in the Preset memory. Normal manual tuning control. • During reception of the stations in order of stereo stations the "ST" indicator is ON. Each time you push the...

Instruction Manual
Page 27
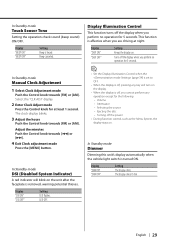
The Menu system basic operation method is the original setting.) Also, the explanation for items that are not applicable ( etc.) are displayed, their setting content is displayed. 2 Select the menu item Push the Control knob towards [4] or [¢]. English | 27 Example: When you push the knob it alternates between "BEEP ON" or "BEEP OFF". You can continue by step. Example: When you select "BEEP", each time you want to the basic operation method above are entered step by returning to step 2 and setting other items. 4 Exit Menu mode Press the [MENU] button. • When other...
The Menu system basic operation method is the original setting.) Also, the explanation for items that are not applicable ( etc.) are displayed, their setting content is displayed. 2 Select the menu item Push the Control knob towards [4] or [¢]. English | 27 Example: When you push the knob it alternates between "BEEP ON" or "BEEP OFF". You can continue by step. Example: When you select "BEEP", each time you want to the basic operation method above are entered step by returning to step 2 and setting other items. 4 Exit Menu mode Press the [MENU] button. • When other...
Instruction Manual
Page 29
... the unit after the faceplate is off the power • During function control, such as the Menu System, the display stays on. In Standby mode Manual Clock Adjustment 1 Select Clock Adjustment mode Push the Control knob towards [FM] or [AM]. Adjust the minutes Push the Control knob towards [4] or [¢]. 4 Exit...
... the unit after the faceplate is off the power • During function control, such as the Menu System, the display stays on. In Standby mode Manual Clock Adjustment 1 Select Clock Adjustment mode Push the Control knob towards [FM] or [AM]. Adjust the minutes Push the Control knob towards [4] or [¢]. 4 Exit...

Instruction Manual
Page 30
...front channel. • Refer to the unit, "BMS +18" will not work correctly even if it is connected to the catalog or instruction manual for power amplifiers that can be rear channel. Bass boost level is flat. When an amplifier that can only be set from Flat to +... activates. Frequency Offset Setting the central frequency, boosted by fader control.) Display "SWPRE R" "SWPRE SW" Setting Rear preout. Function of the KDC-X590/KDC-MP632U In Standby mode Built-in Amp Setting Controlling the built-in amplifier. Display "BMSF NML" "BMSF LOW" Setting Boost with the normal ...
...front channel. • Refer to the unit, "BMS +18" will not work correctly even if it is connected to the catalog or instruction manual for power amplifiers that can be rear channel. Bass boost level is flat. When an amplifier that can only be set from Flat to +... activates. Frequency Offset Setting the central frequency, boosted by fader control.) Display "SWPRE R" "SWPRE SW" Setting Rear preout. Function of the KDC-X590/KDC-MP632U In Standby mode Built-in Amp Setting Controlling the built-in amplifier. Display "BMSF NML" "BMSF LOW" Setting Boost with the normal ...

Instruction Manual
Page 31
Function of the KDC-X590 When LX AMP unit connecting AMP Control You can control the LX AMP connected to... Push the Control knob towards [FM] or [AM]. • For the details on the AMP Control item, see the Instruction manual attached to the LX AMP. 4 Adjust the AMP Control item Push the Control knob towards [FM] or [AM]. In such ... FM station. In FM reception CRSC (Clean Reception System Circuit) Temporarily have priority. In HD Radio mode Receive mode Setting Sets the receive mode. 1 Select the Receive mode Push the Control knob towards [FM] or [AM]. Analog broadcasts only. 4 Exit...
Function of the KDC-X590 When LX AMP unit connecting AMP Control You can control the LX AMP connected to... Push the Control knob towards [FM] or [AM]. • For the details on the AMP Control item, see the Instruction manual attached to the LX AMP. 4 Adjust the AMP Control item Push the Control knob towards [FM] or [AM]. In such ... FM station. In FM reception CRSC (Clean Reception System Circuit) Temporarily have priority. In HD Radio mode Receive mode Setting Sets the receive mode. 1 Select the Receive mode Push the Control knob towards [FM] or [AM]. Analog broadcasts only. 4 Exit...

Instruction Manual
Page 39
...the telephone rings or during conversation. Battery wire (Yellow) Ground wire (Black) - (To car chassis) English | 39 Fuse (10A) To Kenwood disc changer/ External optional accessory If no connections are using the optional power amplifier, connect to its power control terminal. Depending on what antenna ... power terminal for the booster amplifier of the film-type antenna. Connect to the relevant instruction manuals. CONT MUTE ILLUMI To "EXT.AMP.CONT." Connecting Wires to Terminals (KDC-X590) To use the USB cable. REM.CONT Steering remote control (Light Blue/ Yellow) To USB...
...the telephone rings or during conversation. Battery wire (Yellow) Ground wire (Black) - (To car chassis) English | 39 Fuse (10A) To Kenwood disc changer/ External optional accessory If no connections are using the optional power amplifier, connect to its power control terminal. Depending on what antenna ... power terminal for the booster amplifier of the film-type antenna. Connect to the relevant instruction manuals. CONT MUTE ILLUMI To "EXT.AMP.CONT." Connecting Wires to Terminals (KDC-X590) To use the USB cable. REM.CONT Steering remote control (Light Blue/ Yellow) To USB...

Instruction Manual
Page 40
... To front right speaker Gray/Black Gray To rear left input (White) FM/AM antenna input To connect these leads, refer to the relevant instruction manuals. Connecting Wires to Terminals (KDC-MP632U) USB connector To USB device Front left output (White) Front right output (Red) Rear left output (White)/... output (Red) AUX IN • Do not remove the cap when you are made, do not use the USB cable. Fuse (10A) To Kenwood disc changer/ External optional accessory If no connections are using the optional power amplifier, connect to its power control terminal. To connect the...
... To front right speaker Gray/Black Gray To rear left input (White) FM/AM antenna input To connect these leads, refer to the relevant instruction manuals. Connecting Wires to Terminals (KDC-MP632U) USB connector To USB device Front left output (White) Front right output (Red) Rear left output (White)/... output (Red) AUX IN • Do not remove the cap when you are made, do not use the USB cable. Fuse (10A) To Kenwood disc changer/ External optional accessory If no connections are using the optional power amplifier, connect to its power control terminal. To connect the...

Instruction Manual
Page 41
...output (Red) • Do not remove the cap when you are made, do not use the USB cable. Fuse (10A) To Kenwood disc changer/ External optional accessory If no connections are using the optional power amplifier, connect to the power terminal for the booster amplifier of.../ White) FRONT L To front right speaker Gray/Black Gray FRONT R To rear left speaker P.CONT ANT. To connect the Kenwood navigation system, consult your navigation manual. Wiring harness (Accessory1) When using , connect either the telephone rings or during conversation. Connect to malfunction if it gets in ...
...output (Red) • Do not remove the cap when you are made, do not use the USB cable. Fuse (10A) To Kenwood disc changer/ External optional accessory If no connections are using the optional power amplifier, connect to the power terminal for the booster amplifier of.../ White) FRONT L To front right speaker Gray/Black Gray FRONT R To rear left speaker P.CONT ANT. To connect the Kenwood navigation system, consult your navigation manual. Wiring harness (Accessory1) When using , connect either the telephone rings or during conversation. Connect to malfunction if it gets in ...


