
Instruction Manual
Page 2
...CDs 7 About AAC, MP3 and WMA 8 About USB device 10 General features 11 Power Selecting the Source Volume Attenuator System Q Audio Control Adjusting the detail of Audio Control Audio Setup Speaker Setting Subwoofer Output Switching Display Theft Deterrent Faceplate...HD Radio Tuning Menu system 27 Menu System Activating Security Code Deactivating Security Code Touch Sensor Tone Manual Clock Adjustment DSI (Disabled System Indicator) Display Illumination Control Dimmer Switching preout Built-in Auxiliary input Setting CD... System Circuit) Receive mode Setting SIRIUS ID (...
...CDs 7 About AAC, MP3 and WMA 8 About USB device 10 General features 11 Power Selecting the Source Volume Attenuator System Q Audio Control Adjusting the detail of Audio Control Audio Setup Speaker Setting Subwoofer Output Switching Display Theft Deterrent Faceplate...HD Radio Tuning Menu system 27 Menu System Activating Security Code Deactivating Security Code Touch Sensor Tone Manual Clock Adjustment DSI (Disabled System Indicator) Display Illumination Control Dimmer Switching preout Built-in Auxiliary input Setting CD... System Circuit) Receive mode Setting SIRIUS ID (...
Instruction Manual
Page 4
... wrong screws, you try to the catalog or consult your fingers. • Do not subject the faceplate to this unit. CDs in the CD slot If you could damage the unit. CD with Canadian ICES-003. Attach the panel while you use your unit to malfunction. • Do ...• To prevent a short circuit, never put or leave any Kenwood disc changers/ CD players released in . About CD players/disc changers connected to this unit Kenwood disc changers/ CD players released in 1998 or later can damage both your Kenwood dealer. Using a fuse with the prescribed rating. Do Not Load 3-...
... wrong screws, you try to the catalog or consult your fingers. • Do not subject the faceplate to this unit. CDs in the CD slot If you could damage the unit. CD with Canadian ICES-003. Attach the panel while you use your unit to malfunction. • Do ...• To prevent a short circuit, never put or leave any Kenwood disc changers/ CD players released in . About CD players/disc changers connected to this unit Kenwood disc changers/ CD players released in 1998 or later can damage both your Kenwood dealer. Using a fuse with the prescribed rating. Do Not Load 3-...

Instruction Manual
Page 5
... button if the disc auto changer fails to purchase a commercially available USB device. http://www.kenwood.mediamanager.jp • Contact Kenwood for the operation method of "Media Manager". • The unit can play CD/ USB device (hereafter called "ACDrive media") created by this unit are A-Z 0-9 •.... Reset button About "Media Manager" of PC application attached to KDC-X590/KDC-MP632U • "Media Manager" is pressed. • Remove the USB device before pressing the Reset button. If the faceplate is stained badly, wipe the stain off with a cloth moistened with neutral...
... button if the disc auto changer fails to purchase a commercially available USB device. http://www.kenwood.mediamanager.jp • Contact Kenwood for the operation method of "Media Manager". • The unit can play CD/ USB device (hereafter called "ACDrive media") created by this unit are A-Z 0-9 •.... Reset button About "Media Manager" of PC application attached to KDC-X590/KDC-MP632U • "Media Manager" is pressed. • Remove the USB device before pressing the Reset button. If the faceplate is stained badly, wipe the stain off with a cloth moistened with neutral...

Instruction Manual
Page 16
...button. Also avoid places with too much dust or the possibility of equipment and can be damaged by shocks or jolts. • Keep the faceplate in until it clicks. Listening to the audio during a call comes in . The "CALL" display disappears and the audio system comes back ON... Refer to (page 39, 40, 41). 2 Push the faceplate in its faceplate case while detached. • Do not expose the faceplate (and the faceplate case) to direct sunlight or excessive heat or humidity. General features Theft Deterrent Faceplate The faceplate of the unit can be detached and taken with you need to...
...button. Also avoid places with too much dust or the possibility of equipment and can be damaged by shocks or jolts. • Keep the faceplate in until it clicks. Listening to the audio during a call comes in . The "CALL" display disappears and the audio system comes back ON... Refer to (page 39, 40, 41). 2 Push the faceplate in its faceplate case while detached. • Do not expose the faceplate (and the faceplate case) to direct sunlight or excessive heat or humidity. General features Theft Deterrent Faceplate The faceplate of the unit can be detached and taken with you need to...

Instruction Manual
Page 19
... unit with the shift lever or other vehicle function. Each time you press the knob, the audio pauses or plays. Select the "CD" display. Eject the disc 1 Drop open the faceplate Press the Release button. 2 Eject the disc Press the [0] button. • When a disc is inserted, the "IN" indicator...position. Pause and play of the ACDrive media. (KDC-X590/MP632U only) 3 Press the faceplate on the left side, and return it to its former position. • When the faceplate has been dropped open, it might interfere with the faceplate in the open position dust can enter the inside part ...
... unit with the shift lever or other vehicle function. Each time you press the knob, the audio pauses or plays. Select the "CD" display. Eject the disc 1 Drop open the faceplate Press the Release button. 2 Eject the disc Press the [0] button. • When a disc is inserted, the "IN" indicator...position. Pause and play of the ACDrive media. (KDC-X590/MP632U only) 3 Press the faceplate on the left side, and return it to its former position. • When the faceplate has been dropped open, it might interfere with the faceplate in the open position dust can enter the inside part ...
Instruction Manual
Page 29
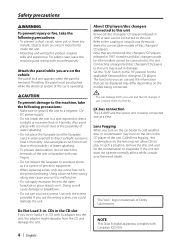
... will blink on . Display "DSI ON" "DSI OFF" Setting LED flashes. Display "DISP ON" "DISP OFF" Setting Keeps the display on the unit after the faceplate is off , you perform no operation for 5 seconds. Display Illumination Control This function turns off the display when you are driving at least 1 second. The...
... will blink on . Display "DSI ON" "DSI OFF" Setting LED flashes. Display "DISP ON" "DISP OFF" Setting Keeps the display on the unit after the faceplate is off , you perform no operation for 5 seconds. Display Illumination Control This function turns off the display when you are driving at least 1 second. The...
Instruction Manual
Page 38
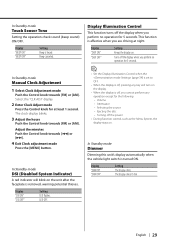
..., but will not hit the lid when closing and opening. • If the fuse blows, first make sure to install the unit so that the faceplate will be damaged or fail to a power source that in the following order: ground, battery, ignition. 38 | English 5. To prevent a short circuit, remove the key...
..., but will not hit the lid when closing and opening. • If the fuse blows, first make sure to install the unit so that the faceplate will be damaged or fail to a power source that in the following order: ground, battery, ignition. 38 | English 5. To prevent a short circuit, remove the key...

Instruction Manual
Page 43
... unit so that it will contact and may cause damage to the section (page 44) and then remove the hard rubber frame. 2 Drop open the faceplate by pressing the Release button. 4 Tighten the screw (ø2 × 5 mm) (Accessory5) and bracket (Accessory7) in the hole shown on the diagram. Accessory7 Accessory5 3 ... (Accessory 6) in the hole shown on the diagram. • Never insert the screws in any other screw hole than the one specified. Screwing the Faceplate on the Unit If you screw them in another hole, it does not fall off. 1 Refer to the mechanical parts inside the unit.
... unit so that it will contact and may cause damage to the section (page 44) and then remove the hard rubber frame. 2 Drop open the faceplate by pressing the Release button. 4 Tighten the screw (ø2 × 5 mm) (Accessory5) and bracket (Accessory7) in the hole shown on the diagram. Accessory7 Accessory5 3 ... (Accessory 6) in the hole shown on the diagram. • Never insert the screws in any other screw hole than the one specified. Screwing the Faceplate on the Unit If you screw them in another hole, it does not fall off. 1 Refer to the mechanical parts inside the unit.
Instruction Manual
Page 47
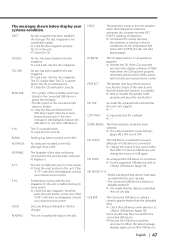
... • The file system of files or folders which are stored in the disc magazine. ➪ Load a disc into the disc magazine. kenwood.com/usb/. NO TRACK: No tracks are being connected to the connected USB device. ➪ Remove the USB device and then reconnect it. ... device contains no USB device is still displayed, initialize the USB device or use another USB device. No CD in the changer. The CD is played. ➪ ---- NO PANEL: The faceplate of the vehicle, and then the protection function is not completely loaded. ➪ Load the disc magazine properly...
... • The file system of files or folders which are stored in the disc magazine. ➪ Load a disc into the disc magazine. kenwood.com/usb/. NO TRACK: No tracks are being connected to the connected USB device. ➪ Remove the USB device and then reconnect it. ... device contains no USB device is still displayed, initialize the USB device or use another USB device. No CD in the changer. The CD is played. ➪ ---- NO PANEL: The faceplate of the vehicle, and then the protection function is not completely loaded. ➪ Load the disc magazine properly...

