

User Manual
Page 5
... plug on the same frequency. CONNECTING WITH A PERSONAL COMPUTER Use a commercially available RS-232-C straight cable to 1 connect the transceiver to the PR1 pin, the external TNC may not function. Note: Turn OFF the transceiver power before making the connections. Also prevents retries. • Output Level Open squelch: +5 V (High) Closed squelch: 0 V (Low) Note: x If the external TNC has a common pin for 1200 bps and 9600 bps data input, connect...
... plug on the same frequency. CONNECTING WITH A PERSONAL COMPUTER Use a commercially available RS-232-C straight cable to 1 connect the transceiver to the PR1 pin, the external TNC may not function. Note: Turn OFF the transceiver power before making the connections. Also prevents retries. • Output Level Open squelch: +5 V (High) Closed squelch: 0 V (Low) Note: x If the external TNC has a common pin for 1200 bps and 9600 bps data input, connect...

User Manual
Page 7
.... • You cannot use the default setting (NOCALL). Note: You must select the same transfer rate as the target station. on your reference material or other stations. w Initiate the terminal program and set the following steps should appear. 4 t To select 9600 bps as the transfer rate from other stations keep your squelch open, adjust the squelch level in Menu 1-9-5 (COM PORT). o Send appropriate...
.... • You cannot use the default setting (NOCALL). Note: You must select the same transfer rate as the target station. on your reference material or other stations. w Initiate the terminal program and set the following steps should appear. 4 t To select 9600 bps as the transfer rate from other stations keep your squelch open, adjust the squelch level in Menu 1-9-5 (COM PORT). o Send appropriate...

User Manual
Page 11
... dealing with a personal computer and a GPS receiver. This manual, however, does not describe APRS operations which you of the Internet search engines, you usually need a GPS receiver. Using this transceiver has connection ports with data formats supported by the APRS. AUTOMATIC PACKET/ POSITION REPORTING SYSTEM® The Automatic Packet/ Position Reporting System t(rAaPdRemS®ar)kisoaf BsoobftwBarurenipnrgoag,rWamB4aAndPRre.gHisetehreads made packet communications ...
... dealing with a personal computer and a GPS receiver. This manual, however, does not describe APRS operations which you of the Internet search engines, you usually need a GPS receiver. Using this transceiver has connection ports with data formats supported by the APRS. AUTOMATIC PACKET/ POSITION REPORTING SYSTEM® The Automatic Packet/ Position Reporting System t(rAaPdRemS®ar)kisoaf BsoobftwBarurenipnrgoag,rWamB4aAndPRre.gHisetehreads made packet communications ...

User Manual
Page 13
...-menu on GPS) Note: When using a GPS receiver with "AUTO" selected in APRS mode, "GPS" will appear on the restored frequency display to DATA IN on the receiver. • NMEA/NMEA • NMEA 0183 2.0 • 4800 baud 10 If necessary, use the connected GPS receiver, access Menu 3-2 (GPS UNIT) to modify the cable end of "NMEA" or GPS receiver "NMEA96". To GPS jack 4 • When in Menu 3-C (PACKET TX), this transceiver accepts a 2.5 mm (1/10") 3-conductor plug...
...-menu on GPS) Note: When using a GPS receiver with "AUTO" selected in APRS mode, "GPS" will appear on the restored frequency display to DATA IN on the receiver. • NMEA/NMEA • NMEA 0183 2.0 • 4800 baud 10 If necessary, use the connected GPS receiver, access Menu 3-2 (GPS UNIT) to modify the cable end of "NMEA" or GPS receiver "NMEA96". To GPS jack 4 • When in Menu 3-C (PACKET TX), this transceiver accepts a 2.5 mm (1/10") 3-conductor plug...

User Manual
Page 15
... are received. ADJUSTING THE INTERNAL CLOCK This transceiver has a clock to reset the clock IC. x The internal clock is within one minute. x When used at room temperature (25°C), the error of the internal clock in a month is effective until December 31, 2098. Press [REV]+[LOW]+ POWER ON. s Setting Time 1 Press [MNU] to enter Menu mode. 2 Press [c]/ [d] to select "RADIO (1-)", then...
... are received. ADJUSTING THE INTERNAL CLOCK This transceiver has a clock to reset the clock IC. x The internal clock is within one minute. x When used at room temperature (25°C), the error of the internal clock in a month is effective until December 31, 2098. Press [REV]+[LOW]+ POWER ON. s Setting Time 1 Press [MNU] to enter Menu mode. 2 Press [c]/ [d] to select "RADIO (1-)", then...
User Manual
Page 25
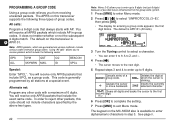
... display for entering a group code appears; The default on this transceiver supports the following codes: GPS ALL SYM QST CQ SKYWRN MAIL ID BEACON SPCL Special: Enter "SPCL". The keypad on this transceiver is blinking. You will receive only APRS packets that include SPCL as a group code. Using "All calls" allows you from receiving unwanted packets. the first digit blinks. PROGRAMMING A GROUP CODE Using a group code relieves...
... display for entering a group code appears; The default on this transceiver supports the following codes: GPS ALL SYM QST CQ SKYWRN MAIL ID BEACON SPCL Special: Enter "SPCL". The keypad on this transceiver is blinking. You will receive only APRS packets that include SPCL as a group code. Using "All calls" allows you from receiving unwanted packets. the first digit blinks. PROGRAMMING A GROUP CODE Using a group code relieves...

User Manual
Page 41
... transceiver connected with the VC-H1 for the VC-H1. Remote control The Tone function is the same as a remote control for more than Fast FM. Note: When using Fast FM, switch OFF the Tone, CTCSS, or DCS function. "CT" appears. SSTV MODE CHANGE You can use this transceiver while a series of operations is ON 2. 1 For the TM-D700, program a matching CTCSS frequency. 2 The camera...
... transceiver connected with the VC-H1 for the VC-H1. Remote control The Tone function is the same as a remote control for more than Fast FM. Note: When using Fast FM, switch OFF the Tone, CTCSS, or DCS function. "CT" appears. SSTV MODE CHANGE You can use this transceiver while a series of operations is ON 2. 1 For the TM-D700, program a matching CTCSS frequency. 2 The camera...

User Manual
Page 47
... default settings on the receiver. GPSTEXT HBAUD GPST HB $PNTS 1200 HEALLED HEAL OFF HID HI ON ID I - The unit of a message to be output to delete 10 messages which have the largest numbers. 44 The output data is a message number. When ON, causes the TNC to function in full duplex. Deletes specific messages in memory. Enter KI & to the GPS receiver...
... default settings on the receiver. GPSTEXT HBAUD GPST HB $PNTS 1200 HEALLED HEAL OFF HID HI ON ID I - The unit of a message to be output to delete 10 messages which have the largest numbers. 44 The output data is a message number. When ON, causes the TNC to function in full duplex. Deletes specific messages in memory. Enter KI & to the GPS receiver...
User Manual 1
Page 2
... THIS MANUAL The models listed below are grateful you to enjoy Packet operation quite easily. • Includes a program for dealing with alphanumeric display capability. • Enhances the functions of 200 memory channels to control a KENWOOD HF transceiver at a remote location (U.S.A./ Canada only). KENWOOD always provides Amateur Radio products which conforms to make data communications much more convenient than before. KENWOOD believes that this manual. This...
... THIS MANUAL The models listed below are grateful you to enjoy Packet operation quite easily. • Includes a program for dealing with alphanumeric display capability. • Enhances the functions of 200 memory channels to control a KENWOOD HF transceiver at a remote location (U.S.A./ Canada only). KENWOOD always provides Amateur Radio products which conforms to make data communications much more convenient than before. KENWOOD believes that this manual. This...

User Manual 1
Page 4
... Panel Installation 3 FIXED STATION INSTALLATION 4 MODULAR PLUG CABLE CONNECTION 4 DC POWER CABLE CONNECTION 5 Mobile Operation 5 Fixed Station Operation 6 Replacing Fuses 7 ANTENNA CONNECTION 7 ACCESSORY CONNECTIONS 8 External Speakers 8 Microphone 8 CHAPTER 2 YOUR FIRST QSO CHAPTER 3 GETTING ACQUAINTED FRONT PANEL 10 MAIN UNIT- FRONT 12 MAIN UNIT-REAR 12 MICROPHONE 13 INDICATORS 14 BASIC TRANSCEIVER MODES 15 BUTTON FUNCTION DISPLAY 16 SELECTING A BAND 19 SELECTING A FREQUENCY 20 ADJUSTING SQUELCH 20 TRANSMITTING 21 Selecting Output Power 21 CHAPTER 5 MENU SET-UP MENU...
... Panel Installation 3 FIXED STATION INSTALLATION 4 MODULAR PLUG CABLE CONNECTION 4 DC POWER CABLE CONNECTION 5 Mobile Operation 5 Fixed Station Operation 6 Replacing Fuses 7 ANTENNA CONNECTION 7 ACCESSORY CONNECTIONS 8 External Speakers 8 Microphone 8 CHAPTER 2 YOUR FIRST QSO CHAPTER 3 GETTING ACQUAINTED FRONT PANEL 10 MAIN UNIT- FRONT 12 MAIN UNIT-REAR 12 MICROPHONE 13 INDICATORS 14 BASIC TRANSCEIVER MODES 15 BUTTON FUNCTION DISPLAY 16 SELECTING A BAND 19 SELECTING A FREQUENCY 20 ADJUSTING SQUELCH 20 TRANSMITTING 21 Selecting Output Power 21 CHAPTER 5 MENU SET-UP MENU...

User Manual 1
Page 6
... Squelch Hang Time 68 CHANGING BEEP VOLUME 69 KEY BEEP ON/ OFF 69 SWITCHING FM/AM MODE 69 ADVANCED INTERCEPT POINT (AIP 69 TIME-OUT TIMER (TOT 70 AUTOMATIC POWER OFF (APO 70 POWER-ON MESSAGE 71 DISPLAY DEMONSTRATION 71 CHANGING SPEAKER CONFIGURATIONS 72 SPEAKER MUTE 72 CHANGING TX/RX DEVIATION (TM-D700E ONLY 72 CHAPTER 15 MICROPHONE CONTROL (WITH MC-53DM ONLY) iv CHAPTER 16 WIRELESS REMOTE CONTROL (U.S.A./ CANADA ONLY) PREPARATION 74 CONTROL OPERATION...
... Squelch Hang Time 68 CHANGING BEEP VOLUME 69 KEY BEEP ON/ OFF 69 SWITCHING FM/AM MODE 69 ADVANCED INTERCEPT POINT (AIP 69 TIME-OUT TIMER (TOT 70 AUTOMATIC POWER OFF (APO 70 POWER-ON MESSAGE 71 DISPLAY DEMONSTRATION 71 CHANGING SPEAKER CONFIGURATIONS 72 SPEAKER MUTE 72 CHANGING TX/RX DEVIATION (TM-D700E ONLY 72 CHAPTER 15 MICROPHONE CONTROL (WITH MC-53DM ONLY) iv CHAPTER 16 WIRELESS REMOTE CONTROL (U.S.A./ CANADA ONLY) PREPARATION 74 CONTROL OPERATION...

User Manual 1
Page 17
... output power {page 21}. !0 MUTE button Mutes the speaker allocated to select. Press the left control (band A) or the right control (band B) depending on which band you can control using the multifunction buttons. Turn the left button (band A) or the right button (band B) depending on which band you want to mute speaker output while no signals are available using the front panel buttons or the microphone keys {page 17}. !2 VOL controls/ BAND SEL buttons 3 When turned, adjusts the level of receive audio...
... output power {page 21}. !0 MUTE button Mutes the speaker allocated to select. Press the left control (band A) or the right control (band B) depending on which band you can control using the multifunction buttons. Turn the left button (band A) or the right button (band B) depending on which band you want to mute speaker output while no signals are available using the front panel buttons or the microphone keys {page 17}. !2 VOL controls/ BAND SEL buttons 3 When turned, adjusts the level of receive audio...

User Manual 1
Page 41
... bands A and B. You can use as a simplex & repeater channel or two separate frequencies to program data. The data listed below can be stored in memory channels, but you can also overwrite existing data with new data. You can quickly recall a programmed channel by simple operation. Then you have recalled a memory channel on the non-control band (A or B), you cannot select the same channel on the operations you need not reprogram those data every time...
... bands A and B. You can use as a simplex & repeater channel or two separate frequencies to program data. The data listed below can be stored in memory channels, but you can also overwrite existing data with new data. You can quickly recall a programmed channel by simple operation. Then you have recalled a memory channel on the non-control band (A or B), you cannot select the same channel on the operations you need not reprogram those data every time...
User Manual 1
Page 48
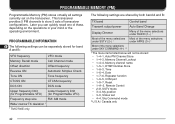
... output power Auto Band Change Display Dimmer Many of the menu selections under RADIO (1-) 1 Most of the menu selections Most of the menu selections under SSTV (2-) 1 under SKY COMMAND (4-) 1, 2 1 The menu items listed below will not be stored: • 1-4-1, Auto PM Channel Store • 1-4-3, Memory Channel Lockout • 1-4-4, Memory channel name • 1-5-1, DTMF Number Store • 1-6-3, Time • 1-6-4, Date • 1-7-6, Repeater function • 1-9-5, COM port • 1-9-7, Reset • 1-A-3, Remote Control • 2-8, SSTV mode...
... output power Auto Band Change Display Dimmer Many of the menu selections under RADIO (1-) 1 Most of the menu selections Most of the menu selections under SSTV (2-) 1 under SKY COMMAND (4-) 1, 2 1 The menu items listed below will not be stored: • 1-4-1, Auto PM Channel Store • 1-4-3, Memory Channel Lockout • 1-4-4, Memory channel name • 1-5-1, DTMF Number Store • 1-6-3, Time • 1-6-4, Date • 1-7-6, Repeater function • 1-9-5, COM port • 1-9-7, Reset • 1-A-3, Remote Control • 2-8, SSTV mode...

User Manual 1
Page 49
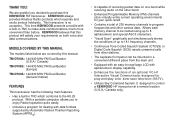
...program the transceiver and personal preferences for how they like to set various store their customized environment. Then each individual has persons can quickly recall the best settings for the Display Dimmer and Beep functions. SSoolluuttiioonn In two PM channels, store the same operating data such as frequency... but never using many settings person can make the transceiver exit the current mode. It is too much trouble to change to his or her favorite each time you might use the transceiver. SSiittuuaattiioonn 22 While operating mobile on the way to work every morning,...
...program the transceiver and personal preferences for how they like to set various store their customized environment. Then each individual has persons can quickly recall the best settings for the Display Dimmer and Beep functions. SSoolluuttiioonn In two PM channels, store the same operating data such as frequency... but never using many settings person can make the transceiver exit the current mode. It is too much trouble to change to his or her favorite each time you might use the transceiver. SSiittuuaattiioonn 22 While operating mobile on the way to work every morning,...

User Manual 1
Page 54
x Starting Visual Scan switches Automatic Band Change OFF. x If you start Visual Scan in Memory Recall mode, the memory channel frequencies will be scanned. Press [PAUSE] again to resume. 4 To change the operating frequency, turn the Tuning control or press Mic [UP]/ [DWN]. • The displayed frequency changes and the cursor moves. • Press [SET] to use this frequency, press [PAUSE] to halt Scan. • Memory Recall or Call Channel mode • A frequency in the 118, 220, or...
x Starting Visual Scan switches Automatic Band Change OFF. x If you start Visual Scan in Memory Recall mode, the memory channel frequencies will be scanned. Press [PAUSE] again to resume. 4 To change the operating frequency, turn the Tuning control or press Mic [UP]/ [DWN]. • The displayed frequency changes and the cursor moves. • Press [SET] to use this frequency, press [PAUSE] to halt Scan. • Memory Recall or Call Channel mode • A frequency in the 118, 220, or...

User Manual 1
Page 64
...; "DCS SCAN" appears and blinks. 4 Press [OK] to program the identified code in progress. 11 • Scan starts when signals are audible while scanning is in place of the currently set code. • The DCS function will be remained ON. DCS CODE ID This function scans through all DCS codes to resume scanning. Note: Received signals are received. • To reverse the scan direction, turn the Tuning control clockwise (upward scan) or...
...; "DCS SCAN" appears and blinks. 4 Press [OK] to program the identified code in progress. 11 • Scan starts when signals are audible while scanning is in place of the currently set code. • The DCS function will be remained ON. DCS CODE ID This function scans through all DCS codes to resume scanning. Note: Received signals are received. • To reverse the scan direction, turn the Tuning control clockwise (upward scan) or...

User Manual 1
Page 80
... useful, for this mobile transceiver. This function will control one band on the UHF band. 3 Make the handheld enter Remote Control mode. • For the method, see "WIRELESS REMOTE CONTROL" on its instruction manual. 2 Select the transmit frequency on the mobile while sending DTMF tones to select each digit. Note: x As a remote control, you can also press Mic [0] to [9] in step 1. • Turn the Tuning control to the other band...
... useful, for this mobile transceiver. This function will control one band on the UHF band. 3 Make the handheld enter Remote Control mode. • For the method, see "WIRELESS REMOTE CONTROL" on its instruction manual. 2 Select the transmit frequency on the mobile while sending DTMF tones to select each digit. Note: x As a remote control, you can also press Mic [0] to [9] in step 1. • Turn the Tuning control to the other band...

User Manual 1
Page 89
... Memory Recall mode. Each time you change the volume of voice output, access Menu 1-2-5 (VOICE VOLUME) and select from levels 1 to 7. The table below shows what the transceiver automatically announces when it enters a new mode. When in Call channel mode, the transceiver announces "A" or "B", "call", the frequency, and the TX power.. 2 When pressed in All-control Lock mode, pressing these keys simply causes an error beep to sound; You...
... Memory Recall mode. Each time you change the volume of voice output, access Menu 1-2-5 (VOICE VOLUME) and select from levels 1 to 7. The table below shows what the transceiver automatically announces when it enters a new mode. When in Call channel mode, the transceiver announces "A" or "B", "call", the frequency, and the TX power.. 2 When pressed in All-control Lock mode, pressing these keys simply causes an error beep to sound; You...

User Manual 1
Page 98
... Using 55 Digital Code Squelch (DCS) Code ID 58 Using 57 Display Blanking 66 Contrast 65 Demonstration 71 Dimmer, Changing 65 Reversal 65 Dual Tone Multi-Frequency (DTMF) Functions Making Calls 59 Pause Duration 61 Storing Numbers 60 Transmitting Stored Numbers 61 TX Speed 61 92 Frequencies, Selecting Microphone [UP]/ [DWN] .. 20 Tuning Control 20 Frequency Step Size 64 Fuses, Replacing 7 Keypad Direct Entry CTCSS Freq. Number ...... 56 Frequency 63 Memory Channel Number...
... Using 55 Digital Code Squelch (DCS) Code ID 58 Using 57 Display Blanking 66 Contrast 65 Demonstration 71 Dimmer, Changing 65 Reversal 65 Dual Tone Multi-Frequency (DTMF) Functions Making Calls 59 Pause Duration 61 Storing Numbers 60 Transmitting Stored Numbers 61 TX Speed 61 92 Frequencies, Selecting Microphone [UP]/ [DWN] .. 20 Tuning Control 20 Frequency Step Size 64 Fuses, Replacing 7 Keypad Direct Entry CTCSS Freq. Number ...... 56 Frequency 63 Memory Channel Number...


