
Instruction Manual
Page 4
... MANUAL • TK-2170: VHF FM Transceiver • TK-3170: UHF FM Transceiver • TK-3173: UHF FM Transceiver NOTICES TO THE USER ◆ Government law prohibits the operation of unlicensed radio transmitters within the territories under government control. ◆ Illegal operation is aware of and understands hazards common to the operation of this product. SAFETY: It is important that you have chosen KENWOOD...
... MANUAL • TK-2170: VHF FM Transceiver • TK-3170: UHF FM Transceiver • TK-3173: UHF FM Transceiver NOTICES TO THE USER ◆ Government law prohibits the operation of unlicensed radio transmitters within the territories under government control. ◆ Illegal operation is aware of and understands hazards common to the operation of this product. SAFETY: It is important that you have chosen KENWOOD...

Instruction Manual
Page 5
... instruction manual. One or more of the following statements may cause harmful interference unless the modifications are designed to provide reasonable protection against harmful interference in a residential installation. Changes or modifications to this equipment does cause harmful interference to radio or television reception, which the receiver is connected. • Consult the dealer for a Class B digital device, pursuant to Part...
... instruction manual. One or more of the following statements may cause harmful interference unless the modifications are designed to provide reasonable protection against harmful interference in a residential installation. Changes or modifications to this equipment does cause harmful interference to radio or television reception, which the receiver is connected. • Consult the dealer for a Class B digital device, pursuant to Part...

Instruction Manual
Page 7
... damaged, do not touch the damaged parts. • If a headset or headphone is connected to the volume level when turning the squelch off before installing optional accessories. Do not touch these locations when replacing the battery pack. • Do not immerse the transceiver in water. • Always switch the transceiver power off . • Do not place the microphone cable around your eyes. • When...
... damaged, do not touch the damaged parts. • If a headset or headphone is connected to the volume level when turning the squelch off before installing optional accessories. Do not touch these locations when replacing the battery pack. • Do not immerse the transceiver in water. • Always switch the transceiver power off . • Do not place the microphone cable around your eyes. • When...

Instruction Manual
Page 8
...contact your KENWOOD dealer. • Use of the transceiver while you use only a speaker/microphone in a high-frequency burn. • If an abnormal odor or smoke is detected coming from the transceiver, switch the transceiver power off in...service stations. • Near explosives or blasting sites. • In aircrafts. • In medical institutions or near airbag equipment while the vehicle is possible for the transceiver to send an electric shock through the earphone and to avoid electric shocks. Turn the transceiver power off immediately, remove the battery pack from the antenna...
...contact your KENWOOD dealer. • Use of the transceiver while you use only a speaker/microphone in a high-frequency burn. • If an abnormal odor or smoke is detected coming from the transceiver, switch the transceiver power off in...service stations. • Near explosives or blasting sites. • In aircrafts. • In medical institutions or near airbag equipment while the vehicle is possible for the transceiver to send an electric shock through the earphone and to avoid electric shocks. Turn the transceiver power off immediately, remove the battery pack from the antenna...
Instruction Manual
Page 9
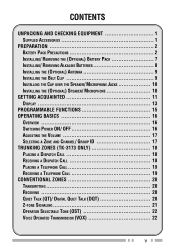
... CHECKING EQUIPMENT 1 SUPPLIED ACCESSORIES 1 PREPARATION 2 BATTERY PACK PRECAUTIONS 2 INSTALLING/ REMOVING THE (OPTIONAL) BATTERY PACK 7 INSTALLING/ REMOVING ALKALINE BATTERIES 8 INSTALLING THE (OPTIONAL) ANTENNA 9 INSTALLING THE BELT CLIP 9 INSTALLING THE CAP OVER THE SPEAKER/ MICROPHONE JACKS 10 INSTALLING THE (OPTIONAL) SPEAKER/ MICROPHONE 10 GETTING ACQUAINTED 11 DISPLAY 13 PROGRAMMABLE FUNCTIONS 15 OPERATING BASICS 16 OVERVIEW 16 SWITCHING POWER ON/ OFF 16 ADJUSTING THE VOLUME 17 SELECTING A ZONE AND CHANNEL/ GROUP ID 17 TRUNKING ZONES (TK-3173 ONLY 18...
... CHECKING EQUIPMENT 1 SUPPLIED ACCESSORIES 1 PREPARATION 2 BATTERY PACK PRECAUTIONS 2 INSTALLING/ REMOVING THE (OPTIONAL) BATTERY PACK 7 INSTALLING/ REMOVING ALKALINE BATTERIES 8 INSTALLING THE (OPTIONAL) ANTENNA 9 INSTALLING THE BELT CLIP 9 INSTALLING THE CAP OVER THE SPEAKER/ MICROPHONE JACKS 10 INSTALLING THE (OPTIONAL) SPEAKER/ MICROPHONE 10 GETTING ACQUAINTED 11 DISPLAY 13 PROGRAMMABLE FUNCTIONS 15 OPERATING BASICS 16 OVERVIEW 16 SWITCHING POWER ON/ OFF 16 ADJUSTING THE VOLUME 17 SELECTING A ZONE AND CHANNEL/ GROUP ID 17 TRUNKING ZONES (TK-3173 ONLY 18...

Instruction Manual
Page 10
... MULTI FREQUENCY) CALLS 31 MANUAL DIALING (KEYPAD MODELS ONLY 31 STORE AND SEND 32 AUTODIAL 32 REDIAL (KEYPAD MODELS ONLY 34 CONNECT/ DISCONNECT IDS (KEYPAD MODELS ONLY 35 DTMF SIGNALING 35 STUN 35 EMERGENCY CALLS 36 ADVANCED OPERATIONS 37 SELECTING A TRANSMIT POWER 37 TALK AROUND 37 MONITOR/ SQUELCH OFF 38 SCRAMBLER 39 KEY LOCK 39 TRANSCEIVER BACKLIGHT 40 BACKGROUND OPERATIONS 41 TIME-OUT TIMER (TOT...
... MULTI FREQUENCY) CALLS 31 MANUAL DIALING (KEYPAD MODELS ONLY 31 STORE AND SEND 32 AUTODIAL 32 REDIAL (KEYPAD MODELS ONLY 34 CONNECT/ DISCONNECT IDS (KEYPAD MODELS ONLY 35 DTMF SIGNALING 35 STUN 35 EMERGENCY CALLS 36 ADVANCED OPERATIONS 37 SELECTING A TRANSMIT POWER 37 TALK AROUND 37 MONITOR/ SQUELCH OFF 38 SCRAMBLER 39 KEY LOCK 39 TRANSCEIVER BACKLIGHT 40 BACKGROUND OPERATIONS 41 TIME-OUT TIMER (TOT...

Instruction Manual
Page 17
... the release latch clicks, locking it in place. 2 Lock the safety catch into place to the transceiver, ensure that the safety catch is firmly closed. ◆ While operating the transceiver using a Li-ion or Ni-MH battery pack in areas with an ambient temperature of -10°C/ +14°F and lower, operating time may be shortened. 7 Note...
... the release latch clicks, locking it in place. 2 Lock the safety catch into place to the transceiver, ensure that the safety catch is firmly closed. ◆ While operating the transceiver using a Li-ion or Ni-MH battery pack in areas with an ambient temperature of -10°C/ +14°F and lower, operating time may be shortened. 7 Note...

Instruction Manual
Page 18
..., press on the two tabs on the upper rear of approximately 1 W (the low power setting on the cover until it locks in fire; Note: ◆ If you want to transmit a stronger signal (using the high power setting on your transceiver). INSTALLING/ REMOVING ALKALINE BATTERIES ◆ Do not install batteries in a hazardous environment where sparks could cause an explosion. ◆ Never discard...
..., press on the two tabs on the upper rear of approximately 1 W (the low power setting on the cover until it locks in fire; Note: ◆ If you want to transmit a stronger signal (using the high power setting on your transceiver). INSTALLING/ REMOVING ALKALINE BATTERIES ◆ Do not install batteries in a hazardous environment where sparks could cause an explosion. ◆ Never discard...
Instruction Manual
Page 23
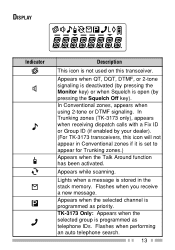
Appears while scanning. Flashes when you receive a new message. Appears when the selected channel is set to appear for Trunking zones.) Appears when the Talk Around function has been activated. Flashes when performing an auto telephone search. 13 In Conventional zones, appears when using 2-tone or DTMF signaling. In Trunking zones (TK-3173 only), appears when receiving dispatch calls with a Fix ID or Group ID...
Appears while scanning. Flashes when you receive a new message. Appears when the selected channel is set to appear for Trunking zones.) Appears when the Talk Around function has been activated. Flashes when performing an auto telephone search. 13 In Conventional zones, appears when using 2-tone or DTMF signaling. In Trunking zones (TK-3173 only), appears when receiving dispatch calls with a Fix ID or Group ID...
Instruction Manual
Page 25
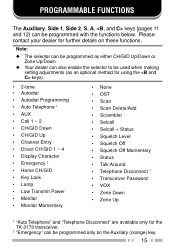
... selector can be programmed as an optional method for using the keys). • 2-tone • Autodial • Autodial Programming • Auto Telephone 1 • AUX • Call 1 ~ 2 • CH/GID Down • CH/GID Up • Channel Entry • Direct CH/GID 1 ~ 4 • Display Character • Emergency 2 • Home CH/GID • Key Lock • Lamp • Low Transmit Power • Monitor...
... selector can be programmed as an optional method for using the keys). • 2-tone • Autodial • Autodial Programming • Auto Telephone 1 • AUX • Call 1 ~ 2 • CH/GID Down • CH/GID Up • Channel Entry • Direct CH/GID 1 ~ 4 • Display Character • Emergency 2 • Home CH/GID • Key Lock • Lamp • Low Transmit Power • Monitor...
Instruction Manual
Page 26
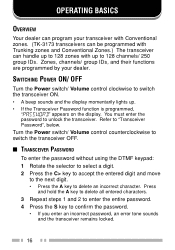
... channels/ 250 group IDs. You must enter the password to delete an incorrect character. OPERATING BASICS OVERVIEW Your dealer can program your dealer. Turn the Power switch/ Volume control counterclockwise to switch the transceiver OFF. ■ TRANSCEIVER PASSWORD To enter the password without using the DTMF keypad: 1 Rotate the selector to select a digit. 2 Press the C> key to accept the entered digit and move to the next digit...
... channels/ 250 group IDs. You must enter the password to delete an incorrect character. OPERATING BASICS OVERVIEW Your dealer can program your dealer. Turn the Power switch/ Volume control counterclockwise to switch the transceiver OFF. ■ TRANSCEIVER PASSWORD To enter the password without using the DTMF keypad: 1 Rotate the selector to select a digit. 2 Press the C> key to accept the entered digit and move to the next digit...

Instruction Manual
Page 27
... character. To enter the password using the selector or the keys programmed as CH/GID Up/ CH/GID Down. ADJUSTING THE VOLUME Rotate the Power switch/ Volume control to fit in the 8-digit display. SELECTING A ZONE AND CHANNEL/ GROUP ID Select the desired zone using the DTMF keypad (keypad models only): 1 Press the DTMF keys corresponding to the password. • Press the A or # key to 8 characters each. Press...
... character. To enter the password using the selector or the keys programmed as CH/GID Up/ CH/GID Down. ADJUSTING THE VOLUME Rotate the Power switch/ Volume control to fit in the 8-digit display. SELECTING A ZONE AND CHANNEL/ GROUP ID Select the desired zone using the DTMF keypad (keypad models only): 1 Press the DTMF keys corresponding to the password. • Press the A or # key to 8 characters each. Press...

Instruction Manual
Page 31
.... ■ RECEIVING When you receive a signal containing the correct tones, squelch opens and you will hear the call. • The indicator appears on the display. (This indicator will not appear on TK-3173 transceivers if it has been set to store Trunking zone data.) • The LED indicator flashes orange. • To mute the speaker after squelch opens, press the key programmed as 2-tone...
.... ■ RECEIVING When you receive a signal containing the correct tones, squelch opens and you will hear the call. • The indicator appears on the display. (This indicator will not appear on TK-3173 transceivers if it has been set to store Trunking zone data.) • The LED indicator flashes orange. • To mute the speaker after squelch opens, press the key programmed as 2-tone...

Instruction Manual
Page 32
.../decode pair. 3 Press the Side 1, S, or key to accept the new setting and return to normal operation. To turn OST ON or OFF, press the key programmed as OST. • The OST indicator ( this function is noise in the background. This feature can program up your dealer. If it is not connected to transmit hands-free. When operating VOX, you to the accessory...
.../decode pair. 3 Press the Side 1, S, or key to accept the new setting and return to normal operation. To turn OST ON or OFF, press the key programmed as OST. • The OST indicator ( this function is noise in the background. This feature can program up your dealer. If it is not connected to transmit hands-free. When operating VOX, you to the accessory...

Instruction Manual
Page 33
...; When the microphone recognizes a sound, the LED lights orange. This allows you to determine a suitable level where background noise will not activate VOX operation while speaking into the headset microphone as VOX for 2 seconds. • The VOX indicator ( ) appears on the display. 3 To turn the VOX function OFF, press and hold the key programmed as you must use an optional KHS...
...; When the microphone recognizes a sound, the LED lights orange. This allows you to determine a suitable level where background noise will not activate VOX operation while speaking into the headset microphone as VOX for 2 seconds. • The VOX indicator ( ) appears on the display. 3 To turn the VOX function OFF, press and hold the key programmed as you must use an optional KHS...
Instruction Manual
Page 34
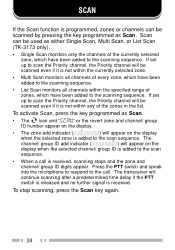
... specified range of zones, which have been added to the scanning sequence. To activate Scan, press the key programmed as either Single Scan, Multi Scan, or List Scan (TK-3173 only). • Single Scan monitors only the channels of the zones in the list. To stop scanning, press the Scan key again. 24 Press the PTT switch and speak into the microphone to respond to the scan sequence. SCAN If the Scan...
... specified range of zones, which have been added to the scanning sequence. To activate Scan, press the key programmed as either Single Scan, Multi Scan, or List Scan (TK-3173 only). • Single Scan monitors only the channels of the zones in the list. To stop scanning, press the Scan key again. 24 Press the PTT switch and speak into the microphone to respond to the scan sequence. SCAN If the Scan...

Instruction Manual
Page 38
...digit Fleet number and a 4-digit ID number. The icon lights when a message is stored in the stack memory. ■ TRANSMITTING 1 Select your dealer settings, when the stack memory is full, either the oldest message will be erased when a new message is a combination of 5 received Status calls can be limited by programming...5. 28 Depending on your desired zone and channel/ group ID. 2 Press the key programmed as Status to enter Status Mode or Selcall + Status to enter Selcall Mode. • When using the Status key to make an individual call ). Status messages range from 10 to 99 (80 ~ 99...
...digit Fleet number and a 4-digit ID number. The icon lights when a message is stored in the stack memory. ■ TRANSMITTING 1 Select your dealer settings, when the stack memory is full, either the oldest message will be erased when a new message is a combination of 5 received Status calls can be limited by programming...5. 28 Depending on your desired zone and channel/ group ID. 2 Press the key programmed as Status to enter Status Mode or Selcall + Status to enter Selcall Mode. • When using the Status key to make an individual call ). Status messages range from 10 to 99 (80 ~ 99...
Instruction Manual
Page 45
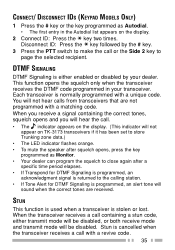
... the key programmed as Autodial. • The first entry in your dealer. DTMF SIGNALING DTMF Signaling is stolen or lost. This function opens the squelch only when the transceiver receives the DTMF code programmed in the Autodial list appears on TK-3173 transceivers if it has been set to store Trunking zone data.) • The LED indicator flashes orange. • To mute the speaker after a specific time...
... the key programmed as Autodial. • The first entry in your dealer. DTMF SIGNALING DTMF Signaling is stolen or lost. This function opens the squelch only when the transceiver receives the DTMF code programmed in the Autodial list appears on TK-3173 transceivers if it has been set to store Trunking zone data.) • The LED indicator flashes orange. • To mute the speaker after a specific time...

Instruction Manual
Page 47
... service (due to sound. Talk Around allows you may occasionally experience an interruption in the way, you to communicate directly with low power causes an error tone to a power failure, etc.). ADVANCED OPERATIONS SELECTING A TRANSMIT POWER Each channel is programmed with high transmit power. Each time you press Low Transmit Power, the transmit power toggles between high and low. • The icon appears while using a channel programmed...
... service (due to sound. Talk Around allows you may occasionally experience an interruption in the way, you to communicate directly with low power causes an error tone to a power failure, etc.). ADVANCED OPERATIONS SELECTING A TRANSMIT POWER Each channel is programmed with high transmit power. Each time you press Low Transmit Power, the transmit power toggles between high and low. • The icon appears while using a channel programmed...

Instruction Manual
Page 51
... the channel is performed, Battery Saver turns OFF. 41 BUSY CHANNEL LOCKOUT (BCL) When activated, BCL prevents you from using a channel for an extended period of power used when a signal is not being received and no operations are being performed (no keys are being pressed, and no operation is performed for an explanation on how BCL functions when using the same channel that exceeds the programmed time set...
... the channel is performed, Battery Saver turns OFF. 41 BUSY CHANNEL LOCKOUT (BCL) When activated, BCL prevents you from using a channel for an extended period of power used when a signal is not being received and no operations are being performed (no keys are being pressed, and no operation is performed for an explanation on how BCL functions when using the same channel that exceeds the programmed time set...


