
User Manual
Page 2
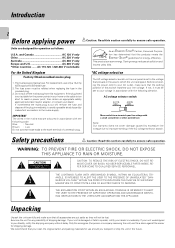
... your AC outlet, make sure that all accessories are designed for any possibility of the AC voltage selector switch. Before connecting the power cord to improper setting of shipping damage. THE LIGHTNING FLASH WITH ARROWHEAD SYMBOL, WITHIN AN EQUILATERAL TRIANGLE, IS INTENDED TO ALERT THE USER TO THE PRESENCE OF UNINSULATED "DANGEROUS VOL-TAGE" WITHIN THE PRODUCT'S ENCLOSURE THAT...
... your AC outlet, make sure that all accessories are designed for any possibility of the AC voltage selector switch. Before connecting the power cord to improper setting of shipping damage. THE LIGHTNING FLASH WITH ARROWHEAD SYMBOL, WITHIN AN EQUILATERAL TRIANGLE, IS INTENDED TO ALERT THE USER TO THE PRESENCE OF UNINSULATED "DANGEROUS VOL-TAGE" WITHIN THE PRODUCT'S ENCLOSURE THAT...
User Manual
Page 3
... difficulty 19 Specifications 20 Audio cord 2) System control cord ... (1) AC plug adaptor 1) (Except for Europe and Australia) For the unit with the power left ON, and restart the operation after the condensation has dried up. Introduction 2 Before applying power 2 Safety precautions 2 Special features 3 Accessories 3 IMPORTANT SAFEGUARDS 4 System connections 6 Controls and indicators (CT-401/KXF-W1030 8 Controls and indicators (CT-403/KXF-W3030 9 Listening to cassette tapes 10 Preparation...
... difficulty 19 Specifications 20 Audio cord 2) System control cord ... (1) AC plug adaptor 1) (Except for Europe and Australia) For the unit with the power left ON, and restart the operation after the condensation has dried up. Introduction 2 Before applying power 2 Safety precautions 2 Special features 3 Accessories 3 IMPORTANT SAFEGUARDS 4 System connections 6 Controls and indicators (CT-401/KXF-W1030 8 Controls and indicators (CT-403/KXF-W3030 9 Listening to cassette tapes 10 Preparation...
User Manual
Page 4
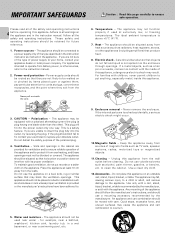
... from heat sources such as TV sets, speaker systems, radios, motorized toys or magnetized objects. 11.Cleaning - The appliance may be walked on the appliance. Electric shock - Care should be situated away from the walls. If the internal parts are unable to replace your electrician to insert the plug fully into the enclosure through openings. to ensure safe operation. The...
... from heat sources such as TV sets, speaker systems, radios, motorized toys or magnetized objects. 11.Cleaning - The appliance may be walked on the appliance. Electric shock - Care should be situated away from the walls. If the internal parts are unable to replace your electrician to insert the plug fully into the enclosure through openings. to ensure safe operation. The...
User Manual
Page 5
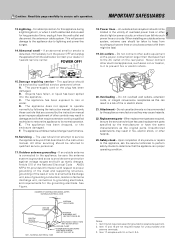
... with antenna terminals. 3. Replacement parts - Contact your dealer or nearest service center. Upon completion of overhead power lines or other hazards. 23. Item 17 complies with respect to proper grounding of the mast and supporting structure, grounding of time, unplug it is grounded so as they may result in the instruction manual. The power-supply cord or the plug has been damaged. Adjust only those controls...
... with antenna terminals. 3. Replacement parts - Contact your dealer or nearest service center. Upon completion of overhead power lines or other hazards. 23. Item 17 complies with respect to proper grounding of the mast and supporting structure, grounding of time, unplug it is grounded so as they may result in the instruction manual. The power-supply cord or the plug has been damaged. Adjust only those controls...
User Manual
Page 6
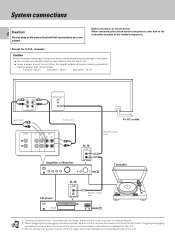
... at rear of the power cord can cause malfunctions or damage to adhere followings. Plugging/unplugging connection cords without removal of the unit. Do not connect up a power source which is larger than , shown below . Top panel : 50 cm Side panel : 10 cm Back panel : 10 cm REC LL PLAY RR LINE IN LINE OUT Audio cord SYSTEM CONTROL Audio cord PHONO L R CD TUNER TAPE REC PLAY SL-16 SYSTEM CONTROL Amplifier or Receiver To AC outlet System control cord Turntable CD player...
... at rear of the power cord can cause malfunctions or damage to adhere followings. Plugging/unplugging connection cords without removal of the unit. Do not connect up a power source which is larger than , shown below . Top panel : 50 cm Side panel : 10 cm Back panel : 10 cm REC LL PLAY RR LINE IN LINE OUT Audio cord SYSTEM CONTROL Audio cord PHONO L R CD TUNER TAPE REC PLAY SL-16 SYSTEM CONTROL Amplifier or Receiver To AC outlet System control cord Turntable CD player...
User Manual
Page 7
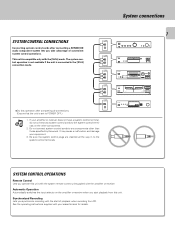
...) - -5 0 +3 +6 (dB) TAPE B SYSTEM CONTROL OPERATIONS Remote Control Lets you operate this unit with the system remote control unit supplied with the start playback from this operation after connecting a KENWOOD audio component system lets you start of convenient system control operations. Be sure the system control plugs are inserted all connections. (Ensure that the unit is connected in to POWER OFF.) Notes 1. System connections SYSTEM CONTROL CONNECTIONS SYSTEM CONTROL Connecting system control cords after completing all the way in the [XS-8] connection mode.
...) - -5 0 +3 +6 (dB) TAPE B SYSTEM CONTROL OPERATIONS Remote Control Lets you operate this unit with the system remote control unit supplied with the start playback from this operation after connecting a KENWOOD audio component system lets you start of convenient system control operations. Be sure the system control plugs are inserted all connections. (Ensure that the unit is connected in to POWER OFF.) Notes 1. System connections SYSTEM CONTROL CONNECTIONS SYSTEM CONTROL Connecting system control cords after completing all the way in the [XS-8] connection mode.
User Manual
Page 8
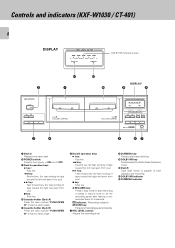
... recording. ! Controls and indicators (KXF-W1030 / CT-401) 8 DISPLAY PEAK LEVEL METER (dB) -5 0 DOLBY NR +3 +6 (dB) DUBBING DOLBY NR reference level ! 2 1 POWER - ON - ON and - indicator : (Recording indicator) 8PAUSE key: Press to let recording pause temporarily. 7 REC LEVEL control: Adjusts the recording level. 8 DUBBING key: Press to start recording or press in stop mode to start tape dubbing. 9 DOLBY NR key: Press to turn power - DOLBY NR...
... recording. ! Controls and indicators (KXF-W1030 / CT-401) 8 DISPLAY PEAK LEVEL METER (dB) -5 0 DOLBY NR +3 +6 (dB) DUBBING DOLBY NR reference level ! 2 1 POWER - ON - ON and - indicator : (Recording indicator) 8PAUSE key: Press to let recording pause temporarily. 7 REC LEVEL control: Adjusts the recording level. 8 DUBBING key: Press to start recording or press in stop mode to start tape dubbing. 9 DOLBY NR key: Press to turn power - DOLBY NR...
User Manual
Page 9
... indicator $ DUBBING indicator ON - OFF 1¡ @ 7 # PUSH/OPEN 0 TAPE A AUTO REVERSE 3 4 PUSH/OPEN 0 TAPE B AUTO REVERSE PEAK LEVEL METER (dB) Op -5 0 +3 +6 (dB) ∏ DOLBY NR DUBBING REV.MODE DOLBY NR DUBBING 1 ¡ 8PAUSE ¶REC/ARM @ 7 # REC LEVEL DPSS MIN MAX 5 67 8 1 Deck A Playback-only tape deck. 2 POWER switch: Press to select the REVERS mode. ! Deck B This deck is capable of 4 seconds. indicator...
... indicator $ DUBBING indicator ON - OFF 1¡ @ 7 # PUSH/OPEN 0 TAPE A AUTO REVERSE 3 4 PUSH/OPEN 0 TAPE B AUTO REVERSE PEAK LEVEL METER (dB) Op -5 0 +3 +6 (dB) ∏ DOLBY NR DUBBING REV.MODE DOLBY NR DUBBING 1 ¡ 8PAUSE ¶REC/ARM @ 7 # REC LEVEL DPSS MIN MAX 5 67 8 1 Deck A Playback-only tape deck. 2 POWER switch: Press to select the REVERS mode. ! Deck B This deck is capable of 4 seconds. indicator...
User Manual
Page 10
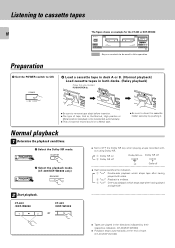
... the Dolby NR key when playing a tape recorded without using Dolby NR. 1 Dolby NR on 2 Dolby NR off Dolby NR on a Metal tape. OFF 2 Load a cassette tape in deck A or B. (Normal playback) Load cassette tapes in this operation Preparation 1 Set the POWER switch to remove tape slack before insertion. ÷ The type of tape. (CT-401/KXF-W1030) Normal playback 1 Determine the playback conditions. 1 Select the Dolby NR mode. (dB) - -5 0 +3 +6 (dB) DOLBY NR...
... the Dolby NR key when playing a tape recorded without using Dolby NR. 1 Dolby NR on 2 Dolby NR off Dolby NR on a Metal tape. OFF 2 Load a cassette tape in deck A or B. (Normal playback) Load cassette tapes in this operation Preparation 1 Set the POWER switch to remove tape slack before insertion. ÷ The type of tape. (CT-401/KXF-W1030) Normal playback 1 Determine the playback conditions. 1 Select the Dolby NR mode. (dB) - -5 0 +3 +6 (dB) DOLBY NR...
User Manual
Page 11
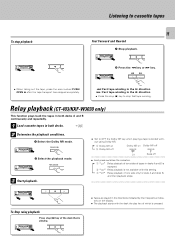
... respective indicators on Dolby NR off DOLBY NR DOLBY NR Lit Goes off ÷ Each press switches the indication. 1 "[" :Relay playback of two sides of tapes in the \ direction ÷ Press the stop (7) key to OFF the Dolby NR key when playing a tape recorded without using Dolby NR. 1 Dolby NR on 2 Dolby NR off Dolby NR on the display. ÷ The playback starts with the deck...
... respective indicators on Dolby NR off DOLBY NR DOLBY NR Lit Goes off ÷ Each press switches the indication. 1 "[" :Relay playback of two sides of tapes in the \ direction ÷ Press the stop (7) key to OFF the Dolby NR key when playing a tape recorded without using Dolby NR. 1 Dolby NR on 2 Dolby NR off Dolby NR on the display. ÷ The playback starts with the deck...
User Manual
Page 12
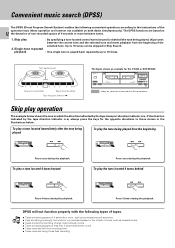
... 5 times during the playback. Convenient music search (DPSS) The DPSS (Direct Program Search System) enables the following types of less than 4 seconds between the current tune and the selected tune and starts playback from the beginning (dB) - -5 0 +3 +6 (dB) 1¡ (dB) - -5 0 +3 +6 (dB) 1¡ Press once during the playback. Skip play operation The example below . Tape transport direction \. To play a tune located immediately after the tune being played...
... 5 times during the playback. Convenient music search (DPSS) The DPSS (Direct Program Search System) enables the following types of less than 4 seconds between the current tune and the selected tune and starts playback from the beginning (dB) - -5 0 +3 +6 (dB) 1¡ (dB) - -5 0 +3 +6 (dB) 1¡ Press once during the playback. Skip play operation The example below . Tape transport direction \. To play a tune located immediately after the tune being played...
User Manual
Page 13
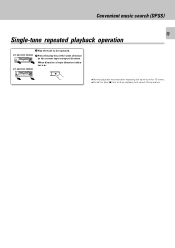
When direction of the same direction (dB) - -5 0 +3 +6 (dB) as the current tape transport direction. Convenient music search (DPSS) 13 Single-tune repeated playback operation 1 Play the tune to stop (7) key to be repeated. (CT-401/KXF-W1030) 2 Press the play key of tape direction indicator is 3: (CT-403/KXF-W3030) (dB) - -5 0 +3 +6 (dB) 3 ÷ Normal playback resumes after repeating the same tune for 16 times. ÷ Press the stop playback and cancel this operation.
When direction of the same direction (dB) - -5 0 +3 +6 (dB) as the current tape transport direction. Convenient music search (DPSS) 13 Single-tune repeated playback operation 1 Play the tune to stop (7) key to be repeated. (CT-401/KXF-W1030) 2 Press the play key of tape direction indicator is 3: (CT-403/KXF-W3030) (dB) - -5 0 +3 +6 (dB) 3 ÷ Normal playback resumes after repeating the same tune for 16 times. ÷ Press the stop playback and cancel this operation.
User Manual
Page 14
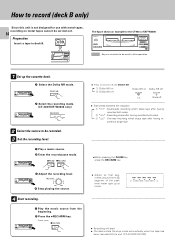
... or KXF-W3030 POWER PUSH/OPEN 0 PUSH/OPEN 0 (dB) - -5 0 +3 +6 (dB) 1¡ @ 7 # TAPE A AUTO REVERSE TAPE B AUTO REVERSE 1 ¡ 8PAUSE ¶REC/ARM @ 7 # : Keys or controls to record (deck B only) Since this operation 1Set up at times. (dB) -5 0 +3 +6 (dB) ÷ Recording will start. ÷ The deck enters the stop mode automatically when the tape has been recorded till the end. (CT-401/KXF-W1030) How to be used...
... or KXF-W3030 POWER PUSH/OPEN 0 PUSH/OPEN 0 (dB) - -5 0 +3 +6 (dB) 1¡ @ 7 # TAPE A AUTO REVERSE TAPE B AUTO REVERSE 1 ¡ 8PAUSE ¶REC/ARM @ 7 # : Keys or controls to record (deck B only) Since this operation 1Set up at times. (dB) -5 0 +3 +6 (dB) ÷ Recording will start. ÷ The deck enters the stop mode automatically when the tape has been recorded till the end. (CT-401/KXF-W1030) How to be used...
User Manual
Page 15
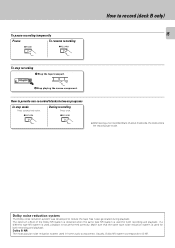
... the record-pause mode. Make sure that the same type noise reduction system is used for both recording and playback. Dolby B NR The most popular noise reduction system used , playback is used in home audio components. Dolby noise reduction system The Dolby noise reduction system was developed to provide non-recorded blanks between programs In stop recording 1 Stop the tape transport. (dB) - -5 0 +3 +6 (dB) 7 2 Stop playing the source component. If a different...
... the record-pause mode. Make sure that the same type noise reduction system is used for both recording and playback. Dolby B NR The most popular noise reduction system used , playback is used in home audio components. Dolby noise reduction system The Dolby noise reduction system was developed to provide non-recorded blanks between programs In stop recording 1 Stop the tape transport. (dB) - -5 0 +3 +6 (dB) 7 2 Stop playing the source component. If a different...
User Manual
Page 16
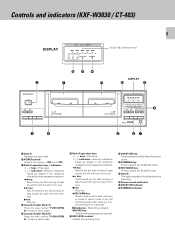
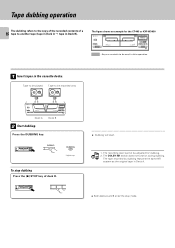
... operation The dubbing refers to the copy of the recorded contents of deck B. (dB) - -5 0 +3 +6 (dB) 7 ÷ Dubbing will start. Tape to be played A Tape to another tape (tape in Deck A = tape in Deck B). The recording level cannot be adjusted for the CT-403 or KXF-W3030 POWER PUSH/OPEN 0 PUSH/OPEN 0 (dB) - -5 0 +3 +6 (dB) 1¡ @ 7 # TAPE A AUTO REVERSE TAPE B AUTO REVERSE 1 ¡ 8PAUSE ¶REC/ARM @ 7 # : Keys or controls...
... operation The dubbing refers to the copy of the recorded contents of deck B. (dB) - -5 0 +3 +6 (dB) 7 ÷ Dubbing will start. Tape to be played A Tape to another tape (tape in Deck A = tape in Deck B). The recording level cannot be adjusted for the CT-403 or KXF-W3030 POWER PUSH/OPEN 0 PUSH/OPEN 0 (dB) - -5 0 +3 +6 (dB) 1¡ @ 7 # TAPE A AUTO REVERSE TAPE B AUTO REVERSE 1 ¡ 8PAUSE ¶REC/ARM @ 7 # : Keys or controls...
User Manual
Page 17
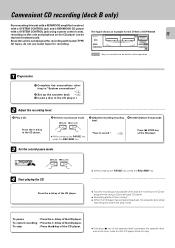
... with a SYSTEM CONTROL jack using a Carrousel type CD player. ÷ Recording starts at this moment. ÷ When the CD player has completed playback, the cassette deck stops recording and enters the stop mode. Press the 6 key of more than one CD are programmed using system control cords, recording on this operation 1 Preparation 1 Complete the connections referring to "System connections". 6 2 Set up the cassette deck $ 3 (Load a disc in the CD player.) 2 Adjust the recording level. 1 Play a CD. 2 Set the...
... with a SYSTEM CONTROL jack using a Carrousel type CD player. ÷ Recording starts at this moment. ÷ When the CD player has completed playback, the cassette deck stops recording and enters the stop mode. Press the 6 key of more than one CD are programmed using system control cords, recording on this operation 1 Preparation 1 Complete the connections referring to "System connections". 6 2 Set up the cassette deck $ 3 (Load a disc in the CD player.) 2 Adjust the recording level. 1 Play a CD. 2 Set the...
User Manual
Page 18
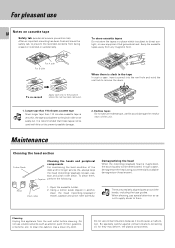
...Open the cassette holder. 2. Be specially careful against contact cleaners containing oil, for longer service life, always keep the head (recording / playback / erase), capstan and pinch roller clean. To re-record Apply tape...removed. 1. Note There are precisely aligned parts around the heads, including the tape guides. For pleasant use 18 Notes on accidentally. Cleaning Unplug this could damage the mechanism of the deck and for they may deform the plastic components. Keep the cassette tapes...peripheral components For maintaining the best condition of the unit. Use ...
...Open the cassette holder. 2. Be specially careful against contact cleaners containing oil, for longer service life, always keep the head (recording / playback / erase), capstan and pinch roller clean. To re-record Apply tape...removed. 1. Note There are precisely aligned parts around the heads, including the tape guides. For pleasant use 18 Notes on accidentally. Cleaning Unplug this could damage the mechanism of the deck and for they may deform the plastic components. Keep the cassette tapes...peripheral components For maintaining the best condition of the unit. Use ...
User Manual
Page 19
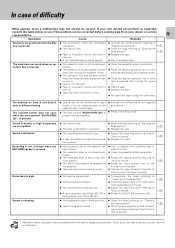
... holder. ¶ The operation key was pressed within less than 4 seconds after the power was too low. ¶ A tape recorded with Dolby NR ON is being played. ¶ Connect the cords properly referring to "System connections". 6 ¶ Clean the head referring to "Cleaning the head section". * ¶ Replace the tape. ¶ Play a recorded tape. The dubbing on . ¶ Insert a tape. ¶ Replace the tape. ¶ Re...
... holder. ¶ The operation key was pressed within less than 4 seconds after the power was too low. ¶ A tape recorded with Dolby NR ON is being played. ¶ Connect the cords properly referring to "System connections". 6 ¶ Clean the head referring to "Cleaning the head section". * ¶ Replace the tape. ¶ Play a recorded tape. The dubbing on . ¶ Insert a tape. ¶ Replace the tape. ¶ Re...
User Manual
Page 20
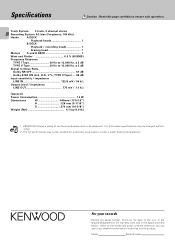
... service on the warranty card, and in development. Refer to the model and serial numbers whenever you call upon your records Record the serial number, found on the back of continuous advancements in the space provided below. Specifications Caution : Read this page carefully to Noise Ratio Dolby NR OFF 57 dB Dolby B NR ON (3rd, H.D., 3 %, TYPE II Tape) .... 66 dB Input...
... service on the warranty card, and in development. Refer to the model and serial numbers whenever you call upon your records Record the serial number, found on the back of continuous advancements in the space provided below. Specifications Caution : Read this page carefully to Noise Ratio Dolby NR OFF 57 dB Dolby B NR ON (3rd, H.D., 3 %, TYPE II Tape) .... 66 dB Input...


