
User Manual
Page 2
... KVT-729DVD Basic Operations 12 iPod Control 38 Connecting an iPod 38 Functions when Displaying the Easy Control Panel 38 Functions while Displaying the Control Screen 39 iPod List 40 USB Device Control 41 Functions when Displaying the Easy Control Panel 41 Functions while Displaying the Control Screen 41 USB List 42 Folder Select 43 TV Watching 44 Functions During TV Screen 44 Functions When Displaying the Easy Control Panel 44 Functions While Displaying the Control Screen 45 Seek Mode 45 Auto Memory 46 Manual Memory 46 Preset Select 47 Set Station...
... KVT-729DVD Basic Operations 12 iPod Control 38 Connecting an iPod 38 Functions when Displaying the Easy Control Panel 38 Functions while Displaying the Control Screen 39 iPod List 40 USB Device Control 41 Functions when Displaying the Easy Control Panel 41 Functions while Displaying the Control Screen 41 USB List 42 Folder Select 43 TV Watching 44 Functions During TV Screen 44 Functions When Displaying the Easy Control Panel 44 Functions While Displaying the Control Screen 45 Seek Mode 45 Auto Memory 46 Manual Memory 46 Preset Select 47 Set Station...
User Manual
Page 3
... Background Select Touch panel Adjustment Clock Setup Monitor Setup Security Code Setup TV Setup RDS Setup DAB Setup Announcement Select AMP Control Setup Memory DVD Language Codes Specifications 66 Audio Control 86 66 Audio Control menu 86 66 Audio Control 86 67 Equalizer Control 87 67 Tone setup 88 68 Zone Control 88 69 70 70 70 71 72 Remote Controller 90 73 Battery installation 90 75 Remote Controller mode switch 90 75 Common operations (AUD mode) 91 76 DVD/VCD/CD/Audio files (DVD mode) 92 76 TV (TV mode) 93 77 Radio (AUD mode) 94...
... Background Select Touch panel Adjustment Clock Setup Monitor Setup Security Code Setup TV Setup RDS Setup DAB Setup Announcement Select AMP Control Setup Memory DVD Language Codes Specifications 66 Audio Control 86 66 Audio Control menu 86 66 Audio Control 86 67 Equalizer Control 87 67 Tone setup 88 68 Zone Control 88 69 70 70 70 71 72 Remote Controller 90 73 Battery installation 90 75 Remote Controller mode switch 90 75 Common operations (AUD mode) 91 76 DVD/VCD/CD/Audio files (DVD mode) 92 76 TV (TV mode) 93 77 Radio (AUD mode) 94...
User Manual
Page 6
... use the wrong screws, you are driving for any Kenwood disc changers/ CD players released in damage. In such a situation, remove the disc and wait for the applicable Kenwood disc changers/ CD players. If you use your Kenwood dealer. 6 KVT-729DVD If the unit still does not operate normally after a while, consult your own screws. Set the "O-N" Switch to the "N" position for the condensation to this unit may form on the car...
... use the wrong screws, you are driving for any Kenwood disc changers/ CD players released in damage. In such a situation, remove the disc and wait for the applicable Kenwood disc changers/ CD players. If you use your Kenwood dealer. 6 KVT-729DVD If the unit still does not operate normally after a while, consult your own screws. Set the "O-N" Switch to the "N" position for the condensation to this unit may form on the car...

User Manual
Page 7
...). • Press the reset button if the disc auto changer fails to factory settings when the Reset button is pressed. • Remove the USB device before pressing the Reset button. Wiping the faceplate with a clean soft dry cloth. ¤ • Applying spray cleaner directly to the unit may affect its version is less than the above. Controllable iPod iPod nano iPod nano second generation iPod with the USB device installed can control an iPod from what appears...
...). • Press the reset button if the disc auto changer fails to factory settings when the Reset button is pressed. • Remove the USB device before pressing the Reset button. Wiping the faceplate with a clean soft dry cloth. ¤ • Applying spray cleaner directly to the unit may affect its version is less than the above. Controllable iPod iPod nano iPod nano second generation iPod with the USB device installed can control an iPod from what appears...

User Manual
Page 8
.../CD-RW recorder instruction manual.) List of the CD. • Do not stick tape etc. Registration Code changes each time a file with coloring on it. • Do not use disc type accessories. • Clean from this unit, pull them out horizontally. • If the CD center hole or outside rim has burrs, use the CD only after removing the burrs with...
.../CD-RW recorder instruction manual.) List of the CD. • Do not stick tape etc. Registration Code changes each time a file with coloring on it. • Do not use disc type accessories. • Clean from this unit, pull them out horizontally. • If the CD center hole or outside rim has burrs, use the CD only after removing the burrs with...

User Manual
Page 10
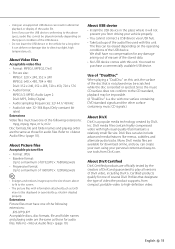
... • Playable disc file format ISO 9660 Level 1/2, Joliet, Romeo, Long file name. • The maximum number of characters for display (CD-R/RW/DVD±R/RW) File/Folder name: 128 characters MP3 ID3 Tag version 1.x: 30 characters • Limitation of structure for USB device connection, usage of the CA-U1EX (option) is longer than the USB compatible cable is played. • Playable...
... • Playable disc file format ISO 9660 Level 1/2, Joliet, Romeo, Long file name. • The maximum number of characters for display (CD-R/RW/DVD±R/RW) File/Folder name: 128 characters MP3 ID3 Tag version 1.x: 30 characters • Limitation of structure for USB device connection, usage of the CA-U1EX (option) is longer than the USB compatible cable is played. • Playable...
User Manual
Page 11
... USB device • Install the USB device in abnormal playback or display of the disc that designate the type of 1600(W) × 1200(H) pixels ⁄ • Enlarges and reduces images up to the size shown above specs, audio files cannot be impossible. (A "DualDisc" is inserted or ejected. Even if you from driving your personal content and easy-touse tools from compact portable video...
... USB device • Install the USB device in abnormal playback or display of the disc that designate the type of 1600(W) × 1200(H) pixels ⁄ • Enlarges and reduces images up to the size shown above specs, audio files cannot be impossible. (A "DualDisc" is inserted or ejected. Even if you from driving your personal content and easy-touse tools from compact portable video...

User Manual
Page 15
... media. • It is necessary to set "NAVIGATION Source" of (page 72) to "On" to add Navigation as a CD changer (optional accessory). (page 23) Outputs a sound signal input to a source that is changed. • Make sure that can also play audio files, video files, and picture files with the [SRC] button. Playing a USB device Music Disc Play When connecting a USB device, playback starts automatically. Refer to enter the USB suspend mode, and then remove the USB device.
... media. • It is necessary to set "NAVIGATION Source" of (page 72) to "On" to add Navigation as a CD changer (optional accessory). (page 23) Outputs a sound signal input to a source that is changed. • Make sure that can also play audio files, video files, and picture files with the [SRC] button. Playing a USB device Music Disc Play When connecting a USB device, playback starts automatically. Refer to enter the USB suspend mode, and then remove the USB device.
User Manual
Page 16
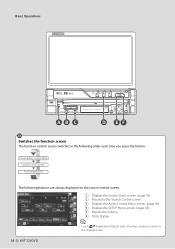
... function screen The function control screen switches in the following buttons are always displayed on the source control screen. 6 1 Displays the Source Select screen. (page 54) 1 2 Returns to the Source Control screen. 2 3 Displays the Audio Control Menu screen. (page 86) 4 Displays the SETUP Menu screen. (page 66) 3 5 Adjusts the Volume. 4 6 Clock display ⁄ 5 5 • Touch displayed at bottom right of various screens to return to the original screen. 16 KVT-729DVD Picture & Easy Control Panel Source Control Screen Picture Panel (OFF) The following order each time...
... function screen The function control screen switches in the following buttons are always displayed on the source control screen. 6 1 Displays the Source Select screen. (page 54) 1 2 Returns to the Source Control screen. 2 3 Displays the Audio Control Menu screen. (page 86) 4 Displays the SETUP Menu screen. (page 66) 3 5 Adjusts the Volume. 4 6 Clock display ⁄ 5 5 • Touch displayed at bottom right of various screens to return to the original screen. 16 KVT-729DVD Picture & Easy Control Panel Source Control Screen Picture Panel (OFF) The following order each time...
User Manual
Page 67
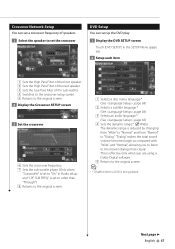
... "Dialog". DVD Setup You can set a crossover frequency of speakers. 1 Select the speaker to set the crossover 1 1 2 2 3 4 5 1 Sets the High Pass Filter of the front speaker. 2 Sets the High Pass Filter of the rear speaker. 3 Sets the Low Pass Filter of the sub woofer. 4 Switches to the crossover setup screen. 5 Returns to the original screen. 2 Display the Crossover SETUP screen 3 Set the crossover 6 7 8 6 Sets the cross over frequency. 7 Sets the sub woofer phase. (Only when "Subwoofer" is set to...
... "Dialog". DVD Setup You can set a crossover frequency of speakers. 1 Select the speaker to set the crossover 1 1 2 2 3 4 5 1 Sets the High Pass Filter of the front speaker. 2 Sets the High Pass Filter of the rear speaker. 3 Sets the Low Pass Filter of the sub woofer. 4 Switches to the crossover setup screen. 5 Returns to the original screen. 2 Display the Crossover SETUP screen 3 Set the crossover 6 7 8 6 Sets the cross over frequency. 7 Sets the sub woofer phase. (Only when "Subwoofer" is set to...
User Manual
Page 69
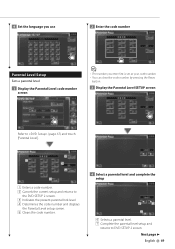
... code number Parental Level Setup Sets a parental level. 1 Display the Parental Level code number screen ⁄ • The number you enter first is set as your code number. • You can clear the code number by pressing the Reset button. 3 Display the Parental Level SETUP screen Refer to (page 67) and touch [Parental Level]. 2 1 3 4 5 1 Enters a code number. 2 Cancels the current setup and returns to the DVD SETUP 2 screen. 3 Indicates the present parental lock level. 4 Determines the code number and displays the Parental Level setup screen. 5 Clears the code number. 4 Select...
... code number Parental Level Setup Sets a parental level. 1 Display the Parental Level code number screen ⁄ • The number you enter first is set as your code number. • You can clear the code number by pressing the Reset button. 3 Display the Parental Level SETUP screen Refer to (page 67) and touch [Parental Level]. 2 1 3 4 5 1 Enters a code number. 2 Cancels the current setup and returns to the DVD SETUP 2 screen. 3 Indicates the present parental lock level. 4 Determines the code number and displays the Parental Level setup screen. 5 Clears the code number. 4 Select...
User Manual
Page 80
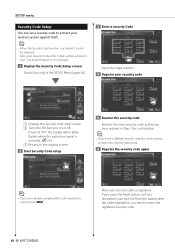
... flashes when the protection panel is activated it cannot be released. If you press the Reset button or if you disconnect your receiver from the battery after the code registration, you need to Step 3 (for confirmation. ⁄ • If you enter a different security code, the screen returns to enter the registered security code. 80 KVT-729DVD Now, your security code is the 4 digit number entered in your "Car Audio...
... flashes when the protection panel is activated it cannot be released. If you press the Reset button or if you disconnect your receiver from the battery after the code registration, you need to Step 3 (for confirmation. ⁄ • If you enter a different security code, the screen returns to enter the registered security code. 80 KVT-729DVD Now, your security code is the 4 digit number entered in your "Car Audio...
User Manual
Page 81
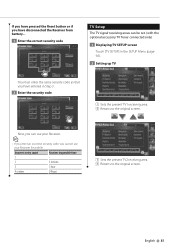
... battery... 1 Enter the correct security code TV Setup The TV signal receiving areas can use your Receiver. ⁄ • If you enter an incorrect security code, you have entered in Step 3. 2 Enter the security code 1 2 1 Sets the present TV1 receiving area. 2 Returns to the original screen. Now, you can be set. (with the optional accessory TV Tuner connected only) 1 Displaying TV SETUP screen Touch [TV SETUP] in the SETUP Menu...
... battery... 1 Enter the correct security code TV Setup The TV signal receiving areas can use your Receiver. ⁄ • If you enter an incorrect security code, you have entered in Step 3. 2 Enter the security code 1 2 1 Sets the present TV1 receiving area. 2 Returns to the original screen. Now, you can be set. (with the optional accessory TV Tuner connected only) 1 Displaying TV SETUP screen Touch [TV SETUP] in the SETUP Menu...
User Manual
Page 86
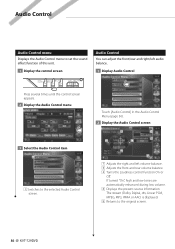
...volume. 4 Displays the present source information. Touch [Audio Control] in the Audio Control Menu (page 86). 2 Display the Audio Control screen 2 3 4 1 1 2 5 1 Adjusts the right and left audio balance. 1 Display Audio Control Press several times until the control screen appears. 2 Display the Audio Control menu 3 Select the Audio Control item 1 1 Switches to the original screen. 86 KVT-729DVD Audio Control Audio Control menu Displays the Audio Control menu to set the sound effect function of this unit. 1 Display the control screen Audio Control You can adjust the front/rear...
...volume. 4 Displays the present source information. Touch [Audio Control] in the Audio Control Menu (page 86). 2 Display the Audio Control screen 2 3 4 1 1 2 5 1 Adjusts the right and left audio balance. 1 Display Audio Control Press several times until the control screen appears. 2 Display the Audio Control menu 3 Select the Audio Control item 1 1 Switches to the original screen. 86 KVT-729DVD Audio Control Audio Control menu Displays the Audio Control menu to set the sound effect function of this unit. 1 Display the control screen Audio Control You can adjust the front/rear...
User Manual
Page 88
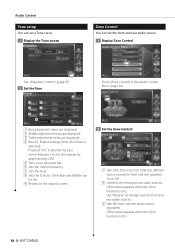
... set) 9 Returns to change over the front and rear audio sources. 3 Sets the front and rear audio source separately. (This button appears when the Zone function is On.) Use "Reverse" to the original screen. Touch [Zone Control] in the Audio Control Menu (page 86). 2 Set the Zone Control 1 2 3 3 4 5 1 Turns the Zone Function (that sets different source sounds for front and rear speakers) On or Off. 2 Switches the front and rear audio sources. (This button appears when the Zone function is On.) 88 KVT-729DVD...
... set) 9 Returns to change over the front and rear audio sources. 3 Sets the front and rear audio source separately. (This button appears when the Zone function is On.) Use "Reverse" to the original screen. Touch [Zone Control] in the Audio Control Menu (page 86). 2 Set the Zone Control 1 2 3 3 4 5 1 Turns the Zone Function (that sets different source sounds for front and rear speakers) On or Off. 2 Switches the front and rear audio sources. (This button appears when the Zone function is On.) 88 KVT-729DVD...
User Manual
Page 95
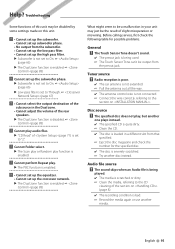
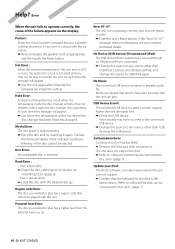
.... • Cannot adjust the volume of the section on (page 8). ✔ The recording condition is bad. ☞ Record the media again or use another disc instead. The Touch Sensor Tone doesn't sound. ✔ The preout jack is set up subwoofer phase. • No output from the preout jack. The specified disc does not play function is not connected. ☞ Connect the wire correctly, referring...
.... • Cannot adjust the volume of the section on (page 8). ✔ The recording condition is bad. ☞ Record the media again or use another disc instead. The Touch Sensor Tone doesn't sound. ✔ The preout jack is set up subwoofer phase. • No output from the preout jack. The specified disc does not play function is not connected. ☞ Connect the wire correctly, referring...
User Manual
Page 96
... connected USB device. ➡ Change the source to operate correctly, the cause of the failure appears on (page 8). • Disc is the latest version. Hold Error : Activation of this unit rises to 60°C or more, the protection circuit is selected as appropriate and then push the Reset button. Media was played that cannot be ejected. Contact the Kenwood dealer if this unit. Region code Error : The disc you wanted to play...
... connected USB device. ➡ Change the source to operate correctly, the cause of the failure appears on (page 8). • Disc is the latest version. Hold Error : Activation of this unit rises to 60°C or more, the protection circuit is selected as appropriate and then push the Reset button. Media was played that cannot be ejected. Contact the Kenwood dealer if this unit. Region code Error : The disc you wanted to play...

User Manual 1
Page 3
..., connect the ignition wire to the speaker connector in your Kenwood dealer. • Only use antenna conversion adapters (ISO-JASO) when the antenna cord has an ISO plug. • Make sure that the mounting angle is 30° or less. on and off with the ignition key. • If the fuse blows, first make sure to the wires via the fuse. ¤ • If the power is not turned...
..., connect the ignition wire to the speaker connector in your Kenwood dealer. • Only use antenna conversion adapters (ISO-JASO) when the antenna cord has an ISO plug. • Make sure that the mounting angle is 30° or less. on and off with the ignition key. • If the fuse blows, first make sure to the wires via the fuse. ¤ • If the power is not turned...

User Manual 1
Page 5
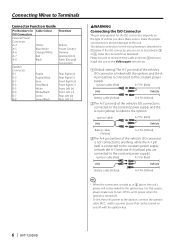
The cable (Accessory 3) is fixed with a chassis using harness band (Accessory !). CONT Wiring harness (Accessory 1) Ground wire (Black) - (To car chassis) A A Battery If you connect the ignition wire (red) and the battery wire (yellow) to the power source running through the fuse box. Always connect those wires to the car chassis (ground), you may cause a short circuit, that in turn may start a fire. CONT EXT. Receiver unit Accessory 3 Receiver unit Accessory ! FM/AM antenna input ILLUMI REVERSE REMO.CONT MUTE ANT CONT P. English | 5 +
The cable (Accessory 3) is fixed with a chassis using harness band (Accessory !). CONT Wiring harness (Accessory 1) Ground wire (Black) - (To car chassis) A A Battery If you connect the ignition wire (red) and the battery wire (yellow) to the power source running through the fuse box. Always connect those wires to the car chassis (ground), you may cause a short circuit, that in turn may start a fire. CONT EXT. Receiver unit Accessory 3 Receiver unit Accessory ! FM/AM antenna input ILLUMI REVERSE REMO.CONT MUTE ANT CONT P. English | 5 +
User Manual 1
Page 6
..., connect the ignition cable (ACC...red) to a power source that reason, always make the proper connections to prevent damage to the unit. If the ISO connector pins are connected to the ignition. Connecting Wires to Terminals Connector Function Guide Pin Numbers for ISO Connectors External Power Connector A-4 A-5 A-6 A-7 A-8 Cable Colour Yellow Blue/White Orange/White Red Black Speaker Connector B-1 B-2 B-3 B-4 B-5 B-6 B-7 B-8 Purple Purple/Black Gray Gray/Black White White/Black Green Green/Black Functions Battery Power Control Dimmer Ignition (ACC) Earth (Ground) Connection Rear...
..., connect the ignition cable (ACC...red) to a power source that reason, always make the proper connections to prevent damage to the unit. If the ISO connector pins are connected to the ignition. Connecting Wires to Terminals Connector Function Guide Pin Numbers for ISO Connectors External Power Connector A-4 A-5 A-6 A-7 A-8 Cable Colour Yellow Blue/White Orange/White Red Black Speaker Connector B-1 B-2 B-3 B-4 B-5 B-6 B-7 B-8 Purple Purple/Black Gray Gray/Black White White/Black Green Green/Black Functions Battery Power Control Dimmer Ignition (ACC) Earth (Ground) Connection Rear...


