
Installation Manual
Page 1
KVT-719DVD KVT-739DVD MONITOR WITH DVD RECEIVER INSTALLATION MANUAL MONITOR CON RECEPTOR DVD MANUAL DE INSTALACIÓN © B54-4513-00/00 (KV/RV)
KVT-719DVD KVT-739DVD MONITOR WITH DVD RECEIVER INSTALLATION MANUAL MONITOR CON RECEPTOR DVD MANUAL DE INSTALACIÓN © B54-4513-00/00 (KV/RV)
Installation Manual
Page 3
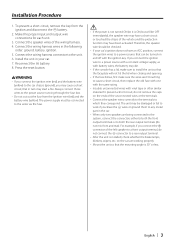
...- The unit may have been activated. Always connect those wires to work if you may cause a short circuit, that the mounting angle is installed, check whether the brake lamps, blinkers, wipers, etc. The power supply must be connected to the wires via the fuse. ¤ •...car are being connected to the system, connect the connectors either to both the rear output terminals (do not mix front and rear). English | 3 Install the unit in the following order: ground, battery, ignition. 5. Reconnect the - Press the reset button. 2WARNING • If you connect the ...
...- The unit may have been activated. Always connect those wires to work if you may cause a short circuit, that the mounting angle is installed, check whether the brake lamps, blinkers, wipers, etc. The power supply must be connected to the wires via the fuse. ¤ •...car are being connected to the system, connect the connectors either to both the rear output terminals (do not mix front and rear). English | 3 Install the unit in the following order: ground, battery, ignition. 5. Reconnect the - Press the reset button. 2WARNING • If you connect the ...
Installation Manual
Page 8
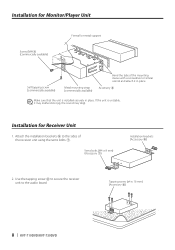
If the unit is installed securely in place. Installation for Monitor/Player Unit Screw (M4X8) (commercially available) Firewall or metal support Self-tapping screw (commercially available) Metal mounting strap (commercially...unit is unstable, it in place. Tapping screw (ø4 × 16 mm) (Accessory 8) 8 | KVT-719DVD/KVT-739DVD Installation for Receiver Unit 1. Attach the installation brackets 9 to the audio board. Sems bolts (M4 × 8 mm) (Accessory 7) Installation brackets (Accessory 9) 2. Use the tapping screw 8 to secure the receiver unit to the sides of the...
If the unit is installed securely in place. Installation for Monitor/Player Unit Screw (M4X8) (commercially available) Firewall or metal support Self-tapping screw (commercially available) Metal mounting strap (commercially...unit is unstable, it in place. Tapping screw (ø4 × 16 mm) (Accessory 8) 8 | KVT-719DVD/KVT-739DVD Installation for Receiver Unit 1. Attach the installation brackets 9 to the audio board. Sems bolts (M4 × 8 mm) (Accessory 7) Installation brackets (Accessory 9) 2. Use the tapping screw 8 to secure the receiver unit to the sides of the...

Installation Manual
Page 10
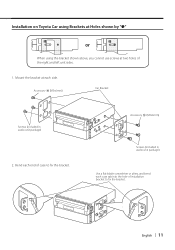
Installing in Japanese-made Cars Installation on Toyota, Nissan or Mitsubishi Car using Brackets at Holes shown by "●" or Accessory 0 (M5x6mm) or Accessory ! (M5x7mm) Car Bracket Accessory 0 (M5x6mm) or Accessory ! (M5x7mm) Screws (included in audio unit package) Audio unit or others Screws (included in audio unit package) ⁄ • Do not use the wrong screws, you could damage the unit. 10 | KVT-719DVD/KVT-739DVD If you use your own screws. Use only the screws provided.
Installing in Japanese-made Cars Installation on Toyota, Nissan or Mitsubishi Car using Brackets at Holes shown by "●" or Accessory 0 (M5x6mm) or Accessory ! (M5x7mm) Car Bracket Accessory 0 (M5x6mm) or Accessory ! (M5x7mm) Screws (included in audio unit package) Audio unit or others Screws (included in audio unit package) ⁄ • Do not use the wrong screws, you could damage the unit. 10 | KVT-719DVD/KVT-739DVD If you use your own screws. Use only the screws provided.
Installation Manual
Page 11
Accessory 0 (M5x6mm) Screws (included in audio unit package) 2. Bend each end of case to fix the bracket. English | 11 Mount the bracket at two holes of installation bracket to fix the bracket. Accessory 0 (M5x6mm) Car Bracket Screws (included in audio unit package) Use a flat-blade screwdriver or pliers, and bend each case tab into the hole of the right and left unit sides. 1. Installation on Toyota Car using Brackets at Holes shown by "●" or When using the bracket shown above, you cannot use screws at each side.
Accessory 0 (M5x6mm) Screws (included in audio unit package) 2. Bend each end of case to fix the bracket. English | 11 Mount the bracket at two holes of installation bracket to fix the bracket. Accessory 0 (M5x6mm) Car Bracket Screws (included in audio unit package) Use a flat-blade screwdriver or pliers, and bend each case tab into the hole of the right and left unit sides. 1. Installation on Toyota Car using Brackets at Holes shown by "●" or When using the bracket shown above, you cannot use screws at each side.


