

Installation Manual
Page 1
KVT-719DVD KVT-739DVD MONITOR WITH DVD RECEIVER INSTALLATION MANUAL MONITOR CON RECEPTOR DVD MANUAL DE INSTALACIÓN © B54-4513-00/00 (KV/RV)
KVT-719DVD KVT-739DVD MONITOR WITH DVD RECEIVER INSTALLATION MANUAL MONITOR CON RECEPTOR DVD MANUAL DE INSTALACIÓN © B54-4513-00/00 (KV/RV)
Installation Manual
Page 3
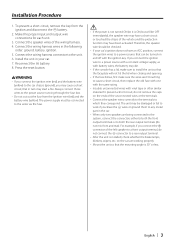
...; Do not cut out the fuse from the ignition and disconnect the - battery. 8. Always connect those wires to a power source that the mounting angle is installed, check whether the brake lamps, blinkers, wipers, etc. The power supply must be connected to the wires via the fuse. ¤ • If the power... turned ON (or it is ON, but will not hit the lid when closing and opening. • If the fuse blows, first make sure to install the unit so that in the car. • When only two speakers are working properly. • Mount the unit so that can be checked. •...
...; Do not cut out the fuse from the ignition and disconnect the - battery. 8. Always connect those wires to a power source that the mounting angle is installed, check whether the brake lamps, blinkers, wipers, etc. The power supply must be connected to the wires via the fuse. ¤ • If the power... turned ON (or it is ON, but will not hit the lid when closing and opening. • If the fuse blows, first make sure to install the unit so that in the car. • When only two speakers are working properly. • Mount the unit so that can be checked. •...
Installation Manual
Page 8
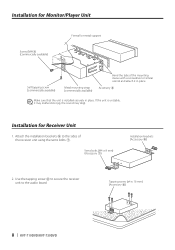
... using the sems bolts 7. Tapping screw (ø4 × 16 mm) (Accessory 8) 8 | KVT-719DVD/KVT-739DVD Use the tapping screw 8 to secure the receiver unit to the sides of the mounting sleeve with a screwdriver or similar utensil and attach it may malfunction (eg, the sound may skip). Installation for Receiver Unit 1. If the unit is...
... using the sems bolts 7. Tapping screw (ø4 × 16 mm) (Accessory 8) 8 | KVT-719DVD/KVT-739DVD Use the tapping screw 8 to secure the receiver unit to the sides of the mounting sleeve with a screwdriver or similar utensil and attach it may malfunction (eg, the sound may skip). Installation for Receiver Unit 1. If the unit is...

Installation Manual
Page 10
Installing in Japanese-made Cars Installation on Toyota, Nissan or Mitsubishi Car using Brackets at Holes shown by "●" or Accessory 0 (M5x6mm) or Accessory ! (M5x7mm) Car Bracket Accessory 0 (M5x6mm) or Accessory ! (M5x7mm) Screws (included in audio unit package) Audio unit or others Screws (included in audio unit package) ⁄ • Do not use the wrong screws, you could damage the unit. 10 | KVT-719DVD/KVT-739DVD If you use your own screws. Use only the screws provided.
Installing in Japanese-made Cars Installation on Toyota, Nissan or Mitsubishi Car using Brackets at Holes shown by "●" or Accessory 0 (M5x6mm) or Accessory ! (M5x7mm) Car Bracket Accessory 0 (M5x6mm) or Accessory ! (M5x7mm) Screws (included in audio unit package) Audio unit or others Screws (included in audio unit package) ⁄ • Do not use the wrong screws, you could damage the unit. 10 | KVT-719DVD/KVT-739DVD If you use your own screws. Use only the screws provided.
Installation Manual
Page 11
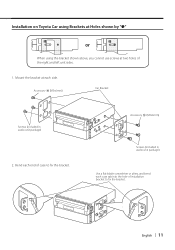
Installation on Toyota Car using Brackets at Holes shown by "●" or When using the bracket shown above, you cannot use screws at each side. Bend each case tab into the hole of installation bracket to fix the bracket. English | 11 Accessory 0 (M5x6mm) Screws (included in audio unit package) 2. Mount the bracket at two holes of case to fix the bracket. Accessory 0 (M5x6mm) Car Bracket Screws (included in audio unit package) Use a flat-blade screwdriver or pliers, and bend each end of the right and left unit sides. 1.
Installation on Toyota Car using Brackets at Holes shown by "●" or When using the bracket shown above, you cannot use screws at each side. Bend each case tab into the hole of installation bracket to fix the bracket. English | 11 Accessory 0 (M5x6mm) Screws (included in audio unit package) 2. Mount the bracket at two holes of case to fix the bracket. Accessory 0 (M5x6mm) Car Bracket Screws (included in audio unit package) Use a flat-blade screwdriver or pliers, and bend each end of the right and left unit sides. 1.


