
User Manual
Page 3
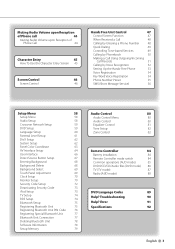
... Setup 75 Registering Bluetooth Unit 75 Registering Bluetooth Unit PIN Code 76 Registering Special Bluetooth Unit 77 Bluetooth Unit Connection 77 Deleting Bluetooth Unit 78 Software Information 78 Setup Memory 79 Audio Control 80 Audio Control Menu 80 Audio Control 80 Equalizer Control 81 Tone Setup 82 Zone Control 82 Remote Controller 84 Battery installation 84 Remote Controller mode switch 84 Common operations (AUD mode) 85 DVD/VCD/CD/Audio files (DVD mode) 86 TV (TV mode) 87 Radio (AUD mode) 88 DVD Language Codes 89 Help? Error 91 Specifications...
... Setup 75 Registering Bluetooth Unit 75 Registering Bluetooth Unit PIN Code 76 Registering Special Bluetooth Unit 77 Bluetooth Unit Connection 77 Deleting Bluetooth Unit 78 Software Information 78 Setup Memory 79 Audio Control 80 Audio Control Menu 80 Audio Control 80 Equalizer Control 81 Tone Setup 82 Zone Control 82 Remote Controller 84 Battery installation 84 Remote Controller mode switch 84 Common operations (AUD mode) 85 DVD/VCD/CD/Audio files (DVD mode) 86 TV (TV mode) 87 Radio (AUD mode) 88 DVD Language Codes 89 Help? Error 91 Specifications...
User Manual
Page 6
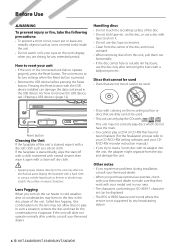
... a situation, remove the disc and wait for any broadcasting station. 6 KVT-524DVD/KVT-554DVD/KVT-54DVDR If the unit still does not operate normally after removing the burrs with tape stuck on the lens in cold weather, dew or condensation may not allow discs to ISO 8859-1 character set can damage the data contained in the USB device. Reset button Cleaning the Unit If the faceplate of the disc. •...
... a situation, remove the disc and wait for any broadcasting station. 6 KVT-524DVD/KVT-554DVD/KVT-54DVDR If the unit still does not operate normally after removing the burrs with tape stuck on the lens in cold weather, dew or condensation may not allow discs to ISO 8859-1 character set can damage the data contained in the USB device. Reset button Cleaning the Unit If the faceplate of the disc. •...
User Manual
Page 7
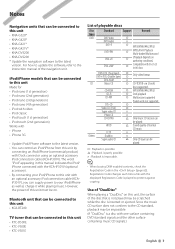
... update the software, refer to the instruction manual of playable discs Disc Standard Support Remark types DVD DVD Video ‡ DVD Audio × DVD-R ‡ MP3/WMA/AAC/JPEG/ DVD-RW ‡ MPEG/DivX Playback Multi-border/Multisession/ DVD+R ‡ (Playback depends on authoring conditions) DVD+RW ‡ Compatible with the displayed Registration Code is played to the latest version. HDCD % Sound quality of the disc that can control an iPod/iPhone from this unit...
... update the software, refer to the instruction manual of playable discs Disc Standard Support Remark types DVD DVD Video ‡ DVD Audio × DVD-R ‡ MP3/WMA/AAC/JPEG/ DVD-RW ‡ MPEG/DivX Playback Multi-border/Multisession/ DVD+R ‡ (Playback depends on authoring conditions) DVD+RW ‡ Compatible with the displayed Registration Code is played to the latest version. HDCD % Sound quality of the disc that can control an iPod/iPhone from this unit...
User Manual
Page 8
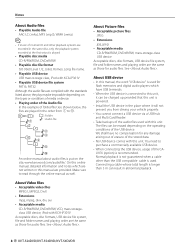
...; • If music of normal CD and other playback systems are recorded in the same disc, only the playback system recorded at the first setout is played. • Playable disc media CD-R/RW/ROM, DVD±R/RW • Playable disc file format ISO 9660 Level 1/2, Joliet, Romeo, Long file name. • Playable USB device USB mass storage class, iPod with KCA...
...; • If music of normal CD and other playback systems are recorded in the same disc, only the playback system recorded at the first setout is played. • Playable disc media CD-R/RW/ROM, DVD±R/RW • Playable disc file format ISO 9660 Level 1/2, Joliet, Romeo, Long file name. • Playable USB device USB mass storage class, iPod with KCA...

User Manual
Page 9
... to remove it is marketed, as the play function may not be able to 32 languages can be played with a limited period of use Do not leave discs with any DVD player. Indicates the type of audio languages recorded. Operation regulatory marks With this DVD, some functions of this unit such as shown in the following marks will appear on a standard TV set screen (4:3) with...
... to remove it is marketed, as the play function may not be able to 32 languages can be played with a limited period of use Do not leave discs with any DVD player. Indicates the type of audio languages recorded. Operation regulatory marks With this DVD, some functions of this unit such as shown in the following marks will appear on a standard TV set screen (4:3) with...

User Manual
Page 12
... stopped at the last time. Basic Operations A Playing a USB device When connecting a USB device, playback starts automatically. ⁄ • If the USB source is selected when a USB device is not connected, "No Device" is displayed. • When the playback is connected firmly. Refer to enter the USB suspend mode, and then remove the USB device. Removing the USB device Press on the USB control screen to (page 36). ¤ • Removing the USB device before entering the USB suspend mode may result in...
... stopped at the last time. Basic Operations A Playing a USB device When connecting a USB device, playback starts automatically. ⁄ • If the USB source is selected when a USB device is not connected, "No Device" is displayed. • When the playback is connected firmly. Refer to enter the USB suspend mode, and then remove the USB device. Removing the USB device Press on the USB control screen to (page 36). ¤ • Removing the USB device before entering the USB suspend mode may result in...

User Manual
Page 16
... connected. During CD play : Selects a chapter. When pressed twice, the disc is Off ). See (page 46). 2 Adjusts the volume. 3 During DVD play : Selects music. During Audio file, Video file, or Picture file play only) 5 Plays or pauses. 6 When touched this area, the source control screen appears. Using the Navigation System Displays the navigation system screen and makes the navigation function available. 1 Displaying the navigation screen Control of Other Sources While Displaying the Navigation Screen Selected source can set the navigation system function...
... connected. During CD play : Selects a chapter. When pressed twice, the disc is Off ). See (page 46). 2 Adjusts the volume. 3 During DVD play : Selects music. During Audio file, Video file, or Picture file play only) 5 Plays or pauses. 6 When touched this area, the source control screen appears. Using the Navigation System Displays the navigation system screen and makes the navigation function available. 1 Displaying the navigation screen Control of Other Sources While Displaying the Navigation Screen Selected source can set the navigation system function...
User Manual
Page 24
... played. T Displays the currently playing file. Play Mode Display a Play Time Display s Music information display Selects Folder Name, File Name, Title, Artist Name, or Album Name. f Fast Forwards or Fast Backwards. (Disabled when a JPEG is played back from its beginning in the folder currently being played.) g Stops playing. k Selects a folder. m Repeats to play (the preset files or data). When pressed twice, the disc is being played one after another. l Switches the button display...
... played. T Displays the currently playing file. Play Mode Display a Play Time Display s Music information display Selects Folder Name, File Name, Title, Artist Name, or Album Name. f Fast Forwards or Fast Backwards. (Disabled when a JPEG is played back from its beginning in the folder currently being played.) g Stops playing. k Selects a folder. m Repeats to play (the preset files or data). When pressed twice, the disc is being played one after another. l Switches the button display...
User Manual
Page 28
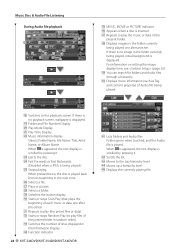
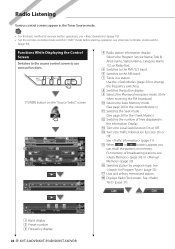
... receiving the FM broadcast) p Selects the Auto Memory mode. (See page 30 for the ) q Switches the Seek mode. (See page 29 for the ) w Switches the number of lines displayed in the Information Display. Functions While Displaying the Control Screen Switches to the source control screen to use various functions. [TUNER] button on memory. i Displays Radio Text screen. See (page 32). Radio Listening Various control screens appear in the Tuner Source mode. • For the basic method of receiver button operations, see (page 10). • Set the remote controller mode switch...
... receiving the FM broadcast) p Selects the Auto Memory mode. (See page 30 for the ) q Switches the Seek mode. (See page 29 for the ) w Switches the number of lines displayed in the Information Display. Functions While Displaying the Control Screen Switches to the source control screen to use various functions. [TUNER] button on memory. i Displays Radio Text screen. See (page 32). Radio Listening Various control screens appear in the Tuner Source mode. • For the basic method of receiver button operations, see (page 10). • Set the remote controller mode switch...
User Manual
Page 40
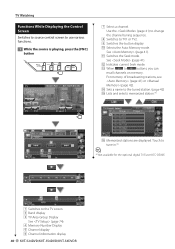
... Memorized stations are displayed. Touch to tune in.*1 ⁄ *1 Not available for the optional digital TV Tuner KTC-D500E. 13 14 15 1 Switches to buttons, you can recall channels on memory. p Selects the Auto Memory mode. e When to the TV screen. 2 Band display 3 TV Area Group Display See (page 74). 4 Memory Number Display 5 Channel display 6 Channel information display 40 KVT-524DVD/KVT-554DVD/KVT-54DVDR O U T: AV - TV Watching Functions While Displaying the Control Screen Switches to source control screen to use various functions. 1 While the source is playing...
... Memorized stations are displayed. Touch to tune in.*1 ⁄ *1 Not available for the optional digital TV Tuner KTC-D500E. 13 14 15 1 Switches to buttons, you can recall channels on memory. p Selects the Auto Memory mode. e When to the TV screen. 2 Band display 3 TV Area Group Display See (page 74). 4 Memory Number Display 5 Channel display 6 Channel information display 40 KVT-524DVD/KVT-554DVD/KVT-54DVDR O U T: AV - TV Watching Functions While Displaying the Control Screen Switches to source control screen to use various functions. 1 While the source is playing...
User Manual
Page 47
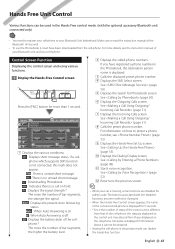
...). 8 Calls the preset phone number. See (page 48). The buttons associated with the optional accessory Bluetooth unit connected only) • You need to register your Bluetooth Unit beforehand. Hands Free Unit Control Various functions can disable the hands-free function. p Displays the Dialing Display screen. See (page 52). No status is displayed if information about it must have registered a phone number in the private mode can be obtained. • Setting the cell-phone in the...
...). 8 Calls the preset phone number. See (page 48). The buttons associated with the optional accessory Bluetooth unit connected only) • You need to register your Bluetooth Unit beforehand. Hands Free Unit Control Various functions can disable the hands-free function. p Displays the Dialing Display screen. See (page 52). No status is displayed if information about it must have registered a phone number in the private mode can be obtained. • Setting the cell-phone in the...

User Manual
Page 59
... of the rear speaker. 3 Sets the Low Pass Filter of the sub woofer. 4 Switches to "Dialog". Next page 3 English 59 Crossover Network Setup You can set up the DVD play stop mode. in Audio Setup and "LPF SUB FREQ" is reduced by changing from "Wide" to "Normal" and from "Normal" to the crossover setup screen. 2 Display the Crossover setup screen 3 Set the crossover 5 6 7 5 Sets the cross over frequency. "Dialog" makes the total sound volume becomes...
... of the rear speaker. 3 Sets the Low Pass Filter of the sub woofer. 4 Switches to "Dialog". Next page 3 English 59 Crossover Network Setup You can set up the DVD play stop mode. in Audio Setup and "LPF SUB FREQ" is reduced by changing from "Wide" to "Normal" and from "Normal" to the crossover setup screen. 2 Display the Crossover setup screen 3 Set the crossover 5 6 7 5 Sets the cross over frequency. "Dialog" makes the total sound volume becomes...
User Manual
Page 61
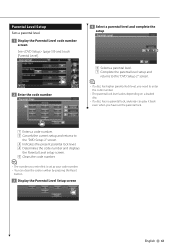
... lock level. 4 Determines the code number and displays the Parental Level setup screen. 5 Clears the code number. ⁄ • The number you enter first is set as your code number. • You can clear the code number by pressing the Reset button. 3 Display the Parental Level Setup screen 4 Select a parental level and complete the setup 6 6 7 6 Selects a parental level. 7 Complete the parental level setup and returns to the "DVD Setup 2" screen. ⁄ • If a disc has higher parental lock level, you need to enter the code number...
... lock level. 4 Determines the code number and displays the Parental Level setup screen. 5 Clears the code number. ⁄ • The number you enter first is set as your code number. • You can clear the code number by pressing the Reset button. 3 Display the Parental Level Setup screen 4 Select a parental level and complete the setup 6 6 7 6 Selects a parental level. 7 Complete the parental level setup and returns to the "DVD Setup 2" screen. ⁄ • If a disc has higher parental lock level, you need to enter the code number...
User Manual
Page 75
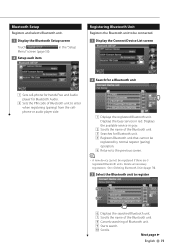
...-phone for Hands Free and Audio player for Bluetooth unit. 4 Registers Bluetooth unit that cannot be registered by normal register (paring) operation. 5 Returns to enter when registering (pairing) from the cellphone or audio player side. 1 2 3 4 5 1 Displays the registered Bluetooth unit. p Scrolls. Bluetooth Setup Registers and selects Bluetooth unit. 1 Display the Bluetooth Setup screen Touch Menu" screen (page 58). Next page 3 English 75 Displays the available service in gray. 2 Scrolls the name of the Bluetooth unit. 3 Searches for Bluetooth Audio. 2 Sets the PIN code...
...-phone for Hands Free and Audio player for Bluetooth unit. 4 Registers Bluetooth unit that cannot be registered by normal register (paring) operation. 5 Returns to enter when registering (pairing) from the cellphone or audio player side. 1 2 3 4 5 1 Displays the registered Bluetooth unit. p Scrolls. Bluetooth Setup Registers and selects Bluetooth unit. 1 Display the Bluetooth Setup screen Touch Menu" screen (page 58). Next page 3 English 75 Displays the available service in gray. 2 Scrolls the name of the Bluetooth unit. 3 Searches for Bluetooth Audio. 2 Sets the PIN code...
User Manual
Page 80
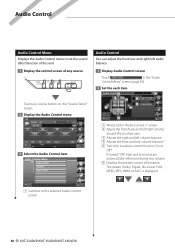
Audio Control Audio Control Menu Displays the Audio Control menu to set the sound effect function of this unit. 1 Display the control screen of any source Touch any source button on the "Source Select" screen. 2 Display the Audio Control menu 3 Select the Audio Control item 1 Audio Control You can adjust the front/rear and right/left volume balance. 4 Adjusts the front and rear volume balance.* 5 Turns the Loudness control function On or Off.* If turned "ON", high and low tones are automatically enhanced during low volume. 6 Displays the present source information. The stream (Dolby ...
Audio Control Audio Control Menu Displays the Audio Control menu to set the sound effect function of this unit. 1 Display the control screen of any source Touch any source button on the "Source Select" screen. 2 Display the Audio Control menu 3 Select the Audio Control item 1 Audio Control You can adjust the front/rear and right/left volume balance. 4 Adjusts the front and rear volume balance.* 5 Turns the Loudness control function On or Off.* If turned "ON", high and low tones are automatically enhanced during low volume. 6 Displays the present source information. The stream (Dolby ...

User Manual
Page 82
... flat. 2 Bass adjustment items are displayed. 3 Middle adjustment items are displayed. 4 Treble adjustment items are displayed. 5 Sets the Center frequency. 6 Sets the level. 7 Sets the Q factor. (Only Bass and Middle can set ) 8 Bass DC Extend settings (Only when Bass is selected) If turned "ON", it extends the bass center frequency to the low register by approximately 20%. 9 Returns to the "Equalizer" screen. 1 1 Displays the current source. 2 Set the Zone Control 2 3 3 4 2 Turns the Zone Function (that sets different source sounds for front and rear speakers) On...
... flat. 2 Bass adjustment items are displayed. 3 Middle adjustment items are displayed. 4 Treble adjustment items are displayed. 5 Sets the Center frequency. 6 Sets the level. 7 Sets the Q factor. (Only Bass and Middle can set ) 8 Bass DC Extend settings (Only when Bass is selected) If turned "ON", it extends the bass center frequency to the low register by approximately 20%. 9 Returns to the "Equalizer" screen. 1 1 Displays the current source. 2 Set the Zone Control 2 3 3 4 2 Turns the Zone Function (that sets different source sounds for front and rear speakers) On...
User Manual
Page 90
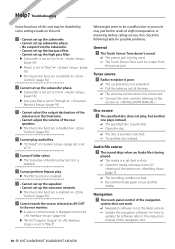
...; Update the navigation software. Cannot watch the source selected as AV-OUT in the rear monitor. ▲ A source control screen is displayed in your unit may be disabled by some settings made on this unit. ! • Cannot set up the subwoofer. • Cannot set up subwoofer phase. • No output from the preout jack. The touch panel control of is disabled. ☞ (page 82) ! Disc source ? The specified disc does not play function...
...; Update the navigation software. Cannot watch the source selected as AV-OUT in the rear monitor. ▲ A source control screen is displayed in your unit may be disabled by some settings made on this unit. ! • Cannot set up the subwoofer. • Cannot set up subwoofer phase. • No output from the preout jack. The touch panel control of is disabled. ☞ (page 82) ! Disc source ? The specified disc does not play function...

User Manual
Page 91
... disappear, see your iPod: The iPod's software is not operating correctly due to play has a region code that the unit can not support. ➡ Confirm that doesn't have occurred to the connected USB device. ➡ Change the source to any source other . ➡ Push the unit's Reset button. No Music: The connected USB device contains no USB device/iPod is activated and you set. Remove the USB device. USB Device Error!!: The connected USB device is inserted. Error When the unit fails to USB/iPod again. Contact the...
... disappear, see your iPod: The iPod's software is not operating correctly due to play has a region code that the unit can not support. ➡ Confirm that doesn't have occurred to the connected USB device. ➡ Change the source to any source other . ➡ Push the unit's Reset button. No Music: The connected USB device contains no USB device/iPod is activated and you set. Remove the USB device. USB Device Error!!: The connected USB device is inserted. Error When the unit fails to USB/iPod again. Contact the...
User Manual 1
Page 2
..., do not remove the caps on the car are working properly. • Mount the unit so that all wire connections are blocked. Therefore, the speaker wire should be turned on your vehicle. wires or ground them to any metal part in the console of the unconnected wires or the terminals. • If the console has a lid, make sure the wires aren't touching to a power source that can...
..., do not remove the caps on the car are working properly. • Mount the unit so that all wire connections are blocked. Therefore, the speaker wire should be turned on your vehicle. wires or ground them to any metal part in the console of the unconnected wires or the terminals. • If the console has a lid, make sure the wires aren't touching to a power source that can...

User Manual 1
Page 3
.... Connecting Wires to Terminals Connector Function Guide Pin Numbers for ISO Connectors External Power Connector A-4 A-5 A-6 A-7 A-8 Cable Colour Yellow Blue/White Orange/White Red Black Speaker Connector B-1 B-2 B-3 B-4 B-5 B-6 B-7 B-8 Purple Purple/Black Gray Gray/Black White White/Black Green Green/Black Functions Battery Power Control Dimmer Ignition (ACC) Earth (Ground) Connection Rear Right (+) Rear Right (-) Front Right (+) Front Right (-) Front Left (+) Front Left (-) Rear Left (+) Rear Left (-) 2WARNING Connecting the ISO Connector The pin arrangement for the wiring harness is...
.... Connecting Wires to Terminals Connector Function Guide Pin Numbers for ISO Connectors External Power Connector A-4 A-5 A-6 A-7 A-8 Cable Colour Yellow Blue/White Orange/White Red Black Speaker Connector B-1 B-2 B-3 B-4 B-5 B-6 B-7 B-8 Purple Purple/Black Gray Gray/Black White White/Black Green Green/Black Functions Battery Power Control Dimmer Ignition (ACC) Earth (Ground) Connection Rear Right (+) Rear Right (-) Front Right (+) Front Right (-) Front Left (+) Front Left (-) Rear Left (+) Rear Left (-) 2WARNING Connecting the ISO Connector The pin arrangement for the wiring harness is...


