Instruction Manual
Page 2
... Control Adjusting the detail of Audio Control Audio Setup Speaker Setting Subwoofer Output TEL Mute Faceplate Angle Adjustment Theft Deterrent Faceplate Display Type Selection Graphic part Display Switching Wallpaper selecting Text Selection for Display Text Display Switching Font Color Select G-Analyzer display Switching Station/Disc Naming (SNPS/DNPS) Tuner features 24...
... Control Adjusting the detail of Audio Control Audio Setup Speaker Setting Subwoofer Output TEL Mute Faceplate Angle Adjustment Theft Deterrent Faceplate Display Type Selection Graphic part Display Switching Wallpaper selecting Text Selection for Display Text Display Switching Font Color Select G-Analyzer display Switching Station/Disc Naming (SNPS/DNPS) Tuner features 24...

Instruction Manual
Page 5
... supported by any broadcasting station. • There are described; English | 5 Notes • If you experience problems during installation, consult your Kenwood dealer. • When you purchase optional accessories, check with your Kenwood dealer to make sure that they work where the service is stained, wipe it again with a dry soft cloth such... be displayed. • The RDS feature won't work with Canadian ICES-003. Before using a volatile liquid such as thinner or alcohol may affect its mechanical parts.
... supported by any broadcasting station. • There are described; English | 5 Notes • If you experience problems during installation, consult your Kenwood dealer. • When you purchase optional accessories, check with your Kenwood dealer to make sure that they work where the service is stained, wipe it again with a dry soft cloth such... be displayed. • The RDS feature won't work with Canadian ICES-003. Before using a volatile liquid such as thinner or alcohol may affect its mechanical parts.
Instruction Manual
Page 6
... performance of the pre-set buttons and the ensemble label are expressly approved in a residential installation. Kenwood Corporation 2967-3, ISHIKAWA-MACHI, HACHIOJI-SHI TOKYO, JAPAN KENWOOD CORP. CERTIFIES THIS EQUIPMENT CONFORMS TO DHHS REGULATIONS N0.21 CFR 1040. 10, CHAPTER 1, SUBCHAPTER ... instead. NOTE This equipment has been tested and found to comply with the instructions. http://www.kenwood.mediamanager.jp • Contact Kenwood for a Class B digital device, pursuant to Part 15 of the following measures: • Reorient or relocate the receiving antenna. • Increase...
... performance of the pre-set buttons and the ensemble label are expressly approved in a residential installation. Kenwood Corporation 2967-3, ISHIKAWA-MACHI, HACHIOJI-SHI TOKYO, JAPAN KENWOOD CORP. CERTIFIES THIS EQUIPMENT CONFORMS TO DHHS REGULATIONS N0.21 CFR 1040. 10, CHAPTER 1, SUBCHAPTER ... instead. NOTE This equipment has been tested and found to comply with the instructions. http://www.kenwood.mediamanager.jp • Contact Kenwood for a Class B digital device, pursuant to Part 15 of the following measures: • Reorient or relocate the receiving antenna. • Increase...
Instruction Manual
Page 14
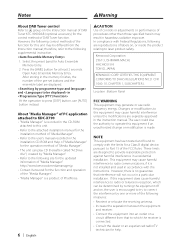
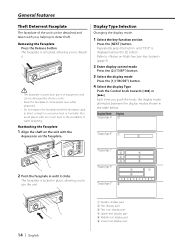
"Display Type C" "Display Type D" "Display Type E" 3 4 3 5 3 6 4 7 6 888888 9 14 | English 1 Graphic display part 2 Text display part 3 Text icon display part 4 Upper text display part 5 Middle text display part 6 Lower text display part The faceplate is unlocked, allowing you to detach it clicks. The faceplate is displayed above the [2] button. Also avoid places with the depression on the ...
"Display Type C" "Display Type D" "Display Type E" 3 4 3 5 3 6 4 7 6 888888 9 14 | English 1 Graphic display part 2 Text display part 3 Text icon display part 4 Upper text display part 5 Middle text display part 6 Lower text display part The faceplate is unlocked, allowing you to detach it clicks. The faceplate is displayed above the [2] button. Also avoid places with the depression on the ...
Instruction Manual
Page 15
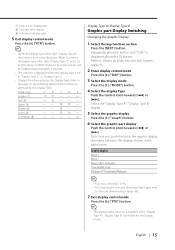
... button. 4 Select the display Type Push the Control knob towards [4] or [¢]. English | 15 7 Source icon display part 8 Function item display 9 G-Analyzer display part 5 Exit display control mode Press the [6] ("RTN") button. • Under the display type other than "Display Type D", ...Display Type D". • Change the information by the Display Type. G-Analyzer 9 - - - - 22 Display Type A/ Display Type B Graphic part Display Switching Changing the graphic Display. 1 Select the key function section Press the [NEXT] button. When you push the knob, the graphic display alternates...
... button. 4 Select the display Type Push the Control knob towards [4] or [¢]. English | 15 7 Source icon display part 8 Function item display 9 G-Analyzer display part 5 Exit display control mode Press the [6] ("RTN") button. • Under the display type other than "Display Type D", ...Display Type D". • Change the information by the Display Type. G-Analyzer 9 - - - - 22 Display Type A/ Display Type B Graphic part Display Switching Changing the graphic Display. 1 Select the key function section Press the [NEXT] button. When you push the knob, the graphic display alternates...
Instruction Manual
Page 16
Refer to (page 9). 2 Enter display control mode Press the [2] ("DISP") button. 3 Select the display mode Press the [1] ("MODE") button. 4 Select the display Type Push the Control knob towards [FM] or [AM]. Push the Control knob towards [4] or [¢]. In Tuner source Information Station name or *1Program Service name *1Radio text or *1Program Service name (FM) Frequency Clock Date Display "SNPS"* "Radio Text"* "Frequency" "Clock" "Date" In CD & External disc source Information Disc title Track title Track number & Play time Disc name Clock Date Display "Disc Title"* "...
Refer to (page 9). 2 Enter display control mode Press the [2] ("DISP") button. 3 Select the display mode Press the [1] ("MODE") button. 4 Select the display Type Push the Control knob towards [FM] or [AM]. Push the Control knob towards [4] or [¢]. In Tuner source Information Station name or *1Program Service name *1Radio text or *1Program Service name (FM) Frequency Clock Date Display "SNPS"* "Radio Text"* "Frequency" "Clock" "Date" In CD & External disc source Information Disc title Track title Track number & Play time Disc name Clock Date Display "Disc Title"* "...
Instruction Manual
Page 18
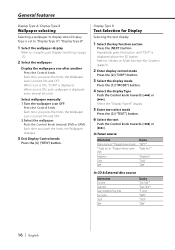
...in WMA file. (KDCMP732 only) • Track number at Audio file displays the last 3 digits when the track number exceeds 1000 songs. (KDCX790 only) • If the contents of LX-AMP is displayed above the [2] button. However, the blank display is able to the table described...Press the [NEXT] button. Select the "Display Type C"/"Display Type D" display. 5 Enter text select mode Press the [2] ("TEXT") button. 6 Select the text display part Push the Control knob towards [4] or [¢]. The cursor ( ) moves to (page 9). 2 Enter display control mode Press the [2] ("DISP") button. 3 Select the...
...in WMA file. (KDCMP732 only) • Track number at Audio file displays the last 3 digits when the track number exceeds 1000 songs. (KDCX790 only) • If the contents of LX-AMP is displayed above the [2] button. However, the blank display is able to the table described...Press the [NEXT] button. Select the "Display Type C"/"Display Type D" display. 5 Enter text select mode Press the [2] ("TEXT") button. 6 Select the text display part Push the Control knob towards [4] or [¢]. The cursor ( ) moves to (page 9). 2 Enter display control mode Press the [2] ("DISP") button. 3 Select the...

Instruction Manual
Page 20
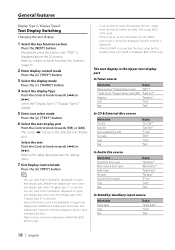
The text display in the Middle text display part In Tuner source Information Clock Date Blank Radio text (FM) (KDC-X790 only) Display "Clock" "Date" "Blank" "Radio Text"* In CD & External disc source Information ... Name" "Composer Name" "Category Name" "Label Name" "Comment" • * If the contents of the information cannot be displayed, Kenwood Logo is displayed. General features The text display in the Lower text display part In Tuner source Information Indicator Clock Date Blank Radio text (FM) (KDC-X790 only) Display "Status" "Clock" "Date" "Blank...
The text display in the Middle text display part In Tuner source Information Clock Date Blank Radio text (FM) (KDC-X790 only) Display "Clock" "Date" "Blank" "Radio Text"* In CD & External disc source Information ... Name" "Composer Name" "Category Name" "Label Name" "Comment" • * If the contents of the information cannot be displayed, Kenwood Logo is displayed. General features The text display in the Lower text display part In Tuner source Information Indicator Clock Date Blank Radio text (FM) (KDC-X790 only) Display "Status" "Clock" "Date" "Blank...
Instruction Manual
Page 21
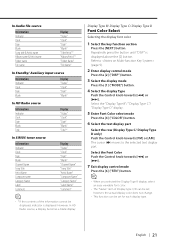
...Display Type B"/ "Display Type C"/ "Display Type D" display. 5 Enter Font Color select mode Press the [4] ("COLOR") button. 6 Select the text display part Select the row (Display Type C/ Display Type D only) Push the Control knob towards [4] or [¢]. English | 21 however, the actual display color ...Color Select Selecting the display font color. 1 Select the key function section Press the [NEXT] button. Refer to the selected text display part. In Audio file source Information Indicator Clock Date Blank Song title & Artist name Album name & Artist name Folder name File name Display ...
...Display Type B"/ "Display Type C"/ "Display Type D" display. 5 Enter Font Color select mode Press the [4] ("COLOR") button. 6 Select the text display part Select the row (Display Type C/ Display Type D only) Push the Control knob towards [4] or [¢]. English | 21 however, the actual display color ...Color Select Selecting the display font color. 1 Select the key function section Press the [NEXT] button. Refer to the selected text display part. In Audio file source Information Indicator Clock Date Blank Song title & Artist name Album name & Artist name Folder name File name Display ...
Instruction Manual
Page 30
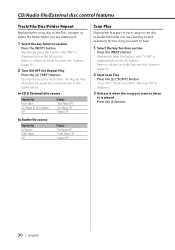
..." In Audio file source Repeat play File Repeat Folder Repeat OFF Display "File Repeat ON" "Folder Repeat ON" "Repeat OFF" Scan Play Playing the first part of each song on the disc or Audio file folder you are listening to hear. 1 Select the key function section Press the [NEXT] button. Each...
..." In Audio file source Repeat play File Repeat Folder Repeat OFF Display "File Repeat ON" "Folder Repeat ON" "Repeat OFF" Scan Play Playing the first part of each song on the disc or Audio file folder you are listening to hear. 1 Select the key function section Press the [NEXT] button. Each...

Instruction Manual
Page 35
... bad conditions on the remote control. • You cannot search for at least 2 seconds. The preset number display blinks 1 time. Function of Middle text display part is selected. 3 Select the Channel Push the Control knob towards [4] or [¢]. • You cannot Channel search until the category information is automatically canceled. •...
... bad conditions on the remote control. • You cannot search for at least 2 seconds. The preset number display blinks 1 time. Function of Middle text display part is selected. 3 Select the Channel Push the Control knob towards [4] or [¢]. • You cannot Channel search until the category information is automatically canceled. •...
Instruction Manual
Page 49
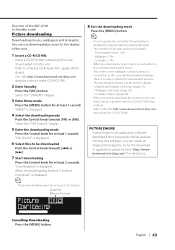
...this software, you can be a problem with the CD-R/CD-RW write method. PICTURE ENGINE Picture Engine is displayed. 6 Select files to prevent data from Kenwood's official website. Refer to make CD-R/CD-RW. 2 Enter Standby Press the [SRC] button. Utilizing this unit. English | 49 You can be ...downloaded Push the Control knob towards [FM] or [AM]. Our URL http://www.kenwood.net-disp.com describes how to the URL http://www.kenwood.net-disp.com, and rewrite the CD-R/CD-RW. When the downloading finishes, "Finished Download" is displayed to be...
...this software, you can be a problem with the CD-R/CD-RW write method. PICTURE ENGINE Picture Engine is displayed. 6 Select files to prevent data from Kenwood's official website. Refer to make CD-R/CD-RW. 2 Enter Standby Press the [SRC] button. Utilizing this unit. English | 49 You can be ...downloaded Push the Control knob towards [FM] or [AM]. Our URL http://www.kenwood.net-disp.com describes how to the URL http://www.kenwood.net-disp.com, and rewrite the CD-R/CD-RW. When the downloading finishes, "Finished Download" is displayed to be...
Instruction Manual
Page 55
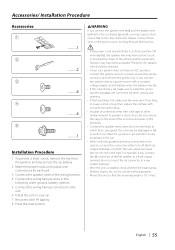
... the unit so that can be turned on the ends of the wiring harness. 4. If you share the - wires or ground them to any metal part in your car's ignition does not have been activated. English | 55 To prevent a short circuit, remove the key from the ignition and disconnect the - Make...
... the unit so that can be turned on the ends of the wiring harness. 4. If you share the - wires or ground them to any metal part in your car's ignition does not have been activated. English | 55 To prevent a short circuit, remove the key from the ignition and disconnect the - Make...
Instruction Manual
Page 58
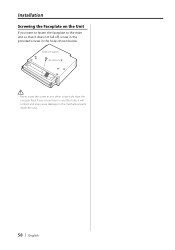
If you want to fasten the faceplate to the main unit so that it will contact and may cause damage to the mechanical parts inside the unit. 58 | English Installation Screwing the Faceplate on the Unit If you screw them in another hole, it does not fall off, screw in the provided screws in any other screw hole than the one specified. Bottom panel Accessory5 • Never insert the screw in the holes shown below.
If you want to fasten the faceplate to the main unit so that it will contact and may cause damage to the mechanical parts inside the unit. 58 | English Installation Screwing the Faceplate on the Unit If you screw them in another hole, it does not fall off, screw in the provided screws in any other screw hole than the one specified. Bottom panel Accessory5 • Never insert the screw in the holes shown below.
Instruction Manual
Page 60
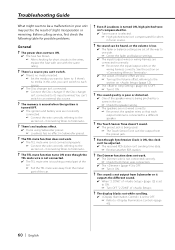
...; The ignition and battery wire are low. ☞ Turn up the Volume offset, referring to a different speaker. ? The sound is not output from the metal part of the car. ? There's a source you can 't switch to . If there's no media inserted. ☞ Set the media you can 't switch. ...received RDS station isn't sending time data. ☞ Receive another RDS station. ? The display blacks out while scrolling. ✔ is touching a metal part of the car. ☞ Pull the TEL mute wire away from Subwoofer or it ON. ? Before calling service, first check the following table for when...
...; The ignition and battery wire are low. ☞ Turn up the Volume offset, referring to a different speaker. ? The sound is not output from the metal part of the car. ? There's a source you can 't switch to . If there's no media inserted. ☞ Set the media you can 't switch. ...received RDS station isn't sending time data. ☞ Receive another RDS station. ? The display blacks out while scrolling. ✔ is touching a metal part of the car. ☞ Pull the TEL mute wire away from Subwoofer or it ON. ? Before calling service, first check the following table for when...

