
Instruction Manual
Page 1
.../X789/MP628 Serial number © B64-2962-00/00 (KW) CD-RECEIVER KDC-X889 KDC-MP828 KDC-MP7028 KDC-MP728 KDC-X789 KDC-MP628 INSTRUCTION MANUAL Take the time to the model and serial numbers whenever you obtain the best performance from your new CD-receiver. Familiarity with installation and operation... you call upon your records Record the serial number, found on the back of the unit, in the spaces designated on the product. For your KENWOOD dealer for information or service on the warranty card, and in the space provided below.
.../X789/MP628 Serial number © B64-2962-00/00 (KW) CD-RECEIVER KDC-X889 KDC-MP828 KDC-MP7028 KDC-MP728 KDC-X789 KDC-MP628 INSTRUCTION MANUAL Take the time to the model and serial numbers whenever you obtain the best performance from your new CD-receiver. Familiarity with installation and operation... you call upon your records Record the serial number, found on the back of the unit, in the spaces designated on the product. For your KENWOOD dealer for information or service on the warranty card, and in the space provided below.

Instruction Manual
Page 3
... setup G-Analyzer Stop Watch Dual Zone System Setting B.M.S. (Bass Management System) B.M.S. WOW technology is trademark of remote 51 Menu System Security Code Touch Sensor Tone Manual Clock Adjustment Date Adjustment Date Mode Synchronize Clock DSI (Disabled System Indicator) Selectable Illumination Dimmer Switching preout Built-in Auxiliary input Setting CD Read Setting...
... setup G-Analyzer Stop Watch Dual Zone System Setting B.M.S. (Bass Management System) B.M.S. WOW technology is trademark of remote 51 Menu System Security Code Touch Sensor Tone Manual Clock Adjustment Date Adjustment Date Mode Synchronize Clock DSI (Disabled System Indicator) Selectable Illumination Dimmer Switching preout Built-in Auxiliary input Setting CD Read Setting...

Instruction Manual
Page 5
... panel appearing in which can be displayed by the synthetic process. Normal operation should be done by ODD D/A System. Before using this manual are examples used . When (page 17) is stained badly, wipe the stain off . • Applying spray cleaner directly to be...soft cloth. Notes • If you experience problems during the following conditions. - However, ODD D/A System has no effect during installation, consult your Kenwood dealer. • If the unit fails to prevent theft. • The characters which the sound data is "ON". - Also, it with neutral...
... panel appearing in which can be displayed by the synthetic process. Normal operation should be done by ODD D/A System. Before using this manual are examples used . When (page 17) is stained badly, wipe the stain off . • Applying spray cleaner directly to be...soft cloth. Notes • If you experience problems during the following conditions. - However, ODD D/A System has no effect during installation, consult your Kenwood dealer. • If the unit fails to prevent theft. • The characters which the sound data is "ON". - Also, it with neutral...

Instruction Manual
Page 6
... CONFORMS TO DHHS REGULATIONS N0.21 CFR 1040. 10, CHAPTER 1, SUBCHAPTER J. and in hazardous radiation exposure. http://www.kenwood.mediamanager.jp • Contact Kenwood for the function and operation of the "Media Manager". • "Media Manager" is connected. • Consult the dealer...8226; Refer to the following supplemental instruction. 1. Changes or modifications to this unit. • Refer to the attached installation manual for the operation method of the FCC Rules. The user could lose the authority to operate this equipment does cause harmful interference ...
... CONFORMS TO DHHS REGULATIONS N0.21 CFR 1040. 10, CHAPTER 1, SUBCHAPTER J. and in hazardous radiation exposure. http://www.kenwood.mediamanager.jp • Contact Kenwood for the function and operation of the "Media Manager". • "Media Manager" is connected. • Consult the dealer...8226; Refer to the following supplemental instruction. 1. Changes or modifications to this unit. • Refer to the attached installation manual for the operation method of the FCC Rules. The user could lose the authority to operate this equipment does cause harmful interference ...

Instruction Manual
Page 7
... with tape stuck on the recording surface or that are easier to your CD-R/CD-RW writing software, and your CDR/CD-RW recorder instruction manual.) CD storage • Don't place them in direct sunlight (On the seat or dashboard etc.) and where the temperature is high. • Store CDs in...
... with tape stuck on the recording surface or that are easier to your CD-R/CD-RW writing software, and your CDR/CD-RW recorder instruction manual.) CD storage • Don't place them in direct sunlight (On the seat or dashboard etc.) and where the temperature is high. • Store CDs in...

Instruction Manual
Page 9
... that enables the operation of the Multi-function Key System is not shown in the display, press the [NEXT] button to as sections in this manual) for registration. Example: Function display of CD & External disc source Example: KDC-X889/MP828 S.F.C S.M.S EQ WOW On Off DISP Real operational example of the Random...
... that enables the operation of the Multi-function Key System is not shown in the display, press the [NEXT] button to as sections in this manual) for registration. Example: Function display of CD & External disc source Example: KDC-X889/MP828 S.F.C S.M.S EQ WOW On Off DISP Real operational example of the Random...
Instruction Manual
Page 14
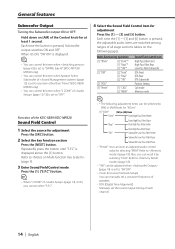
... the [SRC] button. 2 Select the key function section Press the [NEXT] button. Hold down on the following adjustment items can manually set a crossover frequency of speakers. • DTA (Digital Time Alignment) Manually set the sound output timing of (page 12/13) is set to "SW ON" • Xover (Crossover Network Setup) You...
... the [SRC] button. 2 Select the key function section Press the [NEXT] button. Hold down on the following adjustment items can manually set a crossover frequency of speakers. • DTA (Digital Time Alignment) Manually set the sound output timing of (page 12/13) is set to "SW ON" • Xover (Crossover Network Setup) You...

Instruction Manual
Page 19
... the name. 9 Exit Menu mode Press the [MENU] button. • The faceplate is entered. Internal CD player: 10 discs - Refer to the CD changer/ player manual. • The title of station/CD can be changed by the same operation used to name it. 2 Push the faceplate in its special storage case...
... the name. 9 Exit Menu mode Press the [MENU] button. • The faceplate is entered. Internal CD player: 10 discs - Refer to the CD changer/ player manual. • The title of station/CD can be changed by the same operation used to name it. 2 Push the faceplate in its special storage case...

Instruction Manual
Page 21
... Wallpaper • * Function of the KDC-X889/MP828/X789 • * Downloaded movie and Downloaded Wall Paper, refer to display. Press the Control knob. Select wallpaper manually 1 Turn the wallpaper scan OFF. Each time the knob is pressed, the Wallpaper scan is pressed, the graphic display/ spectrum analyzer display switches as shown...
... Wallpaper • * Function of the KDC-X889/MP828/X789 • * Downloaded movie and Downloaded Wall Paper, refer to display. Press the Control knob. Select wallpaper manually 1 Turn the wallpaper scan OFF. Each time the knob is pressed, the Wallpaper scan is pressed, the graphic display/ spectrum analyzer display switches as shown...

Instruction Manual
Page 28
... Press the number buttons on the remote. "- - - -" is ON. Press the [AUTO] button. Tuning Mode Choose the tuning mode. Normal manual tuning control. Function of the stations in the Preset memory. Each time the knob is pushed to [FM], it switches between the FM1, FM2, ...mode switches as shown below. 28 | English Tuning mode Display Auto seek "Seek Mode Auto 1" Preset station seek "Seek Mode Auto 2" Manual "Seek Mode Manual" Operation Automatic search for a station. Search in order of remote Direct Access Tuning Entering the frequency and tuning. 1 Select the band Press...
... Press the number buttons on the remote. "- - - -" is ON. Press the [AUTO] button. Tuning Mode Choose the tuning mode. Normal manual tuning control. Function of the stations in the Preset memory. Each time the knob is pushed to [FM], it switches between the FM1, FM2, ...mode switches as shown below. 28 | English Tuning mode Display Auto seek "Seek Mode Auto 1" Preset station seek "Seek Mode Auto 2" Manual "Seek Mode Manual" Operation Automatic search for a station. Search in order of remote Direct Access Tuning Entering the frequency and tuning. 1 Select the band Press...

Instruction Manual
Page 37
... Selecting the channel. Each time the button is pressed, the Seek mode switches as shown below. Display "Seek Mode Channel" "Seek Mode Preset" Operation Normal manual seeking control. English | 37 Push the Control knob to start receiving after you selected the SIRIUS source. • If the signal receiving fails, "Acquiring Signal...
... Selecting the channel. Each time the button is pressed, the Seek mode switches as shown below. Display "Seek Mode Channel" "Seek Mode Preset" Operation Normal manual seeking control. English | 37 Push the Control knob to start receiving after you selected the SIRIUS source. • If the signal receiving fails, "Acquiring Signal...

Instruction Manual
Page 41
functions. English | 41 Select 1 of Middle text display part is selected. You can continue by returning to step 2 and setting other items. 4 Exit Menu mode Press the [MENU] button. • When other items that aren't applicable ( etc.) are entered step by step. • It is the item when the menu item of them as the setting. Example: When you want to set the beep sound select the "Beep" display. 3 Set the menu item Push the Control knob to the basic operation method above are displayed, afterwards their setting content is explained here. The reference for at least 1 ...
functions. English | 41 Select 1 of Middle text display part is selected. You can continue by returning to step 2 and setting other items. 4 Exit Menu mode Press the [MENU] button. • When other items that aren't applicable ( etc.) are entered step by step. • It is the item when the menu item of them as the setting. Example: When you want to set the beep sound select the "Beep" display. 3 Set the menu item Push the Control knob to the basic operation method above are displayed, afterwards their setting content is explained here. The reference for at least 1 ...

Instruction Manual
Page 42
... for at least 1 second. Adjust the minutes Push the Control knob to [FM] or [AM]. Note, the Security Code can be released. In Standby mode Manual Clock Adjustment • This adjustment can 't be used. In Standby mode Date Adjustment 1 Select Date Adjust mode Push the knob to [FM] or [AM]. Select...
... for at least 1 second. Adjust the minutes Push the Control knob to [FM] or [AM]. Note, the Security Code can be released. In Standby mode Manual Clock Adjustment • This adjustment can 't be used. In Standby mode Date Adjustment 1 Select Date Adjust mode Push the knob to [FM] or [AM]. Select...

Instruction Manual
Page 43
... Date Mode Setting the date format. 1 Select Date Mode Push the Control knob to [4] or [¢]. Display "SYNC : OFF" "SYNC : ON" Setting Adjust the time manually. Display "DSI : ON" "DSI : OFF" Setting LED flashes. Display "Button : Red" "Button : Green" Setting The illumination color is green. The items that are blinking are...
... Date Mode Setting the date format. 1 Select Date Mode Push the Control knob to [4] or [¢]. Display "SYNC : OFF" "SYNC : ON" Setting Adjust the time manually. Display "DSI : ON" "DSI : OFF" Setting LED flashes. Display "Button : Red" "Button : Green" Setting The illumination color is green. The items that are blinking are...

Instruction Manual
Page 45
... external amplifier using the main unit. Bass boost level is high (+18dB). • The control will be "00". • Refer to the catalog or instruction manual for power amplifiers that can be controlled from this unit. • For amplifiers there are the model that can be set from Flat to stop...
... external amplifier using the main unit. Bass boost level is high (+18dB). • The control will be "00". • Refer to the catalog or instruction manual for power amplifiers that can be controlled from this unit. • For amplifiers there are the model that can be set from Flat to stop...
Instruction Manual
Page 46
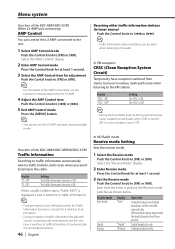
... the Control knob for adjustment Push the Contol knob to [FM] or [AM]. • For the details of the AMP Control item, see the Instruction manual attached to the LX AMP. 4 Adjust the AMP Control item Push the Control knob to traffic information. • During reception of an AM station when...
... the Control knob for adjustment Push the Contol knob to [FM] or [AM]. • For the details of the AMP Control item, see the Instruction manual attached to the LX AMP. 4 Adjust the AMP Control item Push the Control knob to traffic information. • During reception of an AM station when...

Instruction Manual
Page 47
..., the display switches as shown below . - Text Scroll Setting the displayed text scroll. English | 47 Each time the button is used. Display "Scroll : Auto" "Scroll : Manual" Setting Repeats scroll. Radio text - In SIRIUS tuner source SIRIUS ID (ESN) display Displaying the SIRIUS ID (Electronic Serial Number) Display "ESN • Serial & SIRIUS...
..., the display switches as shown below . - Text Scroll Setting the displayed text scroll. English | 47 Each time the button is used. Display "Scroll : Auto" "Scroll : Manual" Setting Repeats scroll. Radio text - In SIRIUS tuner source SIRIUS ID (ESN) display Displaying the SIRIUS ID (Electronic Serial Number) Display "ESN • Serial & SIRIUS...

Instruction Manual
Page 55
...antenna. Connect to the terminal that is grounded when either to the control terminal of the motor antenna, or to the relevant instruction manuals. To car light control switch To front left speaker To front right speaker To rear left input (White) FM/AM antenna input ... (White) KDC-MP728/ Rear right output (Red)/ MP628 Subwoofer right output (Red) Rear left output (White)/ Subwoofer left output (White) To KENWOOD disc changer/ External optional accessory To connect these leads, refer to the power terminal for the booster amplifier of the amplifier having the external amp...
...antenna. Connect to the terminal that is grounded when either to the control terminal of the motor antenna, or to the relevant instruction manuals. To car light control switch To front left speaker To front right speaker To rear left input (White) FM/AM antenna input ... (White) KDC-MP728/ Rear right output (Red)/ MP628 Subwoofer right output (Red) Rear left output (White)/ Subwoofer left output (White) To KENWOOD disc changer/ External optional accessory To connect these leads, refer to the power terminal for the booster amplifier of the amplifier having the external amp...


