Instruction Manual
Page 2
... Clock and Other Functions 34 17 Clock and Date Adjustment Initial Settings Demonstration mode Setting Muting volume upon reception of Phone call Theft Deterrent Faceplate Audio Adjustments 38 Audio Control 20 Preset Equalizer curve Select Manual Equalizer Control Listening Position Selection Listening Position Fine Adjustments Dual Zone System 2 | KDC-X994/ KDC-BT945U/ KDC-X794/ KDC-MP745U
... Clock and Other Functions 34 17 Clock and Date Adjustment Initial Settings Demonstration mode Setting Muting volume upon reception of Phone call Theft Deterrent Faceplate Audio Adjustments 38 Audio Control 20 Preset Equalizer curve Select Manual Equalizer Control Listening Position Selection Listening Position Fine Adjustments Dual Zone System 2 | KDC-X994/ KDC-BT945U/ KDC-X794/ KDC-MP745U
Instruction Manual
Page 4
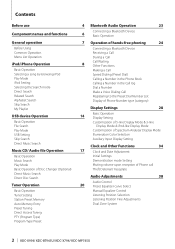
...CD player of the illustrations on the unit or faceplate get dirty, wipe them with your area. • Characters that conform to ISO 8859-1 can be inapplicable. 4 | KDC-X994/ KDC-BT945U/ KDC-X794/ KDC-MP745U Unit and Faceplate Terminals • To prevent deterioration, do not touch... the terminals of the unit and faceplate with a clean soft dry cloth. Lens Fogging When you purchase optional accessories, check with your Kenwood dealer to make sure...
...CD player of the illustrations on the unit or faceplate get dirty, wipe them with your area. • Characters that conform to ISO 8859-1 can be inapplicable. 4 | KDC-X994/ KDC-BT945U/ KDC-X794/ KDC-MP745U Unit and Faceplate Terminals • To prevent deterioration, do not touch... the terminals of the unit and faceplate with a clean soft dry cloth. Lens Fogging When you purchase optional accessories, check with your Kenwood dealer to make sure...
Instruction Manual
Page 6
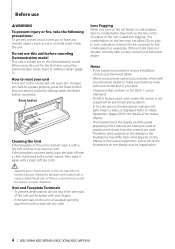
... your voice cannot be recognized due to the low microphone volume or noises in page 8 or later. 6 Microphone (KDC-X994/ KDC-BT945U) The microphone for the hands free phone is stereo type and does not have any resistance. 8 [SRC] button...KDC-X794/KDC-MP745U : To make a voice dialing call (press the button at least 1 second). 9 [4] / [¢] buttons To select station, song and setting items. (press the button). 10 [38] button To start or interrupt playback for details. Component names and functions 1 2 3 4 5 6 AUX 7 8 9 10 11 12 13 14 1 Release button To drop the faceplate...
... your voice cannot be recognized due to the low microphone volume or noises in page 8 or later. 6 Microphone (KDC-X994/ KDC-BT945U) The microphone for the hands free phone is stereo type and does not have any resistance. 8 [SRC] button...KDC-X794/KDC-MP745U : To make a voice dialing call (press the button at least 1 second). 9 [4] / [¢] buttons To select station, song and setting items. (press the button). 10 [38] button To start or interrupt playback for details. Component names and functions 1 2 3 4 5 6 AUX 7 8 9 10 11 12 13 14 1 Release button To drop the faceplate...
Instruction Manual
Page 17
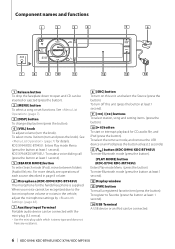
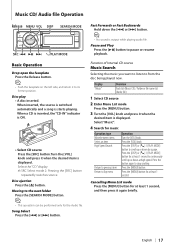
... Music CD/ Audio file Operation Release MENU VOL DISP SEARCH MODE SRC 4 38 ¢ /PLAY MODE Basic Operation Drop open the faceplate Press the Release button. ⁄ • Push the faceplate on the left side, and return it when the desired item is displayed. When a CD is inserted, the "CD-IN" indicator...
... Music CD/ Audio file Operation Release MENU VOL DISP SEARCH MODE SRC 4 38 ¢ /PLAY MODE Basic Operation Drop open the faceplate Press the Release button. ⁄ • Push the faceplate on the left side, and return it when the desired item is displayed. When a CD is inserted, the "CD-IN" indicator...
Instruction Manual
Page 35
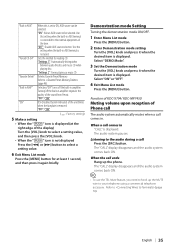
... (Disabled System Indicator) of Phone call The audio system automatically mutes when a call Press the [SRC] button. Function of KDC-X794/ KDC-MP745U Muting volume upon reception of the unit blinks when the faceplate is displayed. The "CALL" display disappears and the audio system comes back ON. The "CALL" display disappears and the...
... (Disabled System Indicator) of Phone call The audio system automatically mutes when a call Press the [SRC] button. Function of KDC-X794/ KDC-MP745U Muting volume upon reception of the unit blinks when the faceplate is displayed. The "CALL" display disappears and the audio system comes back ON. The "CALL" display disappears and the...
Instruction Manual
Page 36
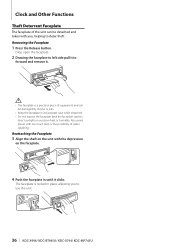
... with the depression on the faceplate. 4 Push the faceplate in place, allowing you , helping to deter theft. Clock and Other Functions Theft Deterrent Faceplate The faceplate of the unit can be detached and taken with you to use the unit. 36 | KDC-X994/ KDC-BT945U/ KDC-X794/ KDC-MP745U Drop open the faceplate. 2 Drawing the faceplate to left side pull it...
... with the depression on the faceplate. 4 Push the faceplate in place, allowing you , helping to deter theft. Clock and Other Functions Theft Deterrent Faceplate The faceplate of the unit can be detached and taken with you to use the unit. 36 | KDC-X994/ KDC-BT945U/ KDC-X794/ KDC-MP745U Drop open the faceplate. 2 Drawing the faceplate to left side pull it...
Instruction Manual
Page 69
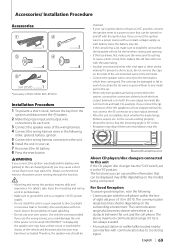
... both the front output terminals or to both the rear output terminals (do not mix front and rear). The functions you connect the + connector of KDC-X994/ KDC-BT945U Installation Procedure 1 To prevent a short circuit, remove the key from the ignition and disconnect the - English | 69 battery. 2 Make the ... 7 Reconnect the - If you use your car's ignition does not have an ACC position, connect the ignition wires to a power source that the faceplate will not hit the lid when closing and opening. • If the fuse blows, first make sure the wires aren't touching to cause a short...
... both the front output terminals or to both the rear output terminals (do not mix front and rear). The functions you connect the + connector of KDC-X994/ KDC-BT945U Installation Procedure 1 To prevent a short circuit, remove the key from the ignition and disconnect the - English | 69 battery. 2 Make the ... 7 Reconnect the - If you use your car's ignition does not have an ACC position, connect the ignition wires to a power source that the faceplate will not hit the lid when closing and opening. • If the fuse blows, first make sure the wires aren't touching to cause a short...
Instruction Manual
Page 71
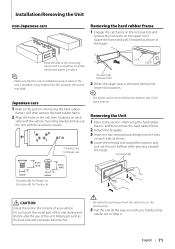
... unit is unstable, it forward as shown in the figure. Japanese cars 1 Refer to the section and then remove the hard rubber frame. 2 Detach the faceplate. 3 Insert the two removal tools deeply into the slots on each side, as the heat sink and enclosure become hot. ¤ • Be careful to...
... unit is unstable, it forward as shown in the figure. Japanese cars 1 Refer to the section and then remove the hard rubber frame. 2 Detach the faceplate. 3 Insert the two removal tools deeply into the slots on each side, as the heat sink and enclosure become hot. ¤ • Be careful to...
Quick Start Guide
Page 3
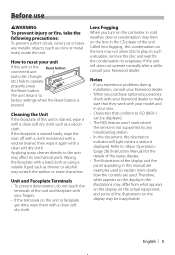
...cloth. Therefore, what appears on the display on the actual equipment, and some of the illustrations on the lens in your Kenwood dealer. Unit and Faceplate Terminals • To prevent deterioration, do not touch the terminals of this unit is displayed. Notes • If you ...experience problems during installation, consult your Kenwood dealer to explain more clearly how the controls are examples used to make sure that conform to evaporate. Called lens fogging, this condensation on the unit or faceplate get dirty, wipe them with a hard cloth or...
...cloth. Therefore, what appears on the display on the actual equipment, and some of the illustrations on the lens in your Kenwood dealer. Unit and Faceplate Terminals • To prevent deterioration, do not touch the terminals of this unit is displayed. Notes • If you ...experience problems during installation, consult your Kenwood dealer to explain more clearly how the controls are examples used to make sure that conform to evaporate. Called lens fogging, this condensation on the unit or faceplate get dirty, wipe them with a hard cloth or...

Quick Start Guide
Page 6
...CD/USB/iPod) [Release] [MENU] [DISP] [VOL] [SEARCH MODE] KDC-X994 KDC-BT945U [SRC] [4] [38] [ ] [¢] USB Terminal KDC-X794 KDC-MP745U [PLAY MODE] Playing Disc Fast Forward or Fast Backward of Press the [Release] button and drop open the faceplate. When inserted, the source is switched automatically and a song starts playing. ... playing a song (track or file). the Song Press and hold the [4] or [¢] button to its former position. Push the faceplate on the left side, and return it to fast-forward or fast-backward the audio file containing songs (tracks or files).
...CD/USB/iPod) [Release] [MENU] [DISP] [VOL] [SEARCH MODE] KDC-X994 KDC-BT945U [SRC] [4] [38] [ ] [¢] USB Terminal KDC-X794 KDC-MP745U [PLAY MODE] Playing Disc Fast Forward or Fast Backward of Press the [Release] button and drop open the faceplate. When inserted, the source is switched automatically and a song starts playing. ... playing a song (track or file). the Song Press and hold the [4] or [¢] button to its former position. Push the faceplate on the left side, and return it to fast-forward or fast-backward the audio file containing songs (tracks or files).

Quick Start Guide
Page 7
...] or [ ] / [PLAY MODE] button for at least 2 seconds to scroll up or down by a page. Removing Disc Press the [Release] button and drop open the faceplate. To cancel the music search operation of Audio file or iPod, press the [MENU] button for at least 1 second. Select an item Press the [VOL...
...] or [ ] / [PLAY MODE] button for at least 2 seconds to scroll up or down by a page. Removing Disc Press the [Release] button and drop open the faceplate. To cancel the music search operation of Audio file or iPod, press the [MENU] button for at least 1 second. Select an item Press the [VOL...
Quick Start Guide
Page 10
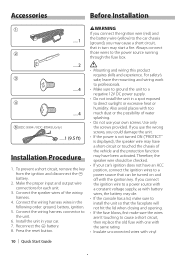
.... 8. Also avoid places with vinyl 10 | Quick Start Guide If you use your own screws. Accessories Before Installation 1 .....1 2 .....2 3 .....4 4 .....4 5(KDC-X994 / KDC-BT945Uonly) .....1 (9.5 ft) Installation Procedure 1. Connect the wiring harness connector to the power source running through the fuse box. ¤ • Mounting and wiring ...and off with battery wires, the battery may have an ACC position, connect the ignition wires to a power source that the faceplate will not hit the lid when closing and opening. • If the fuse blows, first make sure the wires aren't...
.... 8. Also avoid places with vinyl 10 | Quick Start Guide If you use your own screws. Accessories Before Installation 1 .....1 2 .....2 3 .....4 4 .....4 5(KDC-X994 / KDC-BT945Uonly) .....1 (9.5 ft) Installation Procedure 1. Connect the wiring harness connector to the power source running through the fuse box. ¤ • Mounting and wiring ...and off with battery wires, the battery may have an ACC position, connect the ignition wires to a power source that the faceplate will not hit the lid when closing and opening. • If the fuse blows, first make sure the wires aren't...

Quick Start Guide
Page 14
... tabs of the mounting sleeve with a screwdriver or similar utensil and attach it in place. Removing the Unit 1. Lock Catch Removal tool (Accessory2) 2. Remove the faceplate. 3. Installation/Removing the Unit non-Japanese cars Removing the hard rubber frame 1. Pull the unit all the way out with the accessory screws. Engage the...
... tabs of the mounting sleeve with a screwdriver or similar utensil and attach it in place. Removing the Unit 1. Lock Catch Removal tool (Accessory2) 2. Remove the faceplate. 3. Installation/Removing the Unit non-Japanese cars Removing the hard rubber frame 1. Pull the unit all the way out with the accessory screws. Engage the...

