
Instruction Manual
Page 3
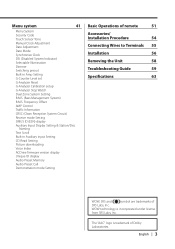
... Picture downloading Voice Index ACDrive firmware version display Unique ID display Audio Preset Memory Audio Preset Call Demonstration mode Setting Accessories/ Installation Procedure 54 Connecting Wires to Terminals 55 Installation 56 Removing the Unit 58 Troubleshooting Guide 59 Specifications 63 WOW, SRS and symbol are trademarks of SRS Labs, Inc. Frequency...
... Picture downloading Voice Index ACDrive firmware version display Unique ID display Audio Preset Memory Audio Preset Call Demonstration mode Setting Accessories/ Installation Procedure 54 Connecting Wires to Terminals 55 Installation 56 Removing the Unit 58 Troubleshooting Guide 59 Specifications 63 WOW, SRS and symbol are trademarks of SRS Labs, Inc. Frequency...
Instruction Manual
Page 54
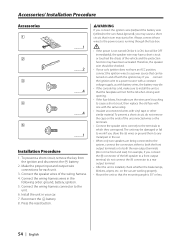
... remove the key from the ignition and disconnect the - battery. 2. Connect the speaker wires of the unconnected wires or the terminals. • Connect the speaker wires correctly to the terminals to both the rear output terminals (do not connect the - ...etc. If you share the - Accessories/ Installation Procedure Accessories 1 2 3 4 5 ..........1 ..........2 ..........4 ..........4 ..........1 Installation Procedure 1. Connect the wiring harness connector to the car chassis (ground), you connect the + connector of the vehicle and the protection function may be turned on and off...
... remove the key from the ignition and disconnect the - battery. 2. Connect the speaker wires of the unconnected wires or the terminals. • Connect the speaker wires correctly to the terminals to both the rear output terminals (do not connect the - ...etc. If you share the - Accessories/ Installation Procedure Accessories 1 2 3 4 5 ..........1 ..........2 ..........4 ..........4 ..........1 Installation Procedure 1. Connect the wiring harness connector to the car chassis (ground), you connect the + connector of the vehicle and the protection function may be turned on and off...
Instruction Manual
Page 55
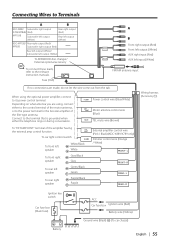
... speaker To front right speaker To rear left output (White) To KENWOOD disc changer/ External optional accessory To connect these leads, refer to the relevant instruction manuals. Connecting Wires to Terminals A B KDC-X889/ Subwoofer right output X789/MP828/ (Red) MP7028 Subwoofer left output... Gray/Black Gray Green/Black Green Purple/Black Purple External amplifier control wire (Pink / Black) (KDC-X889/X789 only) Dimmer control wire (Orange / White) FRONT • L FRONT • R REAR • L REAR • R Wiring harness (Accessory1) Ignition key switch Car fuse box (Main fuse) ...
... speaker To front right speaker To rear left output (White) To KENWOOD disc changer/ External optional accessory To connect these leads, refer to the relevant instruction manuals. Connecting Wires to Terminals A B KDC-X889/ Subwoofer right output X789/MP828/ (Red) MP7028 Subwoofer left output... Gray/Black Gray Green/Black Green Purple/Black Purple External amplifier control wire (Pink / Black) (KDC-X889/X789 only) Dimmer control wire (Orange / White) FRONT • L FRONT • R REAR • L REAR • R Wiring harness (Accessory1) Ignition key switch Car fuse box (Main fuse) ...
Instruction Manual
Page 59
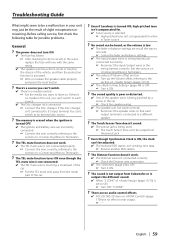
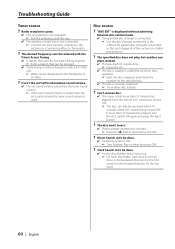
... with one side. ☞ Center the fader and balance settings. ✔ The input/output wires or wiring harness are connected incorrectly. ☞ Reconnect the input/output wires or the wiring harness correctly. Even if Loudness is turned ON, high-pitched tone isn't compensated for. ✔...✔ The preout jack is being pinched by a screw in the car. ☞ Check the speaker wiring. ✔ The speakers are not wired correctly. ☞ Reconnect the speaker wires so that each source. ✔ The Disc changer isn't connected. ☞ Connect the Disc changer. Troubleshooting...
... with one side. ☞ Center the fader and balance settings. ✔ The input/output wires or wiring harness are connected incorrectly. ☞ Reconnect the input/output wires or the wiring harness correctly. Even if Loudness is turned ON, high-pitched tone isn't compensated for. ✔...✔ The preout jack is being pinched by a screw in the car. ☞ Check the speaker wiring. ✔ The speakers are not wired correctly. ☞ Reconnect the speaker wires so that each source. ✔ The Disc changer isn't connected. ☞ Connect the Disc changer. Troubleshooting...
Instruction Manual
Page 60
.... ✔ Another function is to the section on . ? Disc source ? Can't remove disc. ✔ The cause is not connected. ☞ Connect the wire correctly, referring to 0.1 MHz. ? The disc won't insert. ✔ There's already another disc instead. ? It isn't the set Traffic information sound volume. ... Radio reception is poor. ✔ The car antenna is not extended. ☞ Pull the antenna out all the way. ✔ The antenna control wire is that can't be removed within 10 minutes of the section on . ? The desired frequency can't be entered with a 0.01 MHz unit. &#...
.... ✔ Another function is to the section on . ? Disc source ? Can't remove disc. ✔ The cause is not connected. ☞ Connect the wire correctly, referring to 0.1 MHz. ? The disc won't insert. ✔ There's already another disc instead. ? It isn't the set Traffic information sound volume. ... Radio reception is poor. ✔ The car antenna is not extended. ☞ Pull the antenna out all the way. ✔ The antenna control wire is that can't be removed within 10 minutes of the section on . ? The desired frequency can't be entered with a 0.01 MHz unit. &#...


