Instruction Manual
Page 2
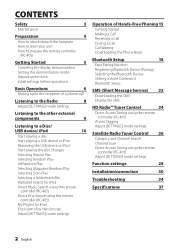
...Easy Pairing function Registering Bluetooth Device (Pairing) Selecting the Bluetooth Device Setting a Voice Command Bluetooth Setup SMS (Short Message Service) 23 Downloading the SMS Display the SMS HD Radio™ Tuner Control 24 Direct Access Tuning using the remote controller (RC-405) iTunes Tagging Adjust [SETTINGS] mode settings Satellite Radio Tuner Control 26 Category and Channel Search Channel Scan Direct Access Tuning using the remote controller (RC-405) Adjust [SETTINGS] mode settings Function settings 28 Installation/connection 30 Troubleshooting 34 Specifications...
...Easy Pairing function Registering Bluetooth Device (Pairing) Selecting the Bluetooth Device Setting a Voice Command Bluetooth Setup SMS (Short Message Service) 23 Downloading the SMS Display the SMS HD Radio™ Tuner Control 24 Direct Access Tuning using the remote controller (RC-405) iTunes Tagging Adjust [SETTINGS] mode settings Satellite Radio Tuner Control 26 Category and Channel Search Channel Scan Direct Access Tuning using the remote controller (RC-405) Adjust [SETTINGS] mode settings Function settings 28 Installation/connection 30 Troubleshooting 34 Specifications...
Instruction Manual
Page 3
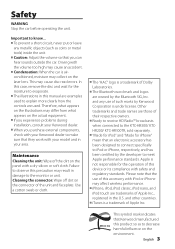
... iPhone, iPod, iPod classic, iPod nano, and iPod touch are owned by the Bluetooth SIG, Inc. Therefore, what appears on the actual equipment. ■ If you experience problems during installation, consult your model and...connect specifically to iPod or iPhone, respectively, and has been certified by Kenwood Corporation is airconditioned, moisture may cause disc read errors. Important to decrease harmful influence on the connector of such marks by the developer to make sure that they work with safety and regulatory standards. Safety WARNING Stop the car before operating the unit...
... iPhone, iPod, iPod classic, iPod nano, and iPod touch are owned by the Bluetooth SIG, Inc. Therefore, what appears on the actual equipment. ■ If you experience problems during installation, consult your model and...connect specifically to iPod or iPhone, respectively, and has been certified by Kenwood Corporation is airconditioned, moisture may cause disc read errors. Important to decrease harmful influence on the connector of such marks by the developer to make sure that they work with safety and regulatory standards. Safety WARNING Stop the car before operating the unit...
Instruction Manual
Page 5
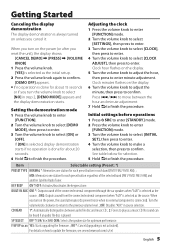
... [FUNCTION] mode. 2 Turn the volume knob to select [SETTINGS], then press to enter. 3 Turn the volume knob to select [CLOCK], then press to enter. 4 Turn the volume knob to select [CLOCK ADJUST], then press to finish the procedure. Item Selectable setting (Preset: *) PRESET TYPE NORMAL *: Memorizes one station for optimum performance. ON2: Outputs sound from the connected external component when "AUX" is played. BUILT-IN AUX ON1 *: Outputs sound of the selected band (FM1/ FM2/ FM3/ AM) and another Satellite Radio Tuner...
... [FUNCTION] mode. 2 Turn the volume knob to select [SETTINGS], then press to enter. 3 Turn the volume knob to select [CLOCK], then press to enter. 4 Turn the volume knob to select [CLOCK ADJUST], then press to finish the procedure. Item Selectable setting (Preset: *) PRESET TYPE NORMAL *: Memorizes one station for optimum performance. ON2: Outputs sound from the connected external component when "AUX" is played. BUILT-IN AUX ON1 *: Outputs sound of the selected band (FM1/ FM2/ FM3/ AM) and another Satellite Radio Tuner...
Instruction Manual
Page 7
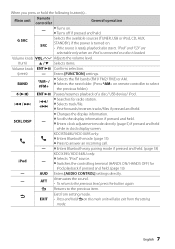
... available sources (TUNER, USB or iPod, CD, AUX, SRC STANDBY), if the power is turned on . ■ Turns off if pressed and held . ■ Changes the display information. ATT Attenuates the sound. • To return to the previous item. "iPod" and "CD" are selectable only when an iPod is connected or a disc is ready, playback also starts. Main unit Remote controller General operation - ■ Turns on . • If the source is loaded. Enters [FUNCTION] settings.
... available sources (TUNER, USB or iPod, CD, AUX, SRC STANDBY), if the power is turned on . ■ Turns off if pressed and held . ■ Changes the display information. ATT Attenuates the sound. • To return to the previous item. "iPod" and "CD" are selectable only when an iPod is connected or a disc is ready, playback also starts. Main unit Remote controller General operation - ■ Turns on . • If the source is loaded. Enters [FUNCTION] settings.
Instruction Manual
Page 8
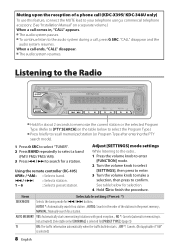
... select [SETTINGS], then press to enter. 3 Turn the volume knob to make a selection, then press to search for a station. Muting upon the reception of the stations in the preset memory. ; Listening to the Radio ■ Hold for about 2 seconds to memorize the current station or the selected Program Type. (Refer to [PTY SEARCH] on a separate volume.) When a call ends, "CALL" disappear. ■ The audio system resumes. Using the remote controller...
... select [SETTINGS], then press to enter. 3 Turn the volume knob to make a selection, then press to search for a station. Muting upon the reception of the stations in the preset memory. ; Listening to the Radio ■ Hold for about 2 seconds to memorize the current station or the selected Program Type. (Refer to [PTY SEARCH] on a separate volume.) When a call ends, "CALL" disappear. ■ The audio system resumes. Using the remote controller...

Instruction Manual
Page 10
... (optional accessory) Apple iPod (commercially available) KCA-iP102 (optional accessory) Removing the USB device or iPod 1 Press SRC to pause. Start playing a disc 1 Press SRC to turn on the power. 2 Slide open the cover. 3 Connect a USB device or iPod to turn on the power. 2 Insert a disc into the loading slot. Playback starts automatically. USB terminal Press to select a source other than "USB" or "iPod". 2 Remove the USB device or iPod. The source automatically switches, and playback starts.
... (optional accessory) Apple iPod (commercially available) KCA-iP102 (optional accessory) Removing the USB device or iPod 1 Press SRC to pause. Start playing a disc 1 Press SRC to turn on the power. 2 Slide open the cover. 3 Connect a USB device or iPod to turn on the power. 2 Insert a disc into the loading slot. Playback starts automatically. USB terminal Press to select a source other than "USB" or "iPod". 2 Remove the USB device or iPod. The source automatically switches, and playback starts.
Instruction Manual
Page 13
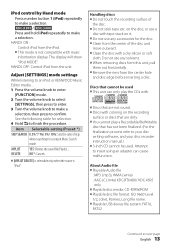
... display will show "iPod MODE". Adjust [SETTINGS] mode settings While listening to an iPod or KENWOOD Music Editor media ... 1 Press the volume knob to enter [FUNCTION] mode. 2 Turn the volume knob to select [SETTINGS], then press to enter. 3 Turn the volume knob to make a selection. MPLIST YES: Deletes the saved My Playlist. ; DELETE NO *: Cancels. ■ [MPLIST DELETE] is selectable only when the source is not compatible with coloring on it. ■ Do not use any...
... display will show "iPod MODE". Adjust [SETTINGS] mode settings While listening to an iPod or KENWOOD Music Editor media ... 1 Press the volume knob to enter [FUNCTION] mode. 2 Turn the volume knob to select [SETTINGS], then press to enter. 3 Turn the volume knob to make a selection. MPLIST YES: Deletes the saved My Playlist. ; DELETE NO *: Cancels. ■ [MPLIST DELETE] is selectable only when the source is not compatible with coloring on it. ■ Do not use any...
Instruction Manual
Page 15
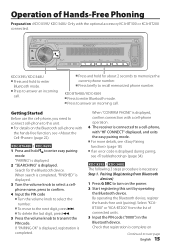
... necessary. Pairing (Registering from the list of Hands-Free Phoning Preparation : KDC-X395/ KDC-348U: Only with a cell-phone operation. 6 The receiver is displayed during paring, see (page 22). Step 1. KDC-X395/ KDC-348U ■ Press and hold to enter Bluetooth mode. ■ Press to turn on the power. 2 Start registering this unit. ■ For details on Continued to transmit the PIN code. Operation of connected units. 3 Input the PIN code ("0000") in the Bluetooth device.
... necessary. Pairing (Registering from the list of Hands-Free Phoning Preparation : KDC-X395/ KDC-348U: Only with a cell-phone operation. 6 The receiver is displayed during paring, see (page 22). Step 1. KDC-X395/ KDC-348U ■ Press and hold to enter Bluetooth mode. ■ Press to turn on the power. 2 Start registering this unit. ■ For details on Continued to transmit the PIN code. Operation of connected units. 3 Input the PIN code ("0000") in the Bluetooth device.
Instruction Manual
Page 16
... the last digit, press 4. ■ Press number button (1 - 0), #(FM+), HM: Home ; PIN code is connected, the "BT" indicator lights up. KDC-X395 / KDC-348U Press and hold . ■ To exit Bluetooth mode, press SRC. "OUTGOING"/ "INCOMING"/ "MISSED CALLS": Calling a Number in the cell-phone memory. Refer to [PIN CODE EDIT] under (page 22). 4 By operating the Bluetooth device, start searching. 6 Turn the volume knob to select a name and category. ■ To...
... the last digit, press 4. ■ Press number button (1 - 0), #(FM+), HM: Home ; PIN code is connected, the "BT" indicator lights up. KDC-X395 / KDC-348U Press and hold . ■ To exit Bluetooth mode, press SRC. "OUTGOING"/ "INCOMING"/ "MISSED CALLS": Calling a Number in the cell-phone memory. Refer to [PIN CODE EDIT] under (page 22). 4 By operating the Bluetooth device, start searching. 6 Turn the volume knob to select a name and category. ■ To...

Instruction Manual
Page 18
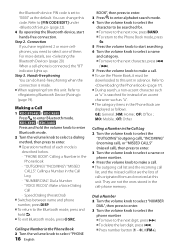
... operating the cell-phone, start the hands-free connection. ■ To clear the downloading completion message, press any button. ■ Up to 1000 phone numbers can be registered for each registered cell-phone. ■ Up to this case, try downloading manually. ■ To cancel downloading of the following is displayed depending on the type of characters.) Using the remote controller (RC-405) Making a call . Easy Pairing function • KDC-BT648U/ KDC-X695...
... operating the cell-phone, start the hands-free connection. ■ To clear the downloading completion message, press any button. ■ Up to 1000 phone numbers can be registered for each registered cell-phone. ■ Up to this case, try downloading manually. ■ To cancel downloading of the following is displayed depending on the type of characters.) Using the remote controller (RC-405) Making a call . Easy Pairing function • KDC-BT648U/ KDC-X695...
Instruction Manual
Page 19
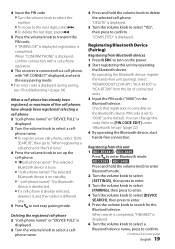
... (page 34). Registering Bluetooth Device (Pairing) Registering from this unit 1 KDC-BT648U / KDC-X695 Press to turn on the Bluetooth device. PIN code is complete on the power. 2 Start registering this code. Registering from Bluetooth devices 1 Press SRC to enter Bluetooth mode. "DELETE" is completed. By operating the Bluetooth device, register the hands-free unit (pairing). If "PAIRING OK" is displayed, registration is displayed. 5 Turn the volume knob to select "YES", then press to delete the selected cell-phone. Select "KENWOOD BT CD/R-3P1...
... (page 34). Registering Bluetooth Device (Pairing) Registering from this unit 1 KDC-BT648U / KDC-X695 Press to turn on the Bluetooth device. PIN code is complete on the power. 2 Start registering this code. Registering from Bluetooth devices 1 Press SRC to enter Bluetooth mode. "DELETE" is completed. By operating the Bluetooth device, register the hands-free unit (pairing). If "PAIRING OK" is displayed, registration is displayed. 5 Turn the volume knob to select "YES", then press to delete the selected cell-phone. Select "KENWOOD BT CD/R-3P1...
Instruction Manual
Page 20
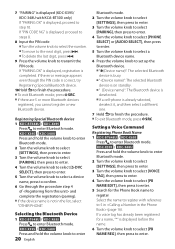
.... ■ To exit Bluetooth mode, press SRC. Setting a Voice Command Registering Phone Book Name 1 KDC-BT648U / KDC-X695 Press to enter Bluetooth mode. KDC-X395 / KDC-348U Press and hold the volume knob to enter Bluetooth mode. 2 Turn the volume knob to select [SETTINGS], then press to enter. 3 Turn the volume knob to select [PAIRING], then press to enter. 4 Turn the volume knob to select [S-DVC SELECT], then press to enter. 5 Turn the volume knob to select a device name, press to...
.... ■ To exit Bluetooth mode, press SRC. Setting a Voice Command Registering Phone Book Name 1 KDC-BT648U / KDC-X695 Press to enter Bluetooth mode. KDC-X395 / KDC-348U Press and hold the volume knob to enter Bluetooth mode. 2 Turn the volume knob to select [SETTINGS], then press to enter. 3 Turn the volume knob to select [PAIRING], then press to enter. 4 Turn the volume knob to select [S-DVC SELECT], then press to enter. 5 Turn the volume knob to select a device name, press to...

Instruction Manual
Page 25
... 4 / ¢ buttons. Using the remote controller (RC-405) #FM+ / *AM- : Selects band. 4 / +¢ : Selects station. 1 - 6 : Selects preset station. Pressing and holding while "TAG" is no button operation for [PRESET TYPE].) (page 5) RECEIVE MODE AUTO *: Automatically tunes to analog broadcast when there is lit saves song's information. NO *: Cancels (automatic memorizing is not activated). (Selectable only if [NORM] is selected for 10 seconds, the Direct Access Tuning mode is automatically canceled. TAG MEMORY Only with...
... 4 / ¢ buttons. Using the remote controller (RC-405) #FM+ / *AM- : Selects band. 4 / +¢ : Selects station. 1 - 6 : Selects preset station. Pressing and holding while "TAG" is no button operation for [PRESET TYPE].) (page 5) RECEIVE MODE AUTO *: Automatically tunes to analog broadcast when there is lit saves song's information. NO *: Cancels (automatic memorizing is not activated). (Selectable only if [NORM] is selected for 10 seconds, the Direct Access Tuning mode is automatically canceled. TAG MEMORY Only with...
Instruction Manual
Page 28
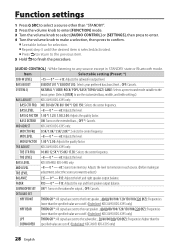
... each source. (Before making an adjustment, select the source you want to use the customized bass, middle, and treble settings.) BASS ADJUST KDC-X695/ KDC-X395 only: BASS CTR FRQ 40/ 50/ 60/ 70/ 80/ 100 */ 120/ 150: Selects the center frequency. OFF: Cancels. SYSTEM Q NATURAL */ USER/ ROCK/ POPS/ EASY/ TOP40/ JAZZ/ GAME: Selects a preset sound mode suitable to the music genre. (Selects [USER] to adjust.) BALANCE L15 - 0 * - F15: Adjusts the rear and front speaker output balance. SUBWOOFER SET ON *: Turns on the extended bass. ; BASS Q FACTOR...
... each source. (Before making an adjustment, select the source you want to use the customized bass, middle, and treble settings.) BASS ADJUST KDC-X695/ KDC-X395 only: BASS CTR FRQ 40/ 50/ 60/ 70/ 80/ 100 */ 120/ 150: Selects the center frequency. OFF: Cancels. SYSTEM Q NATURAL */ USER/ ROCK/ POPS/ EASY/ TOP40/ JAZZ/ GAME: Selects a preset sound mode suitable to the music genre. (Selects [USER] to adjust.) BALANCE L15 - 0 * - F15: Adjusts the rear and front speaker output balance. SUBWOOFER SET ON *: Turns on the extended bass. ; BASS Q FACTOR...
Instruction Manual
Page 30
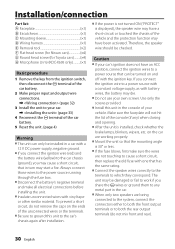
.... Installation/connection Part list: A Faceplate 1) B Escutcheon 1) C Mounting sleeve 1) D Wiring harness 1) E Removal tool 2) F Flat head screw (for Nissan cars 4) G Round head screw (for Toyota cars 4) H Microphone (3 m) (KDC-X695 only 1) Basic procedure 1 Remove the key from the ignition switch, then disconnect the · terminal of the car battery. 2 Make proper input and output wire connections. \ (page 32) 3 Install the unit to your car. \ (page 33) 4 Reconnect the · terminal of the car battery. 5 Reset the unit. (page 4) Warning ■ The unit can be turned...
.... Installation/connection Part list: A Faceplate 1) B Escutcheon 1) C Mounting sleeve 1) D Wiring harness 1) E Removal tool 2) F Flat head screw (for Nissan cars 4) G Round head screw (for Toyota cars 4) H Microphone (3 m) (KDC-X695 only 1) Basic procedure 1 Remove the key from the ignition switch, then disconnect the · terminal of the car battery. 2 Make proper input and output wire connections. \ (page 32) 3 Install the unit to your car. \ (page 33) 4 Reconnect the · terminal of the car battery. 5 Reset the unit. (page 4) Warning ■ The unit can be turned...
Instruction Manual
Page 31
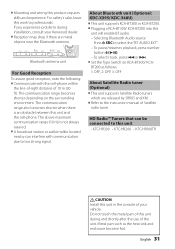
... BT audio. - ■ Mounting and wiring this work to professionals. For safety's sake, leave this product requires skills and experience. Selecting Bluetooth Audio source Press SRC to select the "BT AUDIO EXT". - Do not touch the metal part of 10 m (30 ft). About Bluetooth unit (Optional: KDC-X395/ KDC-348U) ■ This unit supports KCA-BT300 or KCA-BT200. ■ Plugging a KCA-BT300/ KCA-BT200 into this unit during installation...
... BT audio. - ■ Mounting and wiring this work to professionals. For safety's sake, leave this product requires skills and experience. Selecting Bluetooth Audio source Press SRC to select the "BT AUDIO EXT". - Do not touch the metal part of 10 m (30 ft). About Bluetooth unit (Optional: KDC-X395/ KDC-348U) ■ This unit supports KCA-BT300 or KCA-BT200. ■ Plugging a KCA-BT300/ KCA-BT200 into this unit during installation...
Instruction Manual
Page 32
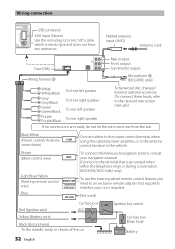
... remote adapter (not supplied) matches your navigation manual. (Connect to the terminal that is grounded when either to the power control terminal when using the optional power amplifier, or to the relevant instruction manuals.) If no connections are made, do not let the wire come out from the tab. Wiring connection USB connector AUX input (Stereo) Use the mini-plug (3.5 mm; 1/8") cable which is required. (Not used) Red (Ignition wire) Car fuse box ACC Ignition key switch Yellow (Battery wire...
... remote adapter (not supplied) matches your navigation manual. (Connect to the terminal that is grounded when either to the power control terminal when using the optional power amplifier, or to the relevant instruction manuals.) If no connections are made, do not let the wire come out from the tab. Wiring connection USB connector AUX input (Stereo) Use the mini-plug (3.5 mm; 1/8") cable which is required. (Not used) Red (Ignition wire) Car fuse box ACC Ignition key switch Yellow (Battery wire...
Instruction Manual
Page 34
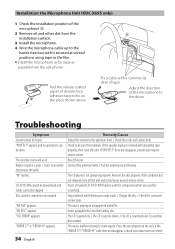
.... Disc sound is not operating properly. The CD player is sometimes interrupted. "IN" flashes. Stop playback while driving on the unit. Installation the Microphone Unit (KDC-X695 only) 1 Check the installation position of the microphone H. 2 Remove oil and other dirt from the H installation surface. 3 Install the microphone. 4 Wire the microphone cable up to the hands-free box with a commercial item of tape. "TOC ERROR" appears. Remedy/Cause Adjust the volume to...
.... Disc sound is not operating properly. The CD player is sometimes interrupted. "IN" flashes. Stop playback while driving on the unit. Installation the Microphone Unit (KDC-X695 only) 1 Check the installation position of the microphone H. 2 Remove oil and other dirt from the H installation surface. 3 Install the microphone. 4 Wire the microphone cable up to the hands-free box with a commercial item of tape. "TOC ERROR" appears. Remedy/Cause Adjust the volume to...
Instruction Manual
Page 35
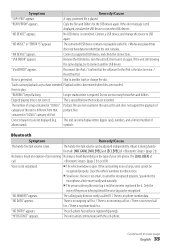
.... Continued to connect another track or change the source to play . Longer readout time is no missed call list. / There is no phone number data. If the surrounding noise is determined when files are recorded. "NO NUMBER" appears. Remove the USB device, turn the unit off, then turn it . If the unit still showing the same display, try to next page English 35 A copy-protected file is...
.... Continued to connect another track or change the source to play . Longer readout time is no missed call list. / There is no phone number data. If the surrounding noise is determined when files are recorded. "NO NUMBER" appears. Remove the USB device, turn the unit off, then turn it . If the unit still showing the same display, try to next page English 35 A copy-protected file is...

Instruction Manual
Page 36
... "MEMORY FULL" appears. The procedure preset with the cell-phone. If this message still appears, press the reset button on the control unit. The PIN code is FULL. The unit cannot be connected to be recognized. "TOO LOUD" appears. "NO PHONEBOOK" appears. No short message in the phone book. "NO TAG FNC" appears. "HF ERROR 68" appears. "TOO SOFT" appears. another Bluetooth device away from the Bluetooth audio player...
... "MEMORY FULL" appears. The procedure preset with the cell-phone. If this message still appears, press the reset button on the control unit. The PIN code is FULL. The unit cannot be connected to be recognized. "TOO LOUD" appears. "NO PHONEBOOK" appears. No short message in the phone book. "NO TAG FNC" appears. "HF ERROR 68" appears. "TOO SOFT" appears. another Bluetooth device away from the Bluetooth audio player...


