

Instruction Manual
Page 2
... preout Built-in Auxiliary input Setting CD Read Setting AMP Control Receive mode Setting Basic Operations of remote 30 Accessories/ 18 Installation Procedure 32 Connecting Wires to Terminals 33 Installation 34 Removing the Unit 36 Troubleshooting Guide 37 20 Specifications 40
... preout Built-in Auxiliary input Setting CD Read Setting AMP Control Receive mode Setting Basic Operations of remote 30 Accessories/ 18 Installation Procedure 32 Connecting Wires to Terminals 33 Installation 34 Removing the Unit 36 Troubleshooting Guide 37 20 Specifications 40

Instruction Manual
Page 4
... your fingers caught between the faceplate and the unit. • Do not apply excessive force to the moving faceplate. If you use automotive-grade wires or other wires with the wrong rating may cause your own screws. Doing so will cause damage or breakdown. • Do not use your unit to malfunction... or metal tools) inside the unit. • If the unit starts to emit smoke or strange smells, turn off the power immediately and consult your Kenwood dealer. • Make sure not to get your fingers. • Do not subject the faceplate to excessive shock, as it . Doing so will cause ...
... your fingers caught between the faceplate and the unit. • Do not apply excessive force to the moving faceplate. If you use automotive-grade wires or other wires with the wrong rating may cause your own screws. Doing so will cause damage or breakdown. • Do not use your unit to malfunction... or metal tools) inside the unit. • If the unit starts to emit smoke or strange smells, turn off the power immediately and consult your Kenwood dealer. • Make sure not to get your fingers. • Do not subject the faceplate to excessive shock, as it . Doing so will cause ...
Instruction Manual
Page 32
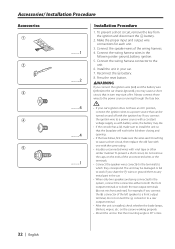
...terminals (do not mix front and rear). Connect the wiring harness wires in turn may be turned on the ends of the wiring harness. 4. Reconnect the - Always connect those wires to a power source that the mounting angle is installed... Accessories/ Installation Procedure Accessories 1 2 3 4 5 ..........1 ..........2 ..........4 ..........4 ..........1 Installation Procedure 1. Connect the speaker wires of the unconnected wires or the terminals. • Connect the speaker wires correctly to the terminals to a rear output terminal. • After the unit is 30° or less. ...
...terminals (do not mix front and rear). Connect the wiring harness wires in turn may be turned on the ends of the wiring harness. 4. Reconnect the - Always connect those wires to a power source that the mounting angle is installed... Accessories/ Installation Procedure Accessories 1 2 3 4 5 ..........1 ..........2 ..........4 ..........4 ..........1 Installation Procedure 1. Connect the speaker wires of the unconnected wires or the terminals. • Connect the speaker wires correctly to the terminals to a rear output terminal. • After the unit is 30° or less. ...

Instruction Manual
Page 33
... External amplifier control wire (Pink / Black) (KDC-X679 only) Dimmer control wire (Orange / White) White/Black To front left speaker White To front right speaker Gray/Black Gray To rear left output (White) (KDC-MP625/MP6025 only) Rear right output (Red) / Sub Woofer right output (Red) (KDC-MP625/MP6025 only) FM/AM antenna input KENWOOD disc changer...
... External amplifier control wire (Pink / Black) (KDC-X679 only) Dimmer control wire (Orange / White) White/Black To front left speaker White To front right speaker Gray/Black Gray To rear left output (White) (KDC-MP625/MP6025 only) Rear right output (Red) / Sub Woofer right output (Red) (KDC-MP625/MP6025 only) FM/AM antenna input KENWOOD disc changer...

Instruction Manual
Page 37
...changer. The Touch Sensor Tone doesn't sound. ✔ The preout jack is touching a metal part of the car. ☞ Pull the TEL mute wire away from the preout jack. ? The desired frequency can't be entered with the Direct Access Tuning. ✔ A station that can't be received ...to one with one side. ☞ Center the fader and balance settings. ✔ The input/output wires or wiring harness are connected incorrectly. ☞ Reconnect the input/output wires or the wiring harness correctly. Troubleshooting Guide What might seem to be a malfunction in your unit may just be the ...
...changer. The Touch Sensor Tone doesn't sound. ✔ The preout jack is touching a metal part of the car. ☞ Pull the TEL mute wire away from the preout jack. ? The desired frequency can't be entered with the Direct Access Tuning. ✔ A station that can't be received ...to one with one side. ☞ Center the fader and balance settings. ✔ The input/output wires or wiring harness are connected incorrectly. ☞ Reconnect the input/output wires or the wiring harness correctly. Troubleshooting Guide What might seem to be a malfunction in your unit may just be the ...


