

Instruction manual
Page 39
... shortly after installation. - Be sure to the car's chassis again after use of less than 30º. • If your vehicle wiring harness does not have the ignition terminal, connect Ignition wire (red) to the terminal on the power. 6 Detach the faceplate and reset the unit. ( 3) ENGLISH 35 INSTALLATION/CONNECTION Warning • The...
... shortly after installation. - Be sure to the car's chassis again after use of less than 30º. • If your vehicle wiring harness does not have the ignition terminal, connect Ignition wire (red) to the terminal on the power. 6 Detach the faceplate and reset the unit. ( 3) ENGLISH 35 INSTALLATION/CONNECTION Warning • The...

Instruction manual
Page 40
... as illustrated before fitting. INSTALLATION/CONNECTION Installing the unit (in the unit (on the top side Orientate the trim plate as shown on the illustration. (D) Wiring harness (E) Extraction key (F) Screws (supplied for installation (A) Faceplate Hook on both sides of the trim plate, then pull it out. 3 Insert the extraction keys deeply into... When installing without the mounting sleeve 1 Remove the mounting sleeve and trim plate from the unit. 2 Align the holes in -dash mounting) Do the required wiring. ( 37) Part list for / ) 36 ENGLISH
... as illustrated before fitting. INSTALLATION/CONNECTION Installing the unit (in the unit (on the top side Orientate the trim plate as shown on the illustration. (D) Wiring harness (E) Extraction key (F) Screws (supplied for installation (A) Faceplate Hook on both sides of the trim plate, then pull it out. 3 Insert the extraction keys deeply into... When installing without the mounting sleeve 1 Remove the mounting sleeve and trim plate from the unit. 2 Align the holes in -dash mounting) Do the required wiring. ( 37) Part list for / ) 36 ENGLISH

Instruction manual
Page 41
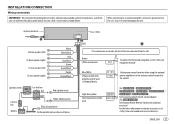
... installing the unit with a commercially available custom wiring harness specific for your car and leave this job to professionals for your car audio dealer. Consult your safety. Brown (Mute control wire) To connect the Kenwood navigation system, refer your navigation manual Blue/White (Power control wire/ Antenna control wire) (12 V 350 mA) Light blue/yellow (Steering...
... installing the unit with a commercially available custom wiring harness specific for your car and leave this job to professionals for your car audio dealer. Consult your safety. Brown (Mute control wire) To connect the Kenwood navigation system, refer your navigation manual Blue/White (Power control wire/ Antenna control wire) (12 V 350 mA) Light blue/yellow (Steering...
Instruction Manual 1
Page 39
... first make sure the wires are not touching car's chassis, then replace the old fuse with vinyl tape. - on the power. 6 Detach the faceplate and reset the unit. ( 3) ENGLISH 35 See Installing the unit (in the console of your vehicle wiring harness does not have the ...ignition terminal, connect Ignition wire (red) to protect the wires. Basic procedure 1 Remove the key from heat dissipate metal parts. • After the unit is installed,...
... first make sure the wires are not touching car's chassis, then replace the old fuse with vinyl tape. - on the power. 6 Detach the faceplate and reset the unit. ( 3) ENGLISH 35 See Installing the unit (in the console of your vehicle wiring harness does not have the ...ignition terminal, connect Ignition wire (red) to protect the wires. Basic procedure 1 Remove the key from heat dissipate metal parts. • After the unit is installed,...

Instruction Manual 1
Page 40
... sleeve and trim plate from the unit. 2 Align the holes in -dash mounting) Do the required wiring. ( 37) Part list for installation (A) Faceplate Hook on the top side Orientate the trim plate as shown on the illustration. (D) Wiring harness (E) Extraction key (F) Screws (supplied for / ) 36 ENGLISH Using wrong screws might damage the unit...
... sleeve and trim plate from the unit. 2 Align the holes in -dash mounting) Do the required wiring. ( 37) Part list for installation (A) Faceplate Hook on the top side Orientate the trim plate as shown on the illustration. (D) Wiring harness (E) Extraction key (F) Screws (supplied for / ) 36 ENGLISH Using wrong screws might damage the unit...
Instruction Manual 1
Page 41
Brown (Mute control wire) To connect the Kenwood navigation system, refer your navigation manual Blue/White (Power control wire/ Antenna control wire) (12 V 350 mA) Light blue/yellow (Steering remote control wire) To the power control terminal when using the optional power amplifier or to ...of the car If no connections are made, do not let the wire come out from the tab. INSTALLATION/CONNECTION Wiring connection IMPORTANT : We recommend installing the unit with a commercially available custom wiring harness specific for your safety. Consult your car audio dealer. When connecting...
Brown (Mute control wire) To connect the Kenwood navigation system, refer your navigation manual Blue/White (Power control wire/ Antenna control wire) (12 V 350 mA) Light blue/yellow (Steering remote control wire) To the power control terminal when using the optional power amplifier or to ...of the car If no connections are made, do not let the wire come out from the tab. INSTALLATION/CONNECTION Wiring connection IMPORTANT : We recommend installing the unit with a commercially available custom wiring harness specific for your safety. Consult your car audio dealer. When connecting...


