
User Manual
Page 2
... Direct Track/File Search Direct Disc Search Track/File/Disc/Folder Repeat Scan Play Random Play Magazine Random Play Folder Select Text/Title Scroll Menu system 16 Menu System Security Code Touch Sensor Tone Manual Clock Adjustment DSI (Disabled System Indicator) Supreme Setting CRSC (Clean Reception System Circuit) Auxiliary Input Display Setting Text Scroll CD Read Setting Basic Operations of remote control 20 Accessories/ Installation Procedure 22 Connecting Wires to Terminals 23 Installation 24 Removing the Unit 26 Troubleshooting Guide 27 Specifications...
... Direct Track/File Search Direct Disc Search Track/File/Disc/Folder Repeat Scan Play Random Play Magazine Random Play Folder Select Text/Title Scroll Menu system 16 Menu System Security Code Touch Sensor Tone Manual Clock Adjustment DSI (Disabled System Indicator) Supreme Setting CRSC (Clean Reception System Circuit) Auxiliary Input Display Setting Text Scroll CD Read Setting Basic Operations of remote control 20 Accessories/ Installation Procedure 22 Connecting Wires to Terminals 23 Installation 24 Removing the Unit 26 Troubleshooting Guide 27 Specifications...
User Manual
Page 3
... touch the terminals of precision equipment. • When replacing a fuse, only use the wrong screws, you connect them incorrectly. If you use a new fuse with your Kenwood dealer for connectable models of the unit. About CD players/disc changers connected to this unit. Set the "O-N" Switch to the catalog or consult your fingers. • Do not subject the faceplate to direct sunlight or excessive heat or humidity. Refer to...
... touch the terminals of precision equipment. • When replacing a fuse, only use the wrong screws, you connect them incorrectly. If you use a new fuse with your Kenwood dealer for connectable models of the unit. About CD players/disc changers connected to this unit. Set the "O-N" Switch to the catalog or consult your fingers. • Do not subject the faceplate to direct sunlight or excessive heat or humidity. Refer to...
User Manual
Page 4
... controls are displayed. therefore, refer to the unit may differ from the Instruction manual; The unit returns to factory settings when the Reset button is utilizing laser beams that they work with a dry, soft cloth. 4 | English After memory storage is finished, the number of the illustrations on the unit or faceplate get dirty, wipe them with your area. • If the unit fails to press [DISP] button, use [AUTO] button...
... controls are displayed. therefore, refer to the unit may differ from the Instruction manual; The unit returns to factory settings when the Reset button is utilizing laser beams that they work with a dry, soft cloth. 4 | English After memory storage is finished, the number of the illustrations on the unit or faceplate get dirty, wipe them with your area. • If the unit fails to press [DISP] button, use [AUTO] button...
User Manual
Page 7
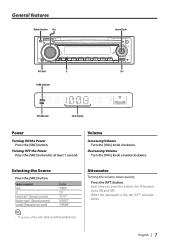
...) Auxiliary input* (Optional accessory) Standby (Illumination only mode) Display "TUNER" "CD" "CD CH" "AUX EXT" "STANDBY" • * Function of the KDC-MP4533/MP4033/MP4033S. Each time you press the button, the Attenuator turns ON and OFF. English | 7 Volume Increasing Volume Turn the [VOL] knob clockwise. Selecting the Source Press the [SRC] button. When the Attenuator is ON, the "ATT" indicator blinks. General features Release button Control knob LOUD indicator ATT indicator Clock display Power Turning...
...) Auxiliary input* (Optional accessory) Standby (Illumination only mode) Display "TUNER" "CD" "CD CH" "AUX EXT" "STANDBY" • * Function of the KDC-MP4533/MP4033/MP4033S. Each time you press the button, the Attenuator turns ON and OFF. English | 7 Volume Increasing Volume Turn the [VOL] knob clockwise. Selecting the Source Press the [SRC] button. When the Attenuator is ON, the "ATT" indicator blinks. General features Release button Control knob LOUD indicator ATT indicator Clock display Power Turning...

User Manual
Page 8
... 9). Adjustment Item Display Range Bass level "BAS L" -8 - +8 Middle level "MID L" -8 - +8 Treble level "TRE L" -8 - +8 Balance "BAL" Left 15 - Sound setting Natural Rock Pops Easy Top 40 Jazz Display "NATURAL" "ROCK" "POPS" "EASY" "TOP40" "JAZZ" • Change each source's volume as Volume offset and Loudness. 1 Select the source to adjust Press the [SRC] button. 2 Enter Audio Setup mode Press the [VOL] knob for at least 1 second. 8 | English Right 15 Fader "FAD" Rear 15 - Each time you...
... 9). Adjustment Item Display Range Bass level "BAS L" -8 - +8 Middle level "MID L" -8 - +8 Treble level "TRE L" -8 - +8 Balance "BAL" Left 15 - Sound setting Natural Rock Pops Easy Top 40 Jazz Display "NATURAL" "ROCK" "POPS" "EASY" "TOP40" "JAZZ" • Change each source's volume as Volume offset and Loudness. 1 Select the source to adjust Press the [SRC] button. 2 Enter Audio Setup mode Press the [VOL] knob for at least 1 second. 8 | English Right 15 Fader "FAD" Rear 15 - Each time you...
User Manual
Page 9
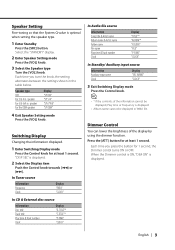
... name Play time & Track number Clock Display "TITLE"* "ALBUM"* "FOLDER" "FILE" "P-TIME" "CLOCK" In Standby/ Auxiliary input source Information Auxiliary input name Clock Display "SRC NAME" "CLOCK" 3 Exit Switching Display mode Press the Control knob. • * If the contents of the display by using the dimmer function. Each time you press the button for at least 1 second. Speaker Setting Fine-tuning so that the System Q value is displayed. • Album name cannot be displayed, Play time or Frequency is optimal when setting the speaker type...
... name Play time & Track number Clock Display "TITLE"* "ALBUM"* "FOLDER" "FILE" "P-TIME" "CLOCK" In Standby/ Auxiliary input source Information Auxiliary input name Clock Display "SRC NAME" "CLOCK" 3 Exit Switching Display mode Press the Control knob. • * If the contents of the display by using the dimmer function. Each time you press the button for at least 1 second. Speaker Setting Fine-tuning so that the System Q value is displayed. • Album name cannot be displayed, Play time or Frequency is optimal when setting the speaker type...
User Manual
Page 10
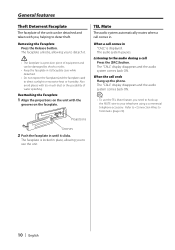
.... • Do not expose the faceplate (and the faceplate case) to direct sunlight or excessive heat or humidity. The audio system pauses. Removing the Faceplate Press the Release button. When a call Press the [SRC] button. Refer to use the TEL Mute feature, you to (page 23). The faceplate unlocks, allowing you , helping to detach it clicks. The faceplate is locked in until it...
.... • Do not expose the faceplate (and the faceplate case) to direct sunlight or excessive heat or humidity. The audio system pauses. Removing the Faceplate Press the Release button. When a call Press the [SRC] button. Refer to use the TEL Mute feature, you to (page 23). The faceplate unlocks, allowing you , helping to detach it clicks. The faceplate is locked in until it...
User Manual
Page 11
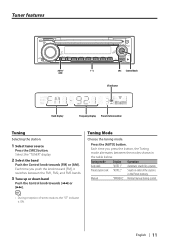
... up or down band Push the Control knob towards [FM] or [AM]. Each time you push the knob toward [FM], it switches between the modes shown in the Preset memory. Tuner features Control knob ST indicator Band display Frequency display Preset station number Tuning Selecting the station. 1 Select tuner source Press the [SRC] button. Tuning Mode Choose the tuning mode. Tuning mode Auto seek Preset station seek Manual Display "AUTO 1" "AUTO 2" "MANUAL" Operation Automatic search for a station. Select the "TUNER" display. 2 Select the band Push the Control knob towards [4] or [¢...
... up or down band Push the Control knob towards [FM] or [AM]. Each time you push the knob toward [FM], it switches between the modes shown in the Preset memory. Tuner features Control knob ST indicator Band display Frequency display Preset station number Tuning Selecting the station. 1 Select tuner source Press the [SRC] button. Tuning Mode Choose the tuning mode. Tuning mode Auto seek Preset station seek Manual Display "AUTO 1" "AUTO 2" "MANUAL" Operation Automatic search for a station. Select the "TUNER" display. 2 Select the band Push the Control knob towards [4] or [¢...

User Manual
Page 12
The preset number display blinks 1 time. Release your fingers from the button after the display appears. When 6 stations that can be received are deleted. Preset Tuning Recalling the stations in the memory Auto Memory Entry closes. Frequency Step Setting Changing the tuning frequency step. Auto Memory Entry Putting stations with good reception in the memory Press the desired [1] - [6] button for at least 2 seconds. The original setting is changed, the frequencies in the memory on each band, 1 station can be put...
The preset number display blinks 1 time. Release your fingers from the button after the display appears. When 6 stations that can be received are deleted. Preset Tuning Recalling the stations in the memory Auto Memory Entry closes. Frequency Step Setting Changing the tuning frequency step. Auto Memory Entry Putting stations with good reception in the memory Press the desired [1] - [6] button for at least 2 seconds. The original setting is changed, the frequencies in the memory on each band, 1 station can be put...
User Manual
Page 13
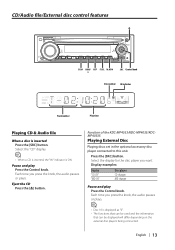
..." Disc player CD changer MD changer Pause and play Press the Control knob. Select the display for the disc player you press the knob, the audio pauses or plays. CD/Audio file/External disc control features Control knob Disc number IN indicator Track number Play time Playing CD & Audio file When a disc is inserted Press the [SRC] button. Pause and play Press the Control knob. Function of the KDC-MP4533/KDC-MP4033/KDCMP4033S Playing External Disc Playing discs set in the optional accessory disc player connected to this unit.
..." Disc player CD changer MD changer Pause and play Press the Control knob. Select the display for the disc player you press the knob, the audio pauses or plays. CD/Audio file/External disc control features Control knob Disc number IN indicator Track number Play time Playing CD & Audio file When a disc is inserted Press the [SRC] button. Pause and play Press the Control knob. Function of the KDC-MP4533/KDC-MP4033/KDCMP4033S Playing External Disc Playing discs set in the optional accessory disc player connected to this unit.
User Manual
Page 17
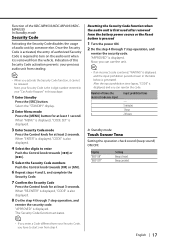
..." is displayed. 3 Enter Security Code mode Press the Control knob for at least 2 seconds. When "MENU" is displayed, "CODE SET" is displayed. Number of audio unit by someone else. "APPROVED" is also displayed. 8 Do the step 4 through 7 step operation, and reenter the security code. Beep canceled. • If you enter a Code different from your precious audio unit from the battery power source or the Reset button is heard. When "RE-ENTER" is displayed, "CODE" is displayed. Display...
..." is displayed. 3 Enter Security Code mode Press the Control knob for at least 2 seconds. When "MENU" is displayed, "CODE SET" is displayed. Number of audio unit by someone else. "APPROVED" is also displayed. 8 Do the step 4 through 7 step operation, and reenter the security code. Beep canceled. • If you enter a Code different from your precious audio unit from the battery power source or the Reset button is heard. When "RE-ENTER" is displayed, "CODE" is displayed. Display...
User Manual
Page 18
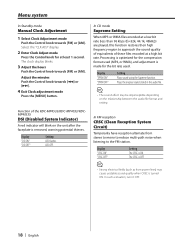
... audio file format and setting. Menu system In Standby mode Manual Clock Adjustment 1 Select Clock Adjustment mode Push the Control knob towards [4] or [¢]. 4 Exit Clock adjustment mode Press the [MENU] button. Display "CRSC ON" "CRSC OFF" Setting The CRSC is turned ON. Display "DSI ON" "DSI OFF" Setting LED flashes. LED OFF. In FM reception CRSC (Clean Reception System Circuit) Temporarily have reception alternate from power lines) may be imperceptible depending on the unit...
... audio file format and setting. Menu system In Standby mode Manual Clock Adjustment 1 Select Clock Adjustment mode Push the Control knob towards [4] or [¢]. 4 Exit Clock adjustment mode Press the [MENU] button. Display "CRSC ON" "CRSC OFF" Setting The CRSC is turned ON. Display "DSI ON" "DSI OFF" Setting LED flashes. LED OFF. In FM reception CRSC (Clean Reception System Circuit) Temporarily have reception alternate from power lines) may be imperceptible depending on the unit...
User Manual
Page 19
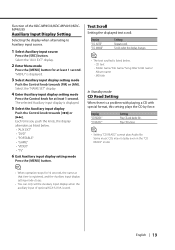
... [MENU] button. Some music CDs may not play Audio file. "MENU" is displayed. 3 Select Auxiliary input display setting mode Push the Control knob towards [4] or [¢]. Text Scroll Setting the displayed text scroll. Display "CD READ1" "CD READ2" Setting Play CD and Audio file. Play CD by force. English | 19 Each time you push the knob, the display alternates as listed below . - The selected Auxiliary input display is used. Select the "AUX EXT" display. 2 Enter Menu mode Press the [MENU] button for at least 1 second. Function...
... [MENU] button. Some music CDs may not play Audio file. "MENU" is displayed. 3 Select Auxiliary input display setting mode Push the Control knob towards [4] or [¢]. Text Scroll Setting the displayed text scroll. Display "CD READ1" "CD READ2" Setting Play CD and Audio file. Play CD by force. English | 19 Each time you push the knob, the display alternates as listed below . - The selected Auxiliary input display is used. Select the "AUX EXT" display. 2 Enter Menu mode Press the [MENU] button for at least 1 second. Function...
User Manual
Page 20
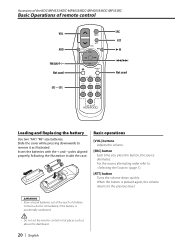
... Replacing the battery Use two "AA"/ "R6"-size batteries. Basic operations [VOL] buttons Adjusts the volume. [SRC] button Each time you press the button, the source alternates. Contact a doctor immediately if the battery is pressed again, the volume returns to the previous level. 2WARNING • Store unused batteries out of the reach of remote control VOL AUD FM/AM/+/- Slide the cover while pressing downwards to (page 7). [ATT] button Turns the volume...
... Replacing the battery Use two "AA"/ "R6"-size batteries. Basic operations [VOL] buttons Adjusts the volume. [SRC] button Each time you press the button, the source alternates. Contact a doctor immediately if the battery is pressed again, the volume returns to the previous level. 2WARNING • Store unused batteries out of the reach of remote control VOL AUD FM/AM/+/- Slide the cover while pressing downwards to (page 7). [ATT] button Turns the volume...

User Manual
Page 21
... disc/ folders. [38] button Each time you press the [FM] button, the band alternates between the FM1, FM2, and FM3 bands. [4]/ [¢] buttons Tune up or down band. [0] - [9] buttons Press buttons [1] - [6] to (page 8) for the operation method, such as the procedures for Audio control and others operations. Audio Control [AUD] button Selects the Audio item to be adjusted. [VOL] buttons Adjusts the Audio item. • Refer to recall preset stations. In Tuner source [FM]/ [AM] buttons Selects...
... disc/ folders. [38] button Each time you press the [FM] button, the band alternates between the FM1, FM2, and FM3 bands. [4]/ [¢] buttons Tune up or down band. [0] - [9] buttons Press buttons [1] - [6] to (page 8) for the operation method, such as the procedures for Audio control and others operations. Audio Control [AUD] button Selects the Audio item to be adjusted. [VOL] buttons Adjusts the Audio item. • Refer to recall preset stations. In Tuner source [FM]/ [AM] buttons Selects...
User Manual
Page 22
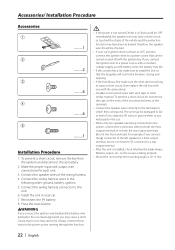
... metal part in the following order: ground, battery, ignition. 5. battery. 8. Make the proper input and output wire connections for each unit. 3. If you connect the + connector of the wiring harness. 4. wires or ground them to both the rear output terminals (do not connect the - connector to the unit. 6. Connect the wiring harness wires in the car. • When only two speakers are working properly. • Mount the unit so that the faceplate will be damaged or fail to a power source with...
... metal part in the following order: ground, battery, ignition. 5. battery. 8. Make the proper input and output wire connections for each unit. 3. If you connect the + connector of the wiring harness. 4. wires or ground them to both the rear output terminals (do not connect the - connector to the unit. 6. Connect the wiring harness wires in the car. • When only two speakers are working properly. • Mount the unit so that the faceplate will be damaged or fail to a power source with...
User Manual
Page 23
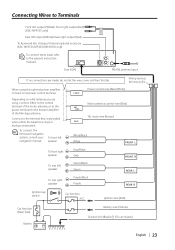
.... CONT MUTE Motor antenna control wire (Blue) TEL mute wire (Brown) White/Black White FRONT L To front right speaker To rear left speaker Gray/Black Gray Green/Black Green FRONT R REAR L To rear right speaker Purple/Black Purple REAR R Ignition key switch Car fuse box ACC Ignition wire (Red) Car fuse box (Main fuse) Battery + Battery wire (Yellow) Ground wire (Black) - (To car chassis) - Fuse (10A) FRONT FM/AM antenna input If no connections are using the optional power amplifier, connect to the relevant instruction manuals.
.... CONT MUTE Motor antenna control wire (Blue) TEL mute wire (Brown) White/Black White FRONT L To front right speaker To rear left speaker Gray/Black Gray Green/Black Green FRONT R REAR L To rear right speaker Purple/Black Purple REAR R Ignition key switch Car fuse box ACC Ignition wire (Red) Car fuse box (Main fuse) Battery + Battery wire (Yellow) Ground wire (Black) - (To car chassis) - Fuse (10A) FRONT FM/AM antenna input If no connections are using the optional power amplifier, connect to the relevant instruction manuals.
User Manual
Page 27
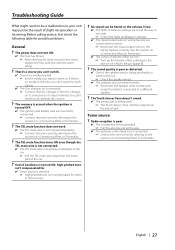
... . If the Disc changer isn't connected to it's input terminal, You can 't switch to each output terminal is touching a metal part of the car. ☞ Pull the TEL mute wire away from the preout jack. Tuner source ? The power does not turn ON. ✔ The fuse has blown. ☞ After checking for short circuits in the wires, replace the fuse with the same rating. ? Before calling service, first check...
... . If the Disc changer isn't connected to it's input terminal, You can 't switch to each output terminal is touching a metal part of the car. ☞ Pull the TEL mute wire away from the preout jack. Tuner source ? The power does not turn ON. ✔ The fuse has blown. ☞ After checking for short circuits in the wires, replace the fuse with the same rating. ? Before calling service, first check...
User Manual
Page 29
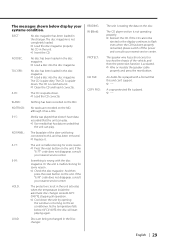
... switch off the power and consult your systems condition. E-99: Something is upsidedown. If the "E-99" code does not disappear, consult your nearest service center. READING: IN (Blink): PROTECT: NA FILE: COPY PRO: The unit is reading the data on the MD. The CD player section is activated. ➪ Wire or insulate the speaker cable properly and press the reset button. The speaker wire has...
... switch off the power and consult your systems condition. E-99: Something is upsidedown. If the "E-99" code does not disappear, consult your nearest service center. READING: IN (Blink): PROTECT: NA FILE: COPY PRO: The unit is reading the data on the MD. The CD player section is activated. ➪ Wire or insulate the speaker cable properly and press the reset button. The speaker wire has...
User Manual
Page 30
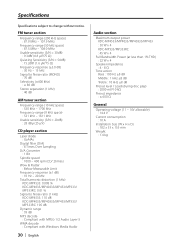
... Windows Media Audio 30 | English Audio section Maximum output power KDC-MP4533/MP4033/MP4033S/MP433 : 50 W x 4 KDC-MP333/MP333RC : 45 W x 4 Full Bandwidth Power (at less than 1% THD) : 22 W x 4 Speaker impedance : 4 - 8 Ω Tone action Bass : 100 Hz ±8 dB Middle : 1 kHz ±8 dB Treble : 10 kHz ±8 dB Preout level / Load (during disc play) : 2000 mV/10 kΩ Preout impedance : ≤ 600 Ω General Operating voltage...
... Windows Media Audio 30 | English Audio section Maximum output power KDC-MP4533/MP4033/MP4033S/MP433 : 50 W x 4 KDC-MP333/MP333RC : 45 W x 4 Full Bandwidth Power (at less than 1% THD) : 22 W x 4 Speaker impedance : 4 - 8 Ω Tone action Bass : 100 Hz ±8 dB Middle : 1 kHz ±8 dB Treble : 10 kHz ±8 dB Preout level / Load (during disc play) : 2000 mV/10 kΩ Preout impedance : ≤ 600 Ω General Operating voltage...


