Instruction Manual
Page 2
English Contents Before use Safety Precautions 3 Handling Compact Discs 5 Operations Buttons and Display 6 Playing CDs 6 Switching Spectrum Analyzer Display 7 Presetting Disc Names 7 Eject 8 Display Level Adjustment 8 Theft Deterrent Faceplate 8 Installation Accessories 9 Installation Procedure 10 Connections 11 Installation 11 Troubleshooting guide 13 Specifications 15 -2-
English Contents Before use Safety Precautions 3 Handling Compact Discs 5 Operations Buttons and Display 6 Playing CDs 6 Switching Spectrum Analyzer Display 7 Presetting Disc Names 7 Eject 8 Display Level Adjustment 8 Theft Deterrent Faceplate 8 Installation Accessories 9 Installation Procedure 10 Connections 11 Installation 11 Troubleshooting guide 13 Specifications 15 -2-
Instruction Manual
Page 3
... unit is NOT designed to be connected directly to direct sunlight, excessive heat or humidity. Otherwise it may break or crack because it contains glass parts. 2CAUTION To prevent damage to the machine, take the following precautions: • Make sure to ground the unit to a negative 12V DC power...separate from the CD and damage the unit. Also avoid places with too much dust or the possibility of water splashing. • Do not set the removed faceplate or the faceplate case in . If used with its adapter into the unit, the adapter might result in damage to direct sunlight or ...
... unit is NOT designed to be connected directly to direct sunlight, excessive heat or humidity. Otherwise it may break or crack because it contains glass parts. 2CAUTION To prevent damage to the machine, take the following precautions: • Make sure to ground the unit to a negative 12V DC power...separate from the CD and damage the unit. Also avoid places with too much dust or the possibility of water splashing. • Do not set the removed faceplate or the faceplate case in . If used with its adapter into the unit, the adapter might result in damage to direct sunlight or ...
Instruction Manual
Page 4
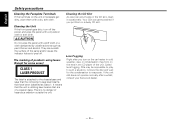
...a whilst, consult your Kenwood dealer. -4- They can accumulate in the CD slot, clean it occasionally. Cleaning the Unit If the front panel gets dirty, turn on the car heater in cold weather, dew or condensation may be impossible to the chassis/case and says that the component uses laser beams that are ... and alcohol. In such a situation, remove the disc and wait for some areas) CLASS 1 LASER PRODUCT The label is attached to play. The marking of products using lasers (Except for the condensation to peel off the power and wipe the panel with a dry silicon cloth or soft cloth...
...a whilst, consult your Kenwood dealer. -4- They can accumulate in the CD slot, clean it occasionally. Cleaning the Unit If the front panel gets dirty, turn on the car heater in cold weather, dew or condensation may be impossible to the chassis/case and says that the component uses laser beams that are ... and alcohol. In such a situation, remove the disc and wait for some areas) CLASS 1 LASER PRODUCT The label is attached to play. The marking of products using lasers (Except for the condensation to peel off the power and wipe the panel with a dry silicon cloth or soft cloth...
Instruction Manual
Page 5
... playing a new CD for this unit and do not use CDs with conventional record cleaners, anti-static formulas, or chemicals such as stabilizers, protective sheets, or CD cleaning discs, since they can cause the sound to skip and the unit to operate incorrectly, resulting in the central hole. Burrs COMPACT • Be sure to use any burrs stuck to the perimeter of the unit. Handling Compact discs Playing a CD...
... playing a new CD for this unit and do not use CDs with conventional record cleaners, anti-static formulas, or chemicals such as stabilizers, protective sheets, or CD cleaning discs, since they can cause the sound to skip and the unit to operate incorrectly, resulting in the central hole. Burrs COMPACT • Be sure to use any burrs stuck to the perimeter of the unit. Handling Compact discs Playing a CD...
Instruction Manual
Page 6
... the display of "EJECT" or "E-01". • Setting the source mode of the Centre unit to a setting other than disc changer mode will cause the indicators and button illumination of this unit to be switched off, but the CD loading/eject operation will still be connected. (See Page 10.) The operations you insert a 8 cm (3 in). CD play 12 cm (5 in). Please see the Centre unit instruction manual. 2CAUTION • When inserting a CD, make sure the CD...
... the display of "EJECT" or "E-01". • Setting the source mode of the Centre unit to a setting other than disc changer mode will cause the indicators and button illumination of this unit to be switched off, but the CD loading/eject operation will still be connected. (See Page 10.) The operations you insert a 8 cm (3 in). CD play 12 cm (5 in). Please see the Centre unit instruction manual. 2CAUTION • When inserting a CD, make sure the CD...
Instruction Manual
Page 7
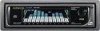
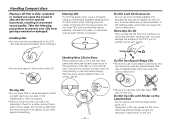
... spectrum analyzer display switches as following table; w Display pattern 1 Display off w v Display pattern 2 Display pattern 9 w v Display pattern 3 Display pattern 8 w v Display pattern 4 Display pattern 7 w v Display pattern 5 Display pattern 6 v Presetting Disc Names NOTE Depending on the centre unit, the number of characters and/or the number of the connected units. Operation for "O" Setting: 1 Selecting CD play source mode. 2 Each time you press the DISP button, the spectrum analyzer display switches as follows; Operation for "N" Setting: This unit permits up...
... spectrum analyzer display switches as following table; w Display pattern 1 Display off w v Display pattern 2 Display pattern 9 w v Display pattern 3 Display pattern 8 w v Display pattern 4 Display pattern 7 w v Display pattern 5 Display pattern 6 v Presetting Disc Names NOTE Depending on the centre unit, the number of characters and/or the number of the connected units. Operation for "O" Setting: 1 Selecting CD play source mode. 2 Each time you press the DISP button, the spectrum analyzer display switches as follows; Operation for "N" Setting: This unit permits up...
Instruction Manual
Page 8
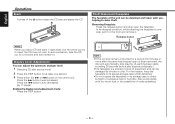
... ¢ button:Level increased. Removing Faceplate: Press the release button and drop open or been removed, the disc will automatically stop playing. (A warning beep starts sounding 30 seconds before play and ejects the CD. 0 NOTE When you load a CD and eject it . Press the 4 button:Level decreased. (by shocks or jolts. English Operations Eject A press of water splashing. -8- Display Level Adjustment You can adjust the spectrum analyzer level. 1 Selecting CD play source mode. 2 Press the DISP button for a moment...
... ¢ button:Level increased. Removing Faceplate: Press the release button and drop open or been removed, the disc will automatically stop playing. (A warning beep starts sounding 30 seconds before play and ejects the CD. 0 NOTE When you load a CD and eject it . Press the 4 button:Level decreased. (by shocks or jolts. English Operations Eject A press of water splashing. -8- Display Level Adjustment You can adjust the spectrum analyzer level. 1 Selecting CD play source mode. 2 Press the DISP button for a moment...
Instruction Manual
Page 9
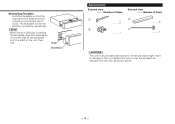
... shipped with the shaft of the unit, then lock. Make sure only to the unit. The faceplate will be set and the unit will be operational. Number of items External view ......... Reattaching Faceplate: Hold the faceplate so that the operation face faces the front toward you and press until it locks. NOTE When there is difficulty in damage to use of any accessories except for...
... shipped with the shaft of the unit, then lock. Make sure only to the unit. The faceplate will be set and the unit will be operational. Number of items External view ......... Reattaching Faceplate: Hold the faceplate so that the operation face faces the front toward you and press until it locks. NOTE When there is difficulty in damage to use of any accessories except for...
Instruction Manual
Page 10
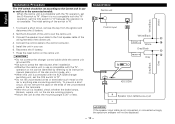
... Gray N O KDC-D300 R Speaker input cable(Accessory4) L 2CAUTION If the speaker input cable is "N". When the centre unit is compatible with the "N"operation, set the O-N switch to "O". • Do not let unconnected wires or terminals touch metal on the centre unit. 2CAUTION • Do not connect the changer control cable while the centre unit is 30° or less. Connect the control cable to the front speaker cable of the wiring hernees of the disc control mode, etc.). •...
... Gray N O KDC-D300 R Speaker input cable(Accessory4) L 2CAUTION If the speaker input cable is "N". When the centre unit is compatible with the "N"operation, set the O-N switch to "O". • Do not let unconnected wires or terminals touch metal on the centre unit. 2CAUTION • Do not connect the changer control cable while the centre unit is 30° or less. Connect the control cable to the front speaker cable of the wiring hernees of the disc control mode, etc.). •...
Instruction Manual
Page 11
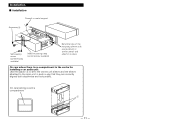
On cars lacking a centre compartment UP 37 UP - 11 - Installation s Installation Firewall or metal support Accessory2 Self-tapping screw (commercially available) Metal mounting strap (commercially available) Bend the tabs of the mounting sleeve with a screwdriver or similar utensil and attach it in such a way that they are correctly aligned both depthwise and horizontally. On cars where there is no compartment in the centre for installing a car audio unit: Use the spacer 3 to affix the centre unit sleeve and the sleeve attached to the main unit in place.
On cars lacking a centre compartment UP 37 UP - 11 - Installation s Installation Firewall or metal support Accessory2 Self-tapping screw (commercially available) Metal mounting strap (commercially available) Bend the tabs of the mounting sleeve with a screwdriver or similar utensil and attach it in such a way that they are correctly aligned both depthwise and horizontally. On cars where there is no compartment in the centre for installing a car audio unit: Use the spacer 3 to affix the centre unit sleeve and the sleeve attached to the main unit in place.

Instruction Manual
Page 12
... lower level. Accessory2 Catch facing up 4 Lower the removal tool toward the bottom, and pull out the unit halfway whilst pressing towards the inside. Lock Catch Accessory1 Removal tool 2 When the lower level is removed, remove the upper two locations. Lower the frame and pull it . - 12 - English Installation s Removing the hard rubber frame 1 Engage the catch pins on the removal tool and remove...
... lower level. Accessory2 Catch facing up 4 Lower the removal tool toward the bottom, and pull out the unit halfway whilst pressing towards the inside. Lock Catch Accessory1 Removal tool 2 When the lower level is removed, remove the upper two locations. Lower the frame and pull it . - 12 - English Installation s Removing the hard rubber frame 1 Engage the catch pins on the removal tool and remove...
Instruction Manual
Page 13
... selected. The spectrum analyser is too low. A CD ejects as soon as it to the disc changer input terminal on a CD. The sound skips on the unit. The system will not go into the Menu mode. - 13 - The fader or balance settings are pressed. SOLUTION Connect the control cable to the section on "Cleaning CDs" (see p. 5). Turn off random play mode, it is not functioning normally. Reset the fader or balance settings. Press the reset button...
... selected. The spectrum analyser is too low. A CD ejects as soon as it to the disc changer input terminal on a CD. The sound skips on the unit. The system will not go into the Menu mode. - 13 - The fader or balance settings are pressed. SOLUTION Connect the control cable to the section on "Cleaning CDs" (see p. 5). Turn off random play mode, it is not functioning normally. Reset the fader or balance settings. Press the reset button...
Instruction Manual
Page 14
English Troubleshooting Guide The following messages are displayed on the centre unit when certain problems are occurring in your nearest service centre. The faceplate of this unit has been removed. ] Replace it correctly. The unit is upside-down the unit by opening the windows or turning on the centre unit. E-01 EJECT NO PANEL E-30 E-04 E-99 No CD in the unit activates when the temperature inside the CD player exceeds 60...
English Troubleshooting Guide The following messages are displayed on the centre unit when certain problems are occurring in your nearest service centre. The faceplate of this unit has been removed. ] Replace it correctly. The unit is upside-down the unit by opening the windows or turning on the centre unit. E-01 EJECT NO PANEL E-30 E-04 E-99 No CD in the unit activates when the temperature inside the CD player exceeds 60...
Instruction Manual
Page 15
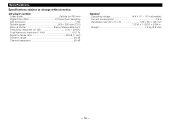
... Channel separation 85 dB General Operating voltage 14.4 V (11 - 16 V allowable) Current consumption 0.6 A Installation size (W × H × D 182 × 50 × 145 mm 7-3/16 × 1-15/16 × 5-3/4 in. CD player section Laser diode GaAlAs (λ=780 nm) Digital filter (D/A 8 Times Over Sampling D/A Converter 1 Bit Spindle speed 500 - 200 rpm (CLV) Wow & Flutter Below Measurable Limit Frequency...
... Channel separation 85 dB General Operating voltage 14.4 V (11 - 16 V allowable) Current consumption 0.6 A Installation size (W × H × D 182 × 50 × 145 mm 7-3/16 × 1-15/16 × 5-3/4 in. CD player section Laser diode GaAlAs (λ=780 nm) Digital filter (D/A 8 Times Over Sampling D/A Converter 1 Bit Spindle speed 500 - 200 rpm (CLV) Wow & Flutter Below Measurable Limit Frequency...


