
Quick Start Guide
Page 1
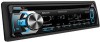
...Refer to read through this instruction manual. Model KDC-X797/ KDC-BT755HD Serial number US Residents Only Register Online Register your Kenwood dealer for information or service on the warranty card, and in the spaces designated on the product. KDC-X797 KDC-BT755HD CD-RECEIVER Quick Start Guide AMPLI-TUNER LECTEUR DE... on the back of the unit, in the space provided below. For your new CD-receiver. Familiarity with installation and operation procedures will help you call upon your Kenwood product at www.Kenwoodusa.com © 2012 JVC KENWOOD Corporation B59-2185-00/01 (KW/K0)
...Refer to read through this instruction manual. Model KDC-X797/ KDC-BT755HD Serial number US Residents Only Register Online Register your Kenwood dealer for information or service on the warranty card, and in the spaces designated on the product. KDC-X797 KDC-BT755HD CD-RECEIVER Quick Start Guide AMPLI-TUNER LECTEUR DE... on the back of the unit, in the space provided below. For your new CD-receiver. Familiarity with installation and operation procedures will help you call upon your Kenwood product at www.Kenwoodusa.com © 2012 JVC KENWOOD Corporation B59-2185-00/01 (KW/K0)
Quick Start Guide
Page 2
...to avoid damaging the speakers by the sudden increase of this Guide, refer to the Instruction Manual on the following website: manual.kenwood.com/edition/im368 To refer to the Instruction Manual, a browser such as coins or metal tools) inside the unit, to ... 3 Basic Operations 3 CD/USB/iPod 4 HD Radio™ Technology 4 Hands-free Phoning 5 Audio Adjustments/ Function Settings 6 Installation/ Connection 7 Wiring connection 8 Installing the Unit 9 Installing without using the USB device or iPod/ iPhone if it might hinder driving safety. • Make sure all important data has ...
...to avoid damaging the speakers by the sudden increase of this Guide, refer to the Instruction Manual on the following website: manual.kenwood.com/edition/im368 To refer to the Instruction Manual, a browser such as coins or metal tools) inside the unit, to ... 3 Basic Operations 3 CD/USB/iPod 4 HD Radio™ Technology 4 Hands-free Phoning 5 Audio Adjustments/ Function Settings 6 Installation/ Connection 7 Wiring connection 8 Installing the Unit 9 Installing without using the USB device or iPod/ iPhone if it might hinder driving safety. • Make sure all important data has ...
Quick Start Guide
Page 7
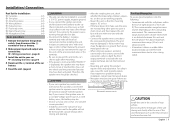
...new one with the same rating. • Connect the speaker wires correctly to your Kenwood dealer. • Reception may be turned on the surrounding environment. X (page 8) 3 Install the unit to the corresponding terminals. If you share the ¤ wires or ... circuit, do not mix front and rear). • Mounting and wiring this unit to the car's chassis again after the use your vehicle. Installation/ Connection Part list for installation: A Faceplate 1) B Trim plate 1) C Mounting sleeve 1) D Wiring harness 1) E Extraction key 2) F Flat head screw 4) G Round head screw 4)...
...new one with the same rating. • Connect the speaker wires correctly to your Kenwood dealer. • Reception may be turned on the surrounding environment. X (page 8) 3 Install the unit to the corresponding terminals. If you share the ¤ wires or ... circuit, do not mix front and rear). • Mounting and wiring this unit to the car's chassis again after the use your vehicle. Installation/ Connection Part list for installation: A Faceplate 1) B Trim plate 1) C Mounting sleeve 1) D Wiring harness 1) E Extraction key 2) F Flat head screw 4) G Round head screw 4)...
Quick Start Guide
Page 9
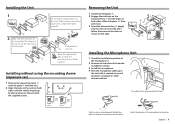
... at several positions using the mounting sleeve (Japanese car) 1 Remove the mounting sleeve C and trim plate B from the H installation surface. 3 Install the microphone. 4 Wire the microphone cable up to the unit with it out. 3 Insert the extraction key E deeply into ...release coated paper of tape. Fix a cable with the supplied screws. E B 12 A E C 3 Installing the Microphone Unit 1 Check the installation position of the microphone H. 2 Remove oil and other desired method. Installing the Unit 1 3 2 1 B A 2 Make sure the direction of your car Bend the appropriate tabs...
... at several positions using the mounting sleeve (Japanese car) 1 Remove the mounting sleeve C and trim plate B from the H installation surface. 3 Install the microphone. 4 Wire the microphone cable up to the unit with it out. 3 Insert the extraction key E deeply into ...release coated paper of tape. Fix a cable with the supplied screws. E B 12 A E C 3 Installing the Microphone Unit 1 Check the installation position of the microphone H. 2 Remove oil and other desired method. Installing the Unit 1 3 2 1 B A 2 Make sure the direction of your car Bend the appropriate tabs...
Quick Start Guide
Page 10
...and create an account with Pandora. (If you can cause malfunction. Android™ • Visit the Google play and search for Pandora to install. • Bluetooth must be built in and the following profiles must be supported. --SPP (Serial Port Profile) --A2DP (Advanced Audio Distribution Profile... for listening to Aha™ are subject to change without prior notice. pandora.com.) • Internet connection by the "KENWOOD Music Editor Light" or "KENWOOD Music Control", you are subject to the Pandora® internet radio are available from this unit with a KCA-iP102. iPhone...
...and create an account with Pandora. (If you can cause malfunction. Android™ • Visit the Google play and search for Pandora to install. • Bluetooth must be built in and the following profiles must be supported. --SPP (Serial Port Profile) --A2DP (Advanced Audio Distribution Profile... for listening to Aha™ are subject to change without prior notice. pandora.com.) • Internet connection by the "KENWOOD Music Editor Light" or "KENWOOD Music Control", you are subject to the Pandora® internet radio are available from this unit with a KCA-iP102. iPhone...

Quick Start Guide
Page 11
...CD) KDC-X797: 4,000 mV/ 10 kΩ KDC-BT755HD: 2,500 mV/ 10 kΩ Preout impedance : ≤ 600 Ω Auxiliary input Frequency response (±3 dB) : 20 Hz - 20 kHz Input Maximum Voltage : 1200 mV Input Impedance : 10 kΩ General Operating voltage : 14.4 V (10.5 - 16V allowable) Maximum Current consumption : 10 A Installation Size ... or iPod touch • Use an Apple iPhone or iPod touch running iOS4 or later. • Search for "iHeart Link for KENWOOD" application to your device, log in and the following profiles must be built in and create a free account with a KCA-iP102...
...CD) KDC-X797: 4,000 mV/ 10 kΩ KDC-BT755HD: 2,500 mV/ 10 kΩ Preout impedance : ≤ 600 Ω Auxiliary input Frequency response (±3 dB) : 20 Hz - 20 kHz Input Maximum Voltage : 1200 mV Input Impedance : 10 kΩ General Operating voltage : 14.4 V (10.5 - 16V allowable) Maximum Current consumption : 10 A Installation Size ... or iPod touch • Use an Apple iPhone or iPod touch running iOS4 or later. • Search for "iHeart Link for KENWOOD" application to your device, log in and the following profiles must be built in and create a free account with a KCA-iP102...

Quick Start Guide
Page 32
...) approuvé pour l'émetteur par Industrie Canada. To reduce potential radio interference to radio communications, if it is not installed and used in a residential installation. Cet équipement émet une énergie RF très faible qui est considérée conforme sans &#... risques de brouillage radioélectrique à l'intention des autres utilisateurs, il faut choisir le type d'antenne et son gain de JVC KENWOOD Corporation 2967-3, ISHIKAWA-MACHI, HACHIOJI-SHI, TOKYO, JAPAN THIS PRODUCT COMPLIES WITH DHHS RULES 21 CFR SUBCHAPTER J IN EFFECT AT DATE OF...
...) approuvé pour l'émetteur par Industrie Canada. To reduce potential radio interference to radio communications, if it is not installed and used in a residential installation. Cet équipement émet une énergie RF très faible qui est considérée conforme sans &#... risques de brouillage radioélectrique à l'intention des autres utilisateurs, il faut choisir le type d'antenne et son gain de JVC KENWOOD Corporation 2967-3, ISHIKAWA-MACHI, HACHIOJI-SHI, TOKYO, JAPAN THIS PRODUCT COMPLIES WITH DHHS RULES 21 CFR SUBCHAPTER J IN EFFECT AT DATE OF...


