Quick Start Guide
Page 2
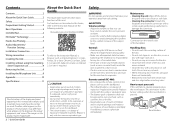
...8226; Remove the rims from this unit. For functions not described in this Guide, refer to the Instruction Manual on the following website: manual.kenwood.com/edition/im368 To refer to use . Maintenance • Cleaning the unit: Wipe off the dirt on the dashboard. • The Lithium... battery is in hot places such as sunshine, fire or the like. • Keep battery out of reach of the faceplate) General: • Avoid using the mounting sleeve (Japanese car 9 Removing the Unit 9 Installing the Microphone Unit 9 Appendix 10 Specifications 11 The ...
...8226; Remove the rims from this unit. For functions not described in this Guide, refer to the Instruction Manual on the following website: manual.kenwood.com/edition/im368 To refer to use . Maintenance • Cleaning the unit: Wipe off the dirt on the dashboard. • The Lithium... battery is in hot places such as sunshine, fire or the like. • Keep battery out of reach of the faceplate) General: • Avoid using the mounting sleeve (Japanese car 9 Removing the Unit 9 Installing the Microphone Unit 9 Appendix 10 Specifications 11 The ...

Quick Start Guide
Page 3
...(commercially available) 1 CA-U1EX (500 mA Max.: optional accessory) is required to connect an iPod. "YES" is selected for KDC-X797) • The faceplate is done for about 15 seconds or if you cancel it can be played. Also avoid places with too much dust or the possibility... (optional accessory) is recommended to connect a USB device. Auxiliary input 1 Open the cover. 2 Connect a portable audio device using buttons on the faceplate. • [ ] indicates the buttons on . English | 3 Preparation/ Getting Started Press and hold to turn the power ON Volume knob Basic ...
...(commercially available) 1 CA-U1EX (500 mA Max.: optional accessory) is required to connect an iPod. "YES" is selected for KDC-X797) • The faceplate is done for about 15 seconds or if you cancel it can be played. Also avoid places with too much dust or the possibility... (optional accessory) is recommended to connect a USB device. Auxiliary input 1 Open the cover. 2 Connect a portable audio device using buttons on the faceplate. • [ ] indicates the buttons on . English | 3 Preparation/ Getting Started Press and hold to turn the power ON Volume knob Basic ...
Quick Start Guide
Page 7
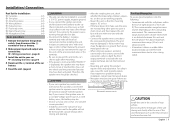
... terminals or to both the rear output terminals (do not remove the caps on the surrounding environment. Make sure the faceplate will not hit the lid of 10 m (30 ft). CAUTION Install this product requires skills and experience. Metal part... such as with battery wires, the battery may have a short-circuit or touched the chassis of your Kenwood dealer. • Reception may start a fire. Installation/ Connection Part list for installation: A Faceplate 1) B Trim plate 1) C Mounting sleeve 1) D Wiring harness 1) E Extraction key 2) F Flat head screw 4) G Round head screw...
... terminals or to both the rear output terminals (do not remove the caps on the surrounding environment. Make sure the faceplate will not hit the lid of 10 m (30 ft). CAUTION Install this product requires skills and experience. Metal part... such as with battery wires, the battery may have a short-circuit or touched the chassis of your Kenwood dealer. • Reception may start a fire. Installation/ Connection Part list for installation: A Faceplate 1) B Trim plate 1) C Mounting sleeve 1) D Wiring harness 1) E Extraction key 2) F Flat head screw 4) G Round head screw...
Quick Start Guide
Page 9
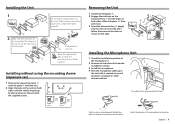
... top side is as shown on both sides of your car Bend the appropriate tabs to C the unit. G ø5mm Removing the Unit 1 Detach the faceplate A. 2 Engage the catch pin on the extraction key E into the slots on both sides) with the vehicle mounting bracket and secure the unit with the...
... top side is as shown on both sides of your car Bend the appropriate tabs to C the unit. G ø5mm Removing the Unit 1 Detach the faceplate A. 2 Engage the catch pin on the extraction key E into the slots on both sides) with the vehicle mounting bracket and secure the unit with the...

