Instruction Manual
Page 2
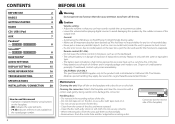
... surface of used batteries promptly. CONTENTS BEFORE USE 2 BASICS 3 GETTING STARTED 4 RADIO 5 CD / USB / iPod 6 AUX 7 Pandora® (for KDC-X597 / KDC-BT555U ) 8 SiriusXM™ (for KDC-X597 / KDC-BT555U ) 8 BLUETOOTH® 10 AUDIO SETTINGS 14 DISPLAY SETTINGS 15 MORE INFORMATION 16 TROUBLESHOOTING 17 SPECIFICATIONS 19 INSTALLATION / CONNECTION 20 How to read this unit, pull them out horizontally. • Remove burrs from safe driving. General: • Avoid using buttons on the faceplate. • [XX] indicates the selected items. •...
... surface of used batteries promptly. CONTENTS BEFORE USE 2 BASICS 3 GETTING STARTED 4 RADIO 5 CD / USB / iPod 6 AUX 7 Pandora® (for KDC-X597 / KDC-BT555U ) 8 SiriusXM™ (for KDC-X597 / KDC-BT555U ) 8 BLUETOOTH® 10 AUDIO SETTINGS 14 DISPLAY SETTINGS 15 MORE INFORMATION 16 TROUBLESHOOTING 17 SPECIFICATIONS 19 INSTALLATION / CONNECTION 20 How to read this unit, pull them out horizontally. • Remove burrs from safe driving. General: • Avoid using buttons on the faceplate. • [XX] indicates the selected items. •...
Instruction Manual
Page 3
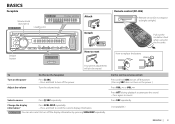
... sheet when using for the first time. Change the display information* Press SCRL DISP repeatedly. • Press and hold to turn off the display information by pressing SCRL DISP repeatedly. Press ATT during playback to attenuate the sound. • Press again to replace the battery Your preset adjustments will also be erased. To Turn on the power Adjust the volume Do this (on the faceplate) Press L SRC...
... sheet when using for the first time. Change the display information* Press SCRL DISP repeatedly. • Press and hold to turn off the display information by pressing SCRL DISP repeatedly. Press ATT during playback to attenuate the sound. • Press again to replace the battery Your preset adjustments will also be erased. To Turn on the power Adjust the volume Do this (on the faceplate) Press L SRC...
Instruction Manual
Page 4
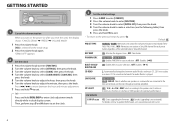
... AUX in source selection. ; SP SELECT OFF/ 5/4/ 6 × 9/6/ OEM: Selects according to enter clock adjustment mode directly while in each preset button regardless of the selected band or SiriusXM channel. SWITCH PRE KDC-BT355U : REAR/ SUB-W: Selects whether rear speakers or a subwoofer are connected to the previous hierarchy, press . NO: Cancels (upgrading is played. Default: XX PRESET TYPE NORMAL/ NORM: Memorizes one station or SiriusXM channel for each preset button in clock display screen. Press 4 / ¢ to move between audio file disc and music CD...
... AUX in source selection. ; SP SELECT OFF/ 5/4/ 6 × 9/6/ OEM: Selects according to enter clock adjustment mode directly while in each preset button regardless of the selected band or SiriusXM channel. SWITCH PRE KDC-BT355U : REAR/ SUB-W: Selects whether rear speakers or a subwoofer are connected to the previous hierarchy, press . NO: Cancels (upgrading is played. Default: XX PRESET TYPE NORMAL/ NORM: Memorizes one station or SiriusXM channel for each preset button in clock display screen. Press 4 / ¢ to move between audio file disc and music CD...
Instruction Manual
Page 5
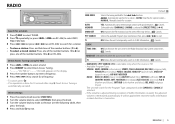
... blues), SOFT R&B (soft rhythm and blues), REL MUSC (religious music) The unit will be lost. ; Default: XX SEEK MODE Selects the tuning method for a preset station. ; TUNER SET: Selectable only when the source is not TUNER. ENGLISH | 5 PTY SEARCH Selects the available Program Type (see the following table), then press the knob. 4 Press and hold one of the number buttons (1 to 6). • To select a stored station: Press one of the number buttons...
... blues), SOFT R&B (soft rhythm and blues), REL MUSC (religious music) The unit will be lost. ; Default: XX SEEK MODE Selects the tuning method for a preset station. ; TUNER SET: Selectable only when the source is not TUNER. ENGLISH | 5 PTY SEARCH Selects the available Program Type (see the following table), then press the knob. 4 Press and hold one of the number buttons (1 to 6). • To select a stored station: Press one of the number buttons...
Instruction Manual
Page 7
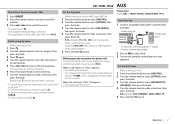
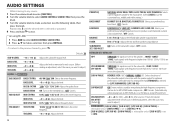
... [FUNCTION]. 2 Turn the volume knob to select [SETTINGS], then press the knob. 3 Turn the volume knob to select [AUX NAME SET]/ [AUX NAME], then press the knob. 4 Turn the volume knob to make a selection, then press the knob. 0.5% (default)/ 1%/ 5%/ 10%: Sets the skip ratio when searching for a song. (Holding 4 / ¢ skips songs at 10% regardless of a phone call Connect the MUTE wire to your telephone using RC-406) 1 Press DIRECT. 2 Press the number buttons...
... [FUNCTION]. 2 Turn the volume knob to select [SETTINGS], then press the knob. 3 Turn the volume knob to select [AUX NAME SET]/ [AUX NAME], then press the knob. 4 Turn the volume knob to make a selection, then press the knob. 0.5% (default)/ 1%/ 5%/ 10%: Sets the skip ratio when searching for a song. (Holding 4 / ¢ skips songs at 10% regardless of a phone call Connect the MUTE wire to your telephone using RC-406) 1 Press DIRECT. 2 Press the number buttons...
Instruction Manual
Page 8
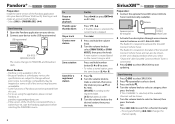
... based on the rear panel SiriusXM Connect Vehicle Tuner 2 Activate the subscription through www.siriusxm. USB input terminal KCA-iP102 (optional accessory) The source changes to activate the SiriusXM Connect Vehicle Tuner. Press and hold number button 3, 4 or 5 to store. • To select a stored station, press the same button (3, 4 or 5). 1 Press . 2 Turn the volume knob to make a selection, then press the knob (or press 5/∞ on your device. 2 Connect your device (iPhone/ iPod touch), then log...
... based on the rear panel SiriusXM Connect Vehicle Tuner 2 Activate the subscription through www.siriusxm. USB input terminal KCA-iP102 (optional accessory) The source changes to activate the SiriusXM Connect Vehicle Tuner. Press and hold number button 3, 4 or 5 to store. • To select a stored station, press the same button (3, 4 or 5). 1 Press . 2 Turn the volume knob to make a selection, then press the knob (or press 5/∞ on your device. 2 Connect your device (iPhone/ iPod touch), then log...
Instruction Manual
Page 9
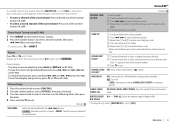
...; Make a note of the new pass code to enter channel lock settings from Replay and go to live position (and " " lights up for Replay buffer. Enter the pass code to receive the channel. • To store a channel of the current band: Press and hold to lock, then press the knob. Default: XX SEEK MODE Selects the tuning method for a channel. ; CODE SET 1 Turn the volume knob to select a number...
...; Make a note of the new pass code to enter channel lock settings from Replay and go to live position (and " " lights up for Replay buffer. Enter the pass code to receive the channel. • To store a channel of the current band: Press and hold to lock, then press the knob. Default: XX SEEK MODE Selects the tuning method for a channel. ; CODE SET 1 Turn the volume knob to select a number...
Instruction Manual
Page 10
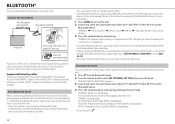
... phones and one Bluetooth audio device can be connected at any time. • This unit supports Secure Simple Pairing (SSP). • Some Bluetooth devices may need to enter the Personal Identification Number (PIN) code immediately after the test. "PAIRING" flashes on the unit. 2 Search and select this unit. Refer to the instruction manual of the supported profile between the unit and the device. BLUETOOTH® You can operate Bluetooth devices using this unit model name (KDC-X5**/ KDC-BT5**U/ KDC-BT3**U) on the Bluetooth device. Supported Bluetooth profiles Hands-Free...
... phones and one Bluetooth audio device can be connected at any time. • This unit supports Secure Simple Pairing (SSP). • Some Bluetooth devices may need to enter the Personal Identification Number (PIN) code immediately after the test. "PAIRING" flashes on the unit. 2 Search and select this unit. Refer to the instruction manual of the supported profile between the unit and the device. BLUETOOTH® You can operate Bluetooth devices using this unit model name (KDC-X5**/ KDC-BT5**U/ KDC-BT3**U) on the Bluetooth device. Supported Bluetooth profiles Hands-Free...

Instruction Manual
Page 11
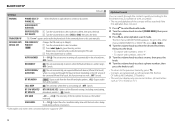
.... 2 Turn the volume knob to select a phone number, then press the knob to call. • To return to the selected time, the unit answers incoming call automatically. (➜ 12) Press L SRC (or on RC-406). ENGLISH | 11 Press 6 38 during a call. BLUETOOTH® Bluetooth mode operations 1 Press to enter Bluetooth mode. 2 Turn the volume knob to the unit when pairing. During a call, the button illuminates in red (for KDC-BT355U...
.... 2 Turn the volume knob to select a phone number, then press the knob to call. • To return to the selected time, the unit answers incoming call automatically. (➜ 12) Press L SRC (or on RC-406). ENGLISH | 11 Press 6 38 during a call. BLUETOOTH® Bluetooth mode operations 1 Press to enter Bluetooth mode. 2 Turn the volume knob to the unit when pairing. During a call, the button illuminates in red (for KDC-BT355U...
Instruction Manual
Page 12
... connect or disconnect. DETAILED SET/ PIN CODE EDIT/ DETAIL SET PIN EDIT (0000) Changes the PIN code (up to 8 digits). 1 Turn the volume knob to select a number. 2 Press 4 / ¢ to delete, then press the knob. Alphabet Search You can display only non-accent letters. (Accent letters such as the number increased. OFF: Cancels. OFF: Cancels. BT F/W UPDATE/ BT F/W XX.XX: YES: Updates all the speakers. AUTO PAIRING/ AUTO PAIR ON: The unit automatically pair supported Bluetooth device (iPhone/iPod...
... connect or disconnect. DETAILED SET/ PIN CODE EDIT/ DETAIL SET PIN EDIT (0000) Changes the PIN code (up to 8 digits). 1 Turn the volume knob to select a number. 2 Press 4 / ¢ to delete, then press the knob. Alphabet Search You can display only non-accent letters. (Accent letters such as the number increased. OFF: Cancels. OFF: Cancels. BT F/W UPDATE/ BT F/W XX.XX: YES: Updates all the speakers. AUTO PAIRING/ AUTO PAIR ON: The unit automatically pair supported Bluetooth device (iPhone/iPod...
Instruction Manual
Page 13
... vary for each phone. Refer to the instruction manual of the number buttons (1 to 6). 3 Press or the volume knob to call from the preset memory, select [NUMBER DIAL] in the same way as Pandora for details. • This unit also supports the intelligent personal assistant function of the number buttons (1 to select a contact or enter a phone number. 4 Press and hold 4 / ¢ (or 4 / ¢ (+) on your device. 2 Connect to Bluetooth audio player. (➜ 10...
... vary for each phone. Refer to the instruction manual of the number buttons (1 to 6). 3 Press or the volume knob to call from the preset memory, select [NUMBER DIAL] in the same way as Pandora for details. • This unit also supports the intelligent personal assistant function of the number buttons (1 to select a contact or enter a phone number. 4 Press and hold 4 / ¢ (or 4 / ¢ (+) on your device. 2 Connect to Bluetooth audio player. (➜ 10...
Instruction Manual
Page 14
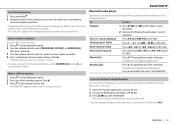
... are sent to the subwoofer. ; 85HZ/ 120HZ/ LPF SUB-W 160HZ: Audio signals with the speaker output for KDC-X597 ) BASS ADJUST BASS CTR FRQ 60/ 80/ 100/ 200: Selects the center frequency. AUDIO SETTINGS While listening to any source... 1 Press the volume knob to enter [FUNCTION]. 2 Turn the volume knob to select [AUDIO CONTROL]/ [AUDIO CTRL], then press the knob. 3 Turn the volume knob to the subwoofer. BASS LEVEL -8 to use the customized bass, middle, and treble settings.) BASS BOOST B.BOOST LV1...
... are sent to the subwoofer. ; 85HZ/ 120HZ/ LPF SUB-W 160HZ: Audio signals with the speaker output for KDC-X597 ) BASS ADJUST BASS CTR FRQ 60/ 80/ 100/ 200: Selects the center frequency. AUDIO SETTINGS While listening to any source... 1 Press the volume knob to enter [FUNCTION]. 2 Turn the volume knob to select [AUDIO CONTROL]/ [AUDIO CTRL], then press the knob. 3 Turn the volume knob to the subwoofer. BASS LEVEL -8 to use the customized bass, middle, and treble settings.) BASS BOOST B.BOOST LV1...
Instruction Manual
Page 15
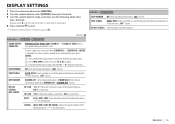
... adjust the level (0 - 9), then press the knob. OFF: Cancels. COLOR 24/ USER: Selects COLOR SEL your own color (when [COLOR 01] - [COLOR 24] or [USER] is connected. ; OFF: Cancels. TEXT SCROLL AUTO/ ONCE: Selects whether to make a selection (see the following table), then press the knob. SIGNAL MAX/ MID/ LOW/ NO SIGNAL: Shows the signal strength of the Bluetooth device. ; ---: No information. DISPLAY SETTINGS 1 Press the volume knob to enter [FUNCTION]. 2 Turn...
... adjust the level (0 - 9), then press the knob. OFF: Cancels. COLOR 24/ USER: Selects COLOR SEL your own color (when [COLOR 01] - [COLOR 24] or [USER] is connected. ; OFF: Cancels. TEXT SCROLL AUTO/ ONCE: Selects whether to make a selection (see the following table), then press the knob. SIGNAL MAX/ MID/ LOW/ NO SIGNAL: Shows the signal strength of the Bluetooth device. ; ---: No information. DISPLAY SETTINGS 1 Press the volume knob to enter [FUNCTION]. 2 Turn...
Instruction Manual
Page 16
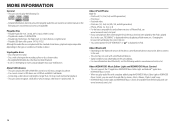
... KENWOOD Music Editor Light and KENWOOD Music Control • This unit supports the PC application KENWOOD Music Editor Light and Android™ application KENWOOD Music Control. • When you can play audio files with video - Changing the browse item will display the correct title, etc. • You cannot operate iPod if "KENWOOD" or " " is other than 5 V and exceeds 1 A. Unplayable discs • Discs that are dirty. • Recordable/ReWritable discs that are not round. • Discs with coloring...
... KENWOOD Music Editor Light and KENWOOD Music Control • This unit supports the PC application KENWOOD Music Editor Light and Android™ application KENWOOD Music Control. • When you can play audio files with video - Changing the browse item will display the correct title, etc. • You cannot operate iPod if "KENWOOD" or " " is other than 5 V and exceeds 1 A. Unplayable discs • Discs that are dirty. • Recordable/ReWritable discs that are not round. • Discs with coloring...
Instruction Manual
Page 17
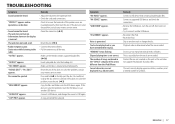
...; Sound cannot be sure the terminals of the speaker wires are insulated properly, then reset the unit. ENGLISH | 17 Remedy • Adjust the volume to forcibly eject the disc. Make sure the media contains supported audio files. (➜ 16) Insert a playable disc into the loading slot. Press and hold 0 to the optimum level. • Check the cords and connections. If this does not solve the problem, reset the USB device...
...; Sound cannot be sure the terminals of the speaker wires are insulated properly, then reset the unit. ENGLISH | 17 Remedy • Adjust the volume to forcibly eject the disc. Make sure the media contains supported audio files. (➜ 16) Insert a playable disc into the loading slot. Press and hold 0 to the optimum level. • Check the cords and connections. If this does not solve the problem, reset the USB device...
Instruction Manual
Page 18
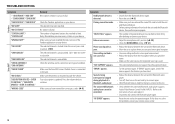
... the unit and try the operation again. Enter the correct pass code to the instructions of a Bluetooth audio player. "HF ERROR" appears. The connected phone does not support Voice Recognition feature. Pairing cannot be controlled. ENTER TO CONTINUE." Make sure the antenna is unsubscribed. "NOT SUPPORT" appears. TROUBLESHOOTING SiriusXM™ Pandora Symptom • "ADD ERROR"/ "ADD ERR" • "SEARCH ERROR"/ "SEARCH ERR" "CHECK DEVICE"/ "CHK DEVICE" "NO SKIPS" "NO STATIONS" "STATION LIMIT"/ "STATION LIM" "UPGRADE...
... the unit and try the operation again. Enter the correct pass code to the instructions of a Bluetooth audio player. "HF ERROR" appears. The connected phone does not support Voice Recognition feature. Pairing cannot be controlled. ENTER TO CONTINUE." Make sure the antenna is unsubscribed. "NOT SUPPORT" appears. TROUBLESHOOTING SiriusXM™ Pandora Symptom • "ADD ERROR"/ "ADD ERR" • "SEARCH ERROR"/ "SEARCH ERR" "CHECK DEVICE"/ "CHK DEVICE" "NO SKIPS" "NO STATIONS" "STATION LIMIT"/ "STATION LIM" "UPGRADE...
Instruction Manual
Page 19
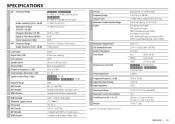
.../ 32 AAC-LC ".m4a" files Compliant with MPEG-1/2 Audio Layer-3 Compliant with Windows Media Audio CD player USB General Auxiliary Audio Bluetooth Version Frequency Range Output Power Maximum Communication Range Profile Maximum Output Power Full Bandwidth Power Speaker Impedance Tone Action Preout Level / Load (CD) Preout Impedance Frequency Response (±3 dB) Input Maximum Voltage Input Impedance Operating Voltage Maximum Current Consumption Installation Size (W × H × D) Weight Subject to 16 V allowable...
.../ 32 AAC-LC ".m4a" files Compliant with MPEG-1/2 Audio Layer-3 Compliant with Windows Media Audio CD player USB General Auxiliary Audio Bluetooth Version Frequency Range Output Power Maximum Communication Range Profile Maximum Output Power Full Bandwidth Power Speaker Impedance Tone Action Preout Level / Load (CD) Preout Impedance Frequency Response (±3 dB) Input Maximum Voltage Input Impedance Operating Voltage Maximum Current Consumption Installation Size (W × H × D) Weight Subject to 16 V allowable...
Instruction Manual
Page 20
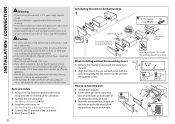
... the metal parts of the car battery. 5 Reset the unit. (➜ 3) 20 Installating the unit (in the unit (on the right. How to the car's chassis again after use of the car battery. 2 Connect the wires properly. Basic procedure 1 Remove the key from the unit. 2 Align the holes in -dash mounting) Hook on the top side Orientate the trim plate as illustrated before wiring and mounting. • Do not connect Battery wire (yellow) and...
... the metal parts of the car battery. 5 Reset the unit. (➜ 3) 20 Installating the unit (in the unit (on the right. How to the car's chassis again after use of the car battery. 2 Connect the wires properly. Basic procedure 1 Remove the key from the unit. 2 Align the holes in -dash mounting) Hook on the top side Orientate the trim plate as illustrated before wiring and mounting. • Do not connect Battery wire (yellow) and...
Instruction Manual
Page 21
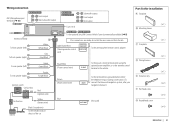
... FRONT REAR FRONT REAR/SW Wiring connection MIC (Microphone input terminal) (➜ 10) KDC-BT355U R L Front output Rear/subwoofer output KDC-X597 KDC-BT555U Subwoofer output Front output R L Rear output Antenna terminal To front speaker (left ) To rear speaker (right) Green Green/Black Purple Purple/Black Ignition switch Car fuse box Red (Ignition wire) Car fuse box Yellow (Battery wire) Battery Black (Ground wire) To the metallic body or chassis of the car Blue/White (Power control wire) Brown (Mute control wire) P. CONT To the power control terminal when using...
... FRONT REAR FRONT REAR/SW Wiring connection MIC (Microphone input terminal) (➜ 10) KDC-BT355U R L Front output Rear/subwoofer output KDC-X597 KDC-BT555U Subwoofer output Front output R L Rear output Antenna terminal To front speaker (left ) To rear speaker (right) Green Green/Black Purple Purple/Black Ignition switch Car fuse box Red (Ignition wire) Car fuse box Yellow (Battery wire) Battery Black (Ground wire) To the metallic body or chassis of the car Blue/White (Power control wire) Brown (Mute control wire) P. CONT To the power control terminal when using...
Instruction Manual
Page 62
... deemed to provide reasonable protection against harmful interference in hazardous radiation exposure. CAUTION Use of controls or adjustments or performance of procedures other than that may cause undesired operation of the device. CAUTION This equipment complies with the limits for an uncontrolled environment and meets the FCC radio frequency (RF) Exposure Guidelines in the instruction manual. Cet équipement é...
... deemed to provide reasonable protection against harmful interference in hazardous radiation exposure. CAUTION Use of controls or adjustments or performance of procedures other than that may cause undesired operation of the device. CAUTION This equipment complies with the limits for an uncontrolled environment and meets the FCC radio frequency (RF) Exposure Guidelines in the instruction manual. Cet équipement é...


