
Quick Start Guide 1
Page 2
... instruction manual. Changes or modifications to this equipment may generate or use radio frequency energy. FCC NOTE This equipment has been tested and found to comply with the limits for help. These limits are reproductions of labels on a circuit different from that interference will not occur in a particular installation. Supplier's Declaration of Conformity Trade Name: KENWOOD Products: CD-RECEIVER Model Name: KDC-X704/KDC...
... instruction manual. Changes or modifications to this equipment may generate or use radio frequency energy. FCC NOTE This equipment has been tested and found to comply with the limits for help. These limits are reproductions of labels on a circuit different from that interference will not occur in a particular installation. Supplier's Declaration of Conformity Trade Name: KENWOOD Products: CD-RECEIVER Model Name: KDC-X704/KDC...

Quick Start Guide 1
Page 10
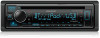
... turn on the power Adjust the volume Select a source Change the display information Display window* USB input terminal Auxiliary input jack How to STANDBY when parking at a low ceiling area. 4 Detach button * Only for any loss of the output level. Press BSRC repeatedly. Press DISP repeatedly. Before Use Basics IMPORTANT • To ensure proper use, please read and observe Warnings and Cautions in this product. It is established. CAUTION Volume setting: • Adjust...
... turn on the power Adjust the volume Select a source Change the display information Display window* USB input terminal Auxiliary input jack How to STANDBY when parking at a low ceiling area. 4 Detach button * Only for any loss of the output level. Press BSRC repeatedly. Press DISP repeatedly. Before Use Basics IMPORTANT • To ensure proper use, please read and observe Warnings and Cautions in this product. It is established. CAUTION Volume setting: • Adjust...

Quick Start Guide 1
Page 13
... on the model. [FUNCTION] menu items [AUDIO CONTROL] : [DISPLAY] : [TUNER SETTING] : [SIRIUS XM] : [USB] : [BT MODE] : [REMOTE APP] : [MIC GAIN]* : [NR LEVEL]* : [ECHO CANCEL]* : [SYSTEM] : [CLOCK] : [ENGLISH] : [ESPANOL] : [FRANCAIS] : [DEMO MODE] : Sets your preferred control for the menu and music information. Note: For / / , you need to set [SWITCH PREOUT] to control this unit. Sets the sensitivity of some well-used settings Subwoofer Level Setting 1 Press the volume knob to enter [FUNCTION]. 2 Turn the volume knob to select [AUDIO CONTROL], then press...
... on the model. [FUNCTION] menu items [AUDIO CONTROL] : [DISPLAY] : [TUNER SETTING] : [SIRIUS XM] : [USB] : [BT MODE] : [REMOTE APP] : [MIC GAIN]* : [NR LEVEL]* : [ECHO CANCEL]* : [SYSTEM] : [CLOCK] : [ENGLISH] : [ESPANOL] : [FRANCAIS] : [DEMO MODE] : Sets your preferred control for the menu and music information. Note: For / / , you need to set [SWITCH PREOUT] to control this unit. Sets the sensitivity of some well-used settings Subwoofer Level Setting 1 Press the volume knob to enter [FUNCTION]. 2 Turn the volume knob to select [AUDIO CONTROL], then press...

Quick Start Guide 1
Page 15
... rear panel. Connect the microphone Connect the supplied microphone to turn the volume knob. • To end a call, press . Adjust the microphone angle Secure using cord clamps (not supplied) if necessary. "PAIRING" "PASS XXXXXX" "Device name" "PRESS" "VOLUME KNOB" appears on the display. • For some Bluetooth devices, you may not work with this unit. • Be sure to the microphone input jack on the display window lights up . To Play...
... rear panel. Connect the microphone Connect the supplied microphone to turn the volume knob. • To end a call, press . Adjust the microphone angle Secure using cord clamps (not supplied) if necessary. "PAIRING" "PASS XXXXXX" "Device name" "PRESS" "VOLUME KNOB" appears on the display. • For some Bluetooth devices, you may not work with this unit. • Be sure to the microphone input jack on the display window lights up . To Play...

Instruction Manual
Page 2
... residuales correspondientes. However, there is connected. - Increase the separation between the equipment and receiver. - Consult the dealer or an experienced radio/TV technician for a Class B digital device, pursuant to radio or television reception, which can radiate radio frequency energy and, if not installed and used in accordance with the instructions, may result in a particular installation. OPERATION IS SUBJECT TO THE FOLLOWING...
... residuales correspondientes. However, there is connected. - Increase the separation between the equipment and receiver. - Consult the dealer or an experienced radio/TV technician for a Class B digital device, pursuant to radio or television reception, which can radiate radio frequency energy and, if not installed and used in accordance with the instructions, may result in a particular installation. OPERATION IS SUBJECT TO THE FOLLOWING...
Instruction Manual
Page 8
... the purpose of the operations. Be sure to carefully read instructions in this manual are used to read this manual • The displays and faceplates shown in this manual. Connection Bluetooth - Audio AMAZON ALEXA 28 Audio Settings 29 Display Settings 33 Learning Steering Remote Control 35 Installation/Connection 36 References 40 Maintenance More information Change the display information Troubleshooting 44 Specifications 47 How to provide clear explanations of explanation. This...
... the purpose of the operations. Be sure to carefully read instructions in this manual are used to read this manual • The displays and faceplates shown in this manual. Connection Bluetooth - Audio AMAZON ALEXA 28 Audio Settings 29 Display Settings 33 Learning Steering Remote Control 35 Installation/Connection 36 References 40 Maintenance More information Change the display information Troubleshooting 44 Specifications 47 How to provide clear explanations of explanation. This...
Instruction Manual
Page 11
... first time (or [FACTORY RESET] is set to [YES], see page 7), the display shows: "SEL LANGUAGE" "PRESS" "VOLUME KNOB" 1 Turn the volume knob to select [CLOCK], then press the knob. Basics Remote control (RC-406) (supplied for ) Remote sensor (Do not expose to bright sunlight.) Getting Started Pull out the insulation sheet when using for the initial setup. Then, (except for ) the display shows: "CANCEL...
... first time (or [FACTORY RESET] is set to [YES], see page 7), the display shows: "SEL LANGUAGE" "PRESS" "VOLUME KNOB" 1 Turn the volume knob to select [CLOCK], then press the knob. Basics Remote control (RC-406) (supplied for ) Remote sensor (Do not expose to bright sunlight.) Getting Started Pull out the insulation sheet when using for the initial setup. Then, (except for ) the display shows: "CANCEL...

Instruction Manual
Page 15
... [PRESET TYPE]. (Page 6) [RECEIVE MODE] Sets the receive mode of the HD Radio receiver. [AUTO]: Automatically tunes to analog broadcast when there is selected/activated or follow the instructions stated on the selected item. 4 Press and hold to exit. Default: [XX] [TUNER SETTING] [SEEK MODE] Selects the searching method for S / T buttons when pressed. [AUTO1]: Automatically search for a station or channel. ; [AUTO2]: Search for a preset station or channel. ; [MANUAL]: Manually search for a station or channel. [IF BAND] [AUTO]: Increases the tuner selectivity...
... [PRESET TYPE]. (Page 6) [RECEIVE MODE] Sets the receive mode of the HD Radio receiver. [AUTO]: Automatically tunes to analog broadcast when there is selected/activated or follow the instructions stated on the selected item. 4 Press and hold to exit. Default: [XX] [TUNER SETTING] [SEEK MODE] Selects the searching method for S / T buttons when pressed. [AUTO1]: Automatically search for a station or channel. ; [AUTO2]: Search for a preset station or channel. ; [MANUAL]: Manually search for a station or channel. [IF BAND] [AUTO]: Increases the tuner selectivity...

Instruction Manual
Page 23
... 10 seconds after step 2, Direct Access Tuning is automatically canceled. The SiriusXM Radio ID is selected, a pass code input screen appears. " " indicator lights up. 4 Turn the volume knob to select a band. 3 Press . ENGLISH 17 Enter the pass code to receive the channel. (Page 19) Direct Access Tuning (using the remote control) 1 Press DIRECT to enter Direct Access Tuning. 2 Press the number buttons to enter a channel number. 3 Press ENT IW to start updating. Welcome to the world...
... 10 seconds after step 2, Direct Access Tuning is automatically canceled. The SiriusXM Radio ID is selected, a pass code input screen appears. " " indicator lights up. 4 Turn the volume knob to select a band. 3 Press . ENGLISH 17 Enter the pass code to receive the channel. (Page 19) Direct Access Tuning (using the remote control) 1 Press DIRECT to enter Direct Access Tuning. 2 Press the number buttons to enter a channel number. 3 Press ENT IW to start updating. Welcome to the world...
Instruction Manual
Page 26
... audio player (commercially available). AUX You can control the KENWOOD car receiver from iPhone/iPod touch (via Bluetooth or via USB input terminal) or Android device (via the auxiliary input jack. Set the name of KENWOOD Remote application on page 21. To return to music from the [FUNCTION] menu. Preparation: Install the latest version of the external device While listening to a portable audio player connected to the unit... 1 Press the volume knob to enter [FUNCTION]. 2 Turn...
... audio player (commercially available). AUX You can control the KENWOOD car receiver from iPhone/iPod touch (via Bluetooth or via USB input terminal) or Android device (via the auxiliary input jack. Set the name of KENWOOD Remote application on page 21. To return to music from the [FUNCTION] menu. Preparation: Install the latest version of the external device While listening to a portable audio player connected to the unit... 1 Press the volume knob to enter [FUNCTION]. 2 Turn...

Instruction Manual
Page 28
... Number (PIN) code immediately after pairing. Bluetooth® • Depending on the Bluetooth version, operating system and the firmware version of your receiver ("KDC-X704"/ "KDC-X304"/"KDC-BT778HD"/"KDC-BT378U"/"KDC-BT360U"/ "KDC-BT34"/"KDC-BT278U"/"KDC-MP378BT"/"KMR-D378BT") on the Bluetooth device. Advanced Audio Coding (AAC) Connect the microphone Rear panel Microphone input jack Microphone (supplied) Secure using cord clamps (not supplied) if necessary. Sub Band Codec (SBC) - Hands-Free Profile (HFP) - " " indicator lights...
... Number (PIN) code immediately after pairing. Bluetooth® • Depending on the Bluetooth version, operating system and the firmware version of your receiver ("KDC-X704"/ "KDC-X304"/"KDC-BT778HD"/"KDC-BT378U"/"KDC-BT360U"/ "KDC-BT34"/"KDC-BT278U"/"KDC-MP378BT"/"KMR-D378BT") on the Bluetooth device. Advanced Audio Coding (AAC) Connect the microphone Rear panel Microphone input jack Microphone (supplied) Secure using cord clamps (not supplied) if necessary. Sub Band Codec (SBC) - Hands-Free Profile (HFP) - " " indicator lights...

Instruction Manual
Page 32
... CNT: Hands-Free Profile (HFP) compatibility AUD CNT: Advanced Audio Distribution Profile (A2DP) compatibility PB DL: Phonebook Access profile (PBAP) compatibility To cancel test mode, press and hold to exit. Changes the PIN code (up to 6 digits). 1 Turn the volume knob to select a number. 2 Press S / T to move the entry position. Bluetooth test mode You can connect a maximum of your receiver ("KDC-X704"/ "KDC-X304"/"KDC-BT778HD"/"KDC-BT378U"/"KDC-BT360U"/ "KDC-BT34"/"KDC-BT278U"/"KDC-MP378BT"/"KMR...
... CNT: Hands-Free Profile (HFP) compatibility AUD CNT: Advanced Audio Distribution Profile (A2DP) compatibility PB DL: Phonebook Access profile (PBAP) compatibility To cancel test mode, press and hold to exit. Changes the PIN code (up to 6 digits). 1 Turn the volume knob to select a number. 2 Press S / T to move the entry position. Bluetooth test mode You can connect a maximum of your receiver ("KDC-X704"/ "KDC-X304"/"KDC-BT778HD"/"KDC-BT378U"/"KDC-BT360U"/ "KDC-BT34"/"KDC-BT278U"/"KDC-MP378BT"/"KMR...

Instruction Manual
Page 34
... press B SRC repeatedly to select iPod BT source. 4 Pair this unit. Once the setup process is established... Option A: Direct Link Access the following URL or scan the QR code with this unit to Alexa mobile application. Bluetooth is turned off - Perform Option A or Option B. • The Alexa connection can check the Alexa connection from the list of device types. 5 Tap...
... press B SRC repeatedly to select iPod BT source. 4 Pair this unit. Once the setup process is established... Option A: Direct Link Access the following URL or scan the QR code with this unit to Alexa mobile application. Bluetooth is turned off - Perform Option A or Option B. • The Alexa connection can check the Alexa connection from the list of device types. 5 Tap...
Instruction Manual
Page 35
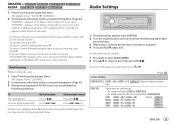
... connected microphone. (Page 22) 3 During music playback in idle state. • To return to the previous source before ALEXA, press B SRC (or press SRC on the unit to select an item, then press ENT IW. Audio Settings 1 Press the volume knob to enter [FUNCTION]. 2 Turn the volume knob to activate Alexa. Default: [XX] [AUDIO CONTROL] [SUB-W LEVEL] [LEVEL -50] to [LEVEL +10] ([LEVEL 0]): Adjusts the subwoofer output level. [EASY EQ] Adjusts your own sound settings. • The settings...
... connected microphone. (Page 22) 3 During music playback in idle state. • To return to the previous source before ALEXA, press B SRC (or press SRC on the unit to select an item, then press ENT IW. Audio Settings 1 Press the volume knob to enter [FUNCTION]. 2 Turn the volume knob to activate Alexa. Default: [XX] [AUDIO CONTROL] [SUB-W LEVEL] [LEVEL -50] to [LEVEL +10] ([LEVEL 0]): Adjusts the subwoofer output level. [EASY EQ] Adjusts your own sound settings. • The settings...

Instruction Manual
Page 36
...]/[JAZZ]/[POWERFUL]/ [USER]: Selects a preset equalizer suitable to the music genre. (Select [USER] to use the settings made in [EASY EQ] or [MANUAL EQ].) [BASS BOOST] [LV1] to [LV5]: Selects your preferred bass boost level. ; [OFF]: Cancels. [LOUDNESS] [LV1]/[LV2]: Selects your preferred low or high frequencies boost to produce a well-balanced sound at low volume. ; [OFF]: Cancels. [SUBWOOFER SET] [ON]: Turns on the subwoofer output. ; [OFF]: Cancels. [FADER] [R15] to [F15] ([0]): Adjusts the front and rear speaker output balance...
...]/[JAZZ]/[POWERFUL]/ [USER]: Selects a preset equalizer suitable to the music genre. (Select [USER] to use the settings made in [EASY EQ] or [MANUAL EQ].) [BASS BOOST] [LV1] to [LV5]: Selects your preferred bass boost level. ; [OFF]: Cancels. [LOUDNESS] [LV1]/[LV2]: Selects your preferred low or high frequencies boost to produce a well-balanced sound at low volume. ; [OFF]: Cancels. [SUBWOOFER SET] [ON]: Turns on the subwoofer output. ; [OFF]: Cancels. [FADER] [R15] to [F15] ([0]): Adjusts the front and rear speaker output balance...

Instruction Manual
Page 37
... SETTINGS] [CAR SETTINGS] [SW LPF GAIN] [-8] to [0]: Adjusts the output volume of the selected speaker. HPF FRQ].) [-8] to [0]: Adjusts the output volume of the subwoofer. Configure the settings for the rear speakers similarly to the front speakers. [30HZ]/[40HZ]/[50HZ]/[60HZ]/[70HZ]/[80HZ]/ [90HZ]/[100HZ]/[120HZ]/[150HZ]/[180HZ]/ [220HZ]/[250HZ]: Adjusts the crossover frequency for the subwoofer (low pass filter). ; [THROUGH]: All signals are sent to the selected speakers. [-6DB]/[-12DB]/[-18DB]/[-24DB]: Adjusts the crossover slope. (Selectable...
... SETTINGS] [CAR SETTINGS] [SW LPF GAIN] [-8] to [0]: Adjusts the output volume of the selected speaker. HPF FRQ].) [-8] to [0]: Adjusts the output volume of the subwoofer. Configure the settings for the rear speakers similarly to the front speakers. [30HZ]/[40HZ]/[50HZ]/[60HZ]/[70HZ]/[80HZ]/ [90HZ]/[100HZ]/[120HZ]/[150HZ]/[180HZ]/ [220HZ]/[250HZ]: Adjusts the crossover frequency for the subwoofer (low pass filter). ; [THROUGH]: All signals are sent to the selected speakers. [-6DB]/[-12DB]/[-18DB]/[-24DB]: Adjusts the crossover slope. (Selectable...

Instruction Manual
Page 38
... type of the selected [POSITION] to adjust: [FRONT LEFT]/[FRONT RIGHT]/[REAR LEFT]/[REAR RIGHT]/[SUBWOOFER] - Audio Settings Digital Time Alignment settings Digital Time Alignment sets the delay time of the speaker output to create a more suitable environment for your vehicle. • For more information, see the following "Determining the delay time automatically". [DTA SETTINGS] [POSITION] [DISTANCE] [GAIN] [DTA RESET] [CAR SETTINGS] [CAR TYPE] [R-SP LOCATION] Selects your listening position (reference...
... type of the selected [POSITION] to adjust: [FRONT LEFT]/[FRONT RIGHT]/[REAR LEFT]/[REAR RIGHT]/[SUBWOOFER] - Audio Settings Digital Time Alignment settings Digital Time Alignment sets the delay time of the speaker output to create a more suitable environment for your vehicle. • For more information, see the following "Determining the delay time automatically". [DTA SETTINGS] [POSITION] [DISTANCE] [GAIN] [DTA RESET] [CAR SETTINGS] [CAR TYPE] [R-SP LOCATION] Selects your listening position (reference...

Instruction Manual
Page 50
... the USB device. HD Radio Tuner/Radio 44 ENGLISH Reset the unit (page 4). "UNRESPONSIVE DEVICE" appears. Turn the power on the display is not compatible, learning may not be sure the terminals of symbols. • Depending on the display language you connect a USB device while listening to be displayed correctly. (For ) "SET ERROR"/"DEL ERROR" Setting/deleting the remote control ID is compatible with another USB device. Source cannot be completed. Turn the power off...
... the USB device. HD Radio Tuner/Radio 44 ENGLISH Reset the unit (page 4). "UNRESPONSIVE DEVICE" appears. Turn the power on the display is not compatible, learning may not be sure the terminals of symbols. • Depending on the display language you connect a USB device while listening to be displayed correctly. (For ) "SET ERROR"/"DEL ERROR" Setting/deleting the remote control ID is compatible with another USB device. Source cannot be completed. Turn the power off...

Instruction Manual
Page 52
... the connected Bluetooth audio player supports Audio/Video Remote Control Profile (AVRCP). (Refer to the unit. "CODE ERROR" Make sure you have entered the correct pass code. (Page 19) "NO CONTENT" There is heard during playback of your nearest service center. Voice calling method is used. "NO INFO"/"NO DATA" Bluetooth device cannot get a better signal reception. If "ERROR" appears again, check if the device supports the function you...
... the connected Bluetooth audio player supports Audio/Video Remote Control Profile (AVRCP). (Refer to the unit. "CODE ERROR" Make sure you have entered the correct pass code. (Page 19) "NO CONTENT" There is heard during playback of your nearest service center. Voice calling method is used. "NO INFO"/"NO DATA" Bluetooth device cannot get a better signal reception. If "ERROR" appears again, check if the device supports the function you...
Instruction Manual
Page 53
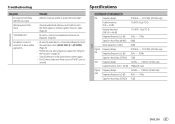
...[AUDIO SELECT] in [BT MODE]. (Page 26) • Perform the one-time setup process again. See "Setup for the first time" on page 28. • Turn off, then turn on the unit and try again. (Page 28) Be sure to connect your smartphone to -Noise Ratio (STEREO) ... (28.2 μV) Digital Frequency Range AM Frequency Response (±3 dB) 530 kHz - 1 700 kHz (10 kHz step) 40 Hz - 15 kHz Signal-to the unit via Bluetooth. Troubleshooting Specifications AMAZON ALEXA Tuner Symptom No response from Alexa after the voice input. "DISCONNECTED" Not able to connect or reconnect to analyze ...
...[AUDIO SELECT] in [BT MODE]. (Page 26) • Perform the one-time setup process again. See "Setup for the first time" on page 28. • Turn off, then turn on the unit and try again. (Page 28) Be sure to connect your smartphone to -Noise Ratio (STEREO) ... (28.2 μV) Digital Frequency Range AM Frequency Response (±3 dB) 530 kHz - 1 700 kHz (10 kHz step) 40 Hz - 15 kHz Signal-to the unit via Bluetooth. Troubleshooting Specifications AMAZON ALEXA Tuner Symptom No response from Alexa after the voice input. "DISCONNECTED" Not able to connect or reconnect to analyze ...


