

User Manual
Page 1
... this instruction manual. KDC-2022 KDC-2022V KDC-202MR KDC-222 KDC-222S KDC-122 KDC-122S CD-RECEIVER INSTRUCTION MANUAL AMPLI-TUNER-LECTEUR DE CD MODE D'EMPLOI REPRODUCTOR DE DISCOS COMPACTOS RECEPTOR DE FM/AM MANUAL DE INSTRUCCIONES RECEPTOR DE CD MANUAL DE INSTRUÇÕES Take the time to the model and serial numbers whenever you obtain the best performance from your KENWOOD dealer for information or service on...
... this instruction manual. KDC-2022 KDC-2022V KDC-202MR KDC-222 KDC-222S KDC-122 KDC-122S CD-RECEIVER INSTRUCTION MANUAL AMPLI-TUNER-LECTEUR DE CD MODE D'EMPLOI REPRODUCTOR DE DISCOS COMPACTOS RECEPTOR DE FM/AM MANUAL DE INSTRUCCIONES RECEPTOR DE CD MANUAL DE INSTRUÇÕES Take the time to the model and serial numbers whenever you obtain the best performance from your KENWOOD dealer for information or service on...

User Manual
Page 2
...6 Power Selecting the Source Volume Attenuator Loudness System Q Audio Control Speaker Setting Clock Display Adjusting Clock DSI (Disabled System Indicator) Theft Deterrent Faceplate Tuner features 9 Tuning Mode Tuning Station Preset Memory Auto Memory Entry Preset Tuning CRSC (Clean Reception System Circuit) CD/External disc control features 11 Playing CD Playing External Disc Fast Forwarding and Reversing Track Search Album Search Track/Album Repeat Track Scan Random Play Magazine Random Play Direct Track Search Direct Album Search Basic Operations of remote......14 Loading and Replacing...
...6 Power Selecting the Source Volume Attenuator Loudness System Q Audio Control Speaker Setting Clock Display Adjusting Clock DSI (Disabled System Indicator) Theft Deterrent Faceplate Tuner features 9 Tuning Mode Tuning Station Preset Memory Auto Memory Entry Preset Tuning CRSC (Clean Reception System Circuit) CD/External disc control features 11 Playing CD Playing External Disc Fast Forwarding and Reversing Track Search Album Search Track/Album Repeat Track Scan Random Play Magazine Random Play Direct Track Search Direct Album Search Basic Operations of remote......14 Loading and Replacing...

User Manual
Page 3
... circuit when replacing a fuse, first disconnect the wiring harness. • Do not place any KENWOOD disc changers/ CD players released in 1997 or earlier and disc changers made by other wires with the prescribed rating. Refer to the catalog or consult your health or even fatal. The unit may result in . Use only the screws provided. Setting the "O-N" Switch to the "N" position for connectable models of water...
... circuit when replacing a fuse, first disconnect the wiring harness. • Do not place any KENWOOD disc changers/ CD players released in 1997 or earlier and disc changers made by other wires with the prescribed rating. Refer to the catalog or consult your health or even fatal. The unit may result in . Use only the screws provided. Setting the "O-N" Switch to the "N" position for connectable models of water...

User Manual
Page 4
Cleaning the Unit If the faceplate of the display and the panel appearing in actual operation. Lens Fogging Right after a while, consult your Kenwood dealer. In such a situation, remove the disc and wait for the condensation to the unit may affect its mechanical parts. If the unit still does not operate normally after you turn on the car heater in cold weather, dew or condensation...
Cleaning the Unit If the faceplate of the display and the panel appearing in actual operation. Lens Fogging Right after a while, consult your Kenwood dealer. In such a situation, remove the disc and wait for the condensation to the unit may affect its mechanical parts. If the unit still does not operate normally after you turn on the car heater in cold weather, dew or condensation...

User Manual
Page 6
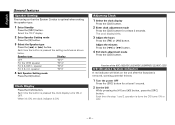
...'s ON, the "ATT" indicator blinks. -6- Attenuator Turning the volume down quickly. Source required Display Tuner "TUnE" CD "CD" External disc "DISC" (Function of the KDC-2022/KDC-2022V/KDC-202MR) Standby (Illumination only mode) "OFF" Clock indicator SYSTEM Q indicator Clock display KDC-222/KDC-222S/KDC-122/KDC-122S LOUD indicator Clock display ATT indicator SYSTEM Q indicator Clock indicator Volume Increasing Volume Press the [u] button. Turning OFF the Power Press the [SRC] button for at least 1 second. Each time the button is pressed the...
...'s ON, the "ATT" indicator blinks. -6- Attenuator Turning the volume down quickly. Source required Display Tuner "TUnE" CD "CD" External disc "DISC" (Function of the KDC-2022/KDC-2022V/KDC-202MR) Standby (Illumination only mode) "OFF" Clock indicator SYSTEM Q indicator Clock display KDC-222/KDC-222S/KDC-122/KDC-122S LOUD indicator Clock display ATT indicator SYSTEM Q indicator Clock indicator Volume Increasing Volume Press the [u] button. Turning OFF the Power Press the [SRC] button for at least 1 second. Each time the button is pressed the...

User Manual
Page 7
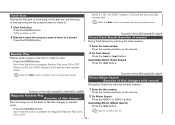
... sound setting preset for different types of the music. 1 Select the source to set in audio control replace the System Q values. Each time the button is ON. First, select the speaker type with the Speaker setting. • When the System Q setting is pressed for low and high tones during low volume. Audio Control 1 Select the source for adjustment Press the [SRC] button. 2 Enter Audio Control mode Press the [AUD] button for adjustment Press the [FM] or [AM] button. Right 15 Rear...
... sound setting preset for different types of the music. 1 Select the source to set in audio control replace the System Q values. Each time the button is ON. First, select the speaker type with the Speaker setting. • When the System Q setting is pressed for low and high tones during low volume. Audio Control 1 Select the source for adjustment Press the [SRC] button. 2 Enter Audio Control mode Press the [AUD] button for adjustment Press the [FM] or [AM] button. Right 15 Rear...
User Manual
Page 8
... features Speaker Setting Fine-tuning so that the System Q value is ON. Select the "OFF" display. 2 Enter Speaker Setting mode Press the [Q] button. 3 Select the Speaker type Press the [4] or [¢] button. Each time the button is pressed the clock display turns ON or OFF. Clock Display Press the [CLK] button. Function of the KDC-2022/KDC-2022V/KDC-202MR/KDC-222/KDC-222S DSI (Disabled System Indicator) A red indicator will blink on the unit after the faceplate is...
... features Speaker Setting Fine-tuning so that the System Q value is ON. Select the "OFF" display. 2 Enter Speaker Setting mode Press the [Q] button. 3 Select the Speaker type Press the [4] or [¢] button. Each time the button is pressed the clock display turns ON or OFF. Clock Display Press the [CLK] button. Function of the KDC-2022/KDC-2022V/KDC-202MR/KDC-222/KDC-222S DSI (Disabled System Indicator) A red indicator will blink on the unit after the faceplate is...

User Manual
Page 9
... taken with you to use the unit. Removing the Faceplate Press the Release button. Tuner features SRC #1 - 6 KDC-2022/KDC-2022V/KDC-202MR ST indicator Preset station number FM/ AM CRSC 4¢ AUTO/ AME CRSC indicator 2 Push the faceplate in its special storage case while detached. • Do not expose the faceplate or its storage case to deter theft. ST indicator AUTO indicator Frequency display For that reason, keep...
... taken with you to use the unit. Removing the Faceplate Press the Release button. Tuner features SRC #1 - 6 KDC-2022/KDC-2022V/KDC-202MR ST indicator Preset station number FM/ AM CRSC 4¢ AUTO/ AME CRSC indicator 2 Push the faceplate in its special storage case while detached. • Do not expose the faceplate or its storage case to deter theft. ST indicator AUTO indicator Frequency display For that reason, keep...

User Manual
Page 10
... station. 1 Select tuner source Press the [SRC] button. Auto Memory Entry Putting stations with good reception in the memory Press the [#1] - [#6] button for at least 2 seconds. Tuner features English Tuning Mode Choose the tuning mode. The preset number display blinks 1 time. Each time the [FM] button is pressed it switches between the FM1, FM2, and FM3 bands. 3 Tune up the station Press the [#1] - [#6] button. - 10 - Tuning mode Display Operation Auto seek Preset station seek Manual "AUTO 1" indicator "AUTO 2" indicator - Normal manual tuning control. 1 Select...
... station. 1 Select tuner source Press the [SRC] button. Auto Memory Entry Putting stations with good reception in the memory Press the [#1] - [#6] button for at least 2 seconds. Tuner features English Tuning Mode Choose the tuning mode. The preset number display blinks 1 time. Each time the [FM] button is pressed it switches between the FM1, FM2, and FM3 bands. 3 Tune up the station Press the [#1] - [#6] button. - 10 - Tuning mode Display Operation Auto seek Preset station seek Manual "AUTO 1" indicator "AUTO 2" indicator - Normal manual tuning control. 1 Select...

User Manual
Page 12
... [SRC] button. Press the [DISC-] or [DISC+] button. Using an adapter and inserting them into this unit. Fast Forwarding and Reversing Function of the KDC-2022/KDC-2022V/KDC-202MR Album Search (Function of the KDC-2022/KDC-2022V/KDC-202MR Playing External Disc Playing discs set in . (8cm) CD cannot be displayed will differ depending on the external disc players being connected. Repeat play the disc at that point. Press the [4] or [¢] button. Function of disc changer) Selecting the disc you want...
... [SRC] button. Press the [DISC-] or [DISC+] button. Using an adapter and inserting them into this unit. Fast Forwarding and Reversing Function of the KDC-2022/KDC-2022V/KDC-202MR Album Search (Function of the KDC-2022/KDC-2022V/KDC-202MR Playing External Disc Playing discs set in . (8cm) CD cannot be displayed will differ depending on the external disc players being connected. Repeat play the disc at that point. Press the [4] or [¢] button. Function of disc changer) Selecting the disc you want...
User Manual
Page 13
... Play Playing all the discs in the disc changer in random order. Magazine Random Play (Function of disc changers with remote) Doing Disc Search by entering the track number. Input "0" to is pressed, the next song select starts. 1 Enter the track number Press the number buttons on the remote. Press the [RDM] button. Each time the button is ON and the track number blinks. Function of the KDC-2022/KDC-2022V/KDC-202MR 1 Enter the disc number Press the number buttons...
... Play Playing all the discs in the disc changer in random order. Magazine Random Play (Function of disc changers with remote) Doing Disc Search by entering the track number. Input "0" to is pressed, the next song select starts. 1 Enter the track number Press the number buttons on the remote. Press the [RDM] button. Each time the button is ON and the track number blinks. Function of the KDC-2022/KDC-2022V/KDC-202MR 1 Enter the disc number Press the number buttons...

User Manual
Page 14
... a doctor immediately if the battery is pressed the source switches. For the source switching order refer to the previous level. - 14 - Basic operations [VOL.] buttons Adjusting the volume. [SRC] button Each time the button is accidentally swallowed. When it is pressed again it returns to (page 6). [ATT] button Turning the volume down quickly. Insert the batteries with the + and - FM/AM/DISC+/DISC- [#0] - [#9] ATT SRC 4/¢ 38 Not used VOL. 2WARNING Store...
... a doctor immediately if the battery is pressed the source switches. For the source switching order refer to the previous level. - 14 - Basic operations [VOL.] buttons Adjusting the volume. [SRC] button Each time the button is accidentally swallowed. When it is pressed again it returns to (page 6). [ATT] button Turning the volume down quickly. Insert the batteries with the + and - FM/AM/DISC+/DISC- [#0] - [#9] ATT SRC 4/¢ 38 Not used VOL. 2WARNING Store...

User Manual
Page 16
...; Connect the speaker wires correctly to the terminals to a power source with a constant voltage supply, as shown above. Number of items 1 3 .........4 .........1 2 .........2 4 .........4 5 .........1 (KDC-2022/KDC-2022V/ KDC-222/KDC-222S only) The use the accessories shipped with the unit, as with battery wires, the battery may be turned on the ends of items External view ......... Make the proper input and output wire connections for those wires to cause a short circuit, then replace the old fuse with...
...; Connect the speaker wires correctly to the terminals to a power source with a constant voltage supply, as shown above. Number of items 1 3 .........4 .........1 2 .........2 4 .........4 5 .........1 (KDC-2022/KDC-2022V/ KDC-222/KDC-222S only) The use the accessories shipped with the unit, as with battery wires, the battery may be turned on the ends of items External view ......... Make the proper input and output wire connections for those wires to cause a short circuit, then replace the old fuse with...

User Manual
Page 17
... front right speaker 33 To rear left output (White) (KDC-2022/2022V/202MR only) 26 Front right output (Red) (KDC-2022/2022V/202MR only) 27 2 KENWOOD disc changer control input (KDC-2022/2022V/202MR only) To connect the Disc changer, consult your Disc changer manual. 3 Fuse (10A) 24 If no connections are made, do not let the wire come out from the tab. 4b Ignition key switch 10 Car fuse box (Main fuse) 11 + Battery 12 - Connecting Wires to the antenna control terminal...
... front right speaker 33 To rear left output (White) (KDC-2022/2022V/202MR only) 26 Front right output (Red) (KDC-2022/2022V/202MR only) 27 2 KENWOOD disc changer control input (KDC-2022/2022V/202MR only) To connect the Disc changer, consult your Disc changer manual. 3 Fuse (10A) 24 If no connections are made, do not let the wire come out from the tab. 4b Ignition key switch 10 Car fuse box (Main fuse) 11 + Battery 12 - Connecting Wires to the antenna control terminal...

User Manual
Page 18
...5mm Accessory3...for Nissan car Accessory4 ...for Toyota car • During installation, do not use of the mounting sleeve with the accessory screws. Make sure that it may malfunction (for those provided. If you want to fasten the faceplate to the main unit so that the unit is unstable, it ... main unit. • Damage may skip). ■ Installing in Japanese-Made Cars 1 Refer to the section "Removing the hard rubber frame" (page 19) and then remove the hard rubber frame. 2 Align the holes in the unit (two locations on the Unit (KDC-2022/KDC-2022V/KDC-222/KDC-222S only...
...5mm Accessory3...for Nissan car Accessory4 ...for Toyota car • During installation, do not use of the mounting sleeve with the accessory screws. Make sure that it may malfunction (for those provided. If you want to fasten the faceplate to the main unit so that the unit is unstable, it ... main unit. • Damage may skip). ■ Installing in Japanese-Made Cars 1 Refer to the section "Removing the hard rubber frame" (page 19) and then remove the hard rubber frame. 2 Align the holes in the unit (two locations on the Unit (KDC-2022/KDC-2022V/KDC-222/KDC-222S only...
User Manual
Page 20
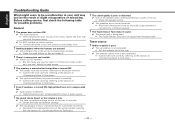
...; The ignition and battery wire are not wired correctly.27 ☞ Reconnect the speaker wires so that each source. ? Radio reception is poor.39 ✔ The car antenna is selected. ☞ High-pitched tone isn't compensated for possible problems. General ? The power does not turn ON.01 ✔ The fuse has blown. ☞ After checking for short circuits in this unit, you want to listen...
...; The ignition and battery wire are not wired correctly.27 ☞ Reconnect the speaker wires so that each source. ? Radio reception is poor.39 ✔ The car antenna is selected. ☞ High-pitched tone isn't compensated for possible problems. General ? The power does not turn ON.01 ✔ The fuse has blown. ☞ After checking for short circuits in this unit, you want to listen...

User Manual
Page 21
... with CD recorder. ✔ A non-compatible CD changer is being turned OFF. "AVin" is displayed without achieving External disc control mode.50 ✔ Unsupported disc changer is severely scratched.55 ☞ Try another disc inserted. ☞ Press the [0] button and remove the disc. ? Cannot play . ? If the following situations, consult your nearest service center: • Even though the disc changer is connected, the Disc Changer source is not ON, with the...
... with CD recorder. ✔ A non-compatible CD changer is being turned OFF. "AVin" is displayed without achieving External disc control mode.50 ✔ Unsupported disc changer is severely scratched.55 ☞ Try another disc inserted. ☞ Press the [0] button and remove the disc. ? Cannot play . ? If the following situations, consult your nearest service center: • Even though the disc changer is connected, the Disc Changer source is not ON, with the...

User Manual
Page 22
...: E-77: The faceplate of the slave unit being exchanged in the unit activates when the temperature inside the automatic disc changer exceeds 60°C (140°F), stopping all operation.E0d ➪ Cool down . If the "E-77" code does not disappear, consult your nearest service center. E-0d: LOAd: IN (Blink): The protective circuit in the Disc changer.E57 The CD player section is quite...
...: E-77: The faceplate of the slave unit being exchanged in the unit activates when the temperature inside the automatic disc changer exceeds 60°C (140°F), stopping all operation.E0d ➪ Cool down . If the "E-77" code does not disappear, consult your nearest service center. E-0d: LOAd: IN (Blink): The protective circuit in the Disc changer.E57 The CD player section is quite...
User Manual
Page 23
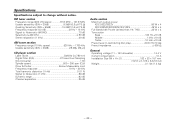
... 85 dB Audio section Maximum output power KDC-2022/2022V 50 W x 4 KDC-202MR/222/222S/122/122S 45 W x 4 Full Bandwidth Power (at less than 1% THD 22 W x 4 Tone action Bass 100 Hz ±10 dB Middle 1 kHz ±10 dB Treble 10 kHz ±10 dB Preout level / Load (during disc play 2000 mV/10 kΩ Preout impedance 600 Ω General Operating voltage (11...
... 85 dB Audio section Maximum output power KDC-2022/2022V 50 W x 4 KDC-202MR/222/222S/122/122S 45 W x 4 Full Bandwidth Power (at less than 1% THD 22 W x 4 Tone action Bass 100 Hz ±10 dB Middle 1 kHz ±10 dB Treble 10 kHz ±10 dB Preout level / Load (during disc play 2000 mV/10 kΩ Preout impedance 600 Ω General Operating voltage (11...

User Manual
Page 24
..., which the receiver is connected. • Consult the dealer or an experienced radio/TV technician for a Class B digital device, pursuant to laser product safety. English 2Warning 2CAUTION Use of controls or adjustments or performance of procedures other than those specified herein may cause harmful interference to radio communications, if it is not installed and used in accordance with the instructions. NOTE...
..., which the receiver is connected. • Consult the dealer or an experienced radio/TV technician for a Class B digital device, pursuant to laser product safety. English 2Warning 2CAUTION Use of controls or adjustments or performance of procedures other than those specified herein may cause harmful interference to radio communications, if it is not installed and used in accordance with the instructions. NOTE...


