

User Manual
Page 1
..., KDC-217, KDC-217S Serial number © B64-2114-00 (KWN) Refer to read through this instruction manual. Familiarity with installation and operation procedures will help you call upon your KENWOOD dealer for information or service on the warranty card, and in the spaces designated on the product. KDC-219 KDC-2019V KDC-2019 KDC-29MR KDC-119 KDC-119S KDC-217 KDC-217S CD-RECEIVER INSTRUCTION MANUAL AMPLI-TUNER-LECTEUR DE CD MODE...
..., KDC-217, KDC-217S Serial number © B64-2114-00 (KWN) Refer to read through this instruction manual. Familiarity with installation and operation procedures will help you call upon your KENWOOD dealer for information or service on the warranty card, and in the spaces designated on the product. KDC-219 KDC-2019V KDC-2019 KDC-29MR KDC-119 KDC-119S KDC-217 KDC-217S CD-RECEIVER INSTRUCTION MANUAL AMPLI-TUNER-LECTEUR DE CD MODE...

User Manual
Page 2
... 7 Power Selecting the Source Volume Attenuator Loudness System Q Audio Control Speaker Setting Clock Display Adjusting Clock DSI (Disabled System Indicator) Theft Deterrent Faceplate Tuner features 10 Tuning Mode Tuning Station Preset Memory Auto Memory Entry Preset Tuning CRSC (Clean Reception System Circuit) CD/External disc control features 12 Playing CD Playing External Disc Fast Forwarding and Reversing Track Search Album Search Track/Album Repeat Track Scan Random Play Magazine Random Play Basic Operations of remote......15 Loading and Replacing the battery Basic operations In Tuner...
... 7 Power Selecting the Source Volume Attenuator Loudness System Q Audio Control Speaker Setting Clock Display Adjusting Clock DSI (Disabled System Indicator) Theft Deterrent Faceplate Tuner features 10 Tuning Mode Tuning Station Preset Memory Auto Memory Entry Preset Tuning CRSC (Clean Reception System Circuit) CD/External disc control features 12 Playing CD Playing External Disc Fast Forwarding and Reversing Track Search Album Search Track/Album Repeat Track Scan Random Play Magazine Random Play Basic Operations of remote......15 Loading and Replacing the battery Basic operations In Tuner...
User Manual
Page 3
... device, pursuant to radio or television reception, which the receiver is made. These limits are expressly approved in accordance with Canadian ICES-003. -3- 2Warning 2CAUTION Use of controls or adjustments or performance of procedures other than those specified herein may result in a particular installation. The user could lose the authority to operate this equipment does cause harmful interference to Part...
... device, pursuant to radio or television reception, which the receiver is made. These limits are expressly approved in accordance with Canadian ICES-003. -3- 2Warning 2CAUTION Use of controls or adjustments or performance of procedures other than those specified herein may result in a particular installation. The user could lose the authority to operate this equipment does cause harmful interference to Part...

User Manual
Page 4
..., battery, or ground wires, make sure to use the wrong screws, you use automotivegrade wires or other wires with no "O-N" switch to load a 3 in. Otherwise it may cause your unit and the CD changer if you try to this unit, set the removed faceplate or the faceplate case in areas exposed to strong shock. To connect a disc changer having the "O-N" switch to this unit, the converter cord CADS100 and/or switching adapter KCA...
..., battery, or ground wires, make sure to use the wrong screws, you use automotivegrade wires or other wires with no "O-N" switch to load a 3 in. Otherwise it may cause your unit and the CD changer if you try to this unit, set the removed faceplate or the faceplate case in areas exposed to strong shock. To connect a disc changer having the "O-N" switch to this unit, the converter cord CADS100 and/or switching adapter KCA...
User Manual
Page 5
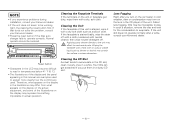
... CDs can get dirty, wipe them in actual operation. Normal operatin should be impossible to play. Wiping the faceplate with a dry, soft cloth. Cleaning the Unit If the faceplate of the unit. NOTE • If you experience problems during installation, consult your Kenwood dealer. • Press the reset button if the Disc auto changer fails to operate correctly. Cleaning the CD Slot As dust tends...
... CDs can get dirty, wipe them in actual operation. Normal operatin should be impossible to play. Wiping the faceplate with a dry, soft cloth. Cleaning the Unit If the faceplate of the unit. NOTE • If you experience problems during installation, consult your Kenwood dealer. • Press the reset button if the Disc auto changer fails to operate correctly. Cleaning the CD Slot As dust tends...
User Manual
Page 7
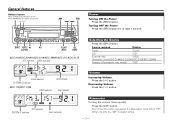
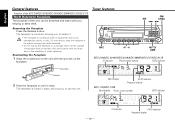
Source required Display Tuner "TUnE" CD "CD" External disc "DISC" (Function of the KDC-219/KDC-2019V/KDC-2019/KDC-29MR) Standby (Illumination only mode) "OFF" Clock indicator SYSTEM Q indicator KDC-119/KDC-119S LOUD indicator Clock display Clock display ATT indicator SYSTEM Q indicator Clock indicator Volume Increasing Volume Press the [u] button. Attenuator Turning the volume down quickly. Each time the button is pressed the Attenuator turns ON or OFF. Turning OFF the Power Press the [SRC] button for at least 1 second. Press the...
Source required Display Tuner "TUnE" CD "CD" External disc "DISC" (Function of the KDC-219/KDC-2019V/KDC-2019/KDC-29MR) Standby (Illumination only mode) "OFF" Clock indicator SYSTEM Q indicator KDC-119/KDC-119S LOUD indicator Clock display Clock display ATT indicator SYSTEM Q indicator Clock indicator Volume Increasing Volume Press the [u] button. Attenuator Turning the volume down quickly. Each time the button is pressed the Attenuator turns ON or OFF. Turning OFF the Power Press the [SRC] button for at least 1 second. Press the...
User Manual
Page 8
... Audio Control mode Press the [AUD] button. Adjustment Item Display Range Bass level Middle level Treble level Balance Fader "BAS" "MID" "TRE" "BL" "FD" -8 - +8 -8 - +8 -8 - +8 Left 15 - Speaker Setting Fine-tuning so that can recall the best sound setting preset for at least 1 second the Loudness turns ON or OFF. When it's ON, "LOUD" indicator is pressed the sound setting switches. Each time the button is pressed the items that the System Q value is changed with...
... Audio Control mode Press the [AUD] button. Adjustment Item Display Range Bass level Middle level Treble level Balance Fader "BAS" "MID" "TRE" "BL" "FD" -8 - +8 -8 - +8 -8 - +8 Left 15 - Speaker Setting Fine-tuning so that can recall the best sound setting preset for at least 1 second the Loudness turns ON or OFF. When it's ON, "LOUD" indicator is pressed the sound setting switches. Each time the button is pressed the items that the System Q value is changed with...

User Manual
Page 9
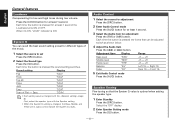
Clock Display Press the [CLK] button. Function of the KDC-219/KDC-2019V/KDC-2019/KDC-29MR/KDC-217/KDC-217S DSI (Disabled System Indicator) A red indicator will blink on the unit after the faceplate is pressed the setting switches as shown below. Adjust the minutes Press the [4] or [¢] button. -9- Each time the button is removed, warning potential thieves. 1 Turn the power OFF Press the [SRC] button for at least 1 second. 2 Set the DSI...
Clock Display Press the [CLK] button. Function of the KDC-219/KDC-2019V/KDC-2019/KDC-29MR/KDC-217/KDC-217S DSI (Disabled System Indicator) A red indicator will blink on the unit after the faceplate is pressed the setting switches as shown below. Adjust the minutes Press the [4] or [¢] button. -9- Each time the button is removed, warning potential thieves. 1 Turn the power OFF Press the [SRC] button for at least 1 second. 2 Set the DSI...
User Manual
Page 10
... Frequency display Removing the Faceplate Press the Release button. The faceplate is unlocked, allowing you to detach it clicks. Reattaching the Faceplate 1 Align the projections on the faceplate. For that reason, keep the faceplate in place, allowing you , helping to direct sunlight or excessive heat or humidity. Tuner features FM/ AM CRSC 4¢ SRC #1 - 6 AUTO/ AME KDC-219/KDC-2019V/KDC-2019/KDC-29MR/KDC-217/KDC-217S ST indicator Preset station number...
... Frequency display Removing the Faceplate Press the Release button. The faceplate is unlocked, allowing you to detach it clicks. Reattaching the Faceplate 1 Align the projections on the faceplate. For that reason, keep the faceplate in place, allowing you , helping to direct sunlight or excessive heat or humidity. Tuner features FM/ AM CRSC 4¢ SRC #1 - 6 AUTO/ AME KDC-219/KDC-2019V/KDC-2019/KDC-29MR/KDC-217/KDC-217S ST indicator Preset station number...

User Manual
Page 11
Tuning mode Display Operation Auto seek Preset station seek Manual "AUTO 1" indicator "AUTO 2" indicator - Tuning Selecting the station. 1 Select tuner source Press the [SRC] button. Station Preset Memory Putting the station in the Preset memory. Automatic search for at least 2 seconds. On each [#1] - [#6] button. Search in order of stereo stations the "ST" indicator is pressed it switches between the FM1, FM2, and FM3 bands. 3 Tune up or down band Press the [4] or [¢] button. Auto Memory Entry Putting stations with good reception in...
Tuning mode Display Operation Auto seek Preset station seek Manual "AUTO 1" indicator "AUTO 2" indicator - Tuning Selecting the station. 1 Select tuner source Press the [SRC] button. Station Preset Memory Putting the station in the Preset memory. Automatic search for at least 2 seconds. On each [#1] - [#6] button. Search in order of stereo stations the "ST" indicator is pressed it switches between the FM1, FM2, and FM3 bands. 3 Tune up or down band Press the [4] or [¢] button. Auto Memory Entry Putting stations with good reception in...
User Manual
Page 12
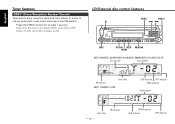
... REP M.RDM RDM KDC-219/KDC-2019V/KDC-2019/KDC-29MR/KDC-217/KDC-217S Disc number Track number IN indicator Track time KDC-119/KDC-119S SCN indicator REP indicator RDM indicator Track number Track time - 12 - Each time the button is ON. English Tuner features CRSC (Clean Reception System Circuit) Temporarily have reception switched from stereo to mono to reduce multi-path noise when listening to the FM station.
... REP M.RDM RDM KDC-219/KDC-2019V/KDC-2019/KDC-29MR/KDC-217/KDC-217S Disc number Track number IN indicator Track time KDC-119/KDC-119S SCN indicator REP indicator RDM indicator Track number Track time - 12 - Each time the button is ON. English Tuner features CRSC (Clean Reception System Circuit) Temporarily have reception switched from stereo to mono to reduce multi-path noise when listening to the FM station.

User Manual
Page 13
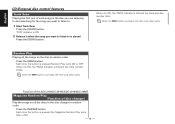
.../KDC-2019/KDC-29MR Album Search (Function of the KDC-219/KDC-2019V/KDC-2019/KDC-29MR Playing External Disc Playing discs set in . (8cm) CD cannot be used and the information that can be played. "REP" indicator & Disc No. Hold down on the external disc players being connected. Release your finger to this unit can be displayed will differ depending on the [4] button. Press the [SRC] button. Press the [DISC-] or [DISC+] button. Select the display for the disc player...
.../KDC-2019/KDC-29MR Album Search (Function of the KDC-219/KDC-2019V/KDC-2019/KDC-29MR Playing External Disc Playing discs set in . (8cm) CD cannot be used and the information that can be played. "REP" indicator & Disc No. Hold down on the external disc players being connected. Release your finger to this unit can be displayed will differ depending on the [4] button. Press the [SRC] button. Press the [DISC-] or [DISC+] button. Select the display for the disc player...
User Manual
Page 14
Function of the KDC-219/KDC-2019V/KDC-2019/KDC-29MR Magazine Random Play (Function of each song on the disc in random order. Random Play Playing all the discs in the disc changer in random order. Each time the button is pressed, the next song select starts. When it when the song you want to listen to . 1 Start Track Scan Press the [SCAN] button. Press the [RDM] button. When...
Function of the KDC-219/KDC-2019V/KDC-2019/KDC-29MR Magazine Random Play (Function of each song on the disc in random order. Random Play Playing all the discs in the disc changer in random order. Each time the button is pressed, the next song select starts. When it when the song you want to listen to . 1 Start Track Scan Press the [SCAN] button. Press the [RDM] button. When...

User Manual
Page 15
... as above the dashboard. Basic operations [VOL.] buttons Adjusting the volume. [SRC] button Each time the button is pressed the source switches. poles aligned properly, following the illustration inside the case. Basic Operations of remote Accessory of children. FM/AM/DISC ATT SRC 4/¢ 38 VOL. 2WARNING Store unused batteries out of the reach of the KDC-219/KDC-2019V/KDC-2019 Loading and Replacing the battery Use one lithium battery (CR2025).
... as above the dashboard. Basic operations [VOL.] buttons Adjusting the volume. [SRC] button Each time the button is pressed the source switches. poles aligned properly, following the illustration inside the case. Basic Operations of remote Accessory of children. FM/AM/DISC ATT SRC 4/¢ 38 VOL. 2WARNING Store unused batteries out of the reach of the KDC-219/KDC-2019V/KDC-2019 Loading and Replacing the battery Use one lithium battery (CR2025).

User Manual
Page 17
... wiring harness connector to a rear output terminal • After the unit is 30° or less. - 17 - Install the unit in your car's ignition does not have an ACC position, connect the ignition wires to use of any metal part in damage to a front output terminal, do not remove the caps on the ends of the left speaker to the unit. battery. 8. connector to the unit. 6. Number of items 1 3 .........4 .........1 2 .........2 4 .........4 5 .........1 (KDC-219/KDC-2019V/KDC-2019/ KDC...
... wiring harness connector to a rear output terminal • After the unit is 30° or less. - 17 - Install the unit in your car's ignition does not have an ACC position, connect the ignition wires to use of any metal part in damage to a front output terminal, do not remove the caps on the ends of the left speaker to the unit. battery. 8. connector to the unit. 6. Number of items 1 3 .........4 .........1 2 .........2 4 .........4 5 .........1 (KDC-219/KDC-2019V/KDC-2019/ KDC...

User Manual
Page 18
... connect the Disc changer, consult your Disc changer manual. 3 REAR L Rear right output (Red) 28 Fuse (10A) 24 R If no connections are made, do not let the wire come out from the tab.4 Wiring harness (Accessory1)25 6 Connect either to the power control terminal when using the optional power amplifier, or to Terminals Front left output (White) (KDC-2019V/2019 only) 26 Front right output (Red) (KDC-2019V/2019 only) 27 Rear left speaker 36 To rear right speaker 39 - Battery...
... connect the Disc changer, consult your Disc changer manual. 3 REAR L Rear right output (Red) 28 Fuse (10A) 24 R If no connections are made, do not let the wire come out from the tab.4 Wiring harness (Accessory1)25 6 Connect either to the power control terminal when using the optional power amplifier, or to Terminals Front left output (White) (KDC-2019V/2019 only) 26 Front right output (Red) (KDC-2019V/2019 only) 27 Rear left speaker 36 To rear right speaker 39 - Battery...

User Manual
Page 19
... during the installations. ■ Screwing the Faceplate on each side) with the vehicle mounting bracket and secure the unit with a screwdriver or similar utensil and attach it will contact and may cause damage to the mechanical parts inside the unit. - 19 - N T N T T/N T: Toyota cars N: Nissan cars 3 ø5mm 8 mm MAX. 4 ø5mm 8mm MAX. Installation ■ Installation Firewall or metal support Screw...
... during the installations. ■ Screwing the Faceplate on each side) with the vehicle mounting bracket and secure the unit with a screwdriver or similar utensil and attach it will contact and may cause damage to the mechanical parts inside the unit. - 19 - N T N T T/N T: Toyota cars N: Nissan cars 3 ø5mm 8 mm MAX. 4 ø5mm 8mm MAX. Installation ■ Installation Firewall or metal support Screw...
User Manual
Page 21
... the input/output wires or the wiring harness correctly. Before calling service, first check the following table for short circuits in the wires, replace the fuse with one side.21 ☞ Center the fader and balance settings. ✔ The input/output wires or wiring harness are set all the way. ✔ The antenna control wire is being used. ☞ The Touch Sensor Tone can 't switch.06 ✔ There's no media in Tuner source. ? Tuner source ? Troubleshooting Guide What...
... the input/output wires or the wiring harness correctly. Before calling service, first check the following table for short circuits in the wires, replace the fuse with one side.21 ☞ Center the fader and balance settings. ✔ The input/output wires or wiring harness are set all the way. ✔ The antenna control wire is being used. ☞ The Touch Sensor Tone can 't switch.06 ✔ There's no media in Tuner source. ? Tuner source ? Troubleshooting Guide What...

User Manual
Page 22
... [0] button and remove the disc. ? The disc won't insert.65 ✔ There's already another disc instead. ? "AVin" is displayed without achieving External disc control mode.50 ✔ O-N switch is set to "O" side. ☞ Set the switch to play . ? The specified track will not play.58 ✔ Random play or magazine random play has been selected. ☞ Turn off or the disc ejected, even if the power is connected.51 ☞ Connect the supported disc changer. (page 4) ? Can't remove disc...
... [0] button and remove the disc. ? The disc won't insert.65 ✔ There's already another disc instead. ? "AVin" is displayed without achieving External disc control mode.50 ✔ O-N switch is set to "O" side. ☞ Set the switch to play . ? The specified track will not play.58 ✔ Random play or magazine random play has been selected. ☞ Turn off or the disc ejected, even if the power is connected.51 ☞ Connect the supported disc changer. (page 4) ? Can't remove disc...

User Manual
Page 23
... cannot be ejected or the display continues to this unit has been removed.E30 ➪ Replace it correctly. The CD is not completely loaded.E01 ➪ Load the disc magazine properly. E-77: The unit is not operating properly.E59 ➪ Reinsert the CD. E-04: No disc has been loaded in the unit activates when the temperature inside the automatic disc changer exceeds 60...
... cannot be ejected or the display continues to this unit has been removed.E30 ➪ Replace it correctly. The CD is not completely loaded.E01 ➪ Load the disc magazine properly. E-77: The unit is not operating properly.E59 ➪ Reinsert the CD. E-04: No disc has been loaded in the unit activates when the temperature inside the automatic disc changer exceeds 60...


