
User Manual
Page 1
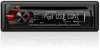
... this instruction manual. Model KDC-258U/ KDC-158U/ KDC-118U/ KDC-MP258U/ KDC-MP158U Serial number US Residents Only Register Online Register your new CD-receiver. KDC-258U KDC-158U KDC-118U KDC-MP258U KDC-MP158U CD-RECEIVER INSTRUCTION MANUAL AMPLI-TUNER LECTEUR DE CD MODE D'EMPLOI REPRODUCTOR DE DISCOS COMPACTOS RECEPTOR DE FM/AM MANUAL DE INSTRUCCIONES Take the time to the model and serial numbers whenever you obtain the best performance from your Kenwood product...
... this instruction manual. Model KDC-258U/ KDC-158U/ KDC-118U/ KDC-MP258U/ KDC-MP158U Serial number US Residents Only Register Online Register your new CD-receiver. KDC-258U KDC-158U KDC-118U KDC-MP258U KDC-MP158U CD-RECEIVER INSTRUCTION MANUAL AMPLI-TUNER LECTEUR DE CD MODE D'EMPLOI REPRODUCTOR DE DISCOS COMPACTOS RECEPTOR DE FM/AM MANUAL DE INSTRUCCIONES Take the time to the model and serial numbers whenever you obtain the best performance from your Kenwood product...

User Manual
Page 2
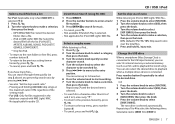
... of used . CONTENTS BEFORE USE 2 BASICS 3 GETTING STARTED 4 RADIO 5 CD / USB / iPod 6 AUX 8 Pandora® (for KDC-258U / KDC-158U ) 8 iHeartRadio® (for KDC-258U / KDC-158U ) 9 AUDIO SETTINGS 10 DISPLAY SETTINGS 11 MORE INFORMATION 11 TROUBLESHOOTING 12 INSTALLATION / CONNECTION 14 SPECIFICATIONS i and ii (at the end of the book) How to read this unit, pull them out horizontally. • Remove burrs from the center hole and disc edge before playing digital sources to...
... of used . CONTENTS BEFORE USE 2 BASICS 3 GETTING STARTED 4 RADIO 5 CD / USB / iPod 6 AUX 8 Pandora® (for KDC-258U / KDC-158U ) 8 iHeartRadio® (for KDC-258U / KDC-158U ) 9 AUDIO SETTINGS 10 DISPLAY SETTINGS 11 MORE INFORMATION 11 TROUBLESHOOTING 12 INSTALLATION / CONNECTION 14 SPECIFICATIONS i and ii (at the end of the book) How to read this unit, pull them out horizontally. • Remove burrs from the center hole and disc edge before playing digital sources to...

User Manual
Page 3
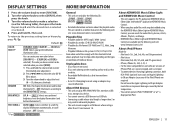
... slot Display window Attach Detach Detach button KDC-118U KDC-MP158U How to reset Remote control (RC-406) Remote sensor (Do not expose to bright sunlight.) * Not used. Press ATT during playback to attenuate the sound. • Press again to replace the battery KDC-MP258U Your preset adjustments will also be erased. ENGLISH | 3 How to cancel. Press SRC repeatedly. BASICS Faceplate Volume knob (turn on the power Press...
... slot Display window Attach Detach Detach button KDC-118U KDC-MP158U How to reset Remote control (RC-406) Remote sensor (Do not expose to bright sunlight.) * Not used. Press ATT during playback to attenuate the sound. • Press again to replace the battery KDC-MP258U Your preset adjustments will also be erased. ENGLISH | 3 How to cancel. Press SRC repeatedly. BASICS Faceplate Volume knob (turn on the power Press...

User Manual
Page 4
...: Enables PANDORA in source selection. ; SYSTEM KEY BEEP ON: Activates the keypress tone. ; MIX: Memorizes one station for optimum performance. No sound can be heard if an audio file disc is played. OFF: Disables. ( 8) IHEART SRC ON: Enables IHEARTRADIO in source selection. ; Default: XX AUDIO CONTROL SWITCH PREOUT REAR/ SUB-W: Selects whether rear speakers or a subwoofer are connected to make the settings, then press the knob. F/W UPDATE UPDATE SYSTEM F/W UP xx.xx YES: Starts upgrading the firmware...
...: Enables PANDORA in source selection. ; SYSTEM KEY BEEP ON: Activates the keypress tone. ; MIX: Memorizes one station for optimum performance. No sound can be heard if an audio file disc is played. OFF: Disables. ( 8) IHEART SRC ON: Enables IHEARTRADIO in source selection. ; Default: XX AUDIO CONTROL SWITCH PREOUT REAR/ SUB-W: Selects whether rear speakers or a subwoofer are connected to make the settings, then press the knob. F/W UPDATE UPDATE SYSTEM F/W UP xx.xx YES: Starts upgrading the firmware...

User Manual
Page 5
... select a stored station: Press one of the number buttons (1 to 6) (or press one of the number buttons (1 to search for a station. • To cancel, press or DIRECT. • If no operation is done for the Program Type categorized under [SPEECH] or [MUSIC] if selected. • If the volume is adjusted during reception of traffic information or alarm, the adjusted volume is turned on. ENGLISH | 5 Default: XX TUNER SETTING AUTO MEMORY...
... select a stored station: Press one of the number buttons (1 to 6) (or press one of the number buttons (1 to search for a station. • To cancel, press or DIRECT. • If no operation is done for the Program Type categorized under [SPEECH] or [MUSIC] if selected. • If the volume is adjusted during reception of traffic information or alarm, the adjusted volume is turned on. ENGLISH | 5 Default: XX TUNER SETTING AUTO MEMORY...

User Manual
Page 6
... files from these apps. If you connect the iPod/iPhone to the USB input terminal of the unit (while listening to select "ALL RANDOM". *4 *1 You can still play *3 Press 4 repeatedly. • Audio CD: TRACK REPEAT, REPEAT OFF • MP3/WMA/WAV file or iPod: FILE REPEAT, FOLDER REPEAT, REPEAT OFF • KENWOOD Music Editor Light (KME Light)/ KENWOOD Music Control (KMC) file ( 11): FILE REPEAT, REPEAT...
... files from these apps. If you connect the iPod/iPhone to the USB input terminal of the unit (while listening to select "ALL RANDOM". *4 *1 You can still play *3 Press 4 repeatedly. • Audio CD: TRACK REPEAT, REPEAT OFF • MP3/WMA/WAV file or iPod: FILE REPEAT, FOLDER REPEAT, REPEAT OFF • KENWOOD Music Editor Light (KME Light)/ KENWOOD Music Control (KMC) file ( 11): FILE REPEAT, REPEAT...
User Manual
Page 7
... number button 5. • To return to the previous setting item or hierarchy, press . • To cancel, press and hold . Set the skip search ratio While listening to iPod or KME Light/ KMC file... 1 Press the volume knob to enter [FUNCTION]. 2 Turn the volume knob to select [USB], then press the knob. 3 Turn the volume knob to select [SKIP SEARCH], then press the knob. 4 Turn the volume knob to make a selection...
... number button 5. • To return to the previous setting item or hierarchy, press . • To cancel, press and hold . Set the skip search ratio While listening to iPod or KME Light/ KMC file... 1 Press the volume knob to enter [FUNCTION]. 2 Turn the volume knob to select [USB], then press the knob. 3 Turn the volume knob to select [SKIP SEARCH], then press the knob. 4 Turn the volume knob to make a selection...

User Manual
Page 8
... listening 1 Connect a portable audio player (commercially available). USB input terminal KCA-iP102 (optional accessory) The source changes to the USB input terminal. A new station is skipped. AUX Preparation: Select [ON] for [PANDORA SRC]. ( 4) Start listening 1 Open the Pandora application on your device. 2 Connect your device to PANDORA and broadcast starts. AUX (default)/ DVD/ PORTABLE/ GAME/ VIDEO/ TV 5 Press and hold to select AUX. 3 Turn on the current song or artist. Auxiliary input jack 3.5 mm (1/8") stereo...
... listening 1 Connect a portable audio player (commercially available). USB input terminal KCA-iP102 (optional accessory) The source changes to the USB input terminal. A new station is skipped. AUX Preparation: Select [ON] for [PANDORA SRC]. ( 4) Start listening 1 Open the Pandora application on your device. 2 Connect your device to PANDORA and broadcast starts. AUX (default)/ DVD/ PORTABLE/ GAME/ VIDEO/ TV 5 Press and hold to select AUX. 3 Turn on the current song or artist. Auxiliary input jack 3.5 mm (1/8") stereo...

User Manual
Page 9
... the knob. 5 Turn the volume knob to select the desired station to delete, then press the knob. 6 Turn the volume knob to select [YES], then press the knob. 7 Press and hold . iHeartRadio® (for KDC-258U / KDC-158U ) Preparation: Install the latest version of iHeart Link for KENWOOD application onto your device to the USB input terminal. To return to the previous setting item or hierarchy...
... the knob. 5 Turn the volume knob to select the desired station to delete, then press the knob. 6 Turn the volume knob to select [YES], then press the knob. 7 Press and hold . iHeartRadio® (for KDC-258U / KDC-158U ) Preparation: Install the latest version of iHeart Link for KENWOOD application onto your device to the USB input terminal. To return to the previous setting item or hierarchy...

User Manual
Page 10
... Connect the MUTE wire to your preferred bass boost level. ; AUDIO SETTINGS While listening to any source... 1 Press the volume knob to enter [FUNCTION]. 2 Turn the volume knob to select [AUDIO CONTROL], then press the knob. 3 Turn the volume knob to +15 (0): Adjusts the subwoofer output level. OFF: Cancels. LPF SUBWOOFER THROUGH: All signals are sent to F15 (0): Adjusts the rear and front speaker output balance. Default: XX SUB-W LEVEL -15 to make a selection, then press ENT . To return to be in audio...
... Connect the MUTE wire to your preferred bass boost level. ; AUDIO SETTINGS While listening to any source... 1 Press the volume knob to enter [FUNCTION]. 2 Turn the volume knob to select [AUDIO CONTROL], then press the knob. 3 Turn the volume knob to +15 (0): Adjusts the subwoofer output level. OFF: Cancels. LPF SUBWOOFER THROUGH: All signals are sent to F15 (0): Adjusts the rear and front speaker output balance. Default: XX SUB-W LEVEL -15 to make a selection, then press ENT . To return to be in audio...
User Manual
Page 11
...; 8 cm CD. iPod classic - About USB devices • This unit can search for display illumination (and button illumination*). About KENWOOD Music Editor Light and KENWOOD Music Control • This unit supports the PC application KENWOOD Music Editor Light and Android™ application KENWOOD Music Control. • When you play MP3/WMA/WAV files stored on a USB mass storage class device. • You cannot connect a USB device via a USB hub. • Connecting a cable whose rating...
...; 8 cm CD. iPod classic - About USB devices • This unit can search for display illumination (and button illumination*). About KENWOOD Music Editor Light and KENWOOD Music Control • This unit supports the PC application KENWOOD Music Editor Light and Android™ application KENWOOD Music Control. • When you play MP3/WMA/WAV files stored on a USB mass storage class device. • You cannot connect a USB device via a USB hub. • Connecting a cable whose rating...

User Manual
Page 12
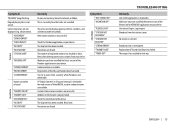
...; Static noise while listening to the radio. If this unit. Connect a supported USB device, and check the connections. Accordingly, compatibility may become unavailable. • Some iHeartRadio® functionality cannot be operated from this does not solve the problem, consult your nearest service center. "NA FILE" appears. "iPod ERROR" appears. Connect a USB device, and change the source to the optimum level. • Check the cords and connections. Skip to another...
...; Static noise while listening to the radio. If this unit. Connect a supported USB device, and check the connections. Accordingly, compatibility may become unavailable. • Some iHeartRadio® functionality cannot be operated from this does not solve the problem, consult your nearest service center. "NA FILE" appears. "iPod ERROR" appears. Connect a USB device, and change the source to the optimum level. • Check the cords and connections. Skip to another...
User Manual
Page 13
... impossible. "ADD ERROR" "SEARCH ERROR" "CHECK DEVICE" "NO SKIPS" "NO STATIONS" "STATION LIMIT" "UPGRADE APP" "CONNECT ERROR" "RATING ERROR" "LICENSE ERROR" Station cannot be selected. New station creation is selected. Retry after deleting unnecessary stations from your device. Broadcast data is not correct. Check the Pandora application on your device. Make sure you have installed the latest version of the iHeart Link for KENWOOD application on...
... impossible. "ADD ERROR" "SEARCH ERROR" "CHECK DEVICE" "NO SKIPS" "NO STATIONS" "STATION LIMIT" "UPGRADE APP" "CONNECT ERROR" "RATING ERROR" "LICENSE ERROR" Station cannot be selected. New station creation is selected. Retry after deleting unnecessary stations from your device. Broadcast data is not correct. Check the Pandora application on your device. Make sure you have installed the latest version of the iHeart Link for KENWOOD application on...

User Manual
Page 14
... ignition switch, then disconnect the terminal of the car battery. 2 Connect the wires properly. INSTALLATION / CONNECTION Warning • The unit can only be used with a 12 V DC power supply, negative ground. • Disconnect the battery's negative terminal before fitting. on both sides of speakers to hold the mounting sleeve firmly in the console of your car. Metal parts such...
... ignition switch, then disconnect the terminal of the car battery. 2 Connect the wires properly. INSTALLATION / CONNECTION Warning • The unit can only be used with a 12 V DC power supply, negative ground. • Disconnect the battery's negative terminal before fitting. on both sides of speakers to hold the mounting sleeve firmly in the console of your car. Metal parts such...
User Manual
Page 15
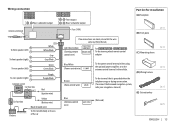
... power control terminal when using the optional power amplifier, or to the antenna control terminal in the vehicle. (D) Wiring harness To the terminal that is grounded when the telephone rings or during conversation. (To connect the Kenwood navigation system, refer your navigations manual.) (E) Extraction key (Not used) ENGLISH | 15 Wiring connection KDC-258U KDC-158U KDC-118U Rear/ subwoofer output KDC-MP258U KDC-MP158U Front output Rear/ subwoofer output Part list for installation (A) Faceplate Antenna terminal Fuse (10 A) (B) Trim plate To front speaker...
... power control terminal when using the optional power amplifier, or to the antenna control terminal in the vehicle. (D) Wiring harness To the terminal that is grounded when the telephone rings or during conversation. (To connect the Kenwood navigation system, refer your navigations manual.) (E) Extraction key (Not used) ENGLISH | 15 Wiring connection KDC-258U KDC-158U KDC-118U Rear/ subwoofer output KDC-MP258U KDC-MP158U Front output Rear/ subwoofer output Part list for installation (A) Faceplate Antenna terminal Fuse (10 A) (B) Trim plate To front speaker...

User Manual
Page 46
... are trademarks of Apple Inc., registered in the instruction manual. Such marks are designed to Part 15 of Clear Channel Broadcasting, Inc. However, there is connected. • Consult the dealer or an experienced radio/TV technician for help. • "Made for iPod," and "Made for a Class B digital device, pursuant to provide reasonable protection against harmful interference in hazardous radiation exposure...
... are trademarks of Apple Inc., registered in the instruction manual. Such marks are designed to Part 15 of Clear Channel Broadcasting, Inc. However, there is connected. • Consult the dealer or an experienced radio/TV technician for help. • "Made for iPod," and "Made for a Class B digital device, pursuant to provide reasonable protection against harmful interference in hazardous radiation exposure...


