Instruction Manual
Page 3
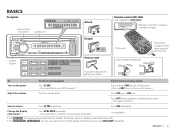
... and hold SRC to turn off the display information by pressing SCRL DISP repeatedly. Detach button KDC-X397 KDC-355U KDC-255U KDC-155U KMR-355U KDC-MP255U KDC-MP155U How to reset Your preset adjustments will automatically turn off after 20 minutes when in standby mode (Auto Power Off...). *2 For KDC-MP255U / KDC-MP155U : You can also select to scroll the current display information. ( not available ) *1...
... and hold SRC to turn off the display information by pressing SCRL DISP repeatedly. Detach button KDC-X397 KDC-355U KDC-255U KDC-155U KMR-355U KDC-MP255U KDC-MP155U How to reset Your preset adjustments will automatically turn off after 20 minutes when in standby mode (Auto Power Off...). *2 For KDC-MP255U / KDC-MP155U : You can also select to scroll the current display information. ( not available ) *1...
Instruction Manual
Page 4
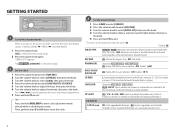
..., press . GETTING STARTED 1 Cancel the demonstration When you turn on the power (or after you reset the unit), the display shows: "CANCEL DEMO" \ "PRESS" \ "VOLUME KNOB" 1 Press the volume knob. [YES] is selected for KDC-X397 / KDC-355U ) REAR/ SUB-W: Selects whether rear speakers or a subwoofer are connected to the line out... to enter [FUNCTION]. 3 Turn the volume knob to select [INITIAL SET], then press the knob. 4 Turn the volume knob to make a selection (see : www.kenwood.com/cs/ce/ 4 EN_KDC-X397[KWK0]f.indd 4 7/26/12 10:55:35 PM No sound can be heard if an audio file disc is not...
..., press . GETTING STARTED 1 Cancel the demonstration When you turn on the power (or after you reset the unit), the display shows: "CANCEL DEMO" \ "PRESS" \ "VOLUME KNOB" 1 Press the volume knob. [YES] is selected for KDC-X397 / KDC-355U ) REAR/ SUB-W: Selects whether rear speakers or a subwoofer are connected to the line out... to enter [FUNCTION]. 3 Turn the volume knob to select [INITIAL SET], then press the knob. 4 Turn the volume knob to make a selection (see : www.kenwood.com/cs/ce/ 4 EN_KDC-X397[KWK0]f.indd 4 7/26/12 10:55:35 PM No sound can be heard if an audio file disc is not...
Instruction Manual
Page 12
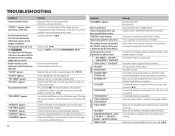
...174; application on your device. Call 1-866-635-2349 to the unit. "NO DISC" appears. "TOC ERROR" appears. "USB ERROR" appears. Reset the unit. This is caused by how the tracks are not displayed (e.g. Make sure you have installed the latest version of this does not solve...connections. Make sure you have entered the correct pass code. (« 9) EN_KDC-X397[KWK0]f.indd 12 7/24/12 5:15:51 PM Clean the connectors. (« 2) Reset the unit. (« 3) Make sure [OFF] is selected for [DEMO MODE]. (« 4) • Connect the antenna firmly. • Pull the antenna out ...
...174; application on your device. Call 1-866-635-2349 to the unit. "NO DISC" appears. "TOC ERROR" appears. "USB ERROR" appears. Reset the unit. This is caused by how the tracks are not displayed (e.g. Make sure you have installed the latest version of this does not solve...connections. Make sure you have entered the correct pass code. (« 9) EN_KDC-X397[KWK0]f.indd 12 7/24/12 5:15:51 PM Clean the connectors. (« 2) Reset the unit. (« 3) Make sure [OFF] is selected for [DEMO MODE]. (« 4) • Connect the antenna firmly. • Pull the antenna out ...
Instruction Manual
Page 14
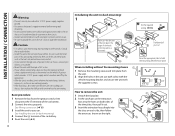
... · terminal of the car battery. 2 Connect the wires properly. See Installing the unit (in-dash mounting). 4 Connect the · terminal of the car battery. 5 Reset the unit. (« 3) 14 Installating the unit (in place. 7/24/12 5:04:38 PM Caution • For safety's sake, leave wiring and mounting to professionals...
... · terminal of the car battery. 2 Connect the wires properly. See Installing the unit (in-dash mounting). 4 Connect the · terminal of the car battery. 5 Reset the unit. (« 3) 14 Installating the unit (in place. 7/24/12 5:04:38 PM Caution • For safety's sake, leave wiring and mounting to professionals...


