
Operation Manual
Page 4
... no object is tinted with a coating, it is damaged or exposed to obstruct the driver's view or deployment of the product while driving. • A window mount is placed near the lens. Replace the unit if it may impact the recording quality. • Connect the charger to avoid accidents, personal injury or...
... no object is tinted with a coating, it is damaged or exposed to obstruct the driver's view or deployment of the product while driving. • A window mount is placed near the lens. Replace the unit if it may impact the recording quality. • Connect the charger to avoid accidents, personal injury or...

Operation Manual
Page 7
...power turns off the power of the device and then contact your dealer or nearest JVC KENWOOD service center. 7 If the device is very dirty, remove the dirt with a cloth... are recorded, video in which they appear to Install" for 24 hours before use to enable the mounting strength of the mount bracket to the distinguishing or recording of traffic lights. • If coating is dirty, gently wipe ..., general-purpose double-sided tape, the adhesion strength may cause scratches. JVC KENWOOD assumes no guarantee that the device can record video in place. If the device is re-affixed or...
...power turns off the power of the device and then contact your dealer or nearest JVC KENWOOD service center. 7 If the device is very dirty, remove the dirt with a cloth... are recorded, video in which they appear to Install" for 24 hours before use to enable the mounting strength of the mount bracket to the distinguishing or recording of traffic lights. • If coating is dirty, gently wipe ..., general-purpose double-sided tape, the adhesion strength may cause scratches. JVC KENWOOD assumes no guarantee that the device can record video in place. If the device is re-affixed or...
Operation Manual
Page 8
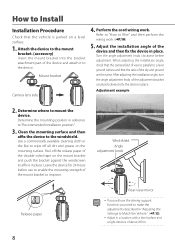
...." (ÁP.12) • Adjust in a location with a level surface and a sight distance of the mount bracket to improve. Determine the mounting position in place. Clean the mounting surface and then affix the device to "Recommended installation position." 3. Perform the cord wiring work . (ÁP.10... surface and that the camera field of view is parked on a level surface. 1. Attach the device to the mount bracket. (accessory) Insert the mount bracket into the bracket attachment part of the adjustment bracket counterclockwise to fix the device in place. Adjustment example 2....
...." (ÁP.12) • Adjust in a location with a level surface and a sight distance of the mount bracket to improve. Determine the mounting position in place. Clean the mounting surface and then affix the device to "Recommended installation position." 3. Perform the cord wiring work . (ÁP.10... surface and that the camera field of view is parked on a level surface. 1. Attach the device to the mount bracket. (accessory) Insert the mount bracket into the bracket attachment part of the adjustment bracket counterclockwise to fix the device in place. Adjustment example 2....
Operation Manual
Page 9
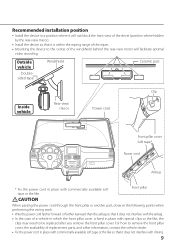
... the power cord in place with commercially available soft tape or the like so that it is within the wiping range of the wiper. • Mounting the device to be replaced after you remove the front pillar cover. Outside vehicle Doublesided tape Windshield Ceramic part Clip Inside vehicle Rear-view mirror...
... the power cord in place with commercially available soft tape or the like so that it is within the wiping range of the wiper. • Mounting the device to be replaced after you remove the front pillar cover. Outside vehicle Doublesided tape Windshield Ceramic part Clip Inside vehicle Rear-view mirror...
Operation Manual
Page 11
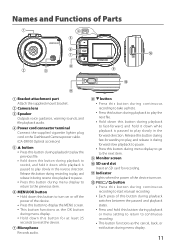
... button for recording. ! Indicator Lights when the power of the device turns on or off the power of Parts 1 4 5 6 0 7 8 9 2 3 @ ! 1 Bracket attachment part Attach the supplied mount bracket. 2 Camera lens 3 Speaker Outputs voice guidance, warning sounds, and file playback audio. Names and Functions of the device. • Press this button during playback...
... button for recording. ! Indicator Lights when the power of the device turns on or off the power of Parts 1 4 5 6 0 7 8 9 2 3 @ ! 1 Bracket attachment part Attach the supplied mount bracket. 2 Camera lens 3 Speaker Outputs voice guidance, warning sounds, and file playback audio. Names and Functions of the device. • Press this button during playback...

Operation Manual
Page 12
... driving support function is set to select and then press the [MENU/OK] button. 1 6. Hold down the [ end the procedure. ] button to • For the mounting height setting, set the nearest height among the setting options. • In the case of a vehicle for which the bonnet front edge cannot be seen... to match the vehicle. 1. Before Using the Driving Support Function Adjusting the Settings to Match the Vehicle Before using the driving support function, set the mounting height of the device from the road surface and adjust the horizon and hoot front edge position settings to select the...
... driving support function is set to select and then press the [MENU/OK] button. 1 6. Hold down the [ end the procedure. ] button to • For the mounting height setting, set the nearest height among the setting options. • In the case of a vehicle for which the bonnet front edge cannot be seen... to match the vehicle. 1. Before Using the Driving Support Function Adjusting the Settings to Match the Vehicle Before using the driving support function, set the mounting height of the device from the road surface and adjust the horizon and hoot front edge position settings to select the...
Operation Manual
Page 21
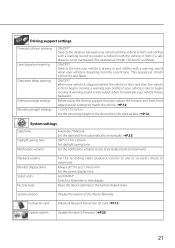
...support function, adjust the horizon and hoot front edge position settings to match the vehicle. (ÁP.12) 1.2 m*/1.35 m/2 m Set the mounting height of the device firmware. Always on*/10 sec/1 min/3 min Set the screen display time. System version Display the version of the ...device from the current lane. Driving support settings Forward collision warning Lane departure warning Departure delay warning Detection range settings Mounting height settings ON/OFF* Detects the distance between your vehicle and the vehicle in front and notifies with a warning sound to prevent...
...support function, adjust the horizon and hoot front edge position settings to match the vehicle. (ÁP.12) 1.2 m*/1.35 m/2 m Set the mounting height of the device firmware. Always on*/10 sec/1 min/3 min Set the screen display time. System version Display the version of the ...device from the current lane. Driving support settings Forward collision warning Lane departure warning Departure delay warning Detection range settings Mounting height settings ON/OFF* Detects the distance between your vehicle and the vehicle in front and notifies with a warning sound to prevent...
Operation Manual
Page 36
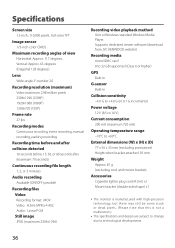
Supports dedicated viewer software (download from JVC KENWOOD website) Recording media microSDHC card 8 to 32 GB supported (Class 6 or higher) GPS Built-in G-sensor Built-in Collision sensitivity -4.0 G to +4.0 G (in 0.1 G increments) Power... External dimensions (W) x (H) x (D) 77 x 56 x 35 mm (excluding protrusions) Height when bracket attached: 93 mm Weight Approx. 81 g (excluding cord and mount bracket) Accessories Cigarette lighter plug cord (4.0 m) x1 Mount bracket (double-sided tape) x1 • The monitor is manufactured with high-precision technology, but there may still be some stuck or...
Supports dedicated viewer software (download from JVC KENWOOD website) Recording media microSDHC card 8 to 32 GB supported (Class 6 or higher) GPS Built-in G-sensor Built-in Collision sensitivity -4.0 G to +4.0 G (in 0.1 G increments) Power... External dimensions (W) x (H) x (D) 77 x 56 x 35 mm (excluding protrusions) Height when bracket attached: 93 mm Weight Approx. 81 g (excluding cord and mount bracket) Accessories Cigarette lighter plug cord (4.0 m) x1 Mount bracket (double-sided tape) x1 • The monitor is manufactured with high-precision technology, but there may still be some stuck or...

