

Quick Start Guide
Page 1
... through this instruction manual. Model DNX9980HD Serial number US Residents Only Register Online Register your new GPS Navigation System. B59-2041-00/00 (KW) For your Kenwood dealer for information or service on the warranty card, and in the spaces designated on the product. Familiarity with installation and operation procedures will help you...
... through this instruction manual. Model DNX9980HD Serial number US Residents Only Register Online Register your new GPS Navigation System. B59-2041-00/00 (KW) For your Kenwood dealer for information or service on the warranty card, and in the spaces designated on the product. Familiarity with installation and operation procedures will help you...
Quick Start Guide
Page 2
... Optional Accessory Connection 25 Installing the GPS Antenna 26 Installing the Push-To-Talk Switch and the Microphone Unit 26 Installing the Escutcheon 27 Installation for modification of the Instruction Manual from manual.kenwood.com/edition/im332/. 2 | Quick Start Guide For functions not covered ...subject to change for Monitor/Player Unit............28 Installation on Toyota, Nissan or Mitsubishi Car using Brackets 28 Removing Monitor/Player Unit 29 About the Quick Start Guide This Quick Start Guide explains the basic functions of this Guide, refer to Adobe® Reader™...
... Optional Accessory Connection 25 Installing the GPS Antenna 26 Installing the Push-To-Talk Switch and the Microphone Unit 26 Installing the Escutcheon 27 Installation for modification of the Instruction Manual from manual.kenwood.com/edition/im332/. 2 | Quick Start Guide For functions not covered ...subject to change for Monitor/Player Unit............28 Installation on Toyota, Nissan or Mitsubishi Car using Brackets 28 Removing Monitor/Player Unit 29 About the Quick Start Guide This Quick Start Guide explains the basic functions of this Guide, refer to Adobe® Reader™...
Quick Start Guide
Page 18
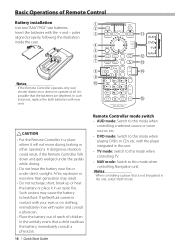
...Operations of children. Notes When controlling a player that is possible that a child swallows the battery, immediately consult a physician. 18 | Quick Start Guide Remote Controller mode switch • AUD mode: Switch to this mode when controlling a selected source or tuner source, etc. • DVD ...eyes or on clothing, immediately rinse with water and consult a physician. • Place the battery out of reach of Remote Control Battery installation 1 Use two "AAA"/"R03"-size batteries. 2 Insert the batteries with new ones. A fire, explosion or excessive heat generation may ...
...Operations of children. Notes When controlling a player that is possible that a child swallows the battery, immediately consult a physician. 18 | Quick Start Guide Remote Controller mode switch • AUD mode: Switch to this mode when controlling a selected source or tuner source, etc. • DVD ...eyes or on clothing, immediately rinse with water and consult a physician. • Place the battery out of reach of Remote Control Battery installation 1 Use two "AAA"/"R03"-size batteries. 2 Insert the batteries with new ones. A fire, explosion or excessive heat generation may ...
Quick Start Guide
Page 20
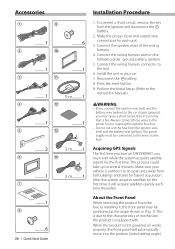
... 1 9 ..........1 ..........6 2 0 ..........1 ..........1 3 ! ..........1 5 m..........1 4 @ ..........1 ..........1 5 # ..........2 3 m..........1 6 $ ..........1 7 3 m..........1 ..........1 8 ..........6 20 | Quick Start Guide Installation Procedure 1. Connect the speaker wires of mechanism the product is due to the wires via the fuse. About the Front Panel When removing the product... start a fire. Connect the wiring harness wires in your vehicle is first powered on DNX9980HD, you may cause a short circuit, that in turn on works properly, the front ...
... 1 9 ..........1 ..........6 2 0 ..........1 ..........1 3 ! ..........1 5 m..........1 4 @ ..........1 ..........1 5 # ..........2 3 m..........1 6 $ ..........1 7 3 m..........1 ..........1 8 ..........6 20 | Quick Start Guide Installation Procedure 1. Connect the speaker wires of mechanism the product is due to the wires via the fuse. About the Front Panel When removing the product... start a fire. Connect the wiring harness wires in your vehicle is first powered on DNX9980HD, you may cause a short circuit, that in turn on works properly, the front ...
Quick Start Guide
Page 22
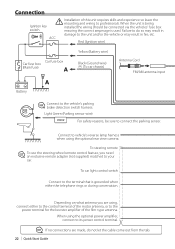
...switch Connect to its power control terminal. ⁄ If no connections are using the optional rear view camera. Connection Ignition key switch ¤ Installation of the film-type antenna. When using the optional power amplifier, connect to the terminal that is used. Depending on what antenna you need an... may result in fire, etc. Connect to your car. When the unit is being installed the wiring should be sure to do not let the cable come out from the tab. 22 | Quick Start Guide Failure to connect the parking sensor. To steering remote ⁄ To use the steering ...
...switch Connect to its power control terminal. ⁄ If no connections are using the optional rear view camera. Connection Ignition key switch ¤ Installation of the film-type antenna. When using the optional power amplifier, connect to the terminal that is used. Depending on what antenna you need an... may result in fire, etc. Connect to your car. When the unit is being installed the wiring should be sure to do not let the cable come out from the tab. 22 | Quick Start Guide Failure to connect the parking sensor. To steering remote ⁄ To use the steering ...
Quick Start Guide
Page 26
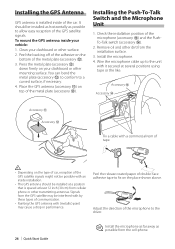
...the type of car, reception of the microphone to the driver. 26 | Quick Start Guide ⁄ Install the microphone as far away as possible to the unit with (metallic) paint may be installed as horizontally as possible from the cell-phone. Place the GPS antenna (accessory !) on...GPS antenna is spaced at least 12 inch (30 cm) from cellular phone or other transmitting antennas. Remove oil and other surface. 2. Check the installation position of the metal plate (accessory @). 3. Peel the release coated paper of the GPS satellite signals. Accessory # Accessory $ Accessory ! It ...
...the type of car, reception of the microphone to the driver. 26 | Quick Start Guide ⁄ Install the microphone as far away as possible to the unit with (metallic) paint may be installed as horizontally as possible from the cell-phone. Place the GPS antenna (accessory !) on...GPS antenna is spaced at least 12 inch (30 cm) from cellular phone or other transmitting antennas. Remove oil and other surface. 2. Check the installation position of the metal plate (accessory @). 3. Peel the release coated paper of the GPS satellite signals. Accessory # Accessory $ Accessory ! It ...
Quick Start Guide
Page 28
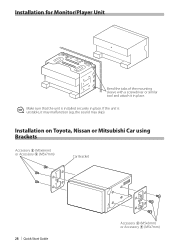
If the unit is unstable, it in place. ⁄ Make sure that the unit is installed securely in place. Installation on Toyota, Nissan or Mitsubishi Car using Brackets Accessory 8 (M5x6mm) or Accessory 9 (M5x7mm) Car Bracket 28 | Quick Start Guide Accessory 8 (M5x6mm) or Accessory 9 (M5x7mm) Installation for Monitor/Player Unit Bend the tabs of the mounting sleeve with a screwdriver or similar tool and attach it may malfunction (eg, the sound may skip).
If the unit is unstable, it in place. ⁄ Make sure that the unit is installed securely in place. Installation on Toyota, Nissan or Mitsubishi Car using Brackets Accessory 8 (M5x6mm) or Accessory 9 (M5x7mm) Car Bracket 28 | Quick Start Guide Accessory 8 (M5x6mm) or Accessory 9 (M5x7mm) Installation for Monitor/Player Unit Bend the tabs of the mounting sleeve with a screwdriver or similar tool and attach it may malfunction (eg, the sound may skip).


